This content originally appeared on Level Up Coding - Medium and was authored by Mike Young

A step-by-step beginner’s guide to running stable diffusion in your browser for free (no downloads required)
Picture this: you’re scrolling through your favorite tech blog, and you stumble upon this incredible new AI model called Stable Diffusion that can magically turn text descriptions into jaw-dropping images. If you’re anything like me, your first thought is, “I NEED to try this!”
But then you start digging into it. You discover that running Stable Diffusion typically requires some complicated hardware setup or downloading a sketchy desktop app that might give your computer a digital version of the flu. Talk about a buzzkill, right?
Well, my fellow AI aficionados, I have some seriously fantastic news. A company called Replicate has brought Stable Diffusion to the masses in the most accessible way possible: through a sleek, user-friendly GUI that you can use right in your browser! And the cherry on top? You can play around with it for free until you hit the paid threshold.
Now, you might be wondering, “But why should I care about running Stable Diffusion in my browser?”
Let me tell you, it’s a game-changer. Not only can you access this mind-blowing AI model anywhere, anytime, and on any device, but you also don’t have to worry about setting up complicated hardware or trusting some random desktop app. It’s like having the power of a thousand artists at your fingertips, just waiting for you to type some words and unleash their collective creativity.
So, if you’re like me and have been itching to dive into the world of AI-driven image generation without the hassle of expensive hardware or dealing with dubious downloads, look no further. In this guide, I’m going to show you how to run Stable Diffusion in the browser for free using Replicate. I’ll also show you how to use a free community tool called Replicate Codex to discover additional cool models that can turn text into images, convert your profile pics into stylized selfies, generate your anime waifu or help you come up with your new favorite pokémon.

Trust me, once you start generating images with nothing more than a few keystrokes, you’ll never want to go back to the old ways. So go ahead, channel your inner creative genius, and get ready to embark on the most exciting artistic journey of your life (so far). Let’s begin!
About the Model: High-Resolution Image Synthesis with Stable Diffusion
Before we start generating images, let’s take a second to understand how Stable Diffusion works. If you’re eager to get started, though, you can skip this section and go to the next one to see how to run Stable Diffusion in your browser. If, on the other hand, you stick around, well… you might learn something!
Stable Diffusion is a type of Latent Diffusion Model. Latent Diffusion Models (LDMs), as proposed by Robin Rombach, Andreas Blattmann, Dominik Lorenz, Patrick Esser, and Björn Ommer, are advanced AI models that enable high-resolution image synthesis. The core idea is to combine the strengths of diffusion models (DMs) and autoencoders, resulting in a powerful and efficient image-generation process.
I’ll explain more about how these types of models work below. First I’ll give you a more technical explanation, and then I’ll break it down for you in beginner language. Don’t get scared by jargon you don’t understand. It will all make sense soon.
Technical Overview of Stable Diffusion
Diffusion models have achieved state-of-the-art synthesis results on image data and beyond by decomposing image formation into a sequential application of denoising autoencoders. This formulation also allows for a guiding mechanism to control the image generation process without the need for retraining. However, DMs often require a large amount of computational resources for optimization and have expensive inference due to sequential evaluations.
To address these limitations, the researchers applied diffusion models in the latent space of powerful pretrained autoencoders. This approach retains the quality and flexibility of DMs while significantly reducing their computational requirements. By training DMs on such a representation, they reached a near-optimal balance between complexity reduction and detail preservation, resulting in a substantial improvement in visual fidelity.
Moreover, the introduction of cross-attention layers into the model architecture enabled diffusion models to become powerful and flexible generators for general conditioning inputs, such as text or bounding boxes. This innovation allows for high-resolution synthesis in a convolutional manner.
Latent Diffusion Models achieved a new state-of-the-art for image inpainting and demonstrated highly competitive performance on various tasks, including unconditional image generation, semantic scene synthesis, and super-resolution.
How Stable Diffusion Works in Plain English (For Beginners)
In simpler terms, Latent Diffusion Models (LDMs) are an advanced AI technique that combines the best parts of two existing methods: diffusion models and autoencoders. Diffusion models are great at generating images, but they can be slow and resource-intensive. Autoencoders, on the other hand, are excellent at compressing and reconstructing images.
By combining these two techniques, the researchers who build Stable Diffusion created a new model that generates high-resolution images quickly and efficiently. They achieved this by training the diffusion model on the compressed data (or latent space) from the autoencoder, which made the process much faster without sacrificing image quality.
Additionally, the researchers added cross-attention layers to the model, allowing it to work well with different types of input, such as text or bounding boxes. This innovation made LDMs even more versatile and capable of producing high-quality images in various scenarios.
In summary, Latent Diffusion Models (LDMs) are a cutting-edge AI technique that generates high-resolution images quickly and efficiently by combining the strengths of diffusion models and autoencoders. These models have achieved impressive results in various image-generation tasks while being less resource-intensive than traditional diffusion models.
Understanding the Inputs and Outputs of the Stable Diffusion Model
Inputs
The main input to the stable-diffusion model is a text prompt. This text prompt is what the model will use to generate the desired image. The text prompt should be in English, as the model was trained mainly with English captions and performs best with this language.
Here’s a full overview of all the valid inputs:
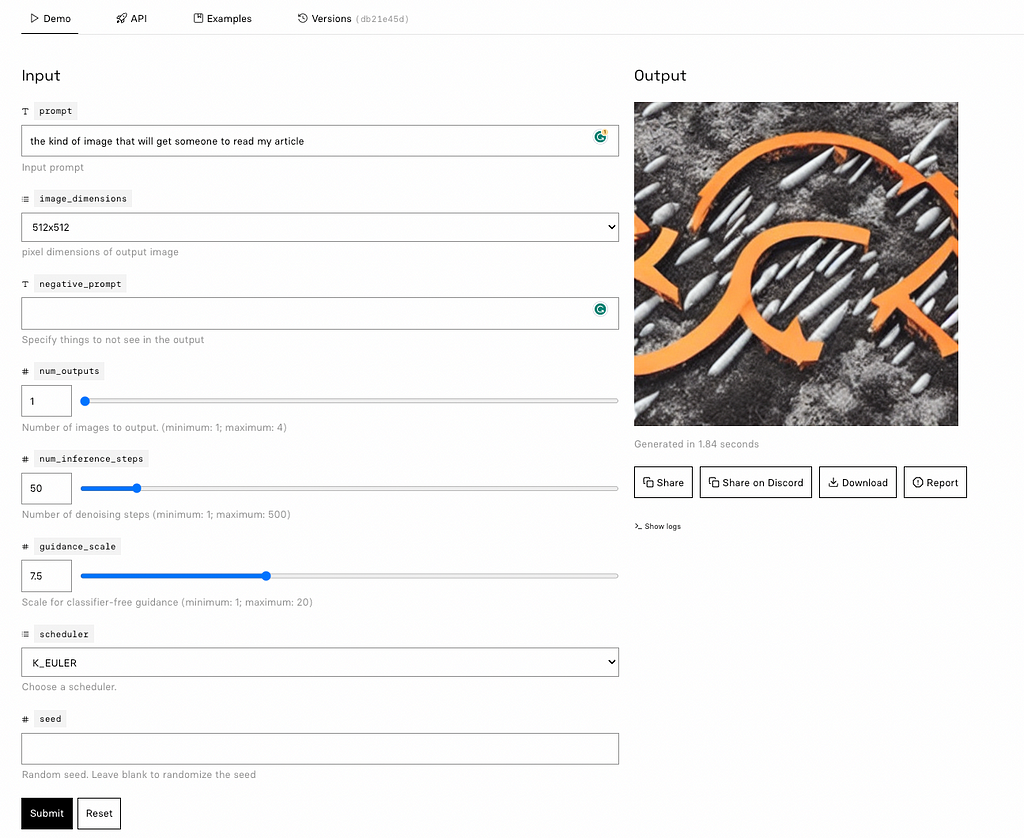
- prompt string: This is the input prompt that describes the desired image content. By default, it is set to “a vision of paradise. unreal engine”.
- image_dimensions string: This input determines the pixel dimensions of the output image. You can choose between “512x512” and “768x768”, with the default value being “768x768”.
- negative_prompt string: This input allows you to specify things that you don’t want to see in the output image.
- num_outputs integer: This input determines the number of images to be generated as output. The default value is 1.
- num_inference_steps integer: This input specifies the number of denoising steps to be performed during the image generation process. The default value is 50.
- guidance_scale number: This input sets the scale for classifier-free guidance, which helps control the image generation process. The default value is 7.5.
- scheduler string: This input allows you to choose a scheduler for the image generation process. The available options are: DDIM, K_EULER, DPMSolverMultistep, K_EULER_ANCESTRAL, PNDM, and KLMS. The default value is DPMSolverMultistep.
- seed integer: This input sets the random seed used for the image generation process. Leave it blank to randomize the seed.
Outputs
The output of the stable-diffusion model is a photo-realistic image based on the text prompt provided. The generated image will have a fixed size of either 512x512 or 768x768, depending on the version of the model used.
Now that we understand the inputs and outputs of the model, let’s dive into using the model to generate images based on our text prompts.
A Step-by-Step Guide to Using the Stable Diffusion Model
If you’re not up for coding, you can interact directly with the stable-diffusion model’s “demo” on Replicate via their UI. This is a great way to experiment with the model’s parameters and get quick feedback and validation. Plus, Replicate offers free usage up to a certain number of queries, so you don’t even need to pay to use the model.
And of course, if you can run Stable Diffusion in your browser then you don’t need to download a sketchy application and try to install it on your computer.

Step 1: Find the Stable Diffusion Model Page on Replicate
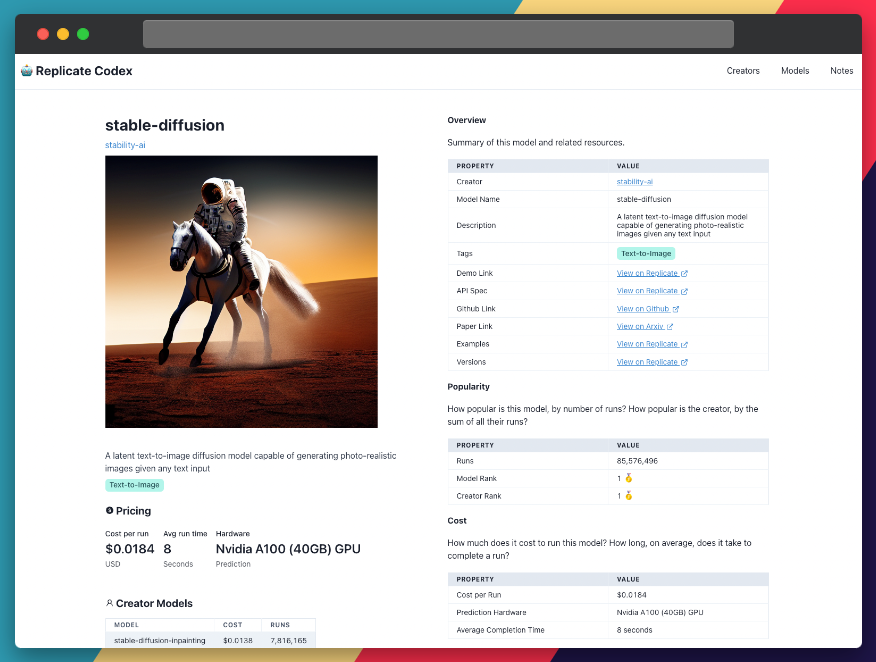
Navigate to the Stable Diffusion page on Replicate. By default, you will be on the “demo” tab. This tab is the one that will let you run Stable Diffusion in your browser. According to the Replicate website:
“The web interface is a good place to start when trying out a model for the first time. It gives you a visual view of all the inputs to the model, and generates a form for running the model right from your browser”
Step 2: Provide Your Text Prompt
Enter your text prompt into the provided input field. This prompt will guide the model in generating the image. Be as descriptive as possible to help the model produce a more accurate representation of your idea.
For example, the prompt: “a gentleman otter in a 19th century portrait” with default settings gives…

Step 3: Adjust Model Parameters (Optional)
If you want to fine-tune the generated image, you can adjust the model’s parameters, such as the guidance scale or the number of sampling steps. Keep in mind that modifying these parameters might affect the image quality and generation time. For example, if I change the guidance scale to “2” instead of “7.5” with the same prompt as above, I get…

Step 4: Generate Your Image
Once you’ve provided your text prompt and adjusted any model parameters, click the “Submit” button. The model will take a few seconds to generate your image, and then you’ll be able to view the resulting photo-realistic image based on your input.
Taking it Further — Finding Other Text-to-Image Models with Replicate Codex
Replicate Codex is a fantastic resource for discovering AI models that cater to various creative needs, including image generation, image-to-image conversion, and much more. It’s a fully searchable, filterable, tagged database of all the models on replicate, and also allows you to compare models and sort by price or explore by the creator. It’s free, and it also has a digest email that will alert you when new models come out so you can try them.
If you’re interested in finding similar models to Stable Diffusion…
Step 1: Visit Replicate Codex
Head over to Replicate Codex to begin your search for similar models.
Step 2: Use the Search Bar
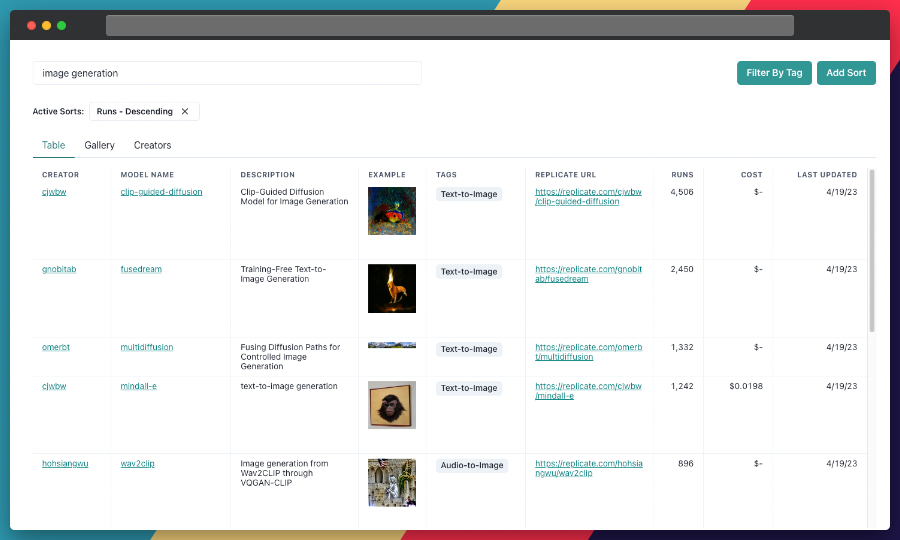
Use the search bar at the top of the page to search for models with specific keywords, such as “text-to-image” or “image generation.” This will show you a list of models related to your search query.
Step 3: Filter the Results
On the left side of the search results page, you’ll find several filters that can help you narrow down the list of models. You can filter and sort models by type (Image-to-Image, Text-to-Image, etc.), cost, popularity, or even specific creators.
By applying these filters, you can find the models that best suit your specific needs and preferences. For example, if you’re looking for a text-to-image model that’s the cheapest or most popular, you can just search and then sort by the relevant metric.

Conclusion
In this guide, we dived deep into the world of Stable Diffusion, an amazing AI model capable of generating photo-realistic images from text prompts. We learned about its origins, architecture, and how to use it effectively to create impressive images in our browsers. We also discussed how to leverage the search and filter features in Replicate Codex to find similar models and compare their outputs, allowing us to broaden our horizons in the world of AI-powered image generation.
I hope this guide has inspired you to explore the creative possibilities of AI and bring your imagination to life. Don’t forget to subscribe for more tutorials, updates on new and improved AI models, and a wealth of inspiration for your next creative project. Thanks for reading!
Level Up Coding
Thanks for being a part of our community! Before you go:
- 👏 Clap for the story and follow the author 👉
- 📰 View more content in the Level Up Coding publication
- 💰 Free coding interview course ⇒ View Course
- 🔔 Follow us: Twitter | LinkedIn | Newsletter
🚀👉 Join the Level Up talent collective and find an amazing job
How to run Stable Diffusion online for free (Step-by-step guide) was originally published in Level Up Coding on Medium, where people are continuing the conversation by highlighting and responding to this story.
This content originally appeared on Level Up Coding - Medium and was authored by Mike Young
Mike Young | Sciencx (2023-04-20T16:31:40+00:00) How to run Stable Diffusion online for free (Step-by-step guide). Retrieved from https://www.scien.cx/2023/04/20/how-to-run-stable-diffusion-online-for-free-step-by-step-guide/
Please log in to upload a file.
There are no updates yet.
Click the Upload button above to add an update.
