The Ultimate Node.js API Gateway Tutorial: Bridging Microservices with Ease

Photo by Tianshu Liu — Edited by Author

Software Architecture Patterns

Master the art of connecting RESTful, GraphQL, and gRPC microservices effortlessly through a powerful, scalable API Gateway using Node.js

Introduction

Szabo Viktor

Uniting Technologies with Node.js API Gateway

Hello there, imagine that you’re working on a large-scale e-commerce platform that requires seamless integration of various microservices to function efficiently. You’ve got inventory management, order processing, and customer support systems, each using different communication protocols like RESTful, GraphQL, and gRPC.

I’ve faced similar challenges in my career, where I needed to create a unified system that could connect diverse microservices with ease, and that’s when I discovered the power of API Gateways and how Node.js can make a huge difference in developing these gateways.

In this article, I’ll share my experiences and insights as a senior software engineer and technical lead, demonstrating how to bridge microservices effortlessly using Node.js API Gateway. We’ll dive into a real-world case study of an e-commerce platform, exploring how to connect RESTful, GraphQL and gRPC microservices to create a seamless, scalable and powerful system. Let’s get started!

Understanding API Gateways

Daria Obymaha

The API Gateway: A Pillar of Microservices Architecture

Ok, now try to imagine being at a massive airport bustling with people and flights from all around the world. How do you ensure that passengers and planes are properly managed, with everyone getting to their destinations smoothly? You’d need an efficient air traffic control system that can coordinate everything, right? In the world of microservices, an API Gateway is just like that air traffic control system, managing the flow of data between various services.

In the last few years, I’ve had the opportunity to work on complex projects that required coordinating numerous microservices. In these situations, API Gateways have been indispensable for ensuring seamless communication and data exchange.

So, let’s dive deeper into what an API Gateway is and why it’s crucial for microservices architecture.

The Role of an API Gateway

An API Gateway is a server that acts as an entry point for handling requests from client applications to microservices. It provides a single, unified interface through which clients can access multiple services, allowing for centralized management and reducing the complexity of interactions between services.

An API gateway takes all API calls from clients and routes them to the right microservice using request routing, composition, and protocol translation — Tibco

API Gateways offer several key benefits, including:

  • Routing: The API Gateway routes client requests to the appropriate microservices, making it easier to manage, modify, and scale services independently.
  • Load Balancing: It distributes incoming traffic evenly among the available instances of a microservice, ensuring optimal performance and availability.
  • Authentication and Authorization: The API Gateway can manage user authentication and authorization, ensuring that only authorized clients can access the protected resources of your microservices.
  • Rate Limiting: It can enforce rate limits on client requests to prevent overloading your microservices and maintain system stability.
  • Monitoring and Logging: The API Gateway can provide centralized monitoring and logging of requests and responses, helping you keep track of system health and performance.

API Gateway Patterns: Monolithic vs. Micro

There are two main patterns for implementing API Gateways: monolithic and micro. In the monolithic pattern, there’s a single, centralized gateway that handles all requests to your microservices. This can become a bottleneck as your system grows, but it’s easier to manage and maintain. On the other hand, the micro pattern consists of multiple, smaller gateways dedicated to specific sets of microservices. This approach offers greater scalability but can be more complex to manage.

Monolithic Architecture Vs Microservices Architecture — appinventiv

Throughout my career, I’ve worked with both monolithic and micro API Gateway patterns, each offering its unique benefits and challenges. The choice between the two depends on your system’s specific requirements, such as the scale and complexity of your microservices architecture.

In the next section, we’ll explore why Node.js is an excellent choice for building API Gateways and how it can help you create a powerful, scalable solution for connecting your microservices.

Why Node.js for API Gateway Development?

Elias

Embracing the Power of Node.js

As a developer with a background in various technologies, including .NET, React, Angular, and Microsoft Azure, I’ve always been eager to explore new ways to enhance my projects, and when it comes to building API Gateways, Node.js has proven to be a game-changer.

Its unique features and capabilities make it an ideal choice for creating powerful, scalable API Gateway solutions. Thus, let’s take a closer look at the reasons why Node.js is perfect for API Gateway development.

High Performance and Scalability

Node.js is built on Chrome’s V8 JavaScript engine, known for its impressive performance. It uses an event-driven, non-blocking I/O model, allowing for efficient handling of simultaneous connections.

This is particularly valuable for API Gateways, which often manage a high volume of requests and need to support multiple microservices. The performance and scalability that Node.js offers have been invaluable in my own projects, allowing me to effectively manage complex microservices ecosystems.

💡 If you’re doing all Node.js-based microservices, a good solution would be using Bit. You can set it up as your main package and dependencies manager and it will abstract you from all the tools on the workflow and they’d be able to compose and deploy different versions only using a single tool. The extra benefit is that you can share internal components (i.e libraries and functions you create for your use case) with other microservices easily.

Learn more here:

Component-Driven Microservices with NodeJS and Bit

Amazon Api Gateway — AWS

Large Ecosystem and Community

Node.js boasts a massive ecosystem, with the npm package manager offering a plethora of modules and libraries that can be easily integrated into your projects. This means you can leverage existing solutions, streamline development, and accelerate time to market.

Additionally, the Node.js community is incredibly active, providing invaluable resources, support, and collaboration opportunities.

Versatility and Flexibility

Node.js supports various communication protocols and data formats, making it an ideal choice for building API Gateways that connect diverse microservices. In my own experience, I’ve successfully used Node.js to create API Gateways that bridge the gap between RESTful, GraphQL, and gRPC microservices — a testament to the platform’s versatility!

Cross-Platform Compatibility

Obviously, Node.js is cross-platform, meaning it can run on Windows, macOS, and Linux systems, thus this compatibility simplifies deployment and reduces potential issues related to platform-specific differences.

Using an API Gateway in an ASP.NET Core App — Microsoft

Familiarity with JavaScript

As a developer with experience in frontend development using Angular, JavaScript, HTML, and CSS, I’ve found the transition to using Node.js for API Gateway development to be seamless. If you’re already familiar with JavaScript, embracing Node.js for your API Gateway projects is a natural progression.

Node.js: A Winning Choice for API Gateway Development

In my career, I’ve seen firsthand the benefits of using Node.js for API Gateway development. Its performance, scalability, versatility, and compatibility make it an excellent choice for creating powerful, flexible solutions that effectively connect diverse microservices.

In the next sections, we’ll explore a real-life case study, demonstrating how Node.js can be used to build an API Gateway for an e-commerce platform that relies on RESTful, GraphQL, and gRPC microservices.

The E-commerce Platform Case Study

Michael Dziedzic

A Real-World Application: Connecting Diverse Microservices

As a passionate software engineer, I’ve always been intrigued by the challenges like connecting diverse microservices to create a cohesive system.

In this section, we’ll explore a real-life case study that highlights the power of a Node.js API Gateway in bridging different types of microservices.

The Case Study

Imagine an e-commerce platform that relies on three distinct microservices for its core functionality: inventory management (RESTful), order processing (GraphQL), and customer support (gRPC). Each of these microservices utilizes different communication protocols and data formats, presenting a unique challenge in creating a seamless, unified system.

The key to overcoming this challenge lies in developing an API Gateway that can effectively connect these diverse microservices and facilitate smooth communication and data exchange.

Ok, let’s play now and let’s set up the development environment for our Node.js API Gateway, so you’ll be ready to connect it to various microservices.

Step 1: Install Node.js and npm

First, ensure you have the latest versions of Node.js and npm (Node Package Manager) installed on your machine. You can download Node.js from the official website: https://nodejs.org/

Step 2: Create a new project directory

Create a new directory for your API Gateway project and navigate to it:

mkdir node-api-gateway
cd node-api-gateway

Step 3: Initialize the project

Run the following command to create a new package.json file and initialize the project:

npm init -y

This will create a package.json file with default values. You can modify these values later as needed.

Step 4: Install required dependencies

We’ll need a few dependencies for our API Gateway, such as express, axios, and body-parser. Install them with the following command:

npm install express axios body-parser

Step 5: Create the entry point

Create a new file named index.js in your project directory. This will be the entry point for your API Gateway application.

npm install touch-cli -g
touch index.js

Step 6: Set up the basic Express app

Open the index.js file in your favorite code editor and add the following code to set up a basic Express app:

const express = require('express');
const bodyParser = require('body-parser');

const app = express();
app.use(bodyParser.json());

const PORT = process.env.PORT || 3000;

app.get('/', (req, res) => {
res.send('Node.js API Gateway is up and running! Easy right???');
});

app.listen(PORT, () => {
console.log(`API Gateway is running on port ${PORT}`);
});

Step 7: Test the setup

Save the index.js file and run the following command in your terminal to start the server:

node index.js

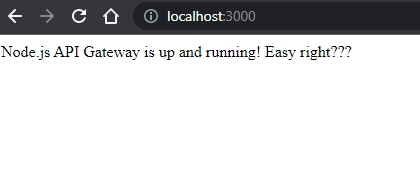
Now, open your browser and navigate to http://localhost:3000. You should see the message “Node.js API Gateway is up and running! Easy right???” displayed on the screen.

This is what I see on my local machine — Author

Congratulations! You’ve successfully set up your Node.js API Gateway development environment. You can now proceed to start connecting different microservices to your API Gateway!

Inventory Management (RESTful)

Pixabay

Connecting Inventory Management Microservice with RESTful APIs

In this section, we’ll explore how to connect the inventory management from our case study to the Node.js API Gateway for seamless integration with other microservices. Instead of diving into the implementation of the microservice itself, we’ll focus on the response examples that the API Gateway consumes.

Example Responses from the Inventory Service

Let’s assume that we have an inventory management microservice implemented and running. Here are some example responses that this service would return when queried for different operations:

  • Get product details: When the API Gateway queries the inventory service for a specific product, the service will return a JSON object containing the product details.
  • Add a new product: When the API Gateway sends a request to add a new product to the inventory, the service will return a JSON object containing the newly added product details.
  • Update product details: When the API Gateway sends a request to update an existing product’s details, the service will return a JSON object containing the updated product details.

An example of JSON response is:

{
"id": "p12345",
"name": "Cool Gadget",
"price": 49.99,
"quantity": 20
}

Consuming Inventory Service Responses in the API Gateway

Now, let’s see how the API Gateway can consume these responses from the inventory management microservice. We’ll use the Axios library to handle the communication between the API Gateway and the inventory service.

  • Get product details
app.get('/inventory/:productId', async (req, res) => {
try {
const { productId } = req.params;
const response = await axios.get(`${INVENTORY_SERVICE_URL}/products/${productId}`);
res.json(response.data);
} catch (error) {
res.status(500).json({ error: 'Error fetching inventory data' });
}
});
  • Add a new product
app.post('/inventory', async (req, res) => {
try {
const product = req.body;
const response = await axios.post(`${INVENTORY_SERVICE_URL}/products`, product);
res.status(201).json(response.data);
} catch (error) {
res.status(500).json({ error: 'Error adding product to inventory' });
}
});
  • Update product details
app.put('/inventory/:productId', async (req, res) => {
try {
const { productId } = req.params;
const product = req.body;
const response = await axios.put(`${INVENTORY_SERVICE_URL}/products/${productId}`, product);
res.json(response.data);
} catch (error) {
res.status(500).json({ error: 'Error updating product details' });
}
});

Now, the API Gateway can effectively communicate with the inventory management microservice, sending requests and processing the received responses. This ensures a seamless connection between the inventory management system and other microservices in the e-commerce platform.

Order Processing (GraphQL)

Mediamodifier

Ok, we’re at good point! Now, let’s see how our Node.js API Gateway can connect to a GraphQL microservice responsible for order processing. GraphQL is a query language and runtime for APIs, allowing clients to request only the data they need, leading to more efficient and flexible communication between services.

Setting up the GraphQL microservice

Let’s assume our order processing microservice is built using Apollo Server, a popular GraphQL server implementation for Node.js. This microservice exposes a GraphQL schema with operations for creating, updating, and querying orders.

Here’s a simplified example of the GraphQL schema for our order processing microservice:

type Order {
id: ID!
customerId: ID!
items: [OrderItem!]!
status: OrderStatus!
createdAt: String!
updatedAt: String!
}

type OrderItem {
productId: ID!
quantity: Int!
price: Float!
}

enum OrderStatus {
PENDING
PROCESSING
SHIPPED
DELIVERED
}

type Query {
getOrder(id: ID!): Order
getOrdersByCustomer(customerId: ID!): [Order!]!
}

type Mutation {
createOrder(customerId: ID!, items: [OrderItemInput!]!): Order!
updateOrderStatus(id: ID!, status: OrderStatus!): Order!
}

input OrderItemInput {
productId: ID!
quantity: Int!
price: Float!
}

Connecting the API Gateway to the GraphQL microservice

To improve our API Gateway’s integration with the GraphQL microservice, let’s switch from using axios to using Apollo Client. Apollo Client provides a comprehensive and optimized GraphQL client for JavaScript, and it can simplify our interactions with the GraphQL microservice.

We’ll start by installing the necessary packages:

npm install @apollo/client graphql

Next, we’ll set up the Apollo Client in our API Gateway. Create a new file named apolloClient.js with the following content:

import { ApolloClient, InMemoryCache, HttpLink } from '@apollo/client';

const link = new HttpLink({
uri: 'http://graphql-order-microservice:4000/graphql',
});

const client = new ApolloClient({
link,
cache: new InMemoryCache(),
});

export default client;

Here, we’re creating an Apollo Client instance with an HttpLink that points to our GraphQL microservice’s endpoint. We’re also using the InMemoryCache for caching GraphQL results.

Now, let’s create a custom hook that will use Apollo Client to send queries and mutations to the GraphQL microservice. Create a new file named useGraphQL.js:

import { useQuery, useMutation } from '@apollo/client';

const useGraphQL = (queryOrMutation, options = {}) => {
const isMutation = queryOrMutation.definitions.some(
(definition) => definition.operation === 'mutation'
);

return isMutation
? useMutation(queryOrMutation, options)
: useQuery(queryOrMutation, options);
};

export default useGraphQL;

This custom hook, useGraphQL, accepts a GraphQL query or mutation as its first argument and an optional options object as its second argument. It uses Apollo Client’s useQuery and useMutation hooks to interact with the GraphQL microservice, depending on whether the provided operation is a query or a mutation.

Finally, let’s update the /orders route in our index.js file to use the custom hook with Apollo Client:

import express from 'express';
import { ApolloProvider } from '@apollo/client/react';
import client from './apolloClient';
import useGraphQL from './useGraphQL';
import bodyParser from 'body-parser';

const app = express();
app.use(bodyParser.json());

app.post('/orders', async (req, res) => {
const [executeGraphQL] = useGraphQL(req.body);
try {
const response = await executeGraphQL();
res.status(200).json(response.data);
} catch (error) {
res.status(500).json({ message: 'Error processing request', error });
}
});

app.listen(3000, () => {
console.log('API Gateway listening on port 3000');
});

Don’t forget to wrap your entire application with the ApolloProvider:

import { render } from 'react-dom';

render(
<ApolloProvider client={client}>
<App />
</ApolloProvider>,
document.getElementById('root')
);

Now our API Gateway uses the custom useGraphQL hook with Apollo Client to interact with the GraphQL microservice. This approach provides more advanced features, such as caching and real-time updates, making our API Gateway even more powerful and efficient in connecting to the GraphQL microservice for order processing.

Customer Support (gRPC)

Charanjeet Dhiman

gRPC is an open-source remote procedure call (RPC) framework that uses HTTP/2 for transport and Protocol Buffers as the interface description language. It’s designed to be efficient, fast, and to work seamlessly across multiple languages and platforms, making it an ideal choice for our customer support microservice example.

I’ve seen firsthand the benefits of using gRPC, especially when it comes to providing fast, reliable customer support services in real-time, and now I’ll walk you through how we can integrate the customer support microservice into our API Gateway.

Integrating the gRPC client into the API Gateway

Let’s update our API Gateway to handle requests to the customer support microservice. First, install the required npm packages:

npm install @grpc/grpc-js @grpc/proto-loader

Next, create a file named customer_support_client.js with the following content:

const grpc = require('@grpc/grpc-js');
const protoLoader = require('@grpc/proto-loader');
const path = require('path');

const PROTO_PATH = path.resolve(__dirname, './customer_support.proto');

const packageDefinition = protoLoader.loadSync(PROTO_PATH, {
keepCase: true,
longs: String,
enums: String,
defaults: true,
oneofs: true,
});

const customerSupportProto = grpc.loadPackageDefinition(packageDefinition).customer_support;

const client = new customerSupportProto.CustomerSupport(
'http://grpc-customer-support:50051',
grpc.credentials.createInsecure()
);

module.exports = client;

This code sets up a gRPC client that connects to the customer support gRPC server on http://grpc-customer-support:50051.

Now, update your API Gateway to handle requests to the customer support microservice. You can do this by adding a new route to your Express application. Assuming your Express app is defined in a file named app.js, add the following code to it:

const express = require('express');
const customerSupportClient = require('./customer_support_client');

const app = express();

app.use(express.json());

app.post('/api/customer-support/ticket', (req, res) => {
const { userId } = req.body;

customerSupportClient.GetSupportTicket({ user_id: userId }, (error, response) => {
if (error) {
console.error('Error invoking GetSupportTicket:', error);
res.status(500).send('Internal server error');
} else {
console.log('GetSupportTicket response:', response);
res.json(response);
}
});
});

// Other route handlers go here

app.listen(3000, () => {
console.log('API Gateway listening on port 3000');
});

This code adds a new route, /api/customer-support/ticket, which accepts POST requests with a JSON payload containing a userId. It then calls the GetSupportTicket method on the gRPC client and sends the response back to the client. If there’s an error, it sends a 500 status code with an “Internal server error” message.

Now, when a user sends a POST request to /api/customer-support/ticket with a valid userId, the API Gateway will call the customer support microservice using gRPC and return the response to the user.

Best Practices and Tips

Stefan Schweihofer

Over the years, I have learned several key principles that have contributed to the design of my API Gateway implementations.

Here, I’ll share some of these insights with you, highlighting instances from my career that have shaped my understanding.

Keep It Modular and Reusable

A crucial aspect of building an API Gateway is ensuring that it’s modular and reusable, and this approach allows for easy maintenance and scalability, as new microservices can be added without significant overhead.

💡 This is exactly the approach Bit enables. By adopting a composable, modularity-first design for your microservices, and independently storing, testing, and documenting atomic units of code instead of entire apps at once, your app scales better, and is infinitely more maintainable.

Learn more:

Extracting and Reusing Pre-existing Components using bit add

As you design your API Gateway, consider the same approach by creating separate modules for handling different types of microservices, such as RESTful, GraphQL, and gRPC.

Use a Robust and Flexible Tech Stack

While working with various technologies, I’ve come to appreciate the importance of a robust and flexible tech stack for API Gateway development, and Node.js has proven to be a powerful choice, providing the necessary performance and adaptability for connecting multiple microservices.

Remember that when choosing a tech stack for your API Gateway, ensure that it supports the needs of your microservices and offers easy integration options.

Reading Advice — Building Microservices: Designing Fine-Grained Systems by Sam Newman

🚨Just so you know, purchasing a book via this post’s links earns me a small commission at no extra cost to you. You get a great book, and I can continue creating content you love. Thanks for supporting my work!

Implement Rate Limiting and Throttling

One key lesson I learned early in my career was the importance of rate limiting and throttling in maintaining a stable system, so bear in mind to protect your microservices from being overwhelmed and ensure a better experience for your users, and limiting the number of requests your API Gateway can handle.

Make sure to include these features in your API Gateway to maintain performance and avoid service degradation.

Utilize Caching and Load Balancing

Caching and load balancing are two vital components that can significantly enhance your API Gateway’s performance, and caching frequently accessed data, you can reduce the latency of your responses and minimize the load on your microservices.

Monitor and Log API Requests

As a software engineer, I understand the importance of monitoring and logging API requests. This practice helps you identify issues, optimize performance, and ensure the smooth operation of your API Gateway.

Implement monitoring and logging in your API Gateway to keep track of system health and troubleshoot issues as they arise.

Ensure Security and Authentication

Security is a critical aspect of any software system. As a technical lead and system designer, I’ve always prioritized security and authentication in my projects. When building your API Gateway, it’s essential to include robust security mechanisms to protect sensitive data and prevent unauthorized access.

Implement strong security and authentication measures in your API Gateway to maintain the integrity of your infrastructure.

Reading Advice — Node.js Design Patterns by Mario Casciaro and Luciano Mammino

Conclusion: Bringing It All Together

Nadine Shaabana

Reflecting on the Journey: A Developer’s Perspective

As we wrap up this ultimate Node.js API Gateway tutorial, I can’t help but think back on my journey in the software development world.

By now, you should have a solid understanding of API Gateways, the reasons behind choosing Node.js for API Gateway development, and how to implement an API Gateway in an e-commerce platform context.

I hope the best practices and tips shared in this article will prove useful as you embark on your journey to create efficient, scalable, and maintainable API Gateways. Remember that the key lies in maintaining a balance between modularity, performance, and security, all while keeping an eye on the ever-evolving landscape of microservices and API Gateway technologies.

If you want to know more about Microservices migrations from Monolithics you must go through my other article “The Long and Winding Road to Microservices”, where I trace the path from centralized to distributed systems and exploring the journey of Monolithic Architecture towards Microservices.

The Long and Winding Road to Microservices: The Evolution of Monolithic Architecture

And hey, of course, if you liked this article don’t forget to follow me for more content like this! 😎🚀 #Medium #FollowMe

From monolithic to composable software with Bit

Bit’s open-source tool help 250,000+ devs to build apps with components.

Turn any UI, feature, or page into a reusable component — and share it across your applications. It’s easier to collaborate and build faster.

Learn more

Split apps into components to make app development easier, and enjoy the best experience for the workflows you want:

Micro-Frontends

Design System

Code-Sharing and reuse

Monorepo

Learn more

Bibliography

Jonathan Borba


The Ultimate Node.js API Gateway Tutorial: Bridging Microservices with Ease was originally published in Bits and Pieces on Medium, where people are continuing the conversation by highlighting and responding to this story.


This content originally appeared on Bits and Pieces - Medium and was authored by Anto Semeraro
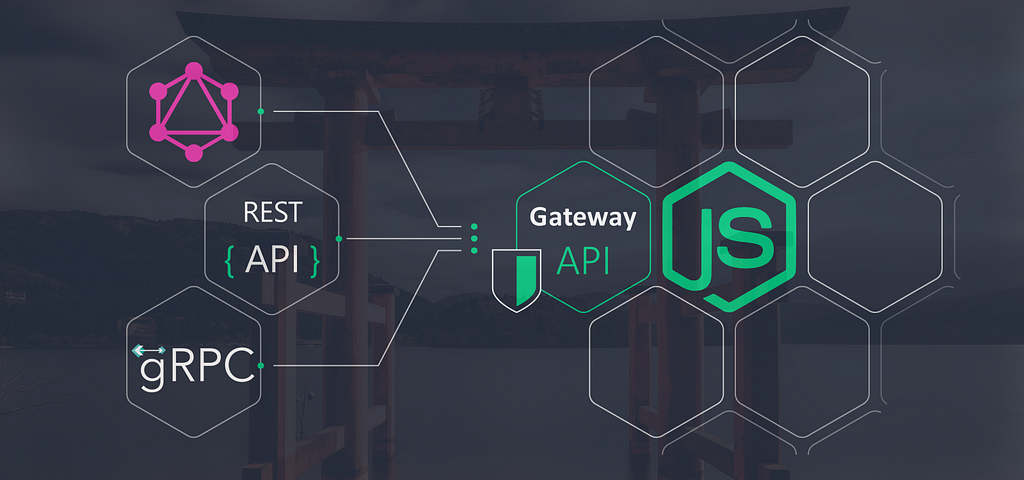
Photo by Tianshu Liu — Edited by Author

Software Architecture Patterns

Master the art of connecting RESTful, GraphQL, and gRPC microservices effortlessly through a powerful, scalable API Gateway using Node.js

Introduction

Szabo Viktor

Uniting Technologies with Node.js API Gateway

Hello there, imagine that you’re working on a large-scale e-commerce platform that requires seamless integration of various microservices to function efficiently. You’ve got inventory management, order processing, and customer support systems, each using different communication protocols like RESTful, GraphQL, and gRPC.

I’ve faced similar challenges in my career, where I needed to create a unified system that could connect diverse microservices with ease, and that’s when I discovered the power of API Gateways and how Node.js can make a huge difference in developing these gateways.

In this article, I’ll share my experiences and insights as a senior software engineer and technical lead, demonstrating how to bridge microservices effortlessly using Node.js API Gateway. We’ll dive into a real-world case study of an e-commerce platform, exploring how to connect RESTful, GraphQL and gRPC microservices to create a seamless, scalable and powerful system. Let’s get started!

Understanding API Gateways

Daria Obymaha

The API Gateway: A Pillar of Microservices Architecture

Ok, now try to imagine being at a massive airport bustling with people and flights from all around the world. How do you ensure that passengers and planes are properly managed, with everyone getting to their destinations smoothly? You’d need an efficient air traffic control system that can coordinate everything, right? In the world of microservices, an API Gateway is just like that air traffic control system, managing the flow of data between various services.

In the last few years, I’ve had the opportunity to work on complex projects that required coordinating numerous microservices. In these situations, API Gateways have been indispensable for ensuring seamless communication and data exchange.

So, let’s dive deeper into what an API Gateway is and why it’s crucial for microservices architecture.

The Role of an API Gateway

An API Gateway is a server that acts as an entry point for handling requests from client applications to microservices. It provides a single, unified interface through which clients can access multiple services, allowing for centralized management and reducing the complexity of interactions between services.

An API gateway takes all API calls from clients and routes them to the right microservice using request routing, composition, and protocol translation — Tibco

API Gateways offer several key benefits, including:

  • Routing: The API Gateway routes client requests to the appropriate microservices, making it easier to manage, modify, and scale services independently.
  • Load Balancing: It distributes incoming traffic evenly among the available instances of a microservice, ensuring optimal performance and availability.
  • Authentication and Authorization: The API Gateway can manage user authentication and authorization, ensuring that only authorized clients can access the protected resources of your microservices.
  • Rate Limiting: It can enforce rate limits on client requests to prevent overloading your microservices and maintain system stability.
  • Monitoring and Logging: The API Gateway can provide centralized monitoring and logging of requests and responses, helping you keep track of system health and performance.

API Gateway Patterns: Monolithic vs. Micro

There are two main patterns for implementing API Gateways: monolithic and micro. In the monolithic pattern, there’s a single, centralized gateway that handles all requests to your microservices. This can become a bottleneck as your system grows, but it’s easier to manage and maintain. On the other hand, the micro pattern consists of multiple, smaller gateways dedicated to specific sets of microservices. This approach offers greater scalability but can be more complex to manage.
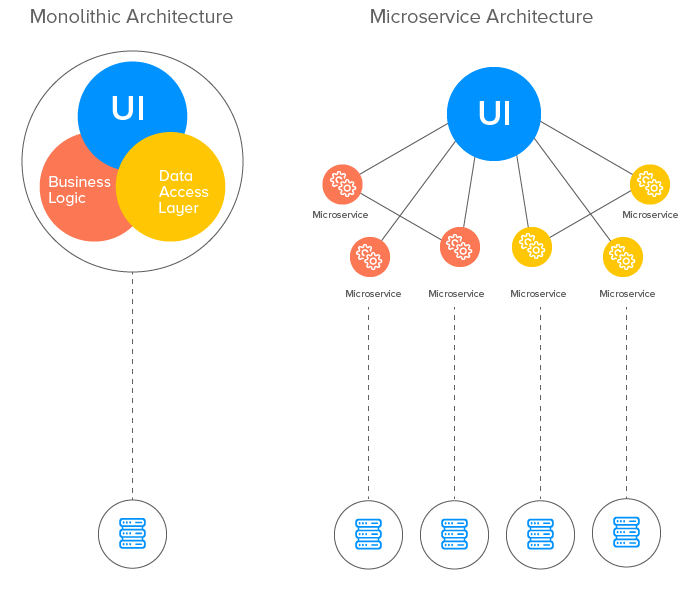
Monolithic Architecture Vs Microservices Architecture — appinventiv

Throughout my career, I’ve worked with both monolithic and micro API Gateway patterns, each offering its unique benefits and challenges. The choice between the two depends on your system’s specific requirements, such as the scale and complexity of your microservices architecture.

In the next section, we’ll explore why Node.js is an excellent choice for building API Gateways and how it can help you create a powerful, scalable solution for connecting your microservices.

Why Node.js for API Gateway Development?

Elias

Embracing the Power of Node.js

As a developer with a background in various technologies, including .NET, React, Angular, and Microsoft Azure, I’ve always been eager to explore new ways to enhance my projects, and when it comes to building API Gateways, Node.js has proven to be a game-changer.

Its unique features and capabilities make it an ideal choice for creating powerful, scalable API Gateway solutions. Thus, let’s take a closer look at the reasons why Node.js is perfect for API Gateway development.

High Performance and Scalability

Node.js is built on Chrome’s V8 JavaScript engine, known for its impressive performance. It uses an event-driven, non-blocking I/O model, allowing for efficient handling of simultaneous connections.

This is particularly valuable for API Gateways, which often manage a high volume of requests and need to support multiple microservices. The performance and scalability that Node.js offers have been invaluable in my own projects, allowing me to effectively manage complex microservices ecosystems.

💡 If you’re doing all Node.js-based microservices, a good solution would be using Bit. You can set it up as your main package and dependencies manager and it will abstract you from all the tools on the workflow and they’d be able to compose and deploy different versions only using a single tool. The extra benefit is that you can share internal components (i.e libraries and functions you create for your use case) with other microservices easily.

Learn more here:

Component-Driven Microservices with NodeJS and Bit
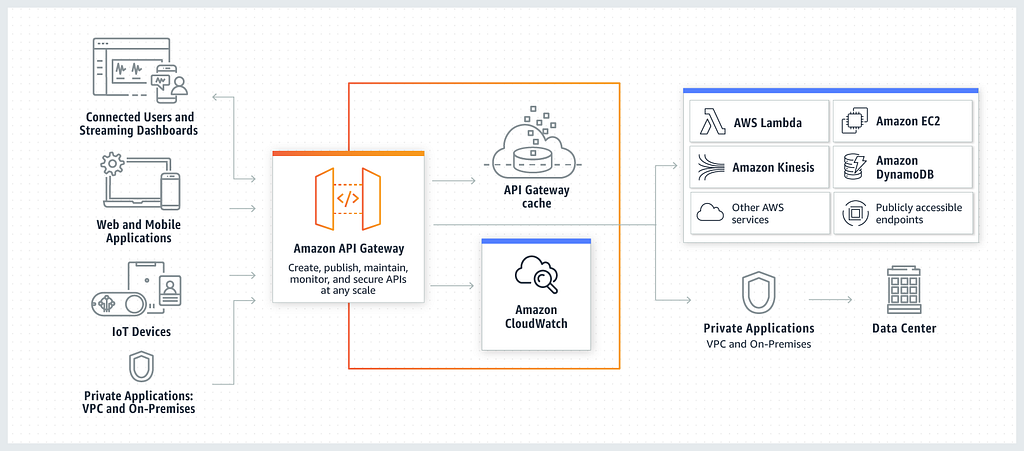
Amazon Api Gateway — AWS

Large Ecosystem and Community

Node.js boasts a massive ecosystem, with the npm package manager offering a plethora of modules and libraries that can be easily integrated into your projects. This means you can leverage existing solutions, streamline development, and accelerate time to market.

Additionally, the Node.js community is incredibly active, providing invaluable resources, support, and collaboration opportunities.

Versatility and Flexibility

Node.js supports various communication protocols and data formats, making it an ideal choice for building API Gateways that connect diverse microservices. In my own experience, I’ve successfully used Node.js to create API Gateways that bridge the gap between RESTful, GraphQL, and gRPC microservices — a testament to the platform’s versatility!

Cross-Platform Compatibility

Obviously, Node.js is cross-platform, meaning it can run on Windows, macOS, and Linux systems, thus this compatibility simplifies deployment and reduces potential issues related to platform-specific differences.
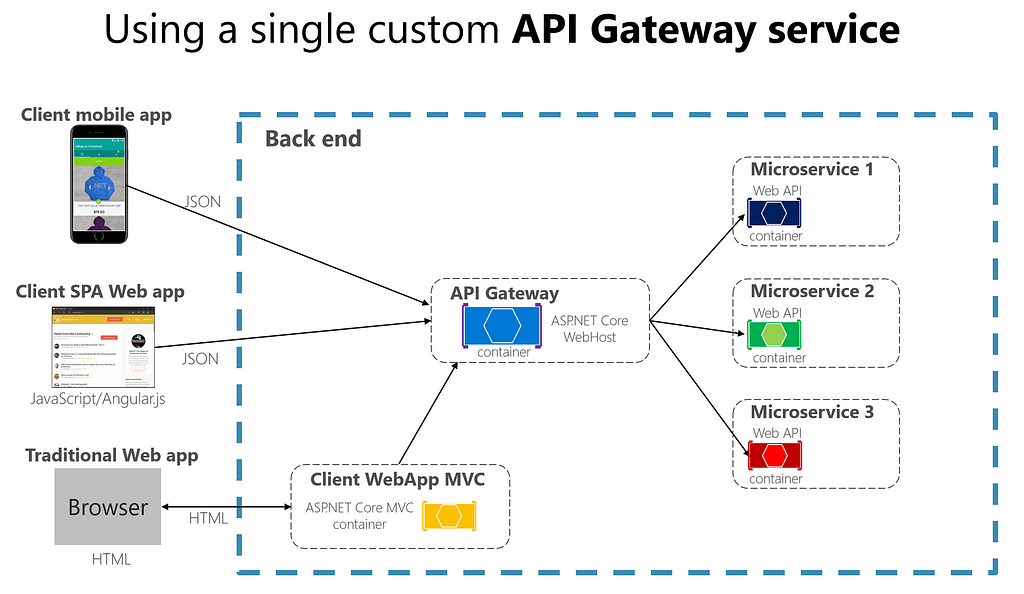
Using an API Gateway in an ASP.NET Core App — Microsoft

Familiarity with JavaScript

As a developer with experience in frontend development using Angular, JavaScript, HTML, and CSS, I’ve found the transition to using Node.js for API Gateway development to be seamless. If you’re already familiar with JavaScript, embracing Node.js for your API Gateway projects is a natural progression.

Node.js: A Winning Choice for API Gateway Development

In my career, I’ve seen firsthand the benefits of using Node.js for API Gateway development. Its performance, scalability, versatility, and compatibility make it an excellent choice for creating powerful, flexible solutions that effectively connect diverse microservices.

In the next sections, we’ll explore a real-life case study, demonstrating how Node.js can be used to build an API Gateway for an e-commerce platform that relies on RESTful, GraphQL, and gRPC microservices.

The E-commerce Platform Case Study

Michael Dziedzic

A Real-World Application: Connecting Diverse Microservices

As a passionate software engineer, I’ve always been intrigued by the challenges like connecting diverse microservices to create a cohesive system.

In this section, we’ll explore a real-life case study that highlights the power of a Node.js API Gateway in bridging different types of microservices.

The Case Study

Imagine an e-commerce platform that relies on three distinct microservices for its core functionality: inventory management (RESTful), order processing (GraphQL), and customer support (gRPC). Each of these microservices utilizes different communication protocols and data formats, presenting a unique challenge in creating a seamless, unified system.

The key to overcoming this challenge lies in developing an API Gateway that can effectively connect these diverse microservices and facilitate smooth communication and data exchange.

Ok, let’s play now and let’s set up the development environment for our Node.js API Gateway, so you’ll be ready to connect it to various microservices.

Step 1: Install Node.js and npm

First, ensure you have the latest versions of Node.js and npm (Node Package Manager) installed on your machine. You can download Node.js from the official website: https://nodejs.org/

Step 2: Create a new project directory

Create a new directory for your API Gateway project and navigate to it:

mkdir node-api-gateway
cd node-api-gateway

Step 3: Initialize the project

Run the following command to create a new package.json file and initialize the project:

npm init -y

This will create a package.json file with default values. You can modify these values later as needed.

Step 4: Install required dependencies

We’ll need a few dependencies for our API Gateway, such as express, axios, and body-parser. Install them with the following command:

npm install express axios body-parser

Step 5: Create the entry point

Create a new file named index.js in your project directory. This will be the entry point for your API Gateway application.

npm install touch-cli -g
touch index.js

Step 6: Set up the basic Express app

Open the index.js file in your favorite code editor and add the following code to set up a basic Express app:

const express = require('express');
const bodyParser = require('body-parser');

const app = express();
app.use(bodyParser.json());

const PORT = process.env.PORT || 3000;

app.get('/', (req, res) => {
res.send('Node.js API Gateway is up and running! Easy right???');
});

app.listen(PORT, () => {
console.log(`API Gateway is running on port ${PORT}`);
});

Step 7: Test the setup

Save the index.js file and run the following command in your terminal to start the server:

node index.js

Now, open your browser and navigate to http://localhost:3000. You should see the message "Node.js API Gateway is up and running! Easy right???" displayed on the screen.
This is what I see on my local machine — Author

Congratulations! You’ve successfully set up your Node.js API Gateway development environment. You can now proceed to start connecting different microservices to your API Gateway!

Inventory Management (RESTful)

Pixabay

Connecting Inventory Management Microservice with RESTful APIs

In this section, we’ll explore how to connect the inventory management from our case study to the Node.js API Gateway for seamless integration with other microservices. Instead of diving into the implementation of the microservice itself, we’ll focus on the response examples that the API Gateway consumes.

Example Responses from the Inventory Service

Let’s assume that we have an inventory management microservice implemented and running. Here are some example responses that this service would return when queried for different operations:

  • Get product details: When the API Gateway queries the inventory service for a specific product, the service will return a JSON object containing the product details.
  • Add a new product: When the API Gateway sends a request to add a new product to the inventory, the service will return a JSON object containing the newly added product details.
  • Update product details: When the API Gateway sends a request to update an existing product’s details, the service will return a JSON object containing the updated product details.

An example of JSON response is:

{
"id": "p12345",
"name": "Cool Gadget",
"price": 49.99,
"quantity": 20
}

Consuming Inventory Service Responses in the API Gateway

Now, let’s see how the API Gateway can consume these responses from the inventory management microservice. We’ll use the Axios library to handle the communication between the API Gateway and the inventory service.

  • Get product details
app.get('/inventory/:productId', async (req, res) => {
try {
const { productId } = req.params;
const response = await axios.get(`${INVENTORY_SERVICE_URL}/products/${productId}`);
res.json(response.data);
} catch (error) {
res.status(500).json({ error: 'Error fetching inventory data' });
}
});
  • Add a new product
app.post('/inventory', async (req, res) => {
try {
const product = req.body;
const response = await axios.post(`${INVENTORY_SERVICE_URL}/products`, product);
res.status(201).json(response.data);
} catch (error) {
res.status(500).json({ error: 'Error adding product to inventory' });
}
});
  • Update product details
app.put('/inventory/:productId', async (req, res) => {
try {
const { productId } = req.params;
const product = req.body;
const response = await axios.put(`${INVENTORY_SERVICE_URL}/products/${productId}`, product);
res.json(response.data);
} catch (error) {
res.status(500).json({ error: 'Error updating product details' });
}
});

Now, the API Gateway can effectively communicate with the inventory management microservice, sending requests and processing the received responses. This ensures a seamless connection between the inventory management system and other microservices in the e-commerce platform.

Order Processing (GraphQL)

Mediamodifier

Ok, we’re at good point! Now, let’s see how our Node.js API Gateway can connect to a GraphQL microservice responsible for order processing. GraphQL is a query language and runtime for APIs, allowing clients to request only the data they need, leading to more efficient and flexible communication between services.

Setting up the GraphQL microservice

Let’s assume our order processing microservice is built using Apollo Server, a popular GraphQL server implementation for Node.js. This microservice exposes a GraphQL schema with operations for creating, updating, and querying orders.

Here’s a simplified example of the GraphQL schema for our order processing microservice:

type Order {
id: ID!
customerId: ID!
items: [OrderItem!]!
status: OrderStatus!
createdAt: String!
updatedAt: String!
}

type OrderItem {
productId: ID!
quantity: Int!
price: Float!
}

enum OrderStatus {
PENDING
PROCESSING
SHIPPED
DELIVERED
}

type Query {
getOrder(id: ID!): Order
getOrdersByCustomer(customerId: ID!): [Order!]!
}

type Mutation {
createOrder(customerId: ID!, items: [OrderItemInput!]!): Order!
updateOrderStatus(id: ID!, status: OrderStatus!): Order!
}

input OrderItemInput {
productId: ID!
quantity: Int!
price: Float!
}

Connecting the API Gateway to the GraphQL microservice

To improve our API Gateway’s integration with the GraphQL microservice, let’s switch from using axios to using Apollo Client. Apollo Client provides a comprehensive and optimized GraphQL client for JavaScript, and it can simplify our interactions with the GraphQL microservice.

We’ll start by installing the necessary packages:

npm install @apollo/client graphql

Next, we’ll set up the Apollo Client in our API Gateway. Create a new file named apolloClient.js with the following content:

import { ApolloClient, InMemoryCache, HttpLink } from '@apollo/client';

const link = new HttpLink({
uri: 'http://graphql-order-microservice:4000/graphql',
});

const client = new ApolloClient({
link,
cache: new InMemoryCache(),
});

export default client;

Here, we’re creating an Apollo Client instance with an HttpLink that points to our GraphQL microservice's endpoint. We're also using the InMemoryCache for caching GraphQL results.

Now, let’s create a custom hook that will use Apollo Client to send queries and mutations to the GraphQL microservice. Create a new file named useGraphQL.js:

import { useQuery, useMutation } from '@apollo/client';

const useGraphQL = (queryOrMutation, options = {}) => {
const isMutation = queryOrMutation.definitions.some(
(definition) => definition.operation === 'mutation'
);

return isMutation
? useMutation(queryOrMutation, options)
: useQuery(queryOrMutation, options);
};

export default useGraphQL;

This custom hook, useGraphQL, accepts a GraphQL query or mutation as its first argument and an optional options object as its second argument. It uses Apollo Client's useQuery and useMutation hooks to interact with the GraphQL microservice, depending on whether the provided operation is a query or a mutation.

Finally, let’s update the /orders route in our index.js file to use the custom hook with Apollo Client:

import express from 'express';
import { ApolloProvider } from '@apollo/client/react';
import client from './apolloClient';
import useGraphQL from './useGraphQL';
import bodyParser from 'body-parser';

const app = express();
app.use(bodyParser.json());

app.post('/orders', async (req, res) => {
const [executeGraphQL] = useGraphQL(req.body);
try {
const response = await executeGraphQL();
res.status(200).json(response.data);
} catch (error) {
res.status(500).json({ message: 'Error processing request', error });
}
});

app.listen(3000, () => {
console.log('API Gateway listening on port 3000');
});

Don’t forget to wrap your entire application with the ApolloProvider:

import { render } from 'react-dom';

render(
<ApolloProvider client={client}>
<App />
</ApolloProvider>,
document.getElementById('root')
);

Now our API Gateway uses the custom useGraphQL hook with Apollo Client to interact with the GraphQL microservice. This approach provides more advanced features, such as caching and real-time updates, making our API Gateway even more powerful and efficient in connecting to the GraphQL microservice for order processing.

Customer Support (gRPC)

Charanjeet Dhiman

gRPC is an open-source remote procedure call (RPC) framework that uses HTTP/2 for transport and Protocol Buffers as the interface description language. It’s designed to be efficient, fast, and to work seamlessly across multiple languages and platforms, making it an ideal choice for our customer support microservice example.

I’ve seen firsthand the benefits of using gRPC, especially when it comes to providing fast, reliable customer support services in real-time, and now I’ll walk you through how we can integrate the customer support microservice into our API Gateway.

Integrating the gRPC client into the API Gateway

Let’s update our API Gateway to handle requests to the customer support microservice. First, install the required npm packages:

npm install @grpc/grpc-js @grpc/proto-loader

Next, create a file named customer_support_client.js with the following content:

const grpc = require('@grpc/grpc-js');
const protoLoader = require('@grpc/proto-loader');
const path = require('path');

const PROTO_PATH = path.resolve(__dirname, './customer_support.proto');

const packageDefinition = protoLoader.loadSync(PROTO_PATH, {
keepCase: true,
longs: String,
enums: String,
defaults: true,
oneofs: true,
});

const customerSupportProto = grpc.loadPackageDefinition(packageDefinition).customer_support;

const client = new customerSupportProto.CustomerSupport(
'http://grpc-customer-support:50051',
grpc.credentials.createInsecure()
);

module.exports = client;

This code sets up a gRPC client that connects to the customer support gRPC server on http://grpc-customer-support:50051.

Now, update your API Gateway to handle requests to the customer support microservice. You can do this by adding a new route to your Express application. Assuming your Express app is defined in a file named app.js, add the following code to it:

const express = require('express');
const customerSupportClient = require('./customer_support_client');

const app = express();

app.use(express.json());

app.post('/api/customer-support/ticket', (req, res) => {
const { userId } = req.body;

customerSupportClient.GetSupportTicket({ user_id: userId }, (error, response) => {
if (error) {
console.error('Error invoking GetSupportTicket:', error);
res.status(500).send('Internal server error');
} else {
console.log('GetSupportTicket response:', response);
res.json(response);
}
});
});

// Other route handlers go here

app.listen(3000, () => {
console.log('API Gateway listening on port 3000');
});

This code adds a new route, /api/customer-support/ticket, which accepts POST requests with a JSON payload containing a userId. It then calls the GetSupportTicket method on the gRPC client and sends the response back to the client. If there's an error, it sends a 500 status code with an "Internal server error" message.

Now, when a user sends a POST request to /api/customer-support/ticket with a valid userId, the API Gateway will call the customer support microservice using gRPC and return the response to the user.

Best Practices and Tips

Stefan Schweihofer

Over the years, I have learned several key principles that have contributed to the design of my API Gateway implementations.

Here, I’ll share some of these insights with you, highlighting instances from my career that have shaped my understanding.

Keep It Modular and Reusable

A crucial aspect of building an API Gateway is ensuring that it’s modular and reusable, and this approach allows for easy maintenance and scalability, as new microservices can be added without significant overhead.

💡 This is exactly the approach Bit enables. By adopting a composable, modularity-first design for your microservices, and independently storing, testing, and documenting atomic units of code instead of entire apps at once, your app scales better, and is infinitely more maintainable.

Learn more:

Extracting and Reusing Pre-existing Components using bit add

As you design your API Gateway, consider the same approach by creating separate modules for handling different types of microservices, such as RESTful, GraphQL, and gRPC.

Use a Robust and Flexible Tech Stack

While working with various technologies, I’ve come to appreciate the importance of a robust and flexible tech stack for API Gateway development, and Node.js has proven to be a powerful choice, providing the necessary performance and adaptability for connecting multiple microservices.

Remember that when choosing a tech stack for your API Gateway, ensure that it supports the needs of your microservices and offers easy integration options.
Reading Advice — Building Microservices: Designing Fine-Grained Systems by Sam Newman
🚨Just so you know, purchasing a book via this post’s links earns me a small commission at no extra cost to you. You get a great book, and I can continue creating content you love. Thanks for supporting my work!

Implement Rate Limiting and Throttling

One key lesson I learned early in my career was the importance of rate limiting and throttling in maintaining a stable system, so bear in mind to protect your microservices from being overwhelmed and ensure a better experience for your users, and limiting the number of requests your API Gateway can handle.

Make sure to include these features in your API Gateway to maintain performance and avoid service degradation.

Utilize Caching and Load Balancing

Caching and load balancing are two vital components that can significantly enhance your API Gateway’s performance, and caching frequently accessed data, you can reduce the latency of your responses and minimize the load on your microservices.

Monitor and Log API Requests

As a software engineer, I understand the importance of monitoring and logging API requests. This practice helps you identify issues, optimize performance, and ensure the smooth operation of your API Gateway.

Implement monitoring and logging in your API Gateway to keep track of system health and troubleshoot issues as they arise.

Ensure Security and Authentication

Security is a critical aspect of any software system. As a technical lead and system designer, I’ve always prioritized security and authentication in my projects. When building your API Gateway, it’s essential to include robust security mechanisms to protect sensitive data and prevent unauthorized access.

Implement strong security and authentication measures in your API Gateway to maintain the integrity of your infrastructure.

Reading Advice — Node.js Design Patterns by Mario Casciaro and Luciano Mammino

Conclusion: Bringing It All Together

Nadine Shaabana

Reflecting on the Journey: A Developer’s Perspective

As we wrap up this ultimate Node.js API Gateway tutorial, I can’t help but think back on my journey in the software development world.

By now, you should have a solid understanding of API Gateways, the reasons behind choosing Node.js for API Gateway development, and how to implement an API Gateway in an e-commerce platform context.

I hope the best practices and tips shared in this article will prove useful as you embark on your journey to create efficient, scalable, and maintainable API Gateways. Remember that the key lies in maintaining a balance between modularity, performance, and security, all while keeping an eye on the ever-evolving landscape of microservices and API Gateway technologies.

If you want to know more about Microservices migrations from Monolithics you must go through my other article “The Long and Winding Road to Microservices”, where I trace the path from centralized to distributed systems and exploring the journey of Monolithic Architecture towards Microservices.

The Long and Winding Road to Microservices: The Evolution of Monolithic Architecture

And hey, of course, if you liked this article don’t forget to follow me for more content like this! 😎🚀 #Medium #FollowMe

From monolithic to composable software with Bit
Bit’s open-source tool help 250,000+ devs to build apps with components.

Turn any UI, feature, or page into a reusable component — and share it across your applications. It’s easier to collaborate and build faster.

Learn more

Split apps into components to make app development easier, and enjoy the best experience for the workflows you want:

Micro-Frontends

Design System

Code-Sharing and reuse

Monorepo

Learn more

Bibliography

Jonathan Borba

The Ultimate Node.js API Gateway Tutorial: Bridging Microservices with Ease was originally published in Bits and Pieces on Medium, where people are continuing the conversation by highlighting and responding to this story.


This content originally appeared on Bits and Pieces - Medium and was authored by Anto Semeraro


Print Share Comment Cite Upload Translate Updates
APA

Anto Semeraro | Sciencx (2023-05-04T06:01:34+00:00) The Ultimate Node.js API Gateway Tutorial: Bridging Microservices with Ease. Retrieved from https://www.scien.cx/2023/05/04/the-ultimate-node-js-api-gateway-tutorial-bridging-microservices-with-ease/

MLA
" » The Ultimate Node.js API Gateway Tutorial: Bridging Microservices with Ease." Anto Semeraro | Sciencx - Thursday May 4, 2023, https://www.scien.cx/2023/05/04/the-ultimate-node-js-api-gateway-tutorial-bridging-microservices-with-ease/
HARVARD
Anto Semeraro | Sciencx Thursday May 4, 2023 » The Ultimate Node.js API Gateway Tutorial: Bridging Microservices with Ease., viewed ,<https://www.scien.cx/2023/05/04/the-ultimate-node-js-api-gateway-tutorial-bridging-microservices-with-ease/>
VANCOUVER
Anto Semeraro | Sciencx - » The Ultimate Node.js API Gateway Tutorial: Bridging Microservices with Ease. [Internet]. [Accessed ]. Available from: https://www.scien.cx/2023/05/04/the-ultimate-node-js-api-gateway-tutorial-bridging-microservices-with-ease/
CHICAGO
" » The Ultimate Node.js API Gateway Tutorial: Bridging Microservices with Ease." Anto Semeraro | Sciencx - Accessed . https://www.scien.cx/2023/05/04/the-ultimate-node-js-api-gateway-tutorial-bridging-microservices-with-ease/
IEEE
" » The Ultimate Node.js API Gateway Tutorial: Bridging Microservices with Ease." Anto Semeraro | Sciencx [Online]. Available: https://www.scien.cx/2023/05/04/the-ultimate-node-js-api-gateway-tutorial-bridging-microservices-with-ease/. [Accessed: ]
rf:citation
» The Ultimate Node.js API Gateway Tutorial: Bridging Microservices with Ease | Anto Semeraro | Sciencx | https://www.scien.cx/2023/05/04/the-ultimate-node-js-api-gateway-tutorial-bridging-microservices-with-ease/ |

Please log in to upload a file.


There are no updates yet.
Click the Upload button above to add an update.

You must be logged in to translate posts. Please log in or register.