This content originally appeared on DEV Community and was authored by Toluwani Oluwaloseyi
An Azure Compute Gallery (formerly known as Shared Image Gallery) simplifies sharing resources, like images and application packages, across your organization. The Azure Compute Gallery lets you share custom VM images and application packages with others in your organization, within or across regions, within a tenant.(microsoft.com)
An Azure VM image is a pre-configured virtual machine (VM) that is used as a template to create new VM instances. An Azure VM image contains the operating system, applications, and other configurations that are necessary to run the VM.
The Azure VM image is created by capturing the virtual hard disk (VHD) of a configured VM, and it can be used to create multiple VM instances with the same configuration. This is particularly useful for deploying and scaling applications, as it allows you to quickly and easily provision new VM instances with the same settings and configurations as the original VM image.
Step 1:
This is a very interesting walkthrough because you have to create a Windows VM with RDP and Data Disk first before you can capture the image to be used in the compute gallery. If you don't know how to create one, kindly visit my article (https://dev.to/toluwani_oluwaloseyi/how-to-deploy-a-windows-vm-rdp-into-it-and-add-a-data-disc-to-the-windows-vm-on-a-macbook-4163) to learn how to.
Step 2:
Go to the VM that you already created and make sure its running.
Step 3:
Open azure portal on a new tab, search for azure compute galleries and click on "create"
Step 4:
- Subscription: Choose the subscription where you wish to create the resource.
- Resource group: Choose the resource group where you wish to create the resource. If you wish to create a new group click on create a new option.
- Name: Enter a preferred unique name.
- Region: Select the location where you wish to create the account.
Click on "review+create"
Step 5:
After validation is passed, Click on "create"
Step 6:
Go back to the VM you created, click on "overview",then click on "capture"
Step 7:
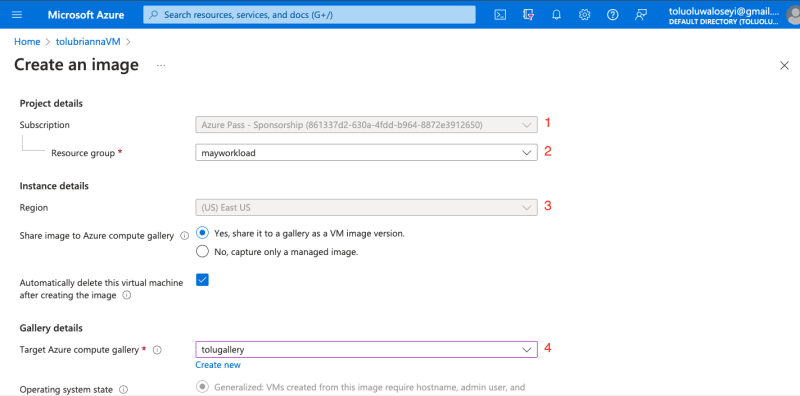
- Subscription: Choose the subscription where you wish to create the resource.
- Resource group: Choose the resource group where you wish to create the resource. If you wish to create a new group click on create a new option.
- Region: Select the location where you wish to create the account.
- Target azure compute gallery: choose the gallery you just created from the dropdowns (I chose tolugallery)
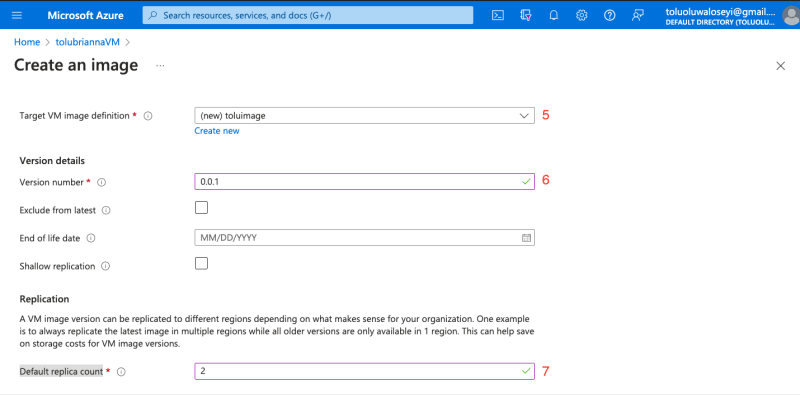
- Target VM Image: Create new random name
- Version number: 0.0.1
- Default replica count: 2 (this means you have your image backups in different places/regions)
- Target regions: Add 2 more regions
Click on review+create"
Step 8:
Once validation is passed, click on "create"
Step 9:
After deployment is completed, go back to the compute gallery to see if the image has been captured and is in the gallery.
(Please note that the deployment of the CaptureVM will be a little delayed because it has to stop and make the virtual machine generalized so that it does not conform to one particular standard and then make it flexible so admin and user password can be added)
Thank you for reading...
This content originally appeared on DEV Community and was authored by Toluwani Oluwaloseyi
Toluwani Oluwaloseyi | Sciencx (2023-05-11T11:27:28+00:00) HOW TO CREATE AN AZURE COMPUTE GALLERY, CAPTURE THE IMAGE OF A VM AND STORE IT IN A COMPUTE GALLERY.. Retrieved from https://www.scien.cx/2023/05/11/how-to-create-an-azure-compute-gallery-capture-the-image-of-a-vm-and-store-it-in-a-compute-gallery/
Please log in to upload a file.
There are no updates yet.
Click the Upload button above to add an update.


