
This content originally appeared on Level Up Coding - Medium and was authored by Bhujith Madav Velmurugan

This article explains with code how to use AWS SageMaker for multi-label image classification starting with model building, training, deployment and inference followed by using the classification model in AWS Lambda for making predictions.
Introduction
According to a survey conducted by Gartner in 2022, only 54% of AI models move from pilot to production. Today, most data science teams know how to build models and make inferences locally. However, deploying the model to production, monitoring it, retraining the model periodically, and automating all these steps is a different ball game altogether. This is where AWS SageMaker steps in. According to the official site of AWS, Amazon SageMaker is a fully-managed service that provides every developer and data scientist with the ability to build, train, and deploy machine learning (ML) models quickly. SageMaker removes the heavy lifting from each step of the machine learning process to make it easier to develop high-quality models.
Recently, I enrolled myself in the Udacity Machine Learning Nanodegree course, which teaches the skills required to build and deploy machine learning models in production using Amazon SageMaker. This article is based on a project I did as part of the course, which has been slightly tweaked and the datasets modified.
Objective
The objective of an image classification problem is to build and train a model to classify images into predefined categories or classes. Our objective is the same. However, we have been developing models locally and manually running the model for every prediction, which is a tedious process. Therefore, in this project, I have used AWS SageMaker to build, train and deploy the image classification model, as well as automate the prediction process. AWS Lambda can be used for this purpose. In this article, I will explain with code how to use AWS SageMaker for image classification, as well as automate the prediction process.
About the dataset
The Multi-class weather dataset (MWD) for image classification is a dataset utilized in the research paper titled “Multi-class weather recognition from still images using heterogeneous ensemble method.” This dataset contains images that belong to four distinct types of outdoor weather conditions, which include sunshine, sunset, rain, and cloudy conditions. The dataset can be found at https://data.mendeley.com/datasets/4drtyfjtfy/1. For preprocessing of the dataset, and to access all the code resources refer to this Github repository.
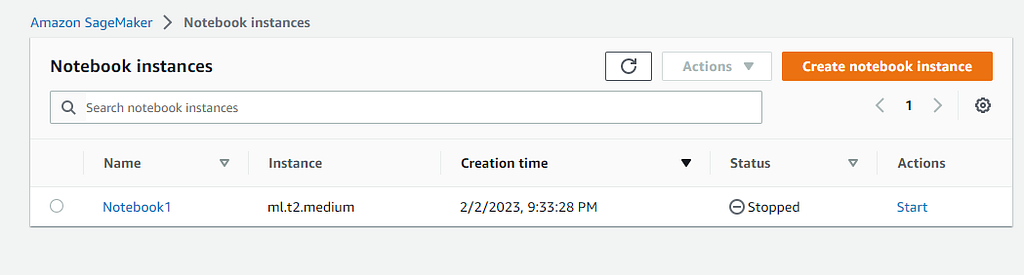
AWS SageMaker Notebook creation
There are many articles that briefly explain how to create notebook instances in SageMaker and provide information on the cost of various notebook instance types. However, I would like to highlight some key steps. First, go to your AWS console and select the SageMaker service. From there, choose Notebook instances and create a new one. During the creation process, you will be prompted to choose an IAM role. Ensure that the IAM role you select has full access to AWS S3 buckets and SageMaker policies.
Model Building
Import the necessary libraries and using Sagemaker SDK get your AWS account region, execution role and the default S3 bucket. Push the training and validation sets along with the metadata files created earlier into this default S3 bucket.
import sagemaker
from sagemaker.session import Session
from sagemaker import get_execution_role

session = sagemaker.Session()

bucket= session.default_bucket()
print("Default Bucket ",bucket)

region = session.boto_region_name
print("AWS Region ",region)

role = get_execution_role()
print("RoleArn ",role)
Let’s start creating the image classification model. AWS SageMaker provides prebuilt Docker images that support deep learning frameworks and other dependencies required for training and inference. Utilizing the SageMaker Python SDK, we can leverage the latest machine learning or deep learning models. In the following code, I have used the image_uris function to retrieve the latest image-classification image, and the model artifacts will be stored in the location specified in the S3 path. For more information about prebuilt models, visit https://docs.aws.amazon.com/sagemaker/latest/dg/pre-built-containers-frameworks-deep-learning.html.
image_classification_model_image = sagemaker.image_uris.retrieve('image-classification',region,version='latest')
s3_path = f"s3://{bucket}/weather_classification_model"
Training
To run the training job, utilize the SageMaker estimator function, which requires the current SageMaker execution role and session variables, along with other necessary parameters. The instance_count parameter is set to 1, but if there are millions of images for training, this can be increased proportionately. SageMaker will then distribute the training load across all instances, and we don’t have to manage these instances. Further information about the SageMaker estimator can be found at https://docs.aws.amazon.com/sagemaker/latest/dg/docker-containers-adapt-your-own-private-registry-estimator.html.
image_classification_model = sagemaker.estimator.Estimator(
    image_uri=image_classification_model_image,
    instance_count=1,
    instance_type="ml.p2.xlarge",
    volume_size=50,
    max_run=360000,
    input_mode="File",
    role=role,
    output_path=s3_path,
    sagemaker_session=session
)
Hyperparameter tuning
When creating our image classification model, it is possible to tune hyperparameters. Two important parameters to note are use_pretrained_model=1 and multi_label=1. The latter indicates multi-image classification, while the former allows us to use transfer learning by making predictions on a custom dataset. We take a pre-trained model, remove the final layers, and retrain it with our custom images. I have also set the image shape, number of classes, total number of training samples, etc. There are several hyperparameters that can be tuned, which can be found here: https://docs.aws.amazon.com/sagemaker/latest/dg/IC-Hyperparameter.html. Additionally, make sure that the image shape is 224 x 224 x 3 or lesser because when I used 300 x 300 x 3, during inference the model took more time to make predictions and it caused timeout problems. If you are using large images try increasing the instance count while deploying.
image_classification_model.set_hyperparameters(
    image_shape='3,224,224' ,
    num_classes=4,
    num_layers=18,
    num_training_samples=894,
    use_pretrained_model=1,
    multi_label=1,
    learning_rate=0.001,
    epochs=5
)
AWS offers several image formats for training models, including the one used in this project. To learn more about this method and other available options, please refer to the documentation at https://docs.aws.amazon.com/sagemaker/latest/dg/image-classification.html. When training the model, it’s important to specify four channels for the InputDataConfig parameter: train, validation, train_lst, and validation_lst. These channel names should not be changed. Additionally, the content type for all four channels should be set to application/x-image. To properly point to your image data, you can specify the main S3 path to the images in the s3_data parameter of the training input. The relative path or file name for each image should be included in the metadata file (lst file). This file should have three columns: the index of the image within the folder, the label of the image, and the relative path of the image. The lst files were created while splitting the dataset into train and test sets and it could be found in the Github repository.
from sagemaker.debugger import Rule, rule_configs
from sagemaker.session import TrainingInput
model_inputs = {
        "train": sagemaker.inputs.TrainingInput(
            s3_data=f"s3://{bucket}/weather_classification/train/",
            content_type="application/x-image"
        ),
        "validation": sagemaker.inputs.TrainingInput(
            s3_data=f"s3://{bucket}/weather_classification/validation/",
            content_type="application/x-image"
        ),
        "train_lst": sagemaker.inputs.TrainingInput(
            s3_data=f"s3://{bucket}/weather_classification/train.lst",
            content_type="application/x-image"
        ),
        "validation_lst": sagemaker.inputs.TrainingInput(
            s3_data=f"s3://{bucket}/weather_classification/validation.lst",
            content_type="application/x-image"
        )
}

## Start the training
image_classification_model.fit(model_inputs)
After training, I had achieved a training set accuracy of 94% and validation set accuracy of 96%. This is a good performance considering the relatively smaller dataset and less number of layers used in the model.
Deployment
Now let’s deploy your model on a single ml.m5.xlarge instance.
from sagemaker.serializers import IdentitySerializer

deployment = image_classification_model.deploy(
    initial_instance_count=1, instance_type='ml.m5.xlarge',
    serializer=IdentitySerializer(content_type="application/x-image")
    )

endpoint = deployment.endpoint_name
You can find the deployed endpoints in the AWS SageMaker dashboard under Inference section.

Inference
Lets test our model. The below code randomly selects an image from the test set of the S3 bucket and uses it for prediction.
import boto3
import random
import os

s3_resource = boto3.resource('s3')
objects = s3_resource.Bucket(bucket).objects.filter(Prefix="weather_classification/test")
obj = random.choice([x.key for x in objects])
print('File selected ',obj)

s3_client = boto3.client('s3')

# Downloads the image file and stores it locally in a tmp folder
s3_client.download_file(bucket, obj, 'tmp/image.png')
Create a predictor object for making predictions. Pass the name of the endpoint and the session variable as parameters. The IdentitySerializer helps in serializing the input for the inference endpoint, and we can specify the file type that would be passed for inference. The serializer would have been specified in the deployment function as well, but both ways are acceptable.
The predictor will return all class probabilities as the output, and the class label for the input image corresponds to the index of the highest probability value in the list.
predictor = sagemaker.predictor.Predictor(endpoint_name=endpoint,
                                         sagemaker_session=session)

predictor.serializer = IdentitySerializer("image/png")

with open("tmp/image.png", "rb") as f:
    image = f.read()


result = predictor.predict(image)
print(result.decode('utf-8'))

##The result [6.237225846916772e-08, 0.9989890456199646, 0.00011317242024233565, 0.0265173502266407]
There is an alternate way for getting predictions and this method would be handy while deploying the model in lambda function. We can make predictions by the invoke_endpoint method of the runtime object.
runtime= boto3.client('runtime.sagemaker')

response = runtime.invoke_endpoint(EndpointName=endpoint,
                                       ContentType='image/png',
                                       Body=image)

result = json.loads(response['Body'].read().decode())

classes = ["cloudy", "rain", "shine", "sunrise"]
for i, val in enumerate(classes):
    print(classes[i], round(result[i]*100,2), end="% ")

##The Result cloudy 0.0% rain 99.9% shine 0.01% sunrise 2.65%
If you are not using the endpoint please delete it. Because if left undeleted it would keep consuming resources.
Use Lambda function for prediction
Lambda is a serverless compute service offered by AWS that can perform tasks in response to an event or can be triggered manually. Why we need a Lambda function? Lambda is a cost-effective, scalable, and reliable way for data scientists to deploy CPU-based machine learning models for inference. Till now we had made predictions in the AWS SageMaker notebook which requires some underlying infrastructure. Everytime when we want to make a prediction we can’t run the entire notebook. Hence we will be deploying our endpoint as a Lambda function.
When you create a Lambda function, it automatically creates a lambda_function.py file with a default function called lambda_handler. These names should not be changed. Your code execution will start at this handler function. Also while creating the Lambda function make sure to choose an IAM role with a policy that gives access to invoke SageMaker endpoint.
import json
import boto3
import base64
import os

## Create a client to access S3 objects
s3=boto3.client('s3')

## This is the name of the deployed endpoint
ENDPOINT = 'image-classification-2023-03-14-17-44-15-030'

runtime= boto3.client('runtime.sagemaker')

def lambda_handler(event, context):

    key = event['s3_key']
    bucket = event['s3_bucket']

    ## Downloads the image sent in the event and stores it locally
    file_path = os.path.join('/tmp', 'image.png')
    with open(file_path, 'wb') as f:
        s3.download_fileobj(bucket, key, f)

    with open("/tmp/image.png", "rb") as f:
        image_data = f.read()

    ## Invokes the endpoint
    response = runtime.invoke_endpoint(EndpointName=ENDPOINT,
                                       ContentType='image/png',
                                       Body=image_data)


    result = json.loads(response['Body'].read().decode())

    classes = ["cloudy", "rain", "shine", "sunrise"]

    ## Returns the class with highest probability
    prediction = classes[result.index(max(result))]

    event["prediction_probabilites"] = result
    event["prediction"] = prediction

    return {
        'statusCode': 200,
        'body': json.dumps(event)
    }
Once created, deploy the Lambda function. The Lambda function can be triggered by uploading the image in the S3 bucket or calling the Lambda function via AWS Step Functions and so on. Here I will be testing the function via the test event. The payload that I would be passing is {“s3_bucket”: “name_of_the bucket”, “s3_key”: “folder/image.jpg”} . The Lambda function starts the execution once the payload is delivered to it. The payload is a JSON object that contains the input parameters which can be accessed within the Lambda function.
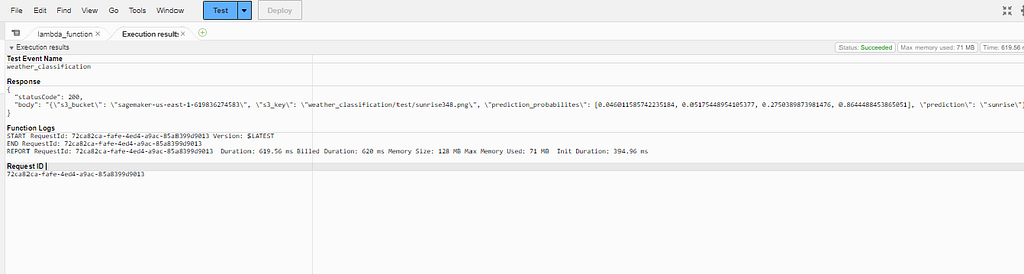
When executed successfully, you will get a JSON response with the probabilities of each class and the class with highest probability.
In this article we saw how we can use AWS Sagemaker for building an image classification model, training it, deploying it and using that model in AWS Lambda function for serving predictions. I hope you find this article useful.
Thanks a lot for reading this article. If you have any feedback please don’t hesitate to provide it. It would be very valuable for me. Please correct me if anything mentioned in this article is not right. Thanks once again. You can find me on Linkedin.
References
Ajayi, Gbeminiyi (2018), “Multi-class Weather Dataset for Image Classification”, Mendeley Data, V1, doi: 10.17632/4drtyfjtfy.1
AWS Innovate | Intro to Deep Learning: Building an Image Classifier on Amazon SageMaker https://youtu.be/KCzgR7eQ3PY
For complete code https://github.com/Bhujith10/Weather_Images_Classification_Sagemaker
Level Up Coding
Thanks for being a part of our community! Before you go:
- 👏 Clap for the story and follow the author 👉
- 📰 View more content in the Level Up Coding publication
- 💰 Free coding interview course ⇒ View Course
- 🔔 Follow us: Twitter | LinkedIn | Newsletter
🚀👉 Join the Level Up talent collective and find an amazing job
Multi-Label Image Classification using AWS SageMaker was originally published in Level Up Coding on Medium, where people are continuing the conversation by highlighting and responding to this story.
This content originally appeared on Level Up Coding - Medium and was authored by Bhujith Madav Velmurugan
Bhujith Madav Velmurugan | Sciencx (2023-05-11T04:34:47+00:00) Multi-Label Image Classification using AWS SageMaker. Retrieved from https://www.scien.cx/2023/05/11/multi-label-image-classification-using-aws-sagemaker/
Please log in to upload a file.
There are no updates yet.
Click the Upload button above to add an update.