Creating Tabbar and Navigation Controller Programmatically in UIKit

Image from: https://developer.apple.com/documentation/uikit/uitabbarcontroller#1653005

I have always been inclined towards adopting a programmatic approach when developing iOS mobile apps with UIKit. While storyboards may initially appear convenient, they tend to make me feel more like a designer than a programmer. Moreover, when it comes to scalability and manageability, I consistently find the programmatic approach to be superior.

Within the scope of this article, I will elaborate on the process of creating a tab bar controller combined with a navigation controller using UIKit.

Setting up SceneDelegate

The initial step in adopting a programmatic approach is to modify the root code of our application. I call it “root” and it reminds me App.js or index.jsin React/React Native. This serves as the entry point for our application or scene. In iOS, we can find a scene function within the SceneDelegateclass, which we will solely utilize to configure our application for programmatic development.

Below is the default structure of the SceneDelegateclass:

import UIKit

class SceneDelegate: UIResponder, UIWindowSceneDelegate {

var window: UIWindow?


func scene(_ scene: UIScene, willConnectTo session: UISceneSession, options connectionOptions: UIScene.ConnectionOptions) {
// Use this method to optionally configure and attach the UIWindow `window` to the provided UIWindowScene `scene`.
// If using a storyboard, the `window` property will automatically be initialized and attached to the scene.
// This delegate does not imply the connecting scene or session are new (see `application:configurationForConnectingSceneSession` instead).
guard let _ = (scene as? UIWindowScene) else { return }
}

func sceneDidDisconnect(_ scene: UIScene) {
// Called as the scene is being released by the system.
// This occurs shortly after the scene enters the background, or when its session is discarded.
// Release any resources associated with this scene that can be re-created the next time the scene connects.
// The scene may re-connect later, as its session was not necessarily discarded (see `application:didDiscardSceneSessions` instead).
}

func sceneDidBecomeActive(_ scene: UIScene) {
// Called when the scene has moved from an inactive state to an active state.
// Use this method to restart any tasks that were paused (or not yet started) when the scene was inactive.
}

func sceneWillResignActive(_ scene: UIScene) {
// Called when the scene will move from an active state to an inactive state.
// This may occur due to temporary interruptions (ex. an incoming phone call).
}

func sceneWillEnterForeground(_ scene: UIScene) {
// Called as the scene transitions from the background to the foreground.
// Use this method to undo the changes made on entering the background.
}

func sceneDidEnterBackground(_ scene: UIScene) {
// Called as the scene transitions from the foreground to the background.
// Use this method to save data, release shared resources, and store enough scene-specific state information
// to restore the scene back to its current state.
}


}

We will only be updating the function below:

func scene(_ scene: UIScene, willConnectTo session: UISceneSession, options connectionOptions: UIScene.ConnectionOptions) {
// Use this method to optionally configure and attach the UIWindow `window` to the provided UIWindowScene `scene`.
// If using a storyboard, the `window` property will automatically be initialized and attached to the scene.
// This delegate does not imply the connecting scene or session are new (see `application:configurationForConnectingSceneSession` instead).
guard let _ = (scene as? UIWindowScene) else { return }
}

Updating scene function in SceneDelegate

In the following code snippet, we ensure the safe retrieval of the windowSceneusing the guard statement. Subsequently, we assign this windowSceneto the window property, which is defined within the SceneDelegate class. Finally, we invoke the makeKeyAndVisible method to make the window the key window.

var window: UIWindow?

func scene(_ scene: UIScene, willConnectTo session: UISceneSession, options connectionOptions: UIScene.ConnectionOptions) {
guard let windowScene = (scene as? UIWindowScene) else { return }
window?.windowScene = windowScene
window?.makeKeyAndVisible()
}

Next, let’s focus on creating the tab bar controller. This controller will handle the view controllers for each tab in our app. For example, if we have two tabs, we’ll need two separate navigation controllers. But why do we choose navigation controllers? Well, it’s because we want to have our own navigation controller within each tab. Let’s take the “Profile” tab as an example. The profile screen will be the main view for that tab, but we may have additional views within the tab that we want to navigate between. That’s why we use navigation controllers for each tab item. They provide the necessary functionality to navigate smoothly between different view controllers within a tab.

Let’s code this!

 func scene(_ scene: UIScene, willConnectTo session: UISceneSession, options connectionOptions: UIScene.ConnectionOptions) {
guard let windowScene = (scene as? UIWindowScene) else { return }
window?.windowScene = windowScene
window?.makeKeyAndVisible()

let tabbar = UITabBarController()

let firstVC = UINavigationController(rootViewController: ViewController())
let secondVC = UINavigationController(rootViewController: SecondViewController())


firstVC.tabBarItem = UITabBarItem(title: "Home", image: UIImage(systemName: "house"),selectedImage: UIImage(systemName: "house.fill"))
secondVC.tabBarItem = UITabBarItem(title: "Profile", image: UIImage(systemName: "person"),selectedImage: UIImage(systemName: "person.fill"))

tabbar.viewControllers = [firstVC, secondVC]

window?.rootViewController = tabbar

}

After initializing our tab bar controller, we proceed to create two navigation controllers, which correspond to the two tab items in our app. The first view controller is the default one, while the second view controller, known as SecondViewController, will be covered in the next section. SecondViewControlleris a regular view controller similar to the default one.

To configure the tab items, we set the tabItem property of each navigation controller using UITabBarItem.

Finally, we assign the created view controllers to the tab bar controller’s viewControllers property.

And the most crucial step is setting the window’s rootViewController as our tab bar controller. This ensures that the tab bar, along with the navigation controllers within each tab item, resides at the top of our app’s hierarchy.

View Controllers in action

Let’s take a look at our ViewController class below:

class ViewController: UIViewController {

override func viewDidLoad() {
super.viewDidLoad()
setupUI()
}

func setupUI(){
view.backgroundColor = .white

let homeLabel: UILabel = {
let label = UILabel()
label.text = "This is home screen"
label.translatesAutoresizingMaskIntoConstraints = false
return label
}()

let homeButton: UIButton = {
let button = UIButton()
button.setTitle("Go to profile", for: .normal)
button.setTitleColor(.white, for: .normal)
button.backgroundColor = .systemOrange
button.translatesAutoresizingMaskIntoConstraints = false
button.addTarget(self, action: #selector(goToProfile), for: .touchUpInside)
return button
}()

view.addSubview(homeButton)
view.addSubview(homeLabel)


NSLayoutConstraint.activate([
homeButton.bottomAnchor.constraint(equalTo: view.safeAreaLayoutGuide.bottomAnchor),
homeButton.widthAnchor.constraint(equalTo: view.widthAnchor),
homeButton.heightAnchor.constraint(equalToConstant: 72),
homeLabel.centerXAnchor.constraint(equalTo: view.centerXAnchor),
homeLabel.centerYAnchor.constraint(equalTo: view.centerYAnchor)
])

}

@objc func goToProfile(){
tabBarController?.selectedIndex = 1
}

}

And, SecondViewController(I know right, poor naming convention here…)

“SecondViewController”

class SecondViewController: UIViewController {
override func viewDidLoad() {
super.viewDidLoad()
setupUI()
}

func setupUI(){
view.backgroundColor = .white

let profileLabel: UILabel = {
let label = UILabel()
label.translatesAutoresizingMaskIntoConstraints = false
label.text = "This is profile screen"
return label
}()

let profileButton: UIButton = {
let button = UIButton()
button.setTitle("Go to home", for: .normal)
button.setTitleColor(.white, for: .normal)
button.backgroundColor = .systemOrange
button.translatesAutoresizingMaskIntoConstraints = false
button.addTarget(self, action: #selector(goToHome), for: .touchUpInside)
return button
}()

view.addSubview(profileButton)
view.addSubview(profileLabel)

NSLayoutConstraint.activate([
homeButton.bottomAnchor.constraint(equalTo: view.safeAreaLayoutGuide.bottomAnchor),
homeButton.widthAnchor.constraint(equalTo: view.widthAnchor),
homeButton.heightAnchor.constraint(equalToConstant: 72),
homeLabel.centerXAnchor.constraint(equalTo: view.centerXAnchor),
homeLabel.centerYAnchor.constraint(equalTo: view.centerYAnchor)
])

}

@objc func goToHome(){
tabBarController?.selectedIndex = 0
}

}

Obviously, the code is just quite repetitive. But it can be neglected for the purpose of this article.

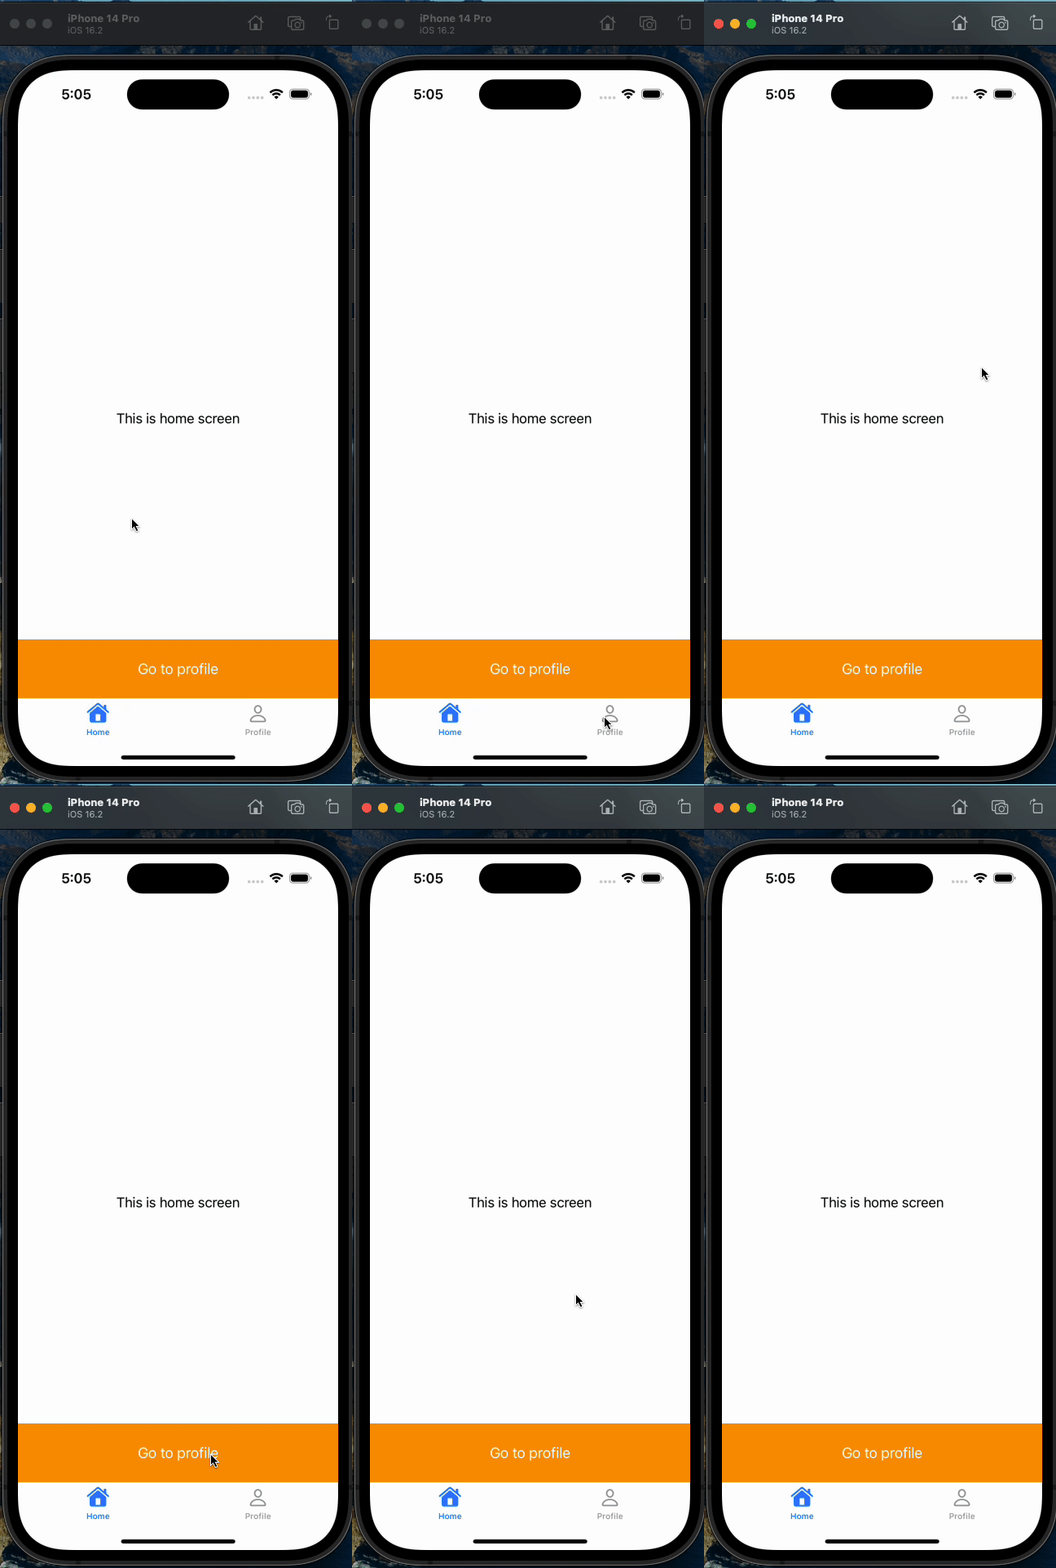
These two view controllers are essentially identical, except for their titles and button actions. Both controllers primarily render a label in the center of the screen, describing the name of the current screen. Additionally, they feature a button at the bottom of the screen, enabling navigation between tab items. That summarizes the core functionality of these view controllers.

Latest picture

We have now a fully programmatic app that utilizes tab bar and navigation controller, without 0 storyboard!

Indeed ugly but functional

Conclusion

In conclusion, adopting a programmatic approach provides greater control over the app’s design and scalability, allowing developers to focus on the programming aspect rather than solely relying on storyboards. Specifically for IBAction/IBOutlet Issues. One particular issue that arises when refactoring code involving IBOutlet and IBAction variables is the need to reestablish connections after making changes. In my experience, after a few days of working on the codebase, I encountered unexpected crashes in the app without any clear explanation. Upon further investigation, I discovered that the cause of these crashes was the renamed IBOutlet and IBAction variable names. Each time this occurred, I had to manually reconnect the affected variables to restore their functionality. This can be a time-consuming and frustrating process, disrupting the development workflow.

Thanks for reading!

Level Up Coding

Thanks for being a part of our community! Before you go:

🚀👉 Join the Level Up talent collective and find an amazing job


Creating Tabbar and Navigation Controller Programmatically in UIKit was originally published in Level Up Coding on Medium, where people are continuing the conversation by highlighting and responding to this story.


This content originally appeared on Level Up Coding - Medium and was authored by Tarik
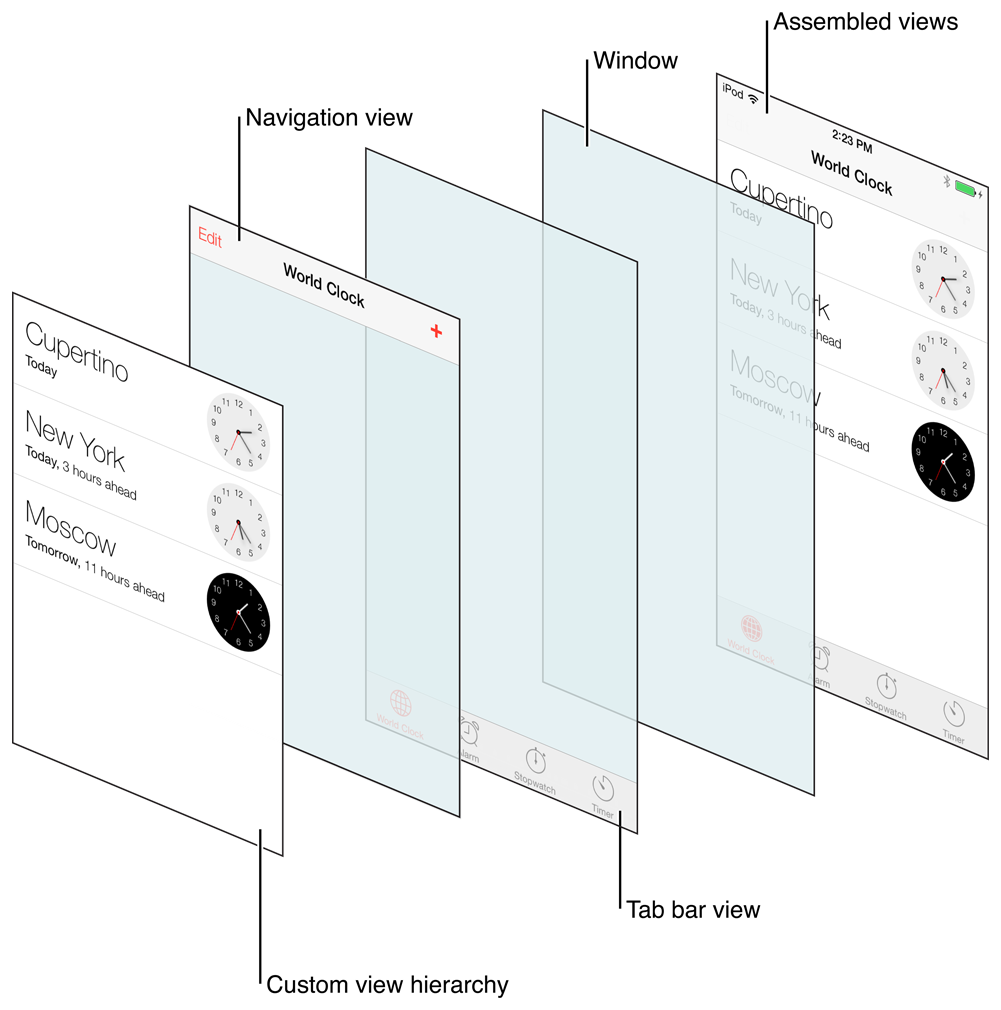
Image from: https://developer.apple.com/documentation/uikit/uitabbarcontroller#1653005

I have always been inclined towards adopting a programmatic approach when developing iOS mobile apps with UIKit. While storyboards may initially appear convenient, they tend to make me feel more like a designer than a programmer. Moreover, when it comes to scalability and manageability, I consistently find the programmatic approach to be superior.

Within the scope of this article, I will elaborate on the process of creating a tab bar controller combined with a navigation controller using UIKit.

Setting up SceneDelegate

The initial step in adopting a programmatic approach is to modify the root code of our application. I call it “root” and it reminds me App.js or index.jsin React/React Native. This serves as the entry point for our application or scene. In iOS, we can find a scene function within the SceneDelegateclass, which we will solely utilize to configure our application for programmatic development.

Below is the default structure of the SceneDelegateclass:

import UIKit

class SceneDelegate: UIResponder, UIWindowSceneDelegate {

var window: UIWindow?


func scene(_ scene: UIScene, willConnectTo session: UISceneSession, options connectionOptions: UIScene.ConnectionOptions) {
// Use this method to optionally configure and attach the UIWindow `window` to the provided UIWindowScene `scene`.
// If using a storyboard, the `window` property will automatically be initialized and attached to the scene.
// This delegate does not imply the connecting scene or session are new (see `application:configurationForConnectingSceneSession` instead).
guard let _ = (scene as? UIWindowScene) else { return }
}

func sceneDidDisconnect(_ scene: UIScene) {
// Called as the scene is being released by the system.
// This occurs shortly after the scene enters the background, or when its session is discarded.
// Release any resources associated with this scene that can be re-created the next time the scene connects.
// The scene may re-connect later, as its session was not necessarily discarded (see `application:didDiscardSceneSessions` instead).
}

func sceneDidBecomeActive(_ scene: UIScene) {
// Called when the scene has moved from an inactive state to an active state.
// Use this method to restart any tasks that were paused (or not yet started) when the scene was inactive.
}

func sceneWillResignActive(_ scene: UIScene) {
// Called when the scene will move from an active state to an inactive state.
// This may occur due to temporary interruptions (ex. an incoming phone call).
}

func sceneWillEnterForeground(_ scene: UIScene) {
// Called as the scene transitions from the background to the foreground.
// Use this method to undo the changes made on entering the background.
}

func sceneDidEnterBackground(_ scene: UIScene) {
// Called as the scene transitions from the foreground to the background.
// Use this method to save data, release shared resources, and store enough scene-specific state information
// to restore the scene back to its current state.
}


}

We will only be updating the function below:

func scene(_ scene: UIScene, willConnectTo session: UISceneSession, options connectionOptions: UIScene.ConnectionOptions) {
// Use this method to optionally configure and attach the UIWindow `window` to the provided UIWindowScene `scene`.
// If using a storyboard, the `window` property will automatically be initialized and attached to the scene.
// This delegate does not imply the connecting scene or session are new (see `application:configurationForConnectingSceneSession` instead).
guard let _ = (scene as? UIWindowScene) else { return }
}

Updating scene function in SceneDelegate

In the following code snippet, we ensure the safe retrieval of the windowSceneusing the guard statement. Subsequently, we assign this windowSceneto the window property, which is defined within the SceneDelegate class. Finally, we invoke the makeKeyAndVisible method to make the window the key window.

var window: UIWindow?

func scene(_ scene: UIScene, willConnectTo session: UISceneSession, options connectionOptions: UIScene.ConnectionOptions) {
guard let windowScene = (scene as? UIWindowScene) else { return }
window?.windowScene = windowScene
window?.makeKeyAndVisible()
}

Next, let’s focus on creating the tab bar controller. This controller will handle the view controllers for each tab in our app. For example, if we have two tabs, we’ll need two separate navigation controllers. But why do we choose navigation controllers? Well, it’s because we want to have our own navigation controller within each tab. Let’s take the “Profile” tab as an example. The profile screen will be the main view for that tab, but we may have additional views within the tab that we want to navigate between. That’s why we use navigation controllers for each tab item. They provide the necessary functionality to navigate smoothly between different view controllers within a tab.

Let’s code this!

 func scene(_ scene: UIScene, willConnectTo session: UISceneSession, options connectionOptions: UIScene.ConnectionOptions) {
guard let windowScene = (scene as? UIWindowScene) else { return }
window?.windowScene = windowScene
window?.makeKeyAndVisible()

let tabbar = UITabBarController()

let firstVC = UINavigationController(rootViewController: ViewController())
let secondVC = UINavigationController(rootViewController: SecondViewController())


firstVC.tabBarItem = UITabBarItem(title: "Home", image: UIImage(systemName: "house"),selectedImage: UIImage(systemName: "house.fill"))
secondVC.tabBarItem = UITabBarItem(title: "Profile", image: UIImage(systemName: "person"),selectedImage: UIImage(systemName: "person.fill"))

tabbar.viewControllers = [firstVC, secondVC]

window?.rootViewController = tabbar

}

After initializing our tab bar controller, we proceed to create two navigation controllers, which correspond to the two tab items in our app. The first view controller is the default one, while the second view controller, known as SecondViewController, will be covered in the next section. SecondViewControlleris a regular view controller similar to the default one.

To configure the tab items, we set the tabItem property of each navigation controller using UITabBarItem.

Finally, we assign the created view controllers to the tab bar controller’s viewControllers property.

And the most crucial step is setting the window's rootViewController as our tab bar controller. This ensures that the tab bar, along with the navigation controllers within each tab item, resides at the top of our app's hierarchy.

View Controllers in action

Let's take a look at our ViewController class below:

class ViewController: UIViewController {

override func viewDidLoad() {
super.viewDidLoad()
setupUI()
}

func setupUI(){
view.backgroundColor = .white

let homeLabel: UILabel = {
let label = UILabel()
label.text = "This is home screen"
label.translatesAutoresizingMaskIntoConstraints = false
return label
}()

let homeButton: UIButton = {
let button = UIButton()
button.setTitle("Go to profile", for: .normal)
button.setTitleColor(.white, for: .normal)
button.backgroundColor = .systemOrange
button.translatesAutoresizingMaskIntoConstraints = false
button.addTarget(self, action: #selector(goToProfile), for: .touchUpInside)
return button
}()

view.addSubview(homeButton)
view.addSubview(homeLabel)


NSLayoutConstraint.activate([
homeButton.bottomAnchor.constraint(equalTo: view.safeAreaLayoutGuide.bottomAnchor),
homeButton.widthAnchor.constraint(equalTo: view.widthAnchor),
homeButton.heightAnchor.constraint(equalToConstant: 72),
homeLabel.centerXAnchor.constraint(equalTo: view.centerXAnchor),
homeLabel.centerYAnchor.constraint(equalTo: view.centerYAnchor)
])

}

@objc func goToProfile(){
tabBarController?.selectedIndex = 1
}

}

And, SecondViewController(I know right, poor naming convention here…)

“SecondViewController”

class SecondViewController: UIViewController {
override func viewDidLoad() {
super.viewDidLoad()
setupUI()
}

func setupUI(){
view.backgroundColor = .white

let profileLabel: UILabel = {
let label = UILabel()
label.translatesAutoresizingMaskIntoConstraints = false
label.text = "This is profile screen"
return label
}()

let profileButton: UIButton = {
let button = UIButton()
button.setTitle("Go to home", for: .normal)
button.setTitleColor(.white, for: .normal)
button.backgroundColor = .systemOrange
button.translatesAutoresizingMaskIntoConstraints = false
button.addTarget(self, action: #selector(goToHome), for: .touchUpInside)
return button
}()

view.addSubview(profileButton)
view.addSubview(profileLabel)

NSLayoutConstraint.activate([
homeButton.bottomAnchor.constraint(equalTo: view.safeAreaLayoutGuide.bottomAnchor),
homeButton.widthAnchor.constraint(equalTo: view.widthAnchor),
homeButton.heightAnchor.constraint(equalToConstant: 72),
homeLabel.centerXAnchor.constraint(equalTo: view.centerXAnchor),
homeLabel.centerYAnchor.constraint(equalTo: view.centerYAnchor)
])

}

@objc func goToHome(){
tabBarController?.selectedIndex = 0
}

}
Obviously, the code is just quite repetitive. But it can be neglected for the purpose of this article.

These two view controllers are essentially identical, except for their titles and button actions. Both controllers primarily render a label in the center of the screen, describing the name of the current screen. Additionally, they feature a button at the bottom of the screen, enabling navigation between tab items. That summarizes the core functionality of these view controllers.

Latest picture

We have now a fully programmatic app that utilizes tab bar and navigation controller, without 0 storyboard!
Indeed ugly but functional

Conclusion

In conclusion, adopting a programmatic approach provides greater control over the app’s design and scalability, allowing developers to focus on the programming aspect rather than solely relying on storyboards. Specifically for IBAction/IBOutlet Issues. One particular issue that arises when refactoring code involving IBOutlet and IBAction variables is the need to reestablish connections after making changes. In my experience, after a few days of working on the codebase, I encountered unexpected crashes in the app without any clear explanation. Upon further investigation, I discovered that the cause of these crashes was the renamed IBOutlet and IBAction variable names. Each time this occurred, I had to manually reconnect the affected variables to restore their functionality. This can be a time-consuming and frustrating process, disrupting the development workflow.

Thanks for reading!

Level Up Coding

Thanks for being a part of our community! Before you go:

🚀👉 Join the Level Up talent collective and find an amazing job


Creating Tabbar and Navigation Controller Programmatically in UIKit was originally published in Level Up Coding on Medium, where people are continuing the conversation by highlighting and responding to this story.


This content originally appeared on Level Up Coding - Medium and was authored by Tarik


Print Share Comment Cite Upload Translate Updates
APA

Tarik | Sciencx (2023-05-12T16:19:30+00:00) Creating Tabbar and Navigation Controller Programmatically in UIKit. Retrieved from https://www.scien.cx/2023/05/12/creating-tabbar-and-navigation-controller-programmatically-in-uikit/

MLA
" » Creating Tabbar and Navigation Controller Programmatically in UIKit." Tarik | Sciencx - Friday May 12, 2023, https://www.scien.cx/2023/05/12/creating-tabbar-and-navigation-controller-programmatically-in-uikit/
HARVARD
Tarik | Sciencx Friday May 12, 2023 » Creating Tabbar and Navigation Controller Programmatically in UIKit., viewed ,<https://www.scien.cx/2023/05/12/creating-tabbar-and-navigation-controller-programmatically-in-uikit/>
VANCOUVER
Tarik | Sciencx - » Creating Tabbar and Navigation Controller Programmatically in UIKit. [Internet]. [Accessed ]. Available from: https://www.scien.cx/2023/05/12/creating-tabbar-and-navigation-controller-programmatically-in-uikit/
CHICAGO
" » Creating Tabbar and Navigation Controller Programmatically in UIKit." Tarik | Sciencx - Accessed . https://www.scien.cx/2023/05/12/creating-tabbar-and-navigation-controller-programmatically-in-uikit/
IEEE
" » Creating Tabbar and Navigation Controller Programmatically in UIKit." Tarik | Sciencx [Online]. Available: https://www.scien.cx/2023/05/12/creating-tabbar-and-navigation-controller-programmatically-in-uikit/. [Accessed: ]
rf:citation
» Creating Tabbar and Navigation Controller Programmatically in UIKit | Tarik | Sciencx | https://www.scien.cx/2023/05/12/creating-tabbar-and-navigation-controller-programmatically-in-uikit/ |

Please log in to upload a file.


There are no updates yet.
Click the Upload button above to add an update.

You must be logged in to translate posts. Please log in or register.