This content originally appeared on Bits and Pieces - Medium and was authored by Anto Semeraro

Front-End Development
Unravel the secrets of Redux with code examples in React applications: understand its power, face its challenges, and write better code with real-life examples.
Introduction

A Journey into Redux and React
As an IT professional with almost two decades of experience in software engineering, I’ve seen the impact that new technologies can have on a developer’s toolkit. I’ve had the privilege to work on various Microsoft platforms and frontend development, and one thing that has always intrigued me is the relationship between React and Redux.
Today, we’re going to dive into the world of Redux and unravel its secrets, power, and challenges, with real-life examples that you can relate to.
Confronting State Management Challenges
Have you ever found yourself tangled in the complex web of state management in your React applications? Or have you spent countless hours debugging an issue, only to find out it was related to a tiny, seemingly insignificant state change? If these scenarios sound familiar, you might be considering Redux as a solution.
Redux is a powerful library that can help you manage the state of your React applications, and in this article, we’ll explore the ins and outs of using Redux in a balanced and insightful manner.

What to Expect in This Article
Throughout this article, we’ll go through the advantages and drawbacks of using Redux, and then put theory into practice with real-life code examples.
In the end, you’ll have a deeper understanding of Redux, and be equipped with the knowledge to decide whether or not to implement Redux in your own React applications. So grab your favorite beverage, get comfortable, and let’s begin our adventure!
The Advantages of Using Redux

Predictable State Management
Have you ever been in the middle of a project, only to realize that your app’s state management is a complete mess? It’s like finding yourself in a maze without a map, and this is where Redux comes in handy.
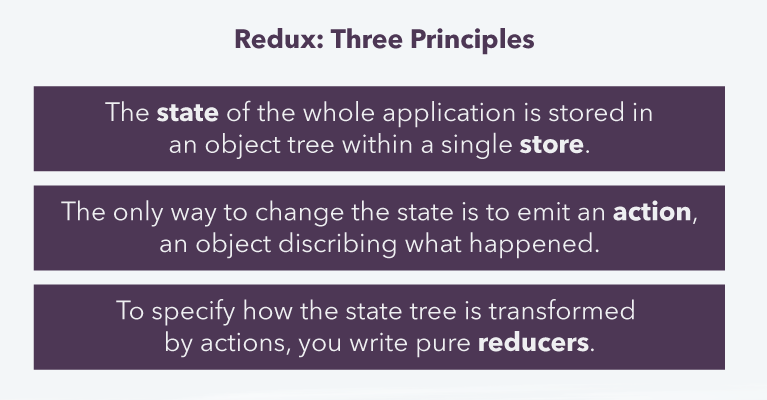
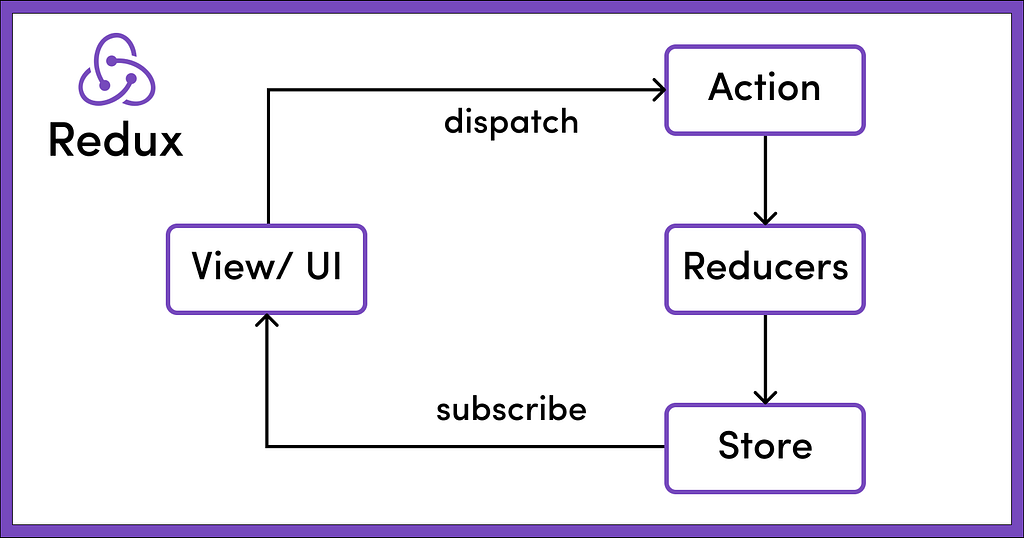
As a unidirectional data flow and a single source of truth for your app’s state, Redux allows you to easily predict and manage your application’s behavior. With Redux, you’ll know exactly where your data is coming from and how it’s being modified, making your state management a walk in the park.
Code Maintainability and Scalability
As developers, you should know that maintainable and scalable code is the key to a successful, long-lasting project, and Redux’s clear separation of concerns and modular structure helps ensure that your application can adapt and grow as your needs evolve.
With the help of Redux’s principles and structure, you’ll be able to easily add new features, refactor existing code, and onboard new team members, all without sacrificing code quality or maintainability.
Enhanced Debugging Capabilities
We’ve all been there: you’ve just found a bug in your application, and you’re about to embark on a nerve-wracking journey through layers of state changes and component updates. Fear not, dear reader!
Redux’s time-travel debugging feature enables you to easily track your application’s state history and reproduce issues, so you can identify and squash bugs with confidence. This powerful tool will make your debugging sessions less painful and more efficient, so you can get back to writing great code.
Middleware for Asynchronous Actions
In modern web applications, asynchronous actions like API calls and data fetching are more important than ever, and with Redux, you can easily incorporate middleware like Redux Thunk or Redux Saga to handle these asynchronous actions in a clean, organized way.
These middleware options allow you to centralize your app’s async logic, making it easier to reason about and maintain.
Community and Ecosystem
One of the biggest advantages of Redux is its thriving community and ecosystem. It’s now a popular and widely adopted library, and it boasts a vast array of resources, tools, and third-party libraries that can help you enhance your development experience and supercharge your React applications.
Are you starting to see the allure of Redux? In the next section, we’ll discuss some potential drawbacks of using Redux, so you can make an informed decision about whether or not it’s the right choice for your React projects.
The Drawbacks of Using Redux

Complexity and Learning Curve
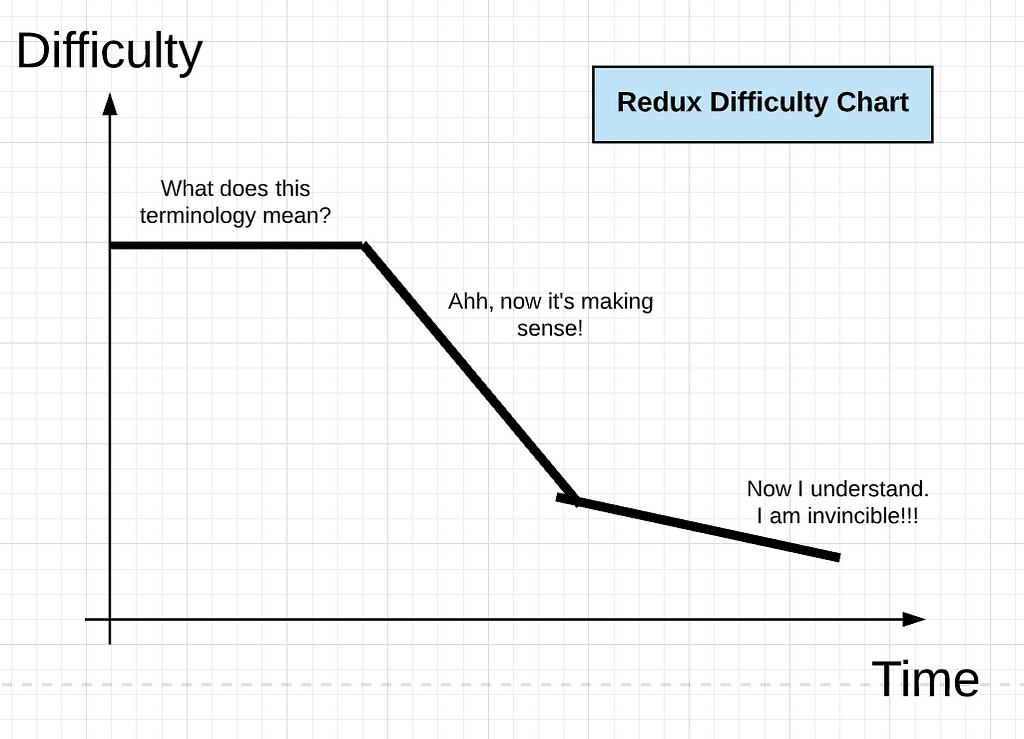
When I first encountered Redux, I felt overwhelmed by its terminology and concepts, and I’m sure many of you have felt the same. The learning curve for Redux can be quite steep, especially if you’re new to React or functional programming.
Understanding actions, reducers, and the store might seem like climbing a mountain, but trust me, once you conquer it, the view from the top is worth the effort.
Boilerplate Code
Redux has a reputation for requiring a significant amount of boilerplate code, and while this might be off-putting at first, it’s important to understand that this verbosity has a purpose. It allows for a clear separation of concerns and makes your code more maintainable in the long run.
However, it’s essential to weigh the benefits against the costs, particularly in smaller projects where the overhead may not be justified.
💡 Adopting a composable, modularity-first design for your code is the way to go. And an open-source toolchain such as Bit can help. With Bit, you can encapsulate your logic and share it as packages across your apps, reducing code duplication and cutting down on boilerplate. Bit also comes with a complete toolkit that lets you test, document, version, and track changes to your components over time, making it easier to manage dependencies and ensure compatibility across your applications. This way your app scales better, and is infinitely more maintainable.
Learn more:
How to reuse React components across your projects
Performance Implications
If not used wisely, Redux can lead to performance bottlenecks in your React application, because by default each connected component will re-render whenever the state changes, regardless of whether its own props have changed.
To prevent unnecessary re-renders, you’ll need to employ techniques like memoization and shallow comparisons, so bear in mind, though, that premature optimization can be just as harmful as not optimizing at all. Find the balance and tackle performance issues as they arise.
Alternatives to Consider
As you might expect, Redux is not the only game in town, and there are other state management libraries and patterns that you could consider, depending on your specific needs and preferences.
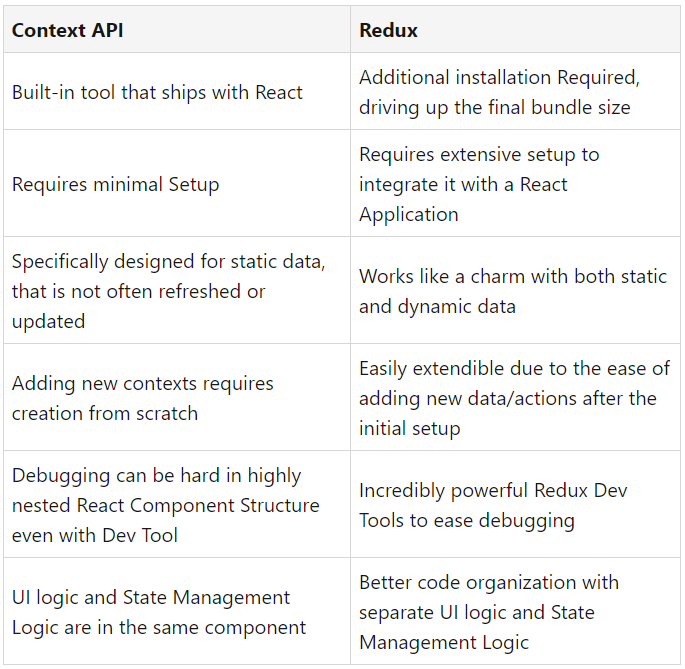
Some popular alternatives include MobX, Recoil, and even React’s built-in Context API (the table above compares the two approaches). Each of these options has its own strengths and weaknesses, and it’s essential to do your research to find the best fit for your project.
Have you encountered any of these challenges while working with Redux? How have you tackled them, or have you considered other state management solutions?
In the next section, we’ll dive into some real-life code examples that demonstrate how to use Redux effectively in your React applications. Remember, practice makes perfect!
Real-Life Code Examples

Installing Redux
So let’s start. First of all, install Redux and React-Redux by running the following command:
npm install redux react-redux
Alternatively, if you’re using yarn:
yarn add redux react-redux
That’s it! You’ve now installed the Redux library and the React-Redux bindings in your React example project. We can now proceed with setting up our Redux store example and connecting your React components.
Setting Up a Redux Store
Imagine you’re building a house. The Redux store is like the foundation, holding everything together. It’s essential to set it up correctly to ensure the stability of your application. Let’s begin by creating a simple Redux store:
import { createStore } from "redux";
import rootReducer from "./reducers";

const store = createStore(rootReducer);

export default store;
In this example, we import the createStore function from Redux and the rootReducer from our reducers. We then create the store using the createStore function, passing in the rootReducer.
Connecting Components to the Store
Now that our store is ready, we need to connect it to our React components. This connection is like a bridge, allowing components to access and modify the application state. Let’s connect a simple Counter component to our store:
import React from "react";
import { connect } from "react-redux";
import { increment, decrement } from "./actions";

const Counter = ({ count, increment, decrement }) => (
  <div>
    <h2>Counter: {count}</h2>
    <button onClick={increment}>Increment</button>
    <button onClick={decrement}>Decrement</button>
  </div>
);

const mapStateToProps = (state) => ({ count: state.count });

const mapDispatchToProps = { increment, decrement };

export default connect(mapStateToProps, mapDispatchToProps)(Counter);
In this example, we use the connect function from react-redux to connect our Counter component to the Redux store. The mapStateToProps function defines how the state from the store maps to the component's props. The mapDispatchToProps object maps the action creators to the component's props.
Implementing Actions and Reducers
Actions and reducers work in tandem, like dance partners, to manage the state of our application. Let’s define a simple action creator and a reducer to handle incrementing and decrementing our counter:
// actions.js
export const increment = () => ({ type: "INCREMENT" });
export const decrement = () => ({ type: "DECREMENT" });

// reducers.js
const initialState = { count: 0 };

const rootReducer = (state = initialState, action) => {
  switch (action.type) {
    case "INCREMENT":
      return { ...state, count: state.count + 1 };
    case "DECREMENT":
      return { ...state, count: state.count - 1 };
    default:
      return state;
  }
};

export default rootReducer;
In this example, we define two simple action creators, increment and decrement. In the reducer, we handle these actions by updating the state accordingly.
Applying Middleware
Middleware allows us to extend Redux’s capabilities, like adding superpowers to our store. Install Redux-Thunk:
npm install redux-thunk
Let’s apply the popular redux-thunk middleware to handle asynchronous actions:
import { createStore, applyMiddleware } from "redux";
import thunk from "redux-thunk";
import rootReducer from "./reducers";

const store = createStore(rootReducer, applyMiddleware(thunk));

export default store;
Here, we import the applyMiddleware function from Redux and thunk from redux-thunk. We then apply the middleware when creating the store.
Optimizing Performance
Now that our Redux store is up and running, we need to ensure optimal performance. We can use the React.memo function and the useMemo hook to memoize our components and prevent unnecessary re-renders, which can help to improve the overall performance of our application. Let’s optimize our Counter component:
import React, { useCallback } from "react";
import { connect } from "react-redux";
import { increment, decrement } from "./actions";

const Counter = React.memo(({ count, increment, decrement }) => {
  const handleIncrement = useCallback(() => increment(), [increment]);
  const handleDecrement = useCallback(() => decrement(), [decrement]);

  return (
    <div>
      <h2>Counter: {count}</h2>
      <button onClick={handleIncrement}>Increment</button>
      <button onClick={handleDecrement}>Decrement</button>
    </div>
  );
});

const mapStateToProps = (state) => ({ count: state.count });

const mapDispatchToProps = { increment, decrement };

export default connect(mapStateToProps, mapDispatchToProps)(Counter);
In this example, we wrap our Counter component with React.memo, which ensures that the component only re-renders when its props change. We also use the useCallback hook to memoize the handleIncrement and handleDecrement functions. This optimization prevents unnecessary re-renders and keeps our application running smoothly.
Handling asynchronous actions with Redux-Thunk
Let’s assume you’re working on a simple weather app that fetches weather data from an API. In this case, you’ll need to handle asynchronous actions to request and update the state based on the API response. We’ll use Redux-Thunk middleware to achieve this.
Create a new action creator fetchWeather in actions/weatherActions.js:
import axios from "axios";

export const FETCH_WEATHER_REQUEST = "FETCH_WEATHER_REQUEST";
export const FETCH_WEATHER_SUCCESS = "FETCH_WEATHER_SUCCESS";
export const FETCH_WEATHER_FAILURE = "FETCH_WEATHER_FAILURE";

export const fetchWeatherRequest = () => ({
  type: FETCH_WEATHER_REQUEST,
});

export const fetchWeatherSuccess = (weather) => ({
  type: FETCH_WEATHER_SUCCESS,
  payload: weather,
});

export const fetchWeatherFailure = (error) => ({
  type: FETCH_WEATHER_FAILURE,
  payload: error,
});

export const fetchWeather = (city) => {
  return (dispatch) => {
    dispatch(fetchWeatherRequest());
    axios
      .get(`https://api.openweathermap.org/data/2.5/weather?q=${city}&appid=YOUR_API_KEY`)
      .then((response) => {
        dispatch(fetchWeatherSuccess(response.data));
      })
      .catch((error) => {
        dispatch(fetchWeatherFailure(error.message));
      });
  };
};
Update your store.js to include the new middleware:
import { createStore, applyMiddleware } from "redux";
import thunk from "redux-thunk";
import rootReducer from "./reducers";

const store = createStore(rootReducer, applyMiddleware(thunk));

export default store;
Using combineReducers for managing multiple reducers
Suppose your application requires a separate reducer for user authentication. You can use the combineReducers function from Redux to combine multiple reducers into one.
Create a new reducer in reducers/authReducer.js:
const initialState = {
  isLoggedIn: false,
  user: null,
};

const authReducer = (state = initialState, action) => {
  switch (action.type) {
    case "LOGIN_SUCCESS":
      return { ...state, isLoggedIn: true, user: action.payload };
    case "LOGOUT":
      return { ...state, isLoggedIn: false, user: null };
    default:
      return state;
  }
};

export default authReducer;
Now, update your reducers/index.js to use combineReducers:
import { combineReducers } from "redux";
import weatherReducer from "./weatherReducer";
import authReducer from "./authReducer";

const rootReducer = combineReducers({
  weather: weatherReducer,
  auth: authReducer,
});

export default rootReducer;
Nested state and useSelector hook
Instead of using connect, you can use the useSelector hook from react-redux to access the state in functional components.
Modify your Weather component to use the useSelector hook:
import React from "react";
import { useSelector } from "react-redux";

const Weather = () => {
  const weather = useSelector((state) => state.weather.weatherData);
  const isLoading = useSelector((state) => state.weather.isLoading);

  return (
    <div>
      {isLoading ? (
        <p>Loading...</p>
      ) : (
        <div>
          <h2>{weather.name}</h2>
          <p>Temperature: {weather.main.temp}°F</p>
        </div>
      )}
    </div>
  );
};

export default Weather
useDispatch hook and action dispatching
To dispatch actions from your functional components, you can use the useDispatch hook from react-redux. Here's how you can modify the Weather component to include a button that triggers the fetchWeather action:
import React, { useState } from "react";
import { useSelector, useDispatch } from "react-redux";
import { fetchWeather } from "../actions/weatherActions";

const Weather = () => {
  const weather = useSelector((state) => state.weather.weatherData);
  const isLoading = useSelector((state) => state.weather.isLoading);
  const dispatch = useDispatch();
  const [city, setCity] = useState("");

  const handleCityChange = (e) => {
    setCity(e.target.value);
  };

  const handleSubmit = (e) => {
    e.preventDefault();
    dispatch(fetchWeather(city));
  };

  return (
    <div>
      <form onSubmit={handleSubmit}>
        <input
          type="text"
          placeholder="Enter city name"
          value={city}
          onChange={handleCityChange}
        />
        <button type="submit">Get Weather</button>
      </form>
      {isLoading ? (
        <p>Loading...</p>
      ) : (
        <div>
          {weather && (
            <>
              <h2>{weather.name}</h2>
              <p>Temperature: {weather.main.temp}°F</p>
            </>
          )}
        </div>
      )}
    </div>
  );
};

export default Weather;
Redux DevTools integration for easier debugging:
To make debugging your Redux state easier, you can integrate your application with Redux DevTools. Here’s how you can update your store.js to include Redux DevTools:
import { createStore, applyMiddleware, compose } from "redux";
import thunk from "redux-thunk";
import rootReducer from "./reducers";

const composeEnhancers = window.__REDUX_DEVTOOLS_EXTENSION_COMPOSE__ || compose;

const store = createStore(rootReducer, composeEnhancers(applyMiddleware(thunk)));

export default store;
With these examples, you now should have a more comprehensive understanding of how to use Redux in a React application.
Comparing Redux and the useState() Hook

While Redux excels in managing complex state and large-scale applications, sometimes it’s not necessary to bring in Redux for simpler applications or state management tasks.
In this section, we’ll compare and contrast the use of Redux with React’s built-in useState() hook to understand their differences and when to choose one over the other.
useState() Hook
React’s useState() hook allows you to manage local state in functional components, making it easy to use state without creating a class component. Here's an example of using useState() to manage the count of button clicks:
import React, { useState } from "react";

const Counter = () => {
  const [count, setCount] = useState(0);

  const incrementCount = () => {
    setCount(count + 1);
  };

  return (
    <div>
      <p>Clicked: {count} times</p>
      <button onClick={incrementCount}>Increment Count</button>
    </div>
  );
};

export default Counter;
Key Differences
- Scope: The useState() hook is limited to managing state within a single component, while Redux manages state globally across an entire application. If your state only affects a single component or is primarily local in nature, useState() is a better choice. For state that needs to be shared across multiple components or parts of your application, Redux is the better option.
- Complexity: Redux introduces more complexity than the useState() hook, with concepts like actions, reducers, and middleware. If you only need to manage a small amount of state or are working on a small-scale application, the useState() hook provides a simpler, more straightforward solution.
- Performance: Due to its global nature, Redux can sometimes lead to performance issues in large applications with frequent state updates. In contrast, useState() can offer better performance for localized state updates as it only re-renders the component it's being used in. However, Redux provides performance optimization options like React.memo and useMemo to help address these concerns.
- Testing and Debugging: Redux provides enhanced debugging capabilities with its integration with Redux DevTools, which makes it easier to trace state changes and debug issues. In comparison, the useState() hook does not offer the same level of debugging support out-of-the-box.
When to Choose Redux or useState()
As a rule of thumb, consider the following when deciding whether to use Redux or the useState() hook:
- Use the useState() hook when state is local to a single component, the state's complexity is low, and you prefer a more straightforward approach.
- Opt for Redux when you have complex state that needs to be shared across multiple components, you require advanced debugging capabilities, or you need to manage asynchronous actions within your application.
Understanding these differences will help you make informed decisions on when to use Redux or the useState() hook, allowing you to optimize your application's performance and code maintainability.
Final Words — The End Is Not The End

Recap of Pros and Cons
In this article, we have explored the wonderful world of Redux in React applications, and we’ve seen the advantages and drawbacks of using Redux and compared it to alternative solutions like the useState() hook.
As we journeyed through the world of state management, we saw that Redux offers us predictable state management, enhanced debugging capabilities, scalability, and a rich ecosystem, making it a powerful tool in our developer arsenal.
On the other hand, we also faced the challenges that come with Redux, such as the complexity and learning curve, the boilerplate code, performance implications, and the existence of alternative solutions that might be more suitable for certain use cases.
Personal Insights and Recommendations
As a seasoned software engineer, I understand the importance of choosing the right tool for the right job. Redux has been an invaluable asset for me in various projects, but it is not a one-size-fits-all solution.
In some cases, the useState() hook or other state management solutions might be a more appropriate choice, especially for smaller projects or components with simple state updates.
So, how can you decide whether Redux is right for your React application? Here’s a quick checklist to consider:
- Does your app have complex state management requirements?
- Is your app likely to scale in the future, and would a more predictable state management solution help maintain code quality?
- Are you comfortable with the initial learning curve and added complexity?
- Can you benefit from the Redux ecosystem, including middleware, community support, and enhanced debugging capabilities?
If you find yourself answering “yes” to most of these questions, Redux might be the right choice for your project. But remember, each project is unique, and you should always weigh the pros and cons according to your specific use case.
Whether you choose to embrace Redux or opt for a different solution, I wish you success and happy coding in your development journey!
I encourage you to share your thoughts, experiences, and questions in the comments section below. And if you liked this article don’t forget to follow me for more content like this! 😎🚀 #Medium #FollowMe
Let’s learn and grow together as a community of passionate developers!
Build React Apps with reusable components, just like Lego
Bit’s open-source tool help 250,000+ devs to build apps with components.
Turn any UI, feature, or page into a reusable component — and share it across your applications. It’s easier to collaborate and build faster.
Split apps into components to make app development easier, and enjoy the best experience for the workflows you want:
→ Micro-Frontends
→ Design System
→ Code-Sharing and reuse
→ Monorepo
Learn more:
- Creating a Developer Website with Bit components
- How We Build Micro Frontends
- How we Build a Component Design System
- How to reuse React components across your projects
- 5 Ways to Build a React Monorepo
- How to Create a Composable React App with Bit
- How to Reuse and Share React Components in 2023: A Step-by-Step Guide
- 5 Tools for Building React Component Libraries in 2023
Bibliography

- “Learning Redux: Write maintainable, consistent, and easy-to-test web applications”, Daniel Bugl, 2017, Packt Publishing.
- “The Road to React: Your Journey to Master Plain Yet Pragmatic React.js”, Robin Wieruch, 2020, Independently published.
- “React in Action”, Mark Tielens Thomas, 2018, Manning Publications.
- “Fullstack React: The Complete Guide to ReactJS and Friends”, Anthony Accomazzo, Nate Murray, and Ari Lerner, 2017, Fullstack.io.
🎉 Friendly reminder: When you buy a book through the links in this article, I receive a small commission at no extra expense for you. This support allows me to continue crafting enjoyable content. I truly appreciate it!
Mastering Redux: A Balanced Analysis with Code Examples for React Developers was originally published in Bits and Pieces on Medium, where people are continuing the conversation by highlighting and responding to this story.
This content originally appeared on Bits and Pieces - Medium and was authored by Anto Semeraro
Anto Semeraro | Sciencx (2023-05-15T06:01:56+00:00) Mastering Redux: A Balanced Analysis with Code Examples for React Developers. Retrieved from https://www.scien.cx/2023/05/15/mastering-redux-a-balanced-analysis-with-code-examples-for-react-developers/
Please log in to upload a file.
There are no updates yet.
Click the Upload button above to add an update.
