You Don’t Know Node.js EventLoop

Generated using Leonardo AI

The Ultimate Guide to Understanding EventLoop in Node.js

You might be wondering if the title of this article is a bit ambitious, but fear not! I’ve put in the time and effort to cover everything you need to know about the EventLoop in Node.js. And believe me, you’ll discover so many new things along the way!

Before beginning this article, I’d like to inform you that it’s important to have a basic understanding of Node.js and its EventLoop to fully comprehend the core concepts discussed.

This comprehensive guide is going to take some time to cover every detail that you need to know, so grab a cup of coffee and settle in for an exciting journey to the fascinating world of Node.js. Let’s get started!

Here is the list of topics covered in this article.

— What is Node.js
 — Reactor Pattern
 — Node.js Architecture
 — Event Queues (I/O Polling, Macrotasks, Microtasks)
 — Changes from Node v11
 — CommonJS vs ES modules
— Libuv (thread pool)
 — DNS is problematic in Node.js
 — Custom Promises — Bluebird
 — Summary

What is Node.js

If you take a look at the official documentation, you’ll find a brief explanation like this.

Node.js is a JavaScript runtime built on Chrome’s V8 JavaScript engine. It uses an event-driven, non-blocking I/O model that makes it lightweight and efficient.

Well, that brief explanation doesn’t tell us much, does it?

There are so many important details and concepts related to the EventLoop in Node.js that require a more in-depth explanation.

Let’s explore them together!

Reactor Pattern

event-driven model

Node.js is written using the Reactor pattern, which provides what is commonly referred to as an event-driven model.

So, how does the Reactor pattern work in event-driven programming?

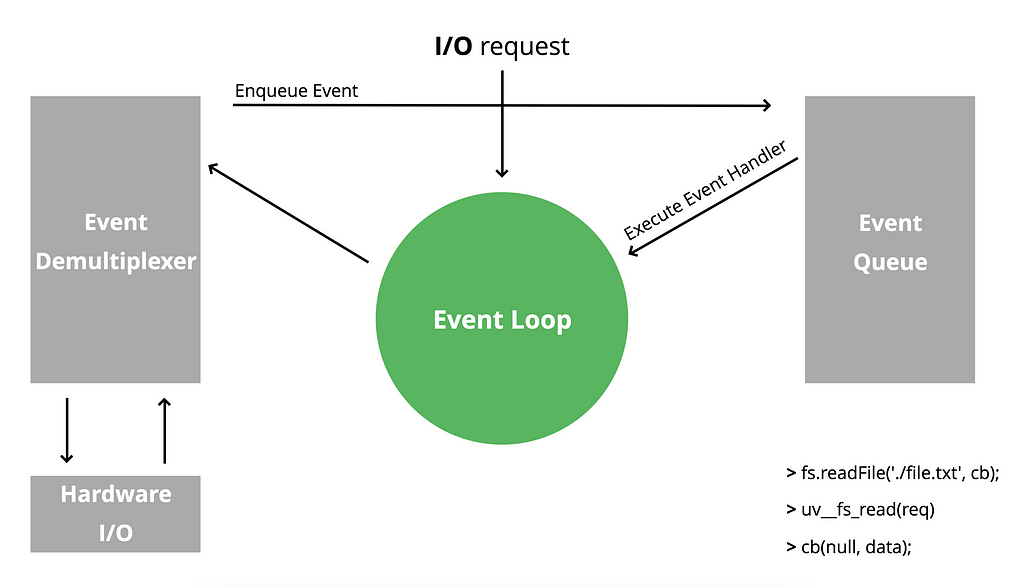
Let’s say we have an I/O request — in this example, it’s a file system action.

fs.readFile('./file.txt', callback);

When we make a function call that involves an I/O operation, the request is directed to the EventLoop, which then passes it on to the Event Demultiplexer.

I/O stands for Input/Output and refers to the communication with the computer’s central processing unit (CPU) .

After receiving the request from the EventLoop, the Event Demultiplexer decides what type of hardware I/O operation needs to be performed, based on the I/O request. In the case of a file system read, the operation is delegated to the appropriate unit, which reads the file.

A specific C/C++ function will read the requested file and return the content to the Event Demultiplexer.

uv__fs_read(req)

When the requested operation is completed, the Event Demultiplexer generates a new event and adds it to the Event Queue, where it can be queued with other similar events.

Once the JavaScript Call Stack is empty, the event from the Event Queue will be processed and our callback function will be executed.

Visualization of the event-driven model.

Neither the Event Demultiplexer nor the Event Queue is a single component. This is the abstract view. For example, the implementation of Event Demultiplexer and Hardware I/O can vary depending on the operating system. Additionally, the Event Queue is not a single queue but rather consists of multiple queues.

— Where does all of this come from?

libuv

The EventLoop in Node.js is provided by the libuv library, which is written in C language specifically for Node.js. It provides the ability to work with the operating system using asynchronous I/O.

https://libuv.org/

libuv is a multi-platform support library with a focus on asynchronous I/O.

— Where does it fit in the Node.js architecture?

Node.js architecture

Using JavaScript, we interact with the operating system. But if we put it bluntly, JavaScript is a high-level language that is limited to basic operations such as creating variables, loops, and functions. It can’t do much more on its own.

— How does it work with the Operation System?

Many programming languages interact directly with the operating system. Therefore, if we integrate JavaScript with those languages, we can essentially work with the operating system using JavaScript.

Here is how it is already done.

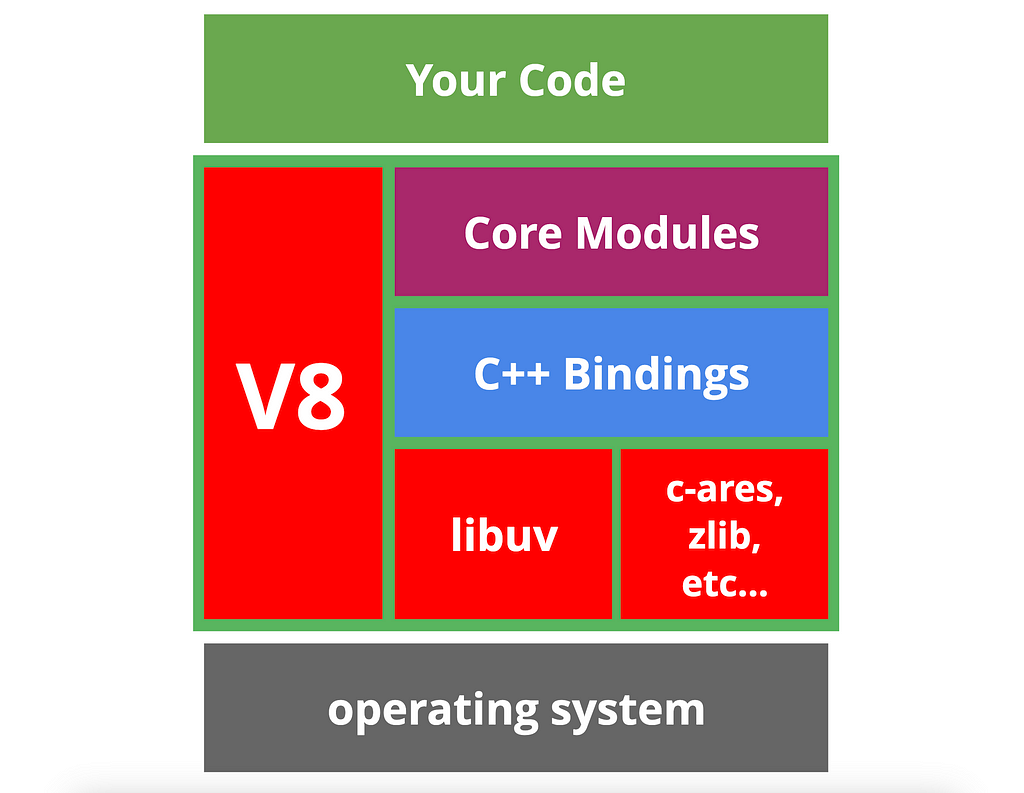
Visualisation of Node.js architecture

The middle layer (Node.js) takes care of our JavaScript code and interacts it with the Operation System. Now let’s discuss the components of Node.js architecture.

V8

This should be a well-known engine that parses and executes our JavaScript code.

libuv

This is the library we previously discussed, which provides the EventLoop and most of the interactions needed to work with the operating system.

Core modules

Node.js provides various native modules, such as fs, http, and crypto. Those are called native modules and include JavaScript source code.

C++ bindings

In Node.js, we have an API that allows us to write C++ code, compile it, and require it in JavaScript as a module. These are called addons. Core modules may have their addons as well.

Node.js provides a compiler that generates addons, which essentially creates a .node file that can be required.

require('./my-cpp-module.node');

The require function in Node.js prioritizes loading .js and .js files, followed by addon files with the .node type.

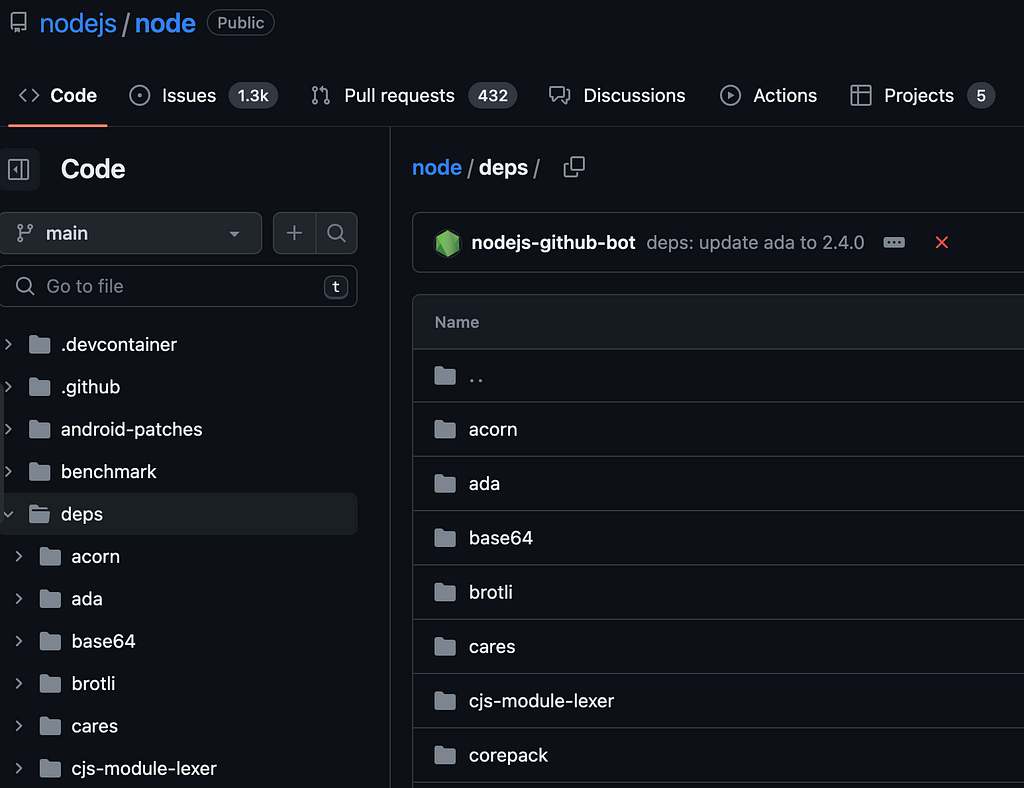
c-ares, zlib, etc

There are also smaller libraries written in C/C++ that provide specific operations, such as file compression, DNS operations, and more.

https://github.com/nodejs/node/tree/main/deps

We are not limited to this. We will revisit libuv later in this article. For now, let’s continue forward.

Event Queues

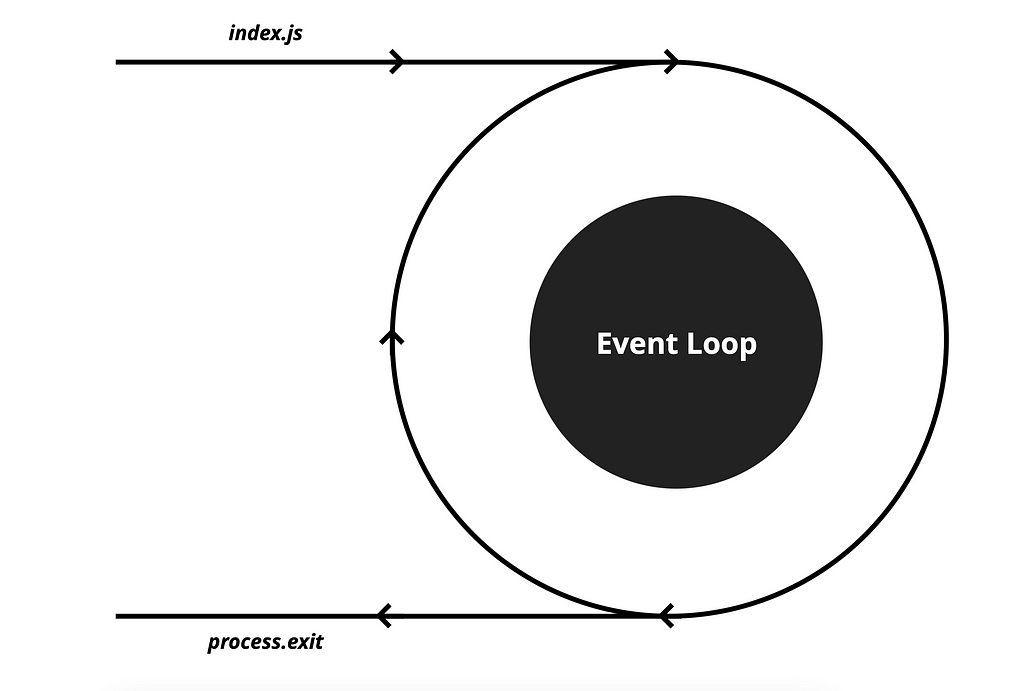
The EventLoop is a mechanism that continuously processes and handles events in a single thread until there are no more events to handle. It is often referred to as a “semi-infinite loop” because it runs indefinitely until there are no more events to handle or an error occurs.

Visualisation of EventLoop #1

As previously mentioned, the EventLoop consists of multiple queues, each with its priority level. In the following sections, we will delve into more detail about these priorities.

Once the Call Stack is empty, the EventLoop goes over the Queues and waits for an event to execute. It checks for timer-related events first.

Visualisation of EventLoop #2

If a setTimeout or setInterval function has finished executing, the Event Demultiplexer will enqueue an event to the Timers queue.

Let’s say we have a setTimeout function which is scheduled to execute in one hour. It means that after one hour, the Event Demultiplexer will enqueue an event into this queue.

When the queue has events, the EventLoop will execute the corresponding callbacks until the queue is empty. Once the queue is empty, the EventLoop will move on to check other queues.

Visualisation of EventLoop #3

In the second position, we have the I/O queue which is responsible for most of the asynchronous operations such as file system operations, networking, and more.

Next, we have the Immediate queue which is responsible for setImmediate calls. It allows us to schedule operations that should run after I/O operations.

Visualisation of EventLoop #4

And at the end, we have a specific queue called close events for the closed event.

Visualisation of EventLoop #5

It is responsible for handling all connections that have a close event, such as database and TCP connections. These events are queued here for execution.

In each cycle, the EventLoop checks all of these queues to determine if any events need to be executed. The EventLoop typically takes only a few milliseconds to review all the queues and check if any events are to be executed. However, if the EventLoop is busy, it may take longer. Fortunately, there are many libraries available on npm that allow us to measure the duration of the EventLoop cycle.

You may think that we have already covered most of it, but I will say it’s just the beginning.

The events which are queued in these queues are also referred to as Macrotasks.

There are two types of tasks in the EventLoop: Macrotasks and Microtasks. We will discuss microtasks later on.

💡 Pro Tip: All event loops, micro, and macro tasks can be turned into tiny components that you can reuse, and share across multiple projects using an open-source toolchain such as Bit. This can significantly reduce code duplication and improve code quality, making your code modular and more maintainable.

Learn more here:

Extracting and Reusing Pre-existing Components using bit add

Now, let’s take a look at how the EventLoop determines when it’s time to stop the Node.js process because there are no more events to handle.

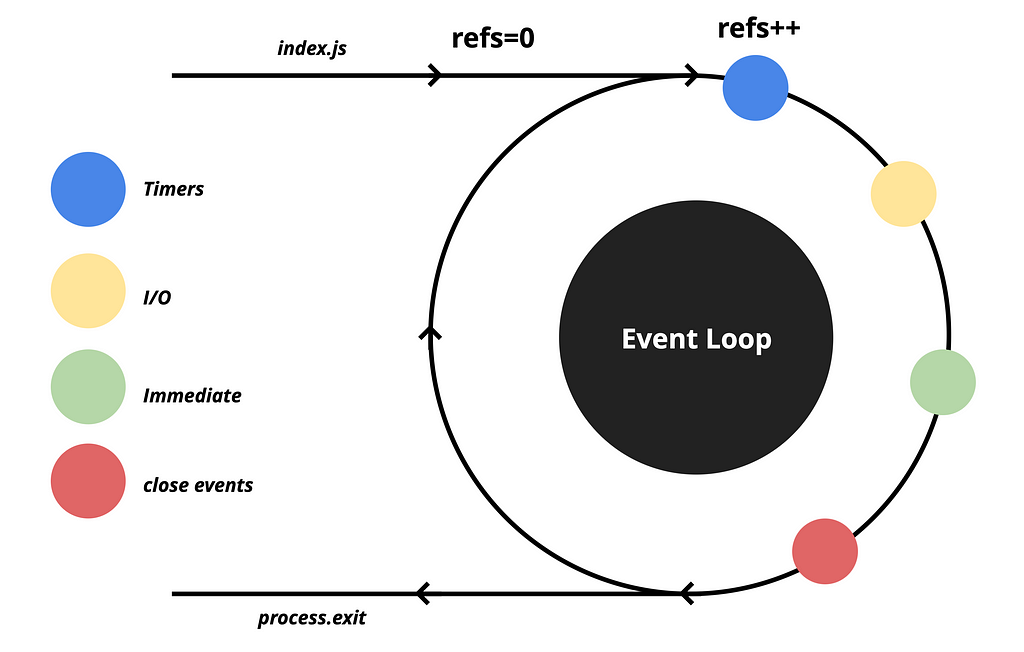
EventLoop maintains a refs counter, which starts at 0 when the process begins. Whenever there is an asynchronous operation, the counter is incremented by one. For example, if we have a setTimeout or readFile operation, each of these functions will increment the counter by one.

Visualisation of EventLoop #6

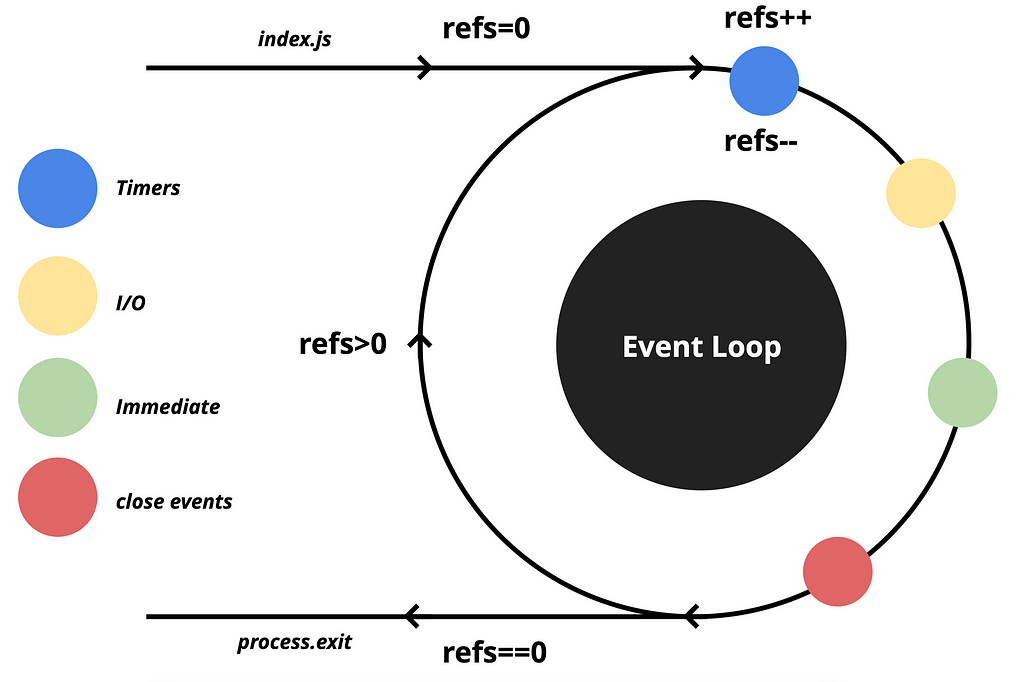
When an event is pushed to the queue, and the EventLoop executes the callback of that particular macrotask, it also decreases the counter by one.

Visualisation of EventLoop with counter

After processing the closed events queue, EventLoop checks the counter. If it is zero, it means there are no ongoing operations, and the process can exit. However, if the counter is not zero, it means there are still ongoing operations, and the EventLoop will continue its cycles until all the operations are completed, and the counter becomes zero.

OK, enough theory, let’s do some practice!

const fs = require('fs');

setTimeout(() => {
console.log('hello');
}, 50);


fs.readFile(__filename, () => {
console.log('world');
});

Let’s take a look at a simple example with one timeout and one file system read to better understand how the EventLoop works in practice.

  1. When the Node process starts, V8 begins by parsing the JavaScript code and executing the setTimeout function. This triggers a C/C++ function (C_TIMEOUT) to execute inside libuv and increase the counter (refs++).
  2. When V8 comes across the readFile function, it does the same thing. Libuv initiates the file read operation (C_FS), which again increases the counter (refs++).
  3. Now there is nothing left for V8 to execute, and EventLoop takes over. It starts by checking each queue one by one until the counter reaches zero.
  4. Once C_TIMEOUT is finished, an event is registered in the timers queue. When EventLoop checks the timers queue again, it detects the event and executes the corresponding callback, resulting in the “hello” message appearing in the console. The counter is then decremented, and the EventLoop continues to check each queue until the counter is zero.
  5. At some point, depending on the file size, the C_FS operation is completed, and an event is registered in the I/O queue. Once again, EventLoop detects the event and executes the corresponding callback, which outputs the “world” message in the console. The counter is decremented again, and EventLoop resumes its work.
  6. Finally, after checking the close event queue, EventLoop checks the counter. Since it is zero, the Node process is exited.

Visualizing the diagram can help you easily understand how the asynchronous code will work, and you won’t have to wonder about the results.

While we’ve been discussing Macrotasks, let’s discuss another important thing.

I/O Polling

This process often confuses those who attempt to learn about the EventLoop. Many articles mention it as part of the EventLoop, but few explain what it does. Even in the official documentation is hard to understand what does it.

Let’s take a look at this example.

const fs = require('fs')
const now = Date.now();

setTimeout(() => {
console.log('hello');
}, 50);

fs.readFile(__filename, () => {
console.log('world');
});

setImmediate(() => {
console.log('immediate');
});

while(Date.now() - now < 2000) {} // 2 second block

We have three operations: setTimeot, readFile and setImmediate.
In the end, we have a while loop that blocks the thread for two seconds. During this time, all three corresponding events should be registered in their respective queues. This means that when V8 finishes executing the while loop, EventLoop should see all three events in the same cycle and based on the diagram execute the callbacks in the following order:

hello
world
immediate

But the actual result looks like this:

hello
immediate
world

It’s because there is an extra process called I/O Polling.

Unlike other types of events, I/O events are only added to their queue at a specific point in the cycle. This is why the callback for setImmediate() will execute before the callback for readFile() even though both are ready when the while loop is done.

The issue is that the I/O queue-checking stage of the EventLoop only runs callbacks that are already in the event queue. They don’t get put into the event queue automatically when they are done. Instead, they are only added to the event queue later during the I/O polling.

Here is what happens after two seconds when the while loop is finished.

  1. The EventLoop proceeds to execute the timer callbacks and finds that the timer has finished and is ready to be executed, so it runs it.
    In the console, we see “hello”.
  2. After that, the EventLoop moves on to the I/O callbacks stage. At this point, the file reading process is finished, but its callback is not yet marked to be executed. It will be marked later in this cycle. The event EventLoop then continues through several other stages and eventually reaches the I/O poll phase. At this point, the readFile() callback event is collected and added to the I/O queue, but it still doesn’t get executed yet.
    It’s ready for execution, but EventLoop will execute it in the next cycle.
  3. Moving on to the next phase, the EventLoop executes the setImmediate() callback.
    In the console, we see “immediate”.
  4. The EventLoop then starts over again. Since there are no timers to execute, it moves to the I/O callbacks stage, where it finally finds and runs the readFile() callback.
    In the console, we see “world”.

This example can be a bit challenging to understand, but it provides valuable insight into the I/O polling process. If you were to remove the two-second while loop, you would notice a different result.

immediate
world
hello

setImmediate() will work in the first cycle of EventLoop when neither of the setTimeout or File Systems processes is finished. After a certain period, the timeout will finish and the EventLoop will execute the corresponding callback. At a later point, when the file has been read, the EventLoop will execute the readFile’s callback.

Everything depends on the delay of the timeouts and the size of the file. If the file is large, it will take longer for the read process to complete. Similarly, if the timeout delay is long, the file read process may complete before the timeout. However, the setImmediate() callback is fixed and will always be registered in the event queue as soon as V8 executes it.

Let’s discuss some other interesting examples that will help us practice the diagram.

Event Queue DIagram (Macrotasks)

setTimeout & setImmediate

In this example, we have a timeout with a delay of 0 seconds and a setImmediate function. This is a tricky question, but if you answer correctly, it can leave a good impression on your knowledge during the interview.

setTimeout(() => {
console.log('setTimeout');
}, 0);

setImmediate(() => {
console.log('setImmediate');
});

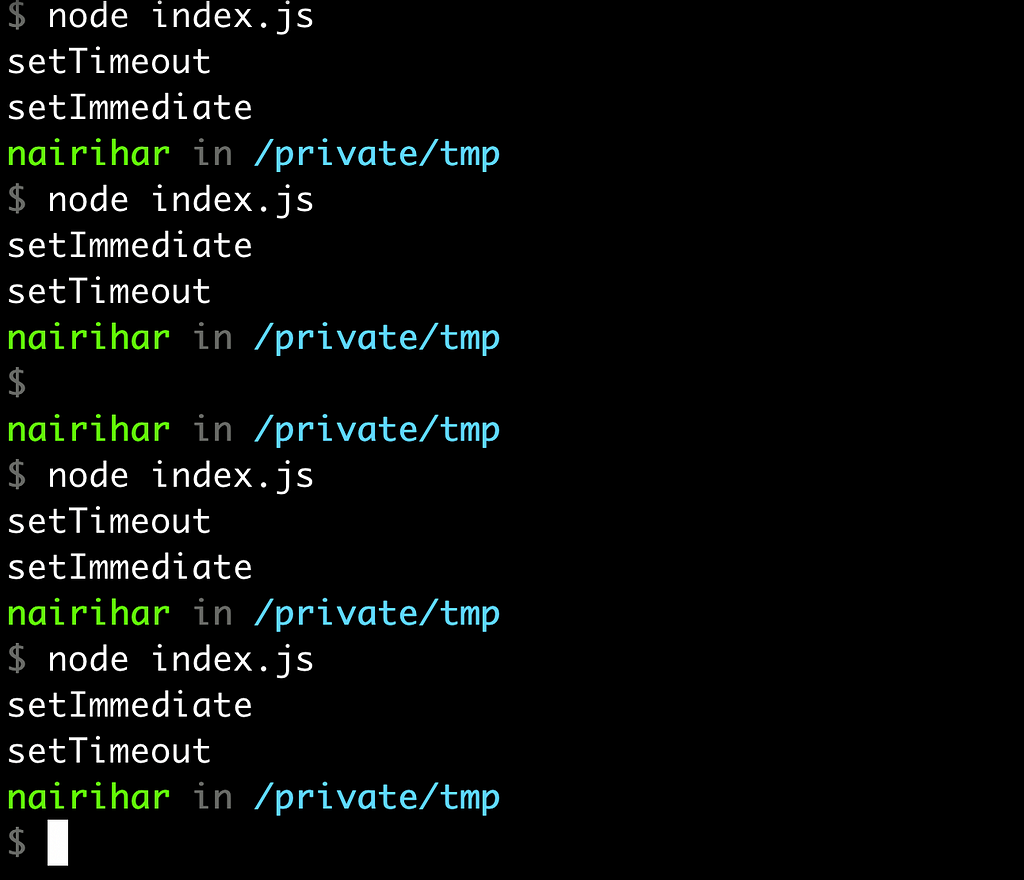
The thing is, you never know which one will be logged first.

The process results in terminal #1

The thing is, you never know which one will be logged first. This is because sometimes a process can take longer(this is about milliseconds) to execute, causing the EventLoop to move past the timers queue when it is empty. Alternatively, the EventLoop may work too quickly, causing the Demultiplexer to not manage to register the event in the Event Queue in time. As a result, if you run this example multiple times, you may get different results each time.

setTimeout & setImmediate inside fs callback

In contrast to the previous example, the result of this code is predictable. Take a moment to examine the code and consider the order in which the logs will appear, using the diagram as a guide.

const fs  = require('fs');

fs.readFile(__filename, () => {
setTimeout(() => {
console.log('setTimeout');
}, 0);

setImmediate(() => {
console.log('setImmediate');
});
});

As the setTimeout and setImmediate are written inside the readFile function, we know that when the callback will be executed, then the EventLoop is in the I/O phase. So, the next one in its direction is the setImmediate queue. And as the setImmediate is an immediately get registered in the queue, it’s not surprising that the logs will always be in this order.

setImmediate
setTimeout

Now that we have gained a good understanding of macrotasks and the workflow of the Event Loop, let’s continue exploring further.

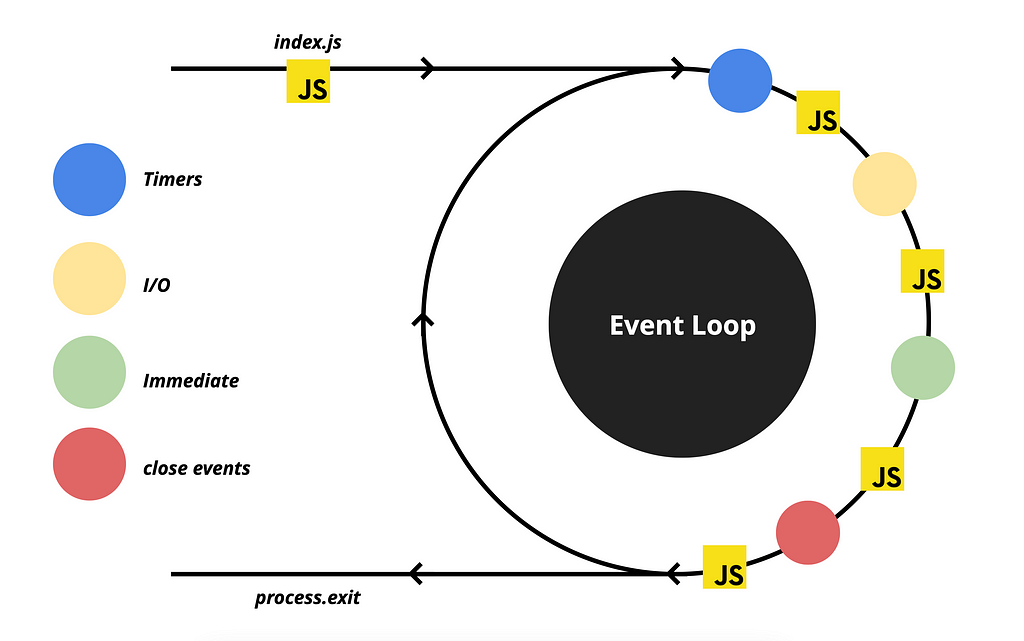
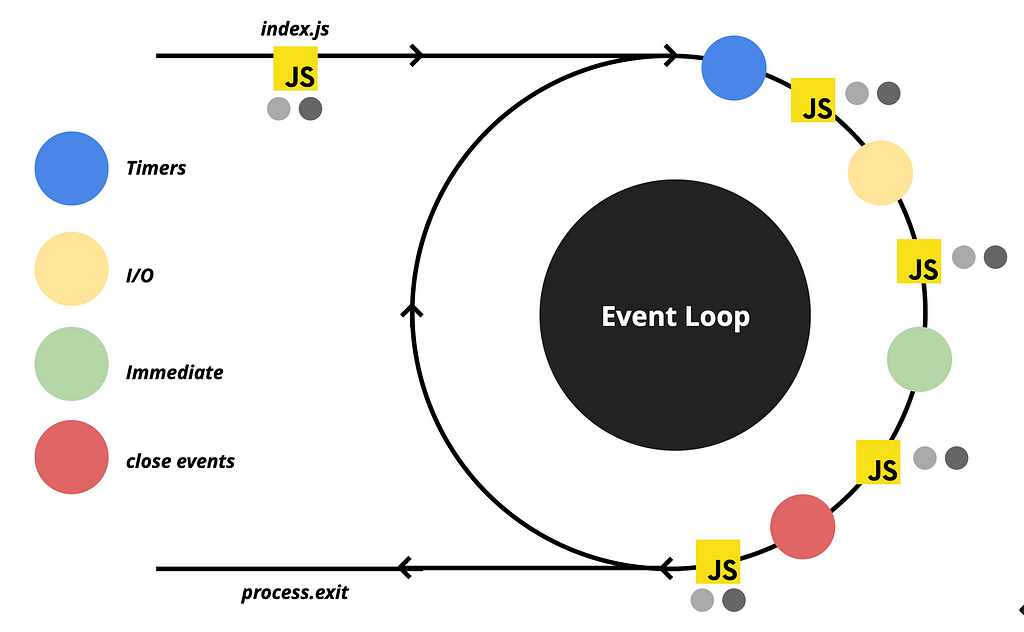
First, let’s improve our diagram slightly by adding markings to indicate the phases that depict JavaScript executions.

Event Queue DIagram (including JS execution phases)

We have a single JavaScript execution when we run the node.js process. After that, when there is nothing left to execute, V8 waits until the Event Loop receives an event and commands the execution of the corresponding callback. As you may have observed, there is a JavaScript execution phase after each queue phase. For instance, in the diagram, the execution of the callback for the timeout occurs during the second JavaScript phase.

So far, our discussion has focused on macrotasks, which didn’t include any information about Promises and process.nextTick. Those two are called Microtasks.

During each JavaScript execution phase, there is additional processing takes place.

Diagram: Microtasks

These two types of microtasks have their dedicated queues. Additionally, there are other microtask schedulers as well, known as MutationObserver, queueMicrotaskbut for our discussion, we will focus on nextTick and Promise.

Once V8 executes all the JavaScript code, it proceeds to check the microtask queues, just like it does with macrotasks. If there is an event registered in the microtask queue, it will be processed, and the corresponding callback will be executed.

Full diagram: Macrotasks and Microtasks

In the diagram, the light gray color represents the process.nextTick() queue, which holds the highest priority among scheduled tasks. The next dark gray color represents the Promise queue, which follows next in terms of priority.

Let’s try some examples.

process.nextTick & Promise

This is a basic example which demonstrates the workflow of Microtasks.

console.log(1);

process.nextTick(() => {
console.log('nextTick');
});

Promise.resolve()
.then(() => {
console.log('Promise');
});

console.log(2);

In terms of output sequencing, the process.nextTick() callbacks will always be executed before the Promise callbacks.

During the execution process, V8 begins with the first console log statement and then proceeds to execute the nextTick function, which registers an event in the queue. A similar process occurs with the Promise, where its callback is stored in a separate queue.
After V8 completes the execution of the last function call, resulting in the output of 2, it moves on to execute the events stored in the queues.

process.nextTick() is a function that allows a callback function to be executed immediately after the current operation completes, but before the Event Loop proceeds to the next phase.

When process.nextTick() is invoked, the provided callback is added to the nextTick queue, which holds the highest priority among scheduled tasks within the Event Loop. As a result, the callback will be executed before any other type of task, including Promises and other microtasks.

The primary use of process.nextTick() is for time-sensitive or high-priority operations that require prompt execution, bypassing the wait for other pending tasks. However, it is essential to exercise caution when using process.nextTick() to prevent blocking the Event Loop and causing performance degradation.

As long as at least one event remains in the Microtasks queue, the EventLoop will continue to prioritize it over the timers queue.

If we recursively run process.nextTick(), the EventLoop will never reach the timers queue, and the corresponding callbacks in the timers queue will never be executed.

function recursiveNextTick() {
process.nextTick(recursiveNextTick);
}

recursiveNextTick();

setTimeout(() => {
console.log('This will never be executed.');
}, 0);

In the above code, recursiveNextTick() function is invoked recursively using process.nextTick(). This causes the EventLoop to continuously process the nextTick queue, never allowing it to reach the timers queue.

As a result, the callback passed to setTimeout will never be executed, and the console statement inside it will never be printed.

Similarly, the same scenario will occur if we recursively use other microtasks. The EventLoop will be continuously occupied with processing the microtask queue, preventing it from reaching the timers queue or executing any other tasks.

Consequently, the callback passed to setTimeout will not be executed, and the console statement within it will never be printed.

function recursiveMicrotask() {
Promise.resolve().then(recursiveMicrotask);
}

recursiveMicrotask();

setTimeout(() => {
console.log('This will never be executed.');
}, 0);

This can lead to the EventLoop being blocked, which can cause scheduled timeouts to run with inaccurate timing or potentially never execute at all.

setTimeout(() => {
console.log('setTimeout');
}, 0);

let count = 0;

function recursiveNextTick() {
count += 1;

if (count === 20000000)
return; // finish recursion

process.nextTick(recursiveNextTick);
}

recursiveNextTick();

As you can observe, the timeout that was scheduled for 0 milliseconds executed after 2 seconds.

So be careful with Microtasks!

As a quick exercise, let’s try to predict the output of the code.

process.nextTick(() => {
console.log('nextTick 1');

process.nextTick(() => {
console.log('nextTick 2');

process.nextTick(() => console.log('nextTick 3'));
process.nextTick(() => console.log('nextTick 4'));
});

process.nextTick(() => {
console.log('nextTick 5');

process.nextTick(() => console.log('nextTick 6'));
process.nextTick(() => console.log('nextTick 7'));
});

});

Here is the explanation:
When this code is executed, it schedules a series of nested process.nextTick callbacks.

  1. The initial process.nextTick callback is executed first, logging ‘nextTick 1’ to the console.
  2. Within this callback, two more process.nextTick callbacks are scheduled: one logging ‘nextTick 2’ and another logging ‘nextTick 5’.
  3. The callback logged as ‘nextTick 2’ is executed next, logging ‘nextTick 2’ to the console.
  4. Inside this callback, two more process.nextTick callbacks are scheduled: one logging ‘nextTick 3’ and another logging ‘nextTick 4’.
  5. The callback logged as ‘nextTick 5’ is executed after ‘nextTick 2’, logging ‘nextTick 5’ to the console.
  6. Inside this callback, two more process.nextTick callbacks are scheduled: one logging ‘nextTick 6’ and another logging ‘nextTick 7’.
  7. Finally, the remaining process.nextTick callbacks are executed in the order they were scheduled, logging ‘nextTick 3’, ‘nextTick 4’, ‘nextTick 6’, and ‘nextTick 7’ to the console.

Here is an overview of how the queue will be structured throughout the execution.

Proess started: [ nT1 ]
nT1 executed: [ nT2, nT5 ]
nT2 executed: [ nT5, nT3, nT4 ]
nT5 executed: [ nT3, nT4, nT6, nT7 ]
// ...

Meanwhile, it’s worth noting that referring back to the diagrams will greatly assist in understanding the underlying logic.

Diagram: Microtasks

Microtasks & Macrotasks in practice

Full diagram: Macrotasks and Microtasks

For the next exercises, you will need to work with the complete diagram to fully grasp the concept.

process.nextTick(() => {
console.log('nextTick');
});

Promise.resolve()
.then(() => {
console.log('Promise');
});

setTimeout(() => {
console.log('setTimeout');
}, 0);

setImmediate(() => {
console.log('setImmediate');
});

This should be an easy one!

Here’s an explanation of how each of these functions behaves:

  1. process.nextTick: This function schedules a callback to be executed, immediately after the current execution process completes. In the code, the callback logs ‘nextTick’ to the console.
  2. Promise: The Promise.resolve creates a resolved promise, and the attached .then method schedules a callback to be executed. In the code, the callback within the .then() logs ‘Promise’ to the console.
  3. setTimeout: This function schedules a callback to be executed as a macrotask after a specified delay. In the code, the callback logs ‘setTimeout’ to the console. Although the delay is set to 0 milliseconds, it still gets queued as a macrotask and will be executed after any pending microtasks (nextTicks, Promises).
  4. setImmediate: Similar to timeout, this function also schedules a callback which will be executed as a macrotask.

The execution order will follow this sequence:

  1. process.nextTick
  2. Promise
  3. setTimeout
  4. setImmediate

It’s important to note that the Event Loop processes microtasks (such as process.nextTick and Promise) before macrotasks (such as setTimeout and setImmediate), and the order within each category is respected.

Okay, now let’s dive into something more challenging.

const fs  = require('fs');

fs.readFile(__filename, () => {
process.nextTick(() => {
console.log('nextTick in fs');
});

setTimeout(() => {
console.log('setTimeout');

process.nextTick(() => {
console.log('nextTick in setTimeout');
});
}, 0);

setImmediate(() => {
console.log('setImmediate');

process.nextTick(() => {
console.log('nextTick in setImmediate');

Promise.resolve()
.then(() => {
console.log('Promise in setImmediate');
});
});
});
});

Looks scary, isn’t it? It will be even worst if it’s an interview…
Well just remember the diagram and everything will be much easier.

When V8 executes the code, initially there is only one operation, which is fs.readFile(). While this operation is being processed, the Event Loop starts its work by checking each queue. It continues checking the queues until the counter (I hope you remember it) reaches 0, at which point the Event Loop will exit the process.

Eventually, the file system read operation will be completed, and the Event Loop will detect it while checking the I/O queue. Inside the callback function there are three new operations: nextTick, setTimeout, and setImmediate.

Now, think about the priorities.

After each Macrotask queue, our Microtasks are executed. This means “nextTick in fs” will be logged. And as the Microtask queues are empty EventLoop goes forward. And in the next phase is the immediate queue. So “setImmediate” will be logged. In addition, it also registers an event in the nextTick queue.

Now, when no immediate events are remaining, JavaScript begins to check the Microtask queues. Consequently, “nextTick in setImmediate” will be logged, and simultaneously, an event will be added to the Promise queue. Since the nextTick queue is now empty, JavaScript proceeds to check the Promise queue, where the newly registered event triggers the logging of “Promise in setImmediate”.

At this stage, all Microtask queues are empty, so the Event Loop proceeds and next, where it founds an event inside the timers queue.
Now, at the end “setTimeout” and “nextTick in setTimeout” will be logged with the same logic as we discussed.

You can further enhance your understanding of Microtasks and Macrotasks by engaging in similar exercises independently. By doing so, you can gain insights into how these tasks operate and develop the ability to anticipate the sequence of results.

Just use this diagram and don’t forget about the I/O polling phase (which is a specific case)!

Full diagram: Macrotasks and Microtasks

Btw if you check the Node.js source code in GitHub, you will notice that Microtasks are at the JavaScript level, and it’s easy to understand and see all those queues and logics… because it’s JavaSciprt, not C++.

Changes from Node v11

setTimeout(() => console.log('Timeout 1'));
setTimeout(() => {
console.log('Timeout 2');
Promise.resolve().then(() => console.log('promise resolve'));
});
setTimeout(() => console.log('Timeout 3'));

When running this example in a web browser, the result would be as follows.

Timeout 1
Timeout 2
promise resolve
Timeout 3

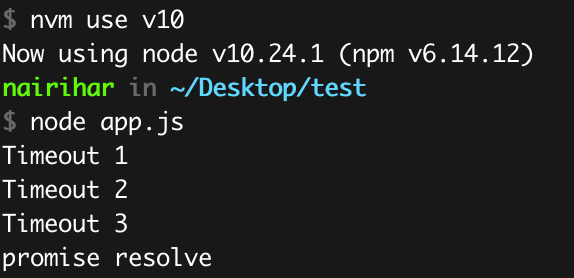
However, in Node versions prior to 11.0.0, you’ll receive the following output:

Example using Node V10

Within the Node.js implementation, process.nextTick, promise and other microtask callbacks are triggered during the transitions between each phase of the EventLoop. Consequently, during the timers phase of the EventLoop, all timer callbacks are handled before the execution of the Promise callback. This particular order of execution is what ultimately produces the output that has been observed and mentioned above.

Extensive discussions have taken place within the Node.js community regarding the need to address this issue and align the behaviour more closely with web standards. The aim is to bring consistency between Node.js and web environments.

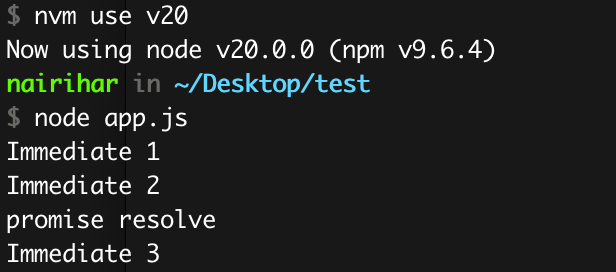
Example using Node V20

In this scenario, instead of using setTimeout, I have incorporated another macrotask(setImmediate) to expand upon the example.

The release of Node.js version 11 brings forth noteworthy changes, enabling nextTick callbacks and microtasks to execute between every individual setTimeout, setImmediate and other macrotasks.
This update harmonizes the behaviour of Node.js with that of web browsers, enhancing the compatibility and reusability of JavaScript code across both environments.

Changes introduced by the Node.js team have the potential to impact the compatibility of existing Node.js applications. Therefore, it is crucial to stay informed and remain vigilant about Node.js updates. Being attentive to these updates is essential as it ensures that you are aware of any modifications that may occur. By staying tuned to Node.js updates, you can proactively address any changes that might affect your applications and ensure their smooth operation in the face of evolving technologies and frameworks.

CommonJS vs ES modules

process.nextTick(()=>{
console.log('nextTick');
});

Promise.resolve().then(()=>{
console.log('promise resolve');
});

console.log('console.log');

This is a rather straightforward example that we have previously discussed.

console.log
nextTick
promise resolve

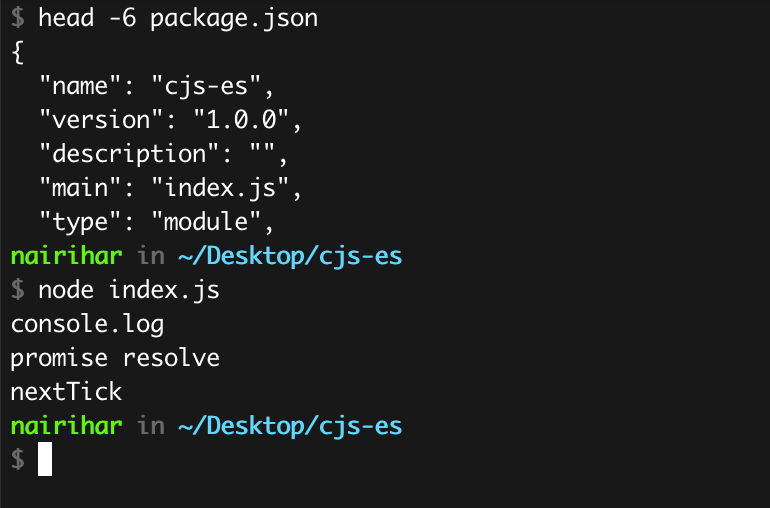
However, when you attempt to utilize it with ES modules, you will observe a notable distinction.

process.nextTick vs Promises (ES modules)

If you understand how ES modules work and what they provide, then it is highly probable that you will comprehend the reason.

ES modules operate asynchronously, and when you compare the usage of require with imports, you will observe a significant disparity in their execution order. The key point to note is that ES modules function asynchronously, meaning that when the program begins, it does not initiate solely as a program in the conventional CommonJS fashion.

This difference in execution order is the reason behind the observed variations in microtask sequencing.

setImmediate(() => {
process.nextTick(()=>{
console.log('nextTick');
});

Promise.resolve().then(()=>{
console.log('promise resolve');
});

console.log('console.log');
});

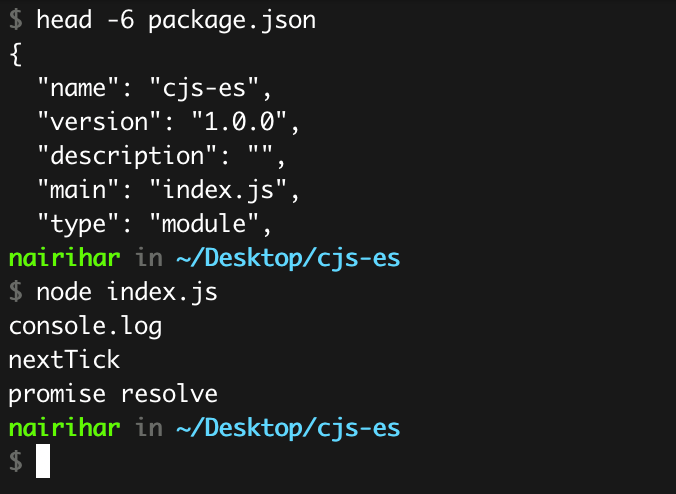
If you execute the same functions within a single macrotask, you will observe that the sequence remains as expected.

process.nextTick vs Promises inside Macrotask (ES modules)

The program’s execution order is contingent upon the position of the pointer, which queue it resides in, and the task phase it is currently in. Consequently, the program’s execution order can be subject to change, which accounts for the observed differences.

In CommonJS we can load ES modules. Note that it returns a promise.
Now, I assume you understand that when it comes to ES modules, the pointer is positioned at the top of the Promise queue. This is the reason why, during program startup, promise queues are given higher priority than nextTick.

libuv

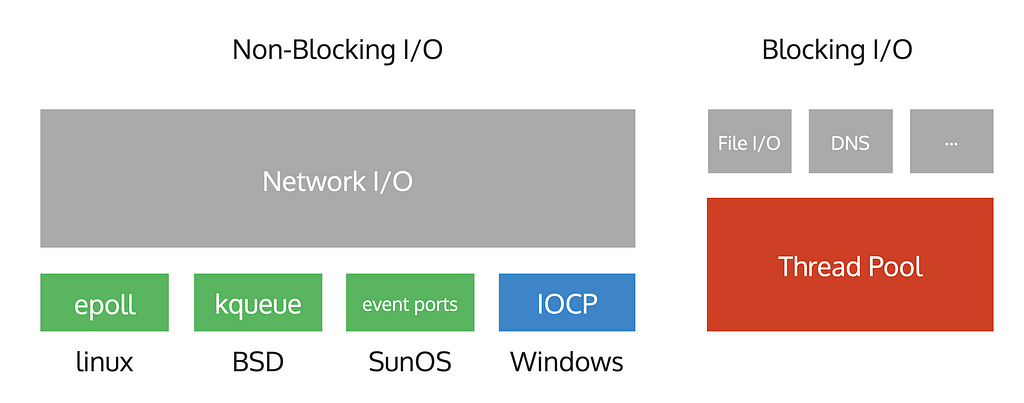
In OS, operations can be blocking or non-blocking. Blocking operations require a separate thread to enable concurrent execution of different operations. However, non-blocking operations allow for simultaneous execution without additional threads.

Visualisation of Blocking and Non-Blocking I/O

File and DNS operations are blocking, meaning they block the thread until completion. On the other hand, network operations are non-blocking, enabling multiple requests to be sent from a single at the same time.

Different operating systems provide notification mechanisms for Non-Blocking I/O. In Linux it’s called epoll, in Windows, it’s called IOCP, and so on. These notification mechanisms allow us to add handlers and wait for operations to complete, they will notify us when a specific operation will be finished.

Libuv uses those mechanisms to allow us to work with the Network I/O asynchronously. But with the Blocking I/O operations, it’s different.

Think about it, Node.js operates on a single thread with an EventLoop, which runs in a semi-infinite loop. However, when it comes to Blocking I/O operations, Libuv cannot handle them within the same thread.

So for that reason, Libuv uses a Thread Pool.

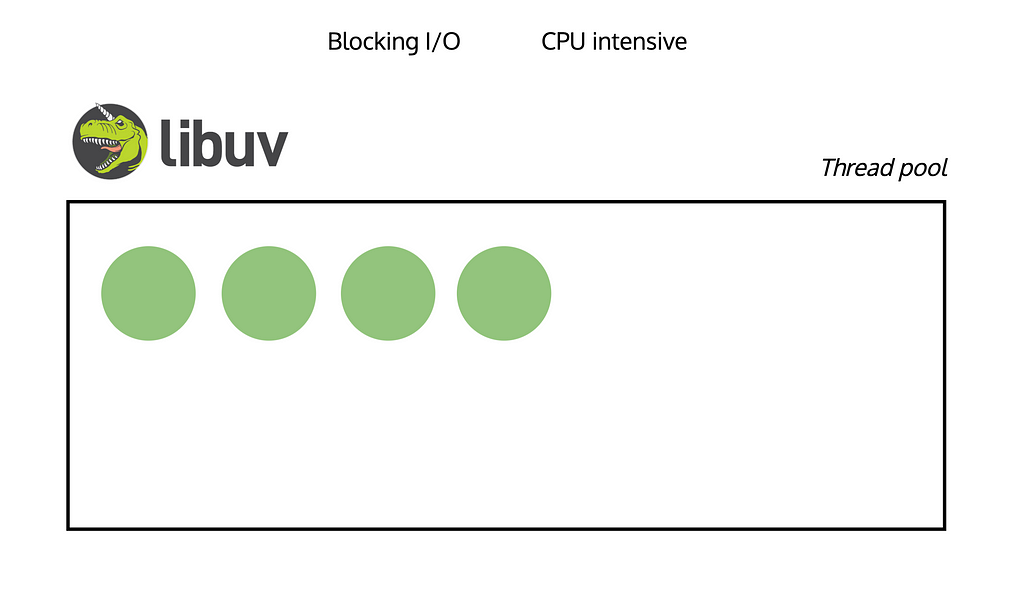
CPU-intensive tasks and Blocking I/O operations pose challenges because we can’t handle them asynchronously. But fortunately, Libuv got a solution for that. Baisicly it utilizes threads to tackle such situations effectively.

Libuv: visualisation #1

With a default thread pool size of 4, Libuv handles file read operations by executing them within one of those threads. Once the operation is completed, the thread is released and Libuv delivers the corresponding response. This enables efficient handling of Blocking I/O operations in an asynchronous manner using the thread pool.

If you attempt to perform 10 file read operations, only 4 of them will initiate the process while the remaining 6 operations will wait until threads become available for execution.

If we want to perform numerous Blocking I/O operations and find that the default thread pool size of 4 is insufficient, we can easily increase the thread pool size.

Libuv: visualisation #2

For that, we need to use this ENV variable.

UV_THREADPOOL_SIZE=64 node script.js

So in this case Libuv will create a Thread Pool with 64 threads.

Please note that having an excessive number of threads in the thread pool can lead to performance issues. This is because maintaining numerous threads requires significant resources. Therefore, it is important to carefully consider the implications before working with this environment variable.

UV_THREADPOOL_SIZE — Demo #1

You may wonder why there are 71 threads instead of 64. The additional threads are utilized by V8 and other components for tasks such as garbage collection and code optimization. These operations require resources, which is why the thread count surpasses the expected 64 threads.

Note that if you don’t use any Blocking I/O operations, the thread pool will not be initialized. You will only observe multiple threads if the pool is initialized, which can be done by executing a single Blocking I/O operation.

require('fs').readFile(__filename, () => {}); // Blocking I/O

setInterval(() => {}, 3000);

In my example, I’ve used this piece of code.
Simply remove the first line and observe that the thread count is noticeably reduced.

UV_THREADPOOL_SIZE — Demo #2

The reason for this is that the interval operation is not a Blocking I/O operation, which means the Thread Pool is not initialized.

DNS is problematic in Node.js

In Node.js, the dns.lookup function is a Blocking I/O operation when resolving hostnames. If you specify a hostname in your request, the DNS lookup process will introduce a blocking operation, as the underlying implementation may rely on synchronous operations.

However, if you work with IP addresses or utilize your DNS lookup mechanism, you have the opportunity to make the process fully asynchronous. So you can eliminate potential blocking and ensure a fully non-blocking execution flow in your Node.js application.

http.get("https://github.com", {
lookup: yourCustomLookupFunction
});

This is a pretty interesting topic, so I would suggest you read this article.

Custom Promises – Bluebird

Why not natives?

You may have noticed that people often utilize custom-written promises, such as Bluebird.js. However, Bluebird.js offers much more than just a set of useful methods. It distinguishes itself by providing advanced features, enhancing promise performance.

Visualisation of Native Promises

This is a straightforward visualization of how native Promises work. Essentially, each Microtask has its corresponding callback.

In Bluebird, you can customize the behaviour of promises, which can result in improved performance depending on various situations.

Visualisation of Bluebird Promises

By default, Bluebird combines all resolved promises and executes them within a single task, known as a Macrotask. In my visual example, it occurs within the setImmediate phase, but by default in Bluebird, it’s setTimeout. This approach allows us to prevent thread blocking when dealing with many promise calls.

Basically, in the queue, we will have one event, and the corresponding callback will include as many callbacks as the number of resolved promises we have.

Something like this.

setImmediate(() => {
promiseResolve1();
promiseResolve2();
promiseResolve3();
promiseResolve4();
});

By the way, we can also configure Bluebird to make promises run in a different phase.

Promise.setScheduler(function(fn) {
process.nextTick(fn);
});

In this case, promises will have the highest priority.

Bluebird uses setTimeout(fn, 0) as a default scheduler. This means that the Promises will be run in the timers phase.

Just try it yourself and you will see how interesting it works.

Summary

Node.js is constantly evolving, with new updates and features being released regularly. Therefore, it’s important to stay updated by following the Node.js changelog. By doing so, you can stay informed about the latest changes and advancements, enabling you to have an up-to-date diagram of the Node.js architecture and its functionalities in your mind.

Node.js

It’s a JS runtime which allows us to build server-side applications which can work with OS.

Libuv was initially developed for Node.js. It is a powerful library that serves as the foundation for the Event Loop and offers additional functionalities. It is designed to facilitate Asynchronous I/O operations across different platforms such as Windows, Linux, and others, providing ample opportunities for efficient and Non-Blocking I/O handling.

Libraries used inside Node.js

Node.js incorporates a wide range of libraries and essential components that are critical for various processes and operations. These components greatly enhance the functionality and capabilities of Node.js.

EventLoop (Macrotasks and Microtasks)

Macrotasks

The Event Loop, the core of Node.js, is implemented in C and C++. It serves as a fundamental mechanism that manages the execution of JavaScript code. It provides multiple queues, known as macrotasks, which correspond to different operations within Node.js. These queues ensure that tasks are executed in the appropriate order and efficiently handle events, I/O operations, and other asynchronous tasks.

Microtasks

In addition to the Event Loop, Node.js also introduces the concept of microtasks, which exist at the JavaScript/Node.js level. Microtasks encompass promises and nextTicks, and they provide a way to execute callbacks asynchronously and with higher priority. Microtasks are processed within the Event Loop after each Macrotask, allowing for finer-grained control and handling of asynchronous operations in Node.js.

Full diagram: Macrotasks and Microtasks

Thank you for taking the time to read this comprehensive article. I hope you found it informative and gained valuable insights from it.
Feel free to ask any questions or tweet me @nairihar

Also follow my “JavaScript Universe” newsletter on Telegram: @javascript

Build Apps with reusable components, just like Lego

Bit’s open-source tool help 250,000+ devs to build apps with components.

Turn any UI, feature, or page into a reusable component — and share it across your applications. It’s easier to collaborate and build faster.

Learn more

Split apps into components to make app development easier, and enjoy the best experience for the workflows you want:

Micro-Frontends

Design System

Code-Sharing and reuse

Monorepo

Learn more:


You Don’t Know Node.js EventLoop was originally published in Bits and Pieces on Medium, where people are continuing the conversation by highlighting and responding to this story.


This content originally appeared on Bits and Pieces - Medium and was authored by nairihar

Generated using Leonardo AI

The Ultimate Guide to Understanding EventLoop in Node.js

You might be wondering if the title of this article is a bit ambitious, but fear not! I’ve put in the time and effort to cover everything you need to know about the EventLoop in Node.js. And believe me, you’ll discover so many new things along the way!

Before beginning this article, I’d like to inform you that it’s important to have a basic understanding of Node.js and its EventLoop to fully comprehend the core concepts discussed.

This comprehensive guide is going to take some time to cover every detail that you need to know, so grab a cup of coffee and settle in for an exciting journey to the fascinating world of Node.js. Let’s get started!

Here is the list of topics covered in this article.

— What is Node.js
 — Reactor Pattern
 — Node.js Architecture
 — Event Queues (I/O Polling, Macrotasks, Microtasks)
 — Changes from Node v11
 — CommonJS vs ES modules
— Libuv (thread pool)
 — DNS is problematic in Node.js
 — Custom Promises — Bluebird
 — Summary

What is Node.js

If you take a look at the official documentation, you’ll find a brief explanation like this.

Node.js is a JavaScript runtime built on Chrome’s V8 JavaScript engine. It uses an event-driven, non-blocking I/O model that makes it lightweight and efficient.

Well, that brief explanation doesn’t tell us much, does it?

There are so many important details and concepts related to the EventLoop in Node.js that require a more in-depth explanation.

Let’s explore them together!

Reactor Pattern

event-driven model

Node.js is written using the Reactor pattern, which provides what is commonly referred to as an event-driven model.

So, how does the Reactor pattern work in event-driven programming?

Let’s say we have an I/O request — in this example, it’s a file system action.

fs.readFile('./file.txt', callback);

When we make a function call that involves an I/O operation, the request is directed to the EventLoop, which then passes it on to the Event Demultiplexer.

I/O stands for Input/Output and refers to the communication with the computer’s central processing unit (CPU) .

After receiving the request from the EventLoop, the Event Demultiplexer decides what type of hardware I/O operation needs to be performed, based on the I/O request. In the case of a file system read, the operation is delegated to the appropriate unit, which reads the file.

A specific C/C++ function will read the requested file and return the content to the Event Demultiplexer.

uv__fs_read(req)

When the requested operation is completed, the Event Demultiplexer generates a new event and adds it to the Event Queue, where it can be queued with other similar events.

Once the JavaScript Call Stack is empty, the event from the Event Queue will be processed and our callback function will be executed.
Visualization of the event-driven model.

Neither the Event Demultiplexer nor the Event Queue is a single component. This is the abstract view. For example, the implementation of Event Demultiplexer and Hardware I/O can vary depending on the operating system. Additionally, the Event Queue is not a single queue but rather consists of multiple queues.

— Where does all of this come from?

libuv

The EventLoop in Node.js is provided by the libuv library, which is written in C language specifically for Node.js. It provides the ability to work with the operating system using asynchronous I/O.

https://libuv.org/
libuv is a multi-platform support library with a focus on asynchronous I/O.

— Where does it fit in the Node.js architecture?

Node.js architecture

Using JavaScript, we interact with the operating system. But if we put it bluntly, JavaScript is a high-level language that is limited to basic operations such as creating variables, loops, and functions. It can’t do much more on its own.

— How does it work with the Operation System?

Many programming languages interact directly with the operating system. Therefore, if we integrate JavaScript with those languages, we can essentially work with the operating system using JavaScript.

Here is how it is already done.
Visualisation of Node.js architecture

The middle layer (Node.js) takes care of our JavaScript code and interacts it with the Operation System. Now let’s discuss the components of Node.js architecture.

V8

This should be a well-known engine that parses and executes our JavaScript code.

libuv

This is the library we previously discussed, which provides the EventLoop and most of the interactions needed to work with the operating system.

Core modules

Node.js provides various native modules, such as fs, http, and crypto. Those are called native modules and include JavaScript source code.

C++ bindings

In Node.js, we have an API that allows us to write C++ code, compile it, and require it in JavaScript as a module. These are called addons. Core modules may have their addons as well.

Node.js provides a compiler that generates addons, which essentially creates a .node file that can be required.

require('./my-cpp-module.node');

The require function in Node.js prioritizes loading .js and .js files, followed by addon files with the .node type.

c-ares, zlib, etc

There are also smaller libraries written in C/C++ that provide specific operations, such as file compression, DNS operations, and more.
https://github.com/nodejs/node/tree/main/deps

We are not limited to this. We will revisit libuv later in this article. For now, let’s continue forward.

Event Queues

The EventLoop is a mechanism that continuously processes and handles events in a single thread until there are no more events to handle. It is often referred to as a “semi-infinite loop” because it runs indefinitely until there are no more events to handle or an error occurs.
Visualisation of EventLoop #1

As previously mentioned, the EventLoop consists of multiple queues, each with its priority level. In the following sections, we will delve into more detail about these priorities.

Once the Call Stack is empty, the EventLoop goes over the Queues and waits for an event to execute. It checks for timer-related events first.
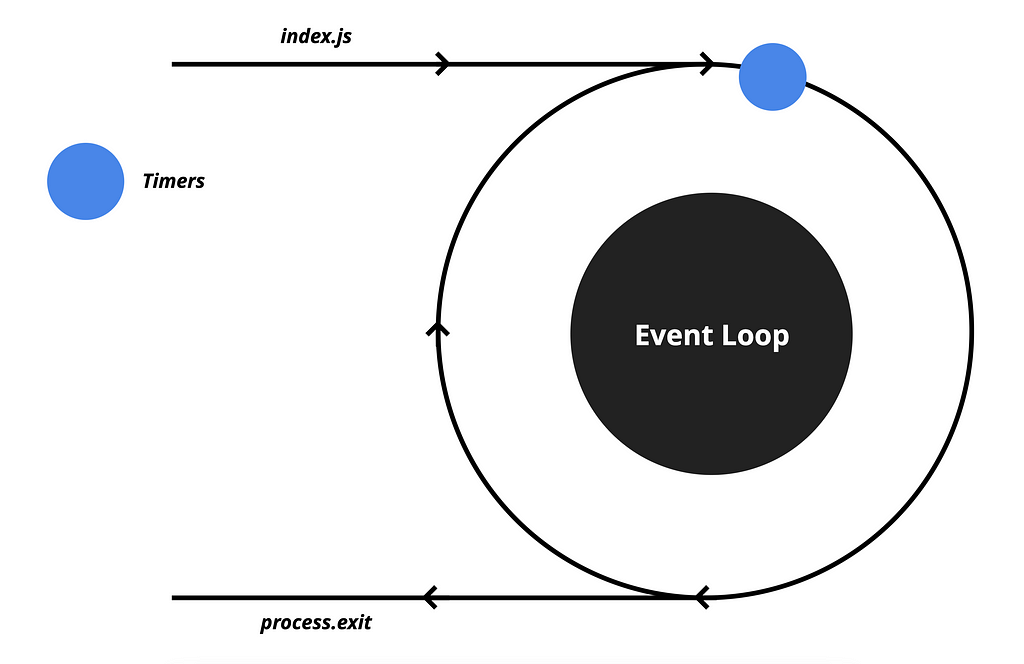
Visualisation of EventLoop #2

If a setTimeout or setInterval function has finished executing, the Event Demultiplexer will enqueue an event to the Timers queue.

Let’s say we have a setTimeout function which is scheduled to execute in one hour. It means that after one hour, the Event Demultiplexer will enqueue an event into this queue.

When the queue has events, the EventLoop will execute the corresponding callbacks until the queue is empty. Once the queue is empty, the EventLoop will move on to check other queues.
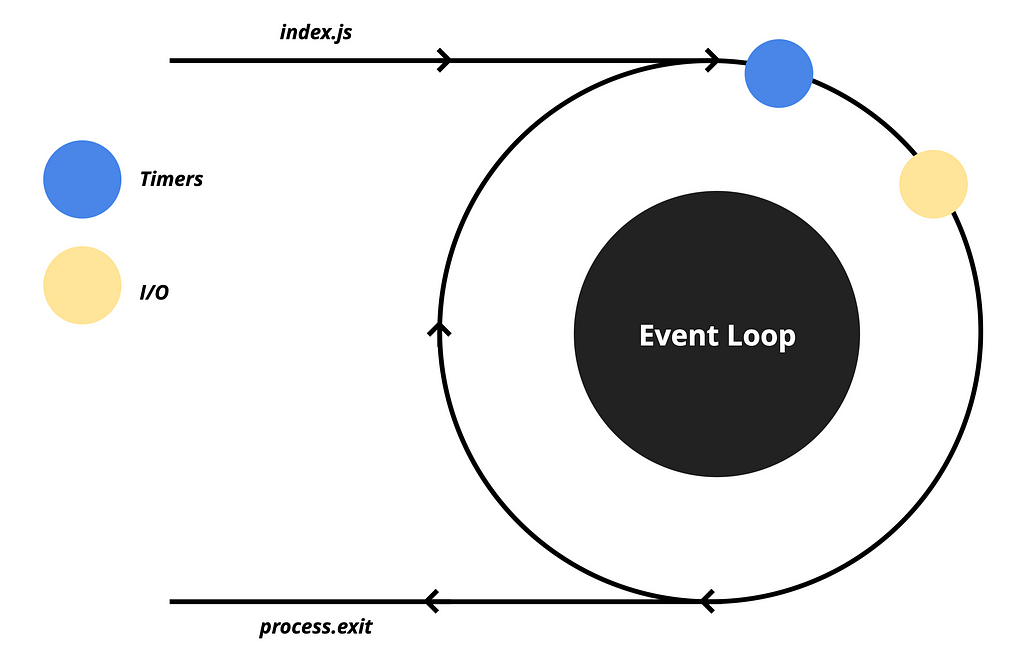
Visualisation of EventLoop #3

In the second position, we have the I/O queue which is responsible for most of the asynchronous operations such as file system operations, networking, and more.

Next, we have the Immediate queue which is responsible for setImmediate calls. It allows us to schedule operations that should run after I/O operations.
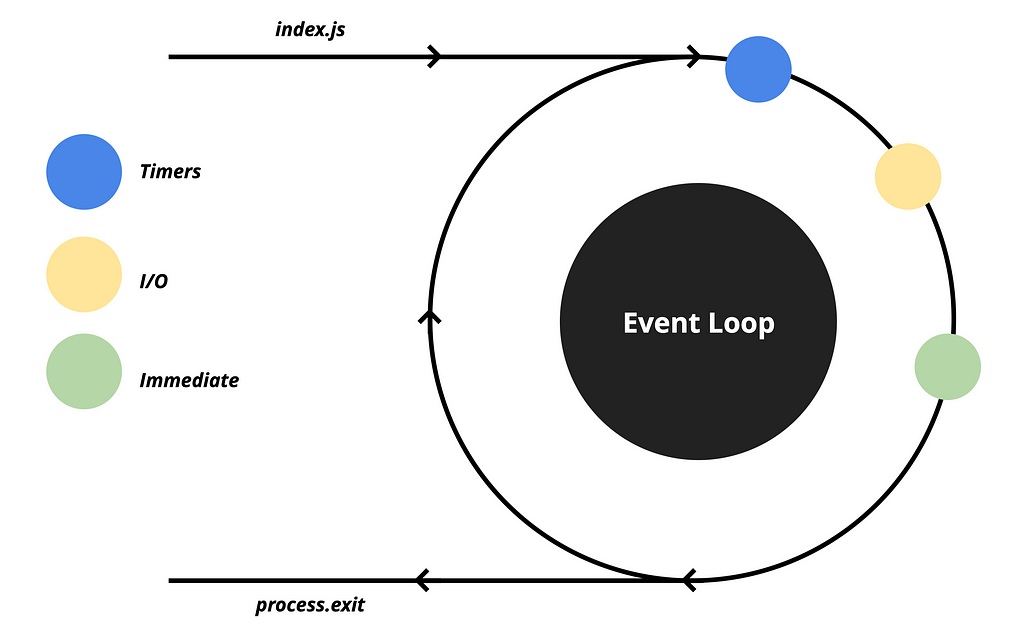
Visualisation of EventLoop #4

And at the end, we have a specific queue called close events for the closed event.
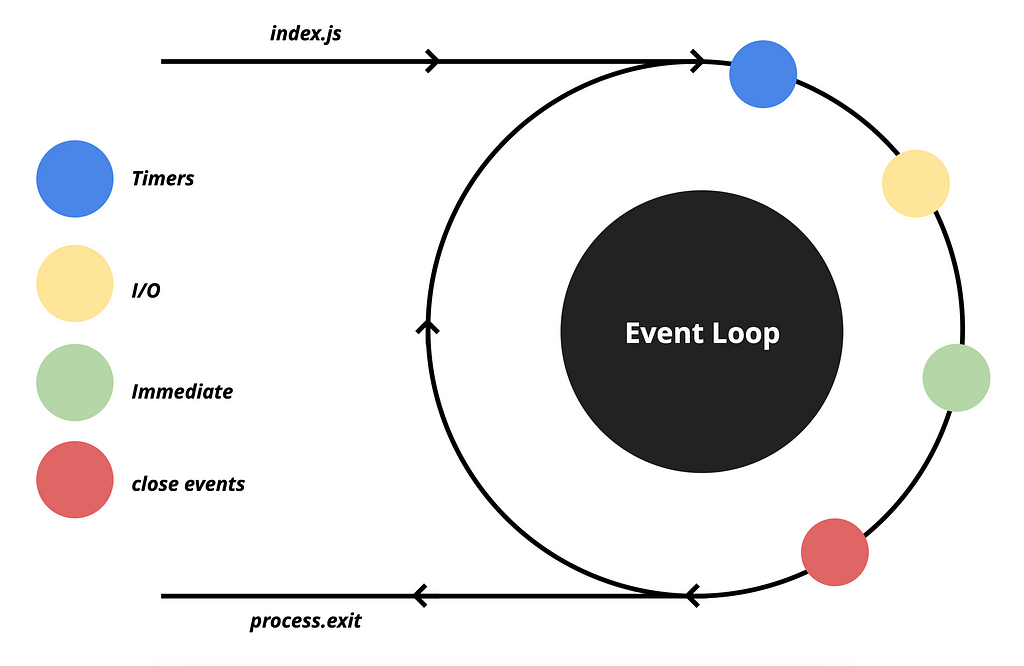
Visualisation of EventLoop #5

It is responsible for handling all connections that have a close event, such as database and TCP connections. These events are queued here for execution.

In each cycle, the EventLoop checks all of these queues to determine if any events need to be executed. The EventLoop typically takes only a few milliseconds to review all the queues and check if any events are to be executed. However, if the EventLoop is busy, it may take longer. Fortunately, there are many libraries available on npm that allow us to measure the duration of the EventLoop cycle.

You may think that we have already covered most of it, but I will say it’s just the beginning.

The events which are queued in these queues are also referred to as Macrotasks.

There are two types of tasks in the EventLoop: Macrotasks and Microtasks. We will discuss microtasks later on.

💡 Pro Tip: All event loops, micro, and macro tasks can be turned into tiny components that you can reuse, and share across multiple projects using an open-source toolchain such as Bit. This can significantly reduce code duplication and improve code quality, making your code modular and more maintainable.

Learn more here:

Extracting and Reusing Pre-existing Components using bit add

Now, let’s take a look at how the EventLoop determines when it’s time to stop the Node.js process because there are no more events to handle.

EventLoop maintains a refs counter, which starts at 0 when the process begins. Whenever there is an asynchronous operation, the counter is incremented by one. For example, if we have a setTimeout or readFile operation, each of these functions will increment the counter by one.
Visualisation of EventLoop #6

When an event is pushed to the queue, and the EventLoop executes the callback of that particular macrotask, it also decreases the counter by one.
Visualisation of EventLoop with counter

After processing the closed events queue, EventLoop checks the counter. If it is zero, it means there are no ongoing operations, and the process can exit. However, if the counter is not zero, it means there are still ongoing operations, and the EventLoop will continue its cycles until all the operations are completed, and the counter becomes zero.

OK, enough theory, let’s do some practice!

const fs = require('fs');

setTimeout(() => {
console.log('hello');
}, 50);


fs.readFile(__filename, () => {
console.log('world');
});

Let’s take a look at a simple example with one timeout and one file system read to better understand how the EventLoop works in practice.

  1. When the Node process starts, V8 begins by parsing the JavaScript code and executing the setTimeout function. This triggers a C/C++ function (C_TIMEOUT) to execute inside libuv and increase the counter (refs++).
  2. When V8 comes across the readFile function, it does the same thing. Libuv initiates the file read operation (C_FS), which again increases the counter (refs++).
  3. Now there is nothing left for V8 to execute, and EventLoop takes over. It starts by checking each queue one by one until the counter reaches zero.
  4. Once C_TIMEOUT is finished, an event is registered in the timers queue. When EventLoop checks the timers queue again, it detects the event and executes the corresponding callback, resulting in the “hello” message appearing in the console. The counter is then decremented, and the EventLoop continues to check each queue until the counter is zero.
  5. At some point, depending on the file size, the C_FS operation is completed, and an event is registered in the I/O queue. Once again, EventLoop detects the event and executes the corresponding callback, which outputs the “world” message in the console. The counter is decremented again, and EventLoop resumes its work.
  6. Finally, after checking the close event queue, EventLoop checks the counter. Since it is zero, the Node process is exited.

Visualizing the diagram can help you easily understand how the asynchronous code will work, and you won’t have to wonder about the results.

While we’ve been discussing Macrotasks, let’s discuss another important thing.

I/O Polling

This process often confuses those who attempt to learn about the EventLoop. Many articles mention it as part of the EventLoop, but few explain what it does. Even in the official documentation is hard to understand what does it.

Let’s take a look at this example.

const fs = require('fs')
const now = Date.now();

setTimeout(() => {
console.log('hello');
}, 50);

fs.readFile(__filename, () => {
console.log('world');
});

setImmediate(() => {
console.log('immediate');
});

while(Date.now() - now < 2000) {} // 2 second block

We have three operations: setTimeot, readFile and setImmediate.
In the end, we have a while loop that blocks the thread for two seconds. During this time, all three corresponding events should be registered in their respective queues. This means that when V8 finishes executing the while loop, EventLoop should see all three events in the same cycle and based on the diagram execute the callbacks in the following order:

hello
world
immediate

But the actual result looks like this:

hello
immediate
world

It’s because there is an extra process called I/O Polling.

Unlike other types of events, I/O events are only added to their queue at a specific point in the cycle. This is why the callback for setImmediate() will execute before the callback for readFile() even though both are ready when the while loop is done.

The issue is that the I/O queue-checking stage of the EventLoop only runs callbacks that are already in the event queue. They don’t get put into the event queue automatically when they are done. Instead, they are only added to the event queue later during the I/O polling.

Here is what happens after two seconds when the while loop is finished.

  1. The EventLoop proceeds to execute the timer callbacks and finds that the timer has finished and is ready to be executed, so it runs it.
    In the console, we see “hello”.
  2. After that, the EventLoop moves on to the I/O callbacks stage. At this point, the file reading process is finished, but its callback is not yet marked to be executed. It will be marked later in this cycle. The event EventLoop then continues through several other stages and eventually reaches the I/O poll phase. At this point, the readFile() callback event is collected and added to the I/O queue, but it still doesn’t get executed yet.
    It’s ready for execution, but EventLoop will execute it in the next cycle.
  3. Moving on to the next phase, the EventLoop executes the setImmediate() callback.
    In the console, we see “immediate”.
  4. The EventLoop then starts over again. Since there are no timers to execute, it moves to the I/O callbacks stage, where it finally finds and runs the readFile() callback.
    In the console, we see “world”.

This example can be a bit challenging to understand, but it provides valuable insight into the I/O polling process. If you were to remove the two-second while loop, you would notice a different result.

immediate
world
hello

setImmediate() will work in the first cycle of EventLoop when neither of the setTimeout or File Systems processes is finished. After a certain period, the timeout will finish and the EventLoop will execute the corresponding callback. At a later point, when the file has been read, the EventLoop will execute the readFile’s callback.

Everything depends on the delay of the timeouts and the size of the file. If the file is large, it will take longer for the read process to complete. Similarly, if the timeout delay is long, the file read process may complete before the timeout. However, the setImmediate() callback is fixed and will always be registered in the event queue as soon as V8 executes it.

Let’s discuss some other interesting examples that will help us practice the diagram.

Event Queue DIagram (Macrotasks)

setTimeout & setImmediate

In this example, we have a timeout with a delay of 0 seconds and a setImmediate function. This is a tricky question, but if you answer correctly, it can leave a good impression on your knowledge during the interview.

setTimeout(() => {
console.log('setTimeout');
}, 0);

setImmediate(() => {
console.log('setImmediate');
});

The thing is, you never know which one will be logged first.
The process results in terminal #1

The thing is, you never know which one will be logged first. This is because sometimes a process can take longer(this is about milliseconds) to execute, causing the EventLoop to move past the timers queue when it is empty. Alternatively, the EventLoop may work too quickly, causing the Demultiplexer to not manage to register the event in the Event Queue in time. As a result, if you run this example multiple times, you may get different results each time.

setTimeout & setImmediate inside fs callback

In contrast to the previous example, the result of this code is predictable. Take a moment to examine the code and consider the order in which the logs will appear, using the diagram as a guide.

const fs  = require('fs');

fs.readFile(__filename, () => {
setTimeout(() => {
console.log('setTimeout');
}, 0);

setImmediate(() => {
console.log('setImmediate');
});
});

As the setTimeout and setImmediate are written inside the readFile function, we know that when the callback will be executed, then the EventLoop is in the I/O phase. So, the next one in its direction is the setImmediate queue. And as the setImmediate is an immediately get registered in the queue, it's not surprising that the logs will always be in this order.

setImmediate
setTimeout

Now that we have gained a good understanding of macrotasks and the workflow of the Event Loop, let’s continue exploring further.

First, let’s improve our diagram slightly by adding markings to indicate the phases that depict JavaScript executions.
Event Queue DIagram (including JS execution phases)

We have a single JavaScript execution when we run the node.js process. After that, when there is nothing left to execute, V8 waits until the Event Loop receives an event and commands the execution of the corresponding callback. As you may have observed, there is a JavaScript execution phase after each queue phase. For instance, in the diagram, the execution of the callback for the timeout occurs during the second JavaScript phase.

So far, our discussion has focused on macrotasks, which didn’t include any information about Promises and process.nextTick. Those two are called Microtasks.

During each JavaScript execution phase, there is additional processing takes place.
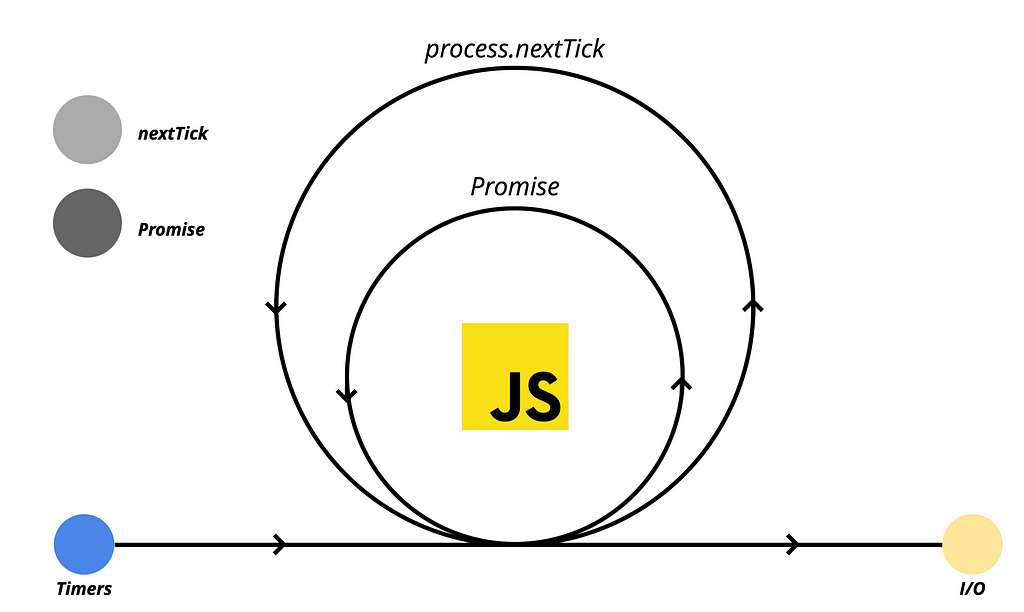
Diagram: Microtasks

These two types of microtasks have their dedicated queues. Additionally, there are other microtask schedulers as well, known as MutationObserver, queueMicrotaskbut for our discussion, we will focus on nextTick and Promise.

Once V8 executes all the JavaScript code, it proceeds to check the microtask queues, just like it does with macrotasks. If there is an event registered in the microtask queue, it will be processed, and the corresponding callback will be executed.
Full diagram: Macrotasks and Microtasks

In the diagram, the light gray color represents the process.nextTick() queue, which holds the highest priority among scheduled tasks. The next dark gray color represents the Promise queue, which follows next in terms of priority.

Let’s try some examples.

process.nextTick & Promise

This is a basic example which demonstrates the workflow of Microtasks.

console.log(1);

process.nextTick(() => {
console.log('nextTick');
});

Promise.resolve()
.then(() => {
console.log('Promise');
});

console.log(2);

In terms of output sequencing, the process.nextTick() callbacks will always be executed before the Promise callbacks.

During the execution process, V8 begins with the first console log statement and then proceeds to execute the nextTick function, which registers an event in the queue. A similar process occurs with the Promise, where its callback is stored in a separate queue.
After V8 completes the execution of the last function call, resulting in the output of 2, it moves on to execute the events stored in the queues.

process.nextTick() is a function that allows a callback function to be executed immediately after the current operation completes, but before the Event Loop proceeds to the next phase.

When process.nextTick() is invoked, the provided callback is added to the nextTick queue, which holds the highest priority among scheduled tasks within the Event Loop. As a result, the callback will be executed before any other type of task, including Promises and other microtasks.

The primary use of process.nextTick() is for time-sensitive or high-priority operations that require prompt execution, bypassing the wait for other pending tasks. However, it is essential to exercise caution when using process.nextTick() to prevent blocking the Event Loop and causing performance degradation.

As long as at least one event remains in the Microtasks queue, the EventLoop will continue to prioritize it over the timers queue.

If we recursively run process.nextTick(), the EventLoop will never reach the timers queue, and the corresponding callbacks in the timers queue will never be executed.

function recursiveNextTick() {
process.nextTick(recursiveNextTick);
}

recursiveNextTick();

setTimeout(() => {
console.log('This will never be executed.');
}, 0);

In the above code, recursiveNextTick() function is invoked recursively using process.nextTick(). This causes the EventLoop to continuously process the nextTick queue, never allowing it to reach the timers queue.

As a result, the callback passed to setTimeout will never be executed, and the console statement inside it will never be printed.

Similarly, the same scenario will occur if we recursively use other microtasks. The EventLoop will be continuously occupied with processing the microtask queue, preventing it from reaching the timers queue or executing any other tasks.

Consequently, the callback passed to setTimeout will not be executed, and the console statement within it will never be printed.

function recursiveMicrotask() {
Promise.resolve().then(recursiveMicrotask);
}

recursiveMicrotask();

setTimeout(() => {
console.log('This will never be executed.');
}, 0);

This can lead to the EventLoop being blocked, which can cause scheduled timeouts to run with inaccurate timing or potentially never execute at all.

setTimeout(() => {
console.log('setTimeout');
}, 0);

let count = 0;

function recursiveNextTick() {
count += 1;

if (count === 20000000)
return; // finish recursion

process.nextTick(recursiveNextTick);
}

recursiveNextTick();

As you can observe, the timeout that was scheduled for 0 milliseconds executed after 2 seconds.

So be careful with Microtasks!

As a quick exercise, let’s try to predict the output of the code.

process.nextTick(() => {
console.log('nextTick 1');

process.nextTick(() => {
console.log('nextTick 2');

process.nextTick(() => console.log('nextTick 3'));
process.nextTick(() => console.log('nextTick 4'));
});

process.nextTick(() => {
console.log('nextTick 5');

process.nextTick(() => console.log('nextTick 6'));
process.nextTick(() => console.log('nextTick 7'));
});

});

Here is the explanation:
When this code is executed, it schedules a series of nested process.nextTick callbacks.

  1. The initial process.nextTick callback is executed first, logging 'nextTick 1' to the console.
  2. Within this callback, two more process.nextTick callbacks are scheduled: one logging 'nextTick 2' and another logging 'nextTick 5'.
  3. The callback logged as ‘nextTick 2’ is executed next, logging ‘nextTick 2’ to the console.
  4. Inside this callback, two more process.nextTick callbacks are scheduled: one logging 'nextTick 3' and another logging 'nextTick 4'.
  5. The callback logged as ‘nextTick 5’ is executed after ‘nextTick 2’, logging ‘nextTick 5’ to the console.
  6. Inside this callback, two more process.nextTick callbacks are scheduled: one logging 'nextTick 6' and another logging 'nextTick 7'.
  7. Finally, the remaining process.nextTick callbacks are executed in the order they were scheduled, logging 'nextTick 3', 'nextTick 4', 'nextTick 6', and 'nextTick 7' to the console.

Here is an overview of how the queue will be structured throughout the execution.

Proess started: [ nT1 ]
nT1 executed: [ nT2, nT5 ]
nT2 executed: [ nT5, nT3, nT4 ]
nT5 executed: [ nT3, nT4, nT6, nT7 ]
// ...

Meanwhile, it’s worth noting that referring back to the diagrams will greatly assist in understanding the underlying logic.

Diagram: Microtasks

Microtasks & Macrotasks in practice

Full diagram: Macrotasks and Microtasks

For the next exercises, you will need to work with the complete diagram to fully grasp the concept.

process.nextTick(() => {
console.log('nextTick');
});

Promise.resolve()
.then(() => {
console.log('Promise');
});

setTimeout(() => {
console.log('setTimeout');
}, 0);

setImmediate(() => {
console.log('setImmediate');
});

This should be an easy one!

Here’s an explanation of how each of these functions behaves:

  1. process.nextTick: This function schedules a callback to be executed, immediately after the current execution process completes. In the code, the callback logs 'nextTick' to the console.
  2. Promise: The Promise.resolve creates a resolved promise, and the attached .then method schedules a callback to be executed. In the code, the callback within the .then() logs 'Promise' to the console.
  3. setTimeout: This function schedules a callback to be executed as a macrotask after a specified delay. In the code, the callback logs 'setTimeout' to the console. Although the delay is set to 0 milliseconds, it still gets queued as a macrotask and will be executed after any pending microtasks (nextTicks, Promises).
  4. setImmediate: Similar to timeout, this function also schedules a callback which will be executed as a macrotask.

The execution order will follow this sequence:

  1. process.nextTick
  2. Promise
  3. setTimeout
  4. setImmediate

It’s important to note that the Event Loop processes microtasks (such as process.nextTick and Promise) before macrotasks (such as setTimeout and setImmediate), and the order within each category is respected.

Okay, now let’s dive into something more challenging.

const fs  = require('fs');

fs.readFile(__filename, () => {
process.nextTick(() => {
console.log('nextTick in fs');
});

setTimeout(() => {
console.log('setTimeout');

process.nextTick(() => {
console.log('nextTick in setTimeout');
});
}, 0);

setImmediate(() => {
console.log('setImmediate');

process.nextTick(() => {
console.log('nextTick in setImmediate');

Promise.resolve()
.then(() => {
console.log('Promise in setImmediate');
});
});
});
});

Looks scary, isn’t it? It will be even worst if it’s an interview…
Well just remember the diagram and everything will be much easier.

When V8 executes the code, initially there is only one operation, which is fs.readFile(). While this operation is being processed, the Event Loop starts its work by checking each queue. It continues checking the queues until the counter (I hope you remember it) reaches 0, at which point the Event Loop will exit the process.

Eventually, the file system read operation will be completed, and the Event Loop will detect it while checking the I/O queue. Inside the callback function there are three new operations: nextTick, setTimeout, and setImmediate.

Now, think about the priorities.

After each Macrotask queue, our Microtasks are executed. This means “nextTick in fs” will be logged. And as the Microtask queues are empty EventLoop goes forward. And in the next phase is the immediate queue. So “setImmediate” will be logged. In addition, it also registers an event in the nextTick queue.

Now, when no immediate events are remaining, JavaScript begins to check the Microtask queues. Consequently, “nextTick in setImmediate” will be logged, and simultaneously, an event will be added to the Promise queue. Since the nextTick queue is now empty, JavaScript proceeds to check the Promise queue, where the newly registered event triggers the logging of “Promise in setImmediate”.

At this stage, all Microtask queues are empty, so the Event Loop proceeds and next, where it founds an event inside the timers queue.
Now, at the end “setTimeout” and “nextTick in setTimeout” will be logged with the same logic as we discussed.

You can further enhance your understanding of Microtasks and Macrotasks by engaging in similar exercises independently. By doing so, you can gain insights into how these tasks operate and develop the ability to anticipate the sequence of results.

Just use this diagram and don’t forget about the I/O polling phase (which is a specific case)!

Full diagram: Macrotasks and Microtasks

Btw if you check the Node.js source code in GitHub, you will notice that Microtasks are at the JavaScript level, and it’s easy to understand and see all those queues and logics… because it’s JavaSciprt, not C++.

Changes from Node v11

setTimeout(() => console.log('Timeout 1'));
setTimeout(() => {
console.log('Timeout 2');
Promise.resolve().then(() => console.log('promise resolve'));
});
setTimeout(() => console.log('Timeout 3'));

When running this example in a web browser, the result would be as follows.

Timeout 1
Timeout 2
promise resolve
Timeout 3

However, in Node versions prior to 11.0.0, you’ll receive the following output:
Example using Node V10

Within the Node.js implementation, process.nextTick, promise and other microtask callbacks are triggered during the transitions between each phase of the EventLoop. Consequently, during the timers phase of the EventLoop, all timer callbacks are handled before the execution of the Promise callback. This particular order of execution is what ultimately produces the output that has been observed and mentioned above.

Extensive discussions have taken place within the Node.js community regarding the need to address this issue and align the behaviour more closely with web standards. The aim is to bring consistency between Node.js and web environments.
Example using Node V20

In this scenario, instead of using setTimeout, I have incorporated another macrotask(setImmediate) to expand upon the example.

The release of Node.js version 11 brings forth noteworthy changes, enabling nextTick callbacks and microtasks to execute between every individual setTimeout, setImmediate and other macrotasks.
This update harmonizes the behaviour of Node.js with that of web browsers, enhancing the compatibility and reusability of JavaScript code across both environments.

Changes introduced by the Node.js team have the potential to impact the compatibility of existing Node.js applications. Therefore, it is crucial to stay informed and remain vigilant about Node.js updates. Being attentive to these updates is essential as it ensures that you are aware of any modifications that may occur. By staying tuned to Node.js updates, you can proactively address any changes that might affect your applications and ensure their smooth operation in the face of evolving technologies and frameworks.

CommonJS vs ES modules

process.nextTick(()=>{
console.log('nextTick');
});

Promise.resolve().then(()=>{
console.log('promise resolve');
});

console.log('console.log');

This is a rather straightforward example that we have previously discussed.

console.log
nextTick
promise resolve

However, when you attempt to utilize it with ES modules, you will observe a notable distinction.
process.nextTick vs Promises (ES modules)

If you understand how ES modules work and what they provide, then it is highly probable that you will comprehend the reason.

ES modules operate asynchronously, and when you compare the usage of require with imports, you will observe a significant disparity in their execution order. The key point to note is that ES modules function asynchronously, meaning that when the program begins, it does not initiate solely as a program in the conventional CommonJS fashion.

This difference in execution order is the reason behind the observed variations in microtask sequencing.

setImmediate(() => {
process.nextTick(()=>{
console.log('nextTick');
});

Promise.resolve().then(()=>{
console.log('promise resolve');
});

console.log('console.log');
});

If you execute the same functions within a single macrotask, you will observe that the sequence remains as expected.
process.nextTick vs Promises inside Macrotask (ES modules)

The program’s execution order is contingent upon the position of the pointer, which queue it resides in, and the task phase it is currently in. Consequently, the program’s execution order can be subject to change, which accounts for the observed differences.

In CommonJS we can load ES modules. Note that it returns a promise.
Now, I assume you understand that when it comes to ES modules, the pointer is positioned at the top of the Promise queue. This is the reason why, during program startup, promise queues are given higher priority than nextTick.

libuv

In OS, operations can be blocking or non-blocking. Blocking operations require a separate thread to enable concurrent execution of different operations. However, non-blocking operations allow for simultaneous execution without additional threads.
Visualisation of Blocking and Non-Blocking I/O

File and DNS operations are blocking, meaning they block the thread until completion. On the other hand, network operations are non-blocking, enabling multiple requests to be sent from a single at the same time.

Different operating systems provide notification mechanisms for Non-Blocking I/O. In Linux it’s called epoll, in Windows, it’s called IOCP, and so on. These notification mechanisms allow us to add handlers and wait for operations to complete, they will notify us when a specific operation will be finished.

Libuv uses those mechanisms to allow us to work with the Network I/O asynchronously. But with the Blocking I/O operations, it’s different.

Think about it, Node.js operates on a single thread with an EventLoop, which runs in a semi-infinite loop. However, when it comes to Blocking I/O operations, Libuv cannot handle them within the same thread.

So for that reason, Libuv uses a Thread Pool.

CPU-intensive tasks and Blocking I/O operations pose challenges because we can’t handle them asynchronously. But fortunately, Libuv got a solution for that. Baisicly it utilizes threads to tackle such situations effectively.
Libuv: visualisation #1

With a default thread pool size of 4, Libuv handles file read operations by executing them within one of those threads. Once the operation is completed, the thread is released and Libuv delivers the corresponding response. This enables efficient handling of Blocking I/O operations in an asynchronous manner using the thread pool.

If you attempt to perform 10 file read operations, only 4 of them will initiate the process while the remaining 6 operations will wait until threads become available for execution.

If we want to perform numerous Blocking I/O operations and find that the default thread pool size of 4 is insufficient, we can easily increase the thread pool size.
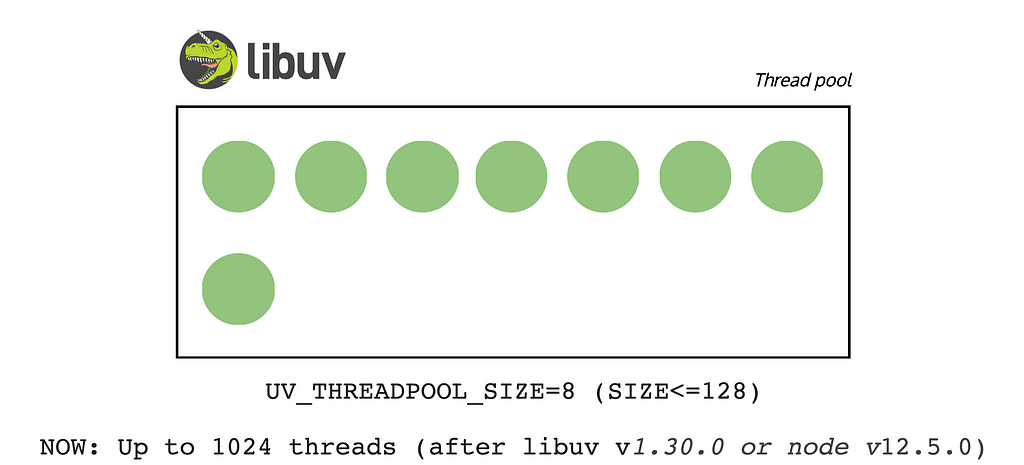
Libuv: visualisation #2

For that, we need to use this ENV variable.

UV_THREADPOOL_SIZE=64 node script.js

So in this case Libuv will create a Thread Pool with 64 threads.

Please note that having an excessive number of threads in the thread pool can lead to performance issues. This is because maintaining numerous threads requires significant resources. Therefore, it is important to carefully consider the implications before working with this environment variable.
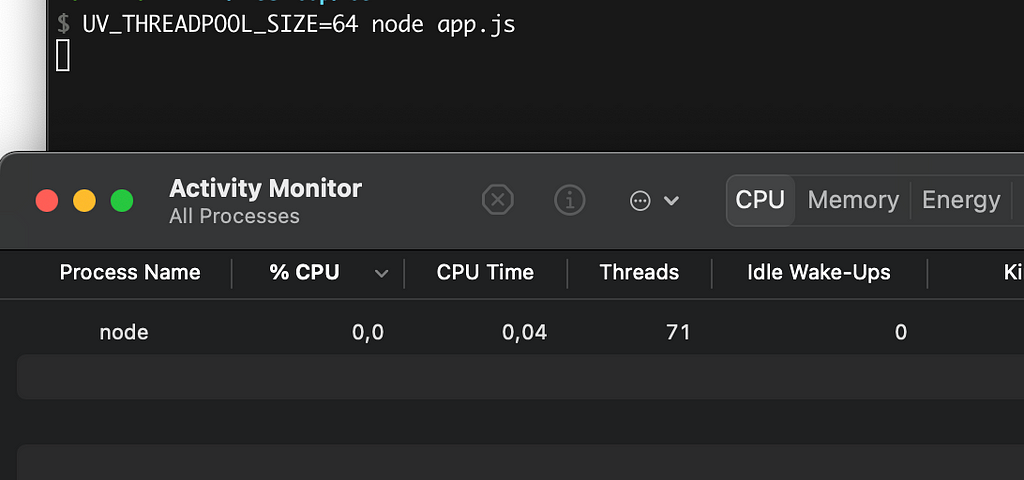
UV_THREADPOOL_SIZE — Demo #1

You may wonder why there are 71 threads instead of 64. The additional threads are utilized by V8 and other components for tasks such as garbage collection and code optimization. These operations require resources, which is why the thread count surpasses the expected 64 threads.

Note that if you don’t use any Blocking I/O operations, the thread pool will not be initialized. You will only observe multiple threads if the pool is initialized, which can be done by executing a single Blocking I/O operation.

require('fs').readFile(__filename, () => {}); // Blocking I/O

setInterval(() => {}, 3000);

In my example, I’ve used this piece of code.
Simply remove the first line and observe that the thread count is noticeably reduced.
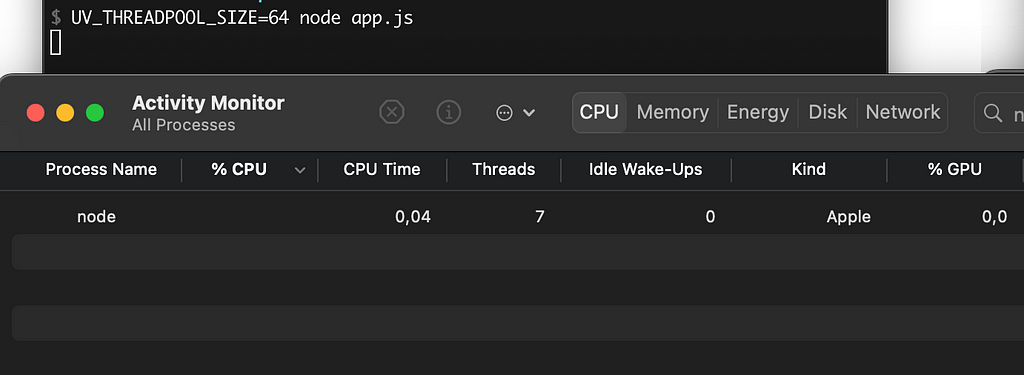
UV_THREADPOOL_SIZE — Demo #2

The reason for this is that the interval operation is not a Blocking I/O operation, which means the Thread Pool is not initialized.

DNS is problematic in Node.js

In Node.js, the dns.lookup function is a Blocking I/O operation when resolving hostnames. If you specify a hostname in your request, the DNS lookup process will introduce a blocking operation, as the underlying implementation may rely on synchronous operations.

However, if you work with IP addresses or utilize your DNS lookup mechanism, you have the opportunity to make the process fully asynchronous. So you can eliminate potential blocking and ensure a fully non-blocking execution flow in your Node.js application.

http.get("https://github.com", {
lookup: yourCustomLookupFunction
});

This is a pretty interesting topic, so I would suggest you read this article.

Custom Promises - Bluebird

Why not natives?

You may have noticed that people often utilize custom-written promises, such as Bluebird.js. However, Bluebird.js offers much more than just a set of useful methods. It distinguishes itself by providing advanced features, enhancing promise performance.
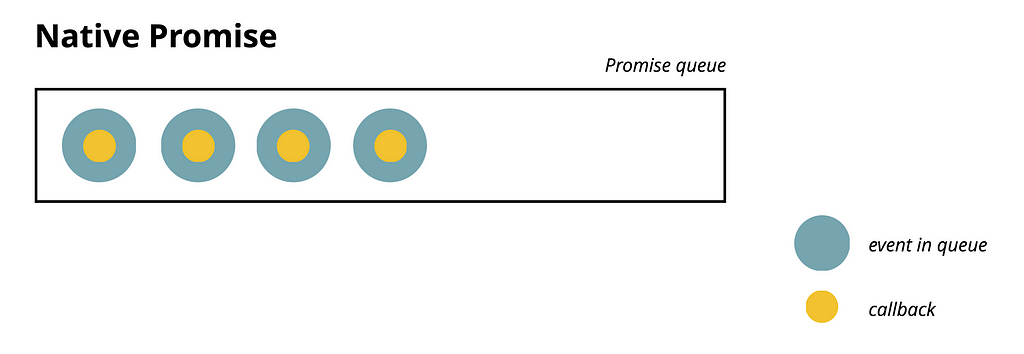
Visualisation of Native Promises

This is a straightforward visualization of how native Promises work. Essentially, each Microtask has its corresponding callback.

In Bluebird, you can customize the behaviour of promises, which can result in improved performance depending on various situations.

Visualisation of Bluebird Promises

By default, Bluebird combines all resolved promises and executes them within a single task, known as a Macrotask. In my visual example, it occurs within the setImmediate phase, but by default in Bluebird, it’s setTimeout. This approach allows us to prevent thread blocking when dealing with many promise calls.

Basically, in the queue, we will have one event, and the corresponding callback will include as many callbacks as the number of resolved promises we have.

Something like this.

setImmediate(() => {
promiseResolve1();
promiseResolve2();
promiseResolve3();
promiseResolve4();
});

By the way, we can also configure Bluebird to make promises run in a different phase.

Promise.setScheduler(function(fn) {
process.nextTick(fn);
});

In this case, promises will have the highest priority.

Bluebird uses setTimeout(fn, 0) as a default scheduler. This means that the Promises will be run in the timers phase.

Just try it yourself and you will see how interesting it works.

Summary

Node.js is constantly evolving, with new updates and features being released regularly. Therefore, it’s important to stay updated by following the Node.js changelog. By doing so, you can stay informed about the latest changes and advancements, enabling you to have an up-to-date diagram of the Node.js architecture and its functionalities in your mind.

Node.js

It’s a JS runtime which allows us to build server-side applications which can work with OS.

Libuv was initially developed for Node.js. It is a powerful library that serves as the foundation for the Event Loop and offers additional functionalities. It is designed to facilitate Asynchronous I/O operations across different platforms such as Windows, Linux, and others, providing ample opportunities for efficient and Non-Blocking I/O handling.
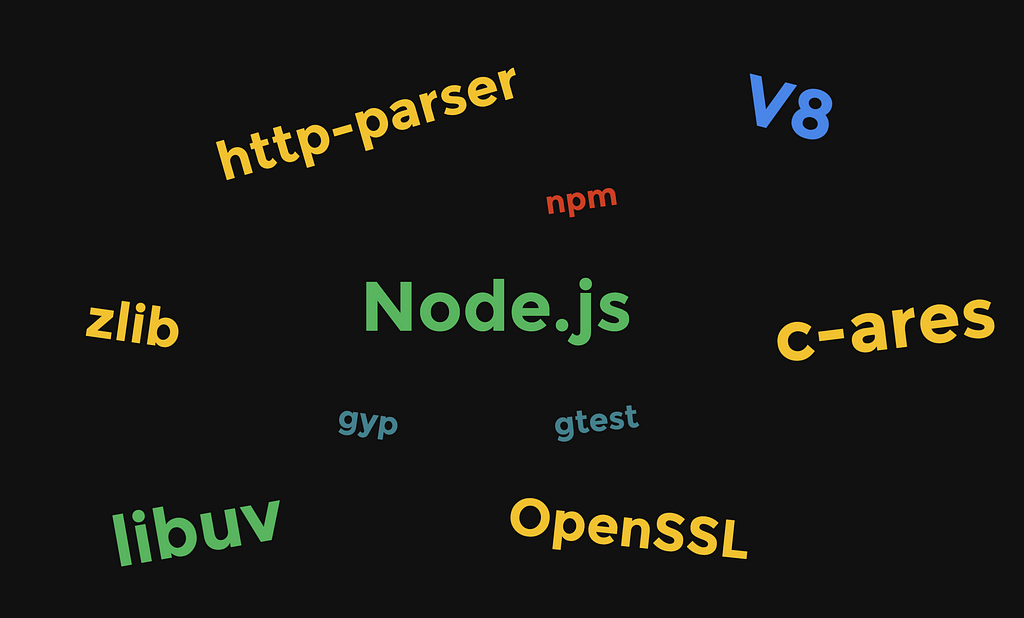
Libraries used inside Node.js

Node.js incorporates a wide range of libraries and essential components that are critical for various processes and operations. These components greatly enhance the functionality and capabilities of Node.js.

EventLoop (Macrotasks and Microtasks)
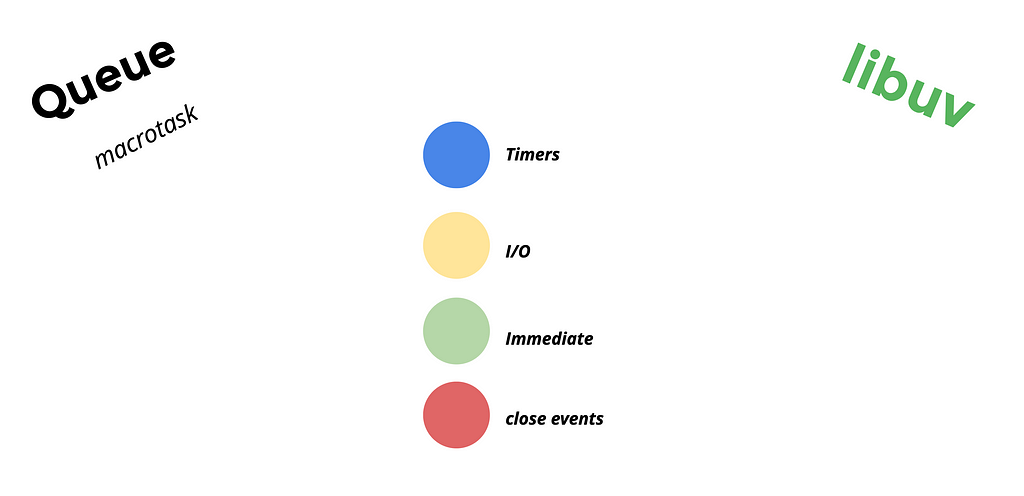
Macrotasks

The Event Loop, the core of Node.js, is implemented in C and C++. It serves as a fundamental mechanism that manages the execution of JavaScript code. It provides multiple queues, known as macrotasks, which correspond to different operations within Node.js. These queues ensure that tasks are executed in the appropriate order and efficiently handle events, I/O operations, and other asynchronous tasks.
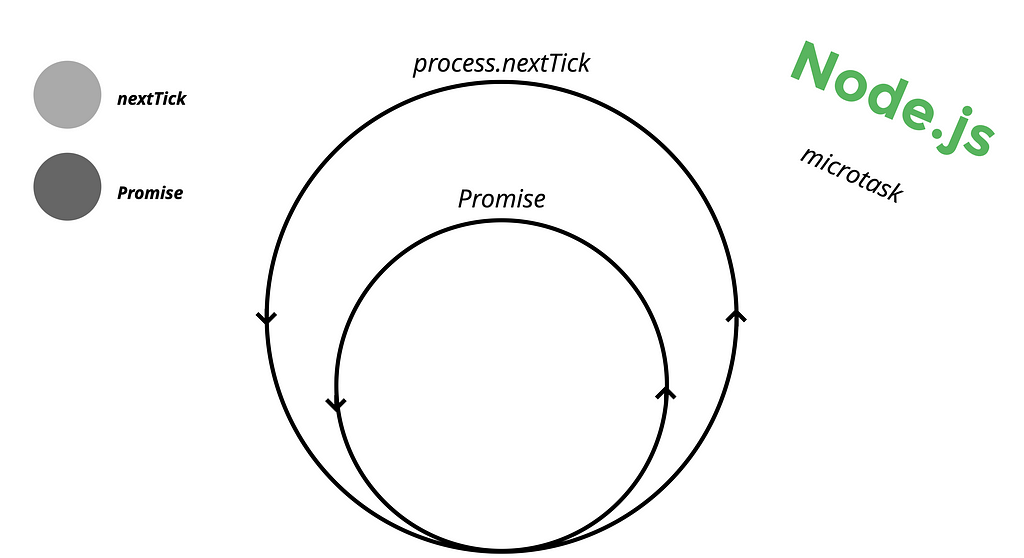
Microtasks

In addition to the Event Loop, Node.js also introduces the concept of microtasks, which exist at the JavaScript/Node.js level. Microtasks encompass promises and nextTicks, and they provide a way to execute callbacks asynchronously and with higher priority. Microtasks are processed within the Event Loop after each Macrotask, allowing for finer-grained control and handling of asynchronous operations in Node.js.

Full diagram: Macrotasks and Microtasks

Thank you for taking the time to read this comprehensive article. I hope you found it informative and gained valuable insights from it.
Feel free to ask any questions or tweet me @nairihar

Also follow my “JavaScript Universe” newsletter on Telegram: @javascript

Build Apps with reusable components, just like Lego
Bit’s open-source tool help 250,000+ devs to build apps with components.

Turn any UI, feature, or page into a reusable component — and share it across your applications. It’s easier to collaborate and build faster.

Learn more

Split apps into components to make app development easier, and enjoy the best experience for the workflows you want:

Micro-Frontends

Design System

Code-Sharing and reuse

Monorepo

Learn more:


You Don’t Know Node.js EventLoop was originally published in Bits and Pieces on Medium, where people are continuing the conversation by highlighting and responding to this story.


This content originally appeared on Bits and Pieces - Medium and was authored by nairihar


Print Share Comment Cite Upload Translate Updates
APA

nairihar | Sciencx (2023-05-30T16:56:01+00:00) You Don’t Know Node.js EventLoop. Retrieved from https://www.scien.cx/2023/05/30/you-dont-know-node-js-eventloop/

MLA
" » You Don’t Know Node.js EventLoop." nairihar | Sciencx - Tuesday May 30, 2023, https://www.scien.cx/2023/05/30/you-dont-know-node-js-eventloop/
HARVARD
nairihar | Sciencx Tuesday May 30, 2023 » You Don’t Know Node.js EventLoop., viewed ,<https://www.scien.cx/2023/05/30/you-dont-know-node-js-eventloop/>
VANCOUVER
nairihar | Sciencx - » You Don’t Know Node.js EventLoop. [Internet]. [Accessed ]. Available from: https://www.scien.cx/2023/05/30/you-dont-know-node-js-eventloop/
CHICAGO
" » You Don’t Know Node.js EventLoop." nairihar | Sciencx - Accessed . https://www.scien.cx/2023/05/30/you-dont-know-node-js-eventloop/
IEEE
" » You Don’t Know Node.js EventLoop." nairihar | Sciencx [Online]. Available: https://www.scien.cx/2023/05/30/you-dont-know-node-js-eventloop/. [Accessed: ]
rf:citation
» You Don’t Know Node.js EventLoop | nairihar | Sciencx | https://www.scien.cx/2023/05/30/you-dont-know-node-js-eventloop/ |

Please log in to upload a file.


There are no updates yet.
Click the Upload button above to add an update.

You must be logged in to translate posts. Please log in or register.