This content originally appeared on Telerik Blogs and was authored by Claudio Bernasconi
Get started with Blazor in Visual Studio 2022: Set up the development environment, create your first Blazor Server project, navigate the project structure, and learn about the development lifecycle.
In the first article of the Blazor Basics series, we learned what Blazor is, what it isn’t, and how it works under the hood.
Now we are ready to set up our development environment, create our first Blazor Server project, navigate the project structure and learn about the development lifecycle.
Setting up Visual Studio for Blazor Development
You can use your preferred IDE for Blazor development. However, I suggest using Visual Studio for the best Blazor development tooling support.
The Visual Studio Community Edition is free for personal use, and you can use it for commercial development for companies below 1 million dollars in revenue.
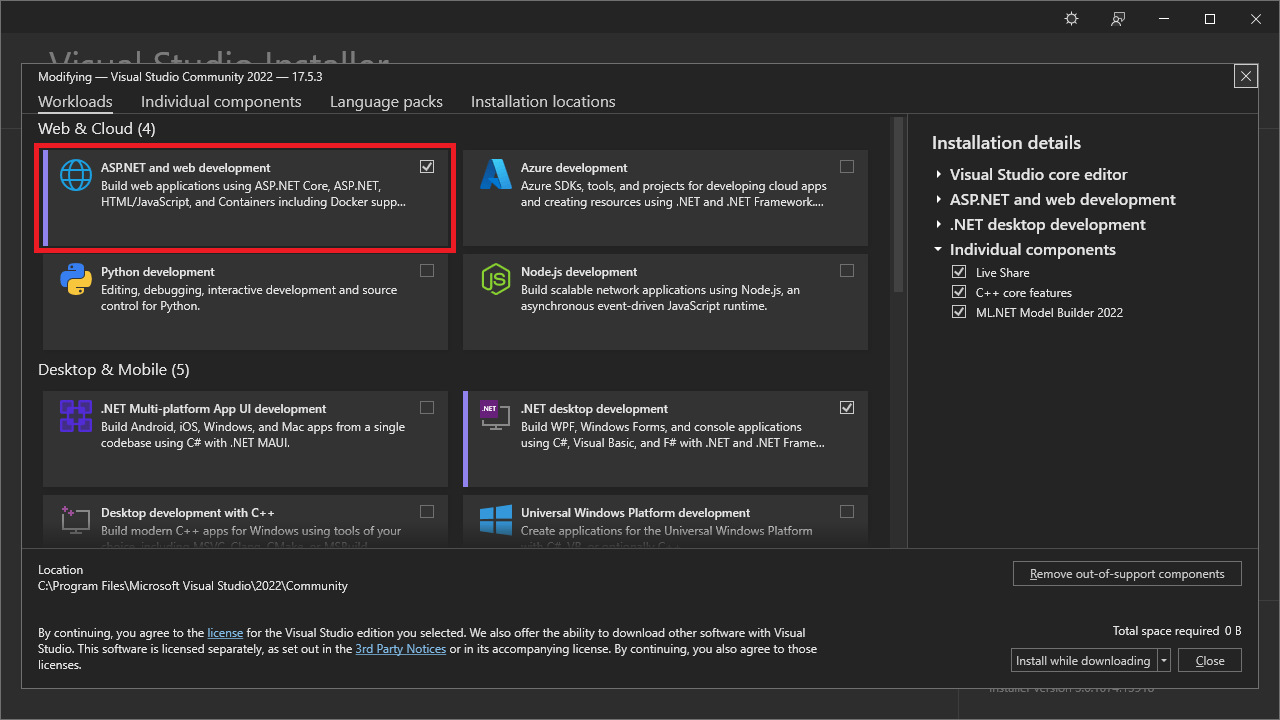
For a new or existing Visual Studio installation, ensure you have the ASP.NET and web development workload installed. Everything you need to get started with Blazor development is included in this workload.
Create the First Blazor Server Project
In Visual Studio, we create a new project and select the Blazor Server App project template.
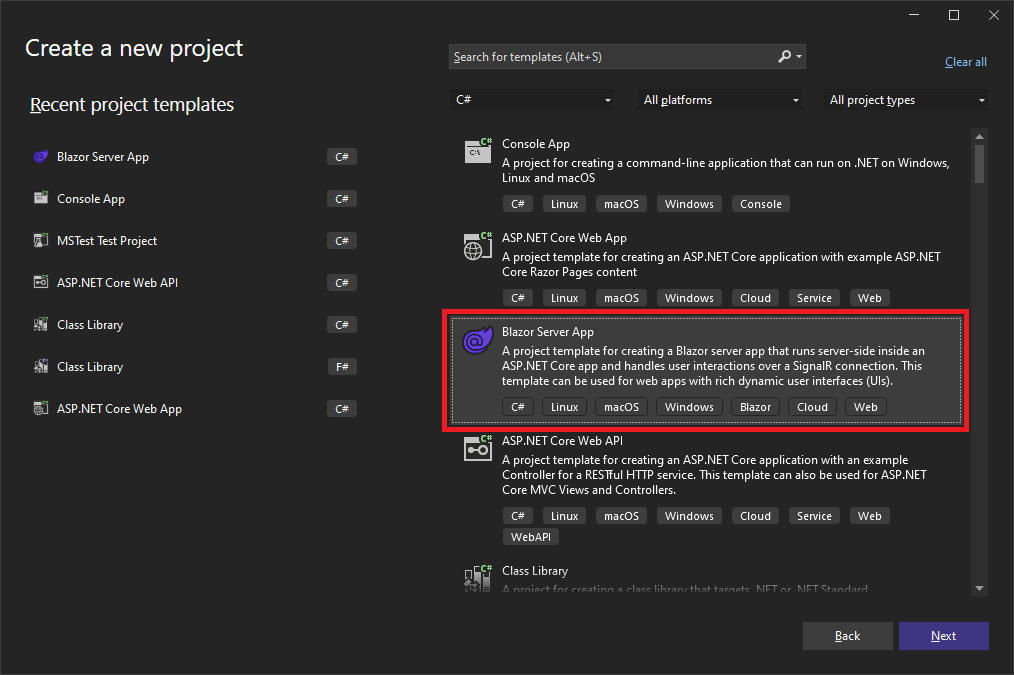
For the first project, I suggest selecting Blazor Server over Blazor WebAssembly because the project structure is simpler, and it will be easy working with a Blazor WebAssembly project later in your Blazor development journey.
Name your project, select a location on the hard drive, and press the Next button to get to the Additional Information dialog.
In the Additional Information dialog, select the most recent version of .NET as the framework.
We do not need authentication for this project, but the supported options include individual accounts, the Microsoft identity platform and Windows authentication. The templates are valuable when you need to implement authentication.
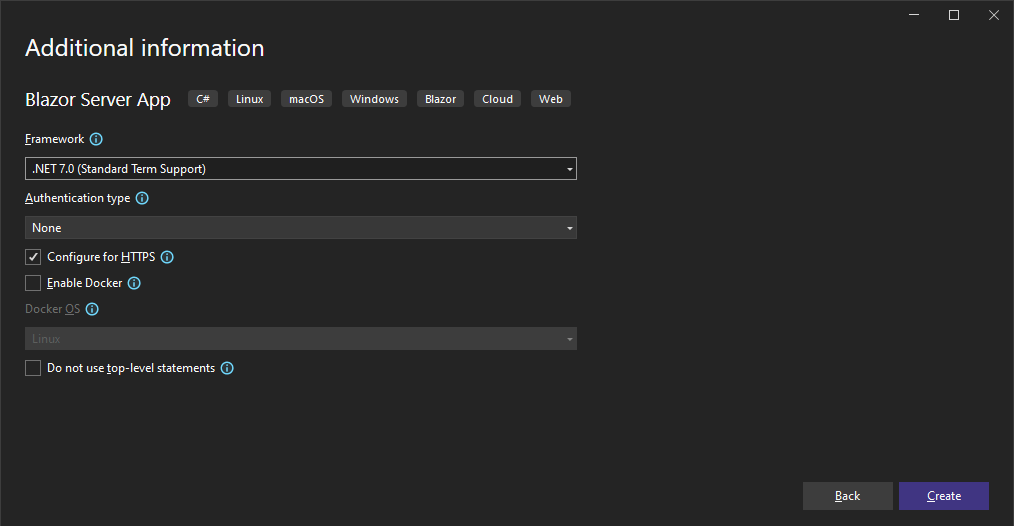
We will use HTTPS, do not need Docker, and want to use top-level statements in the Program.cs file. You can leave all the default values in the dialog and press the Create button, and Visual Studio will
create the project for you.
Project Overview—Navigating the Source Code
A Blazor Server project consists of a single project. Of course, you can add dependencies to other .NET projects as you can with any other application type.
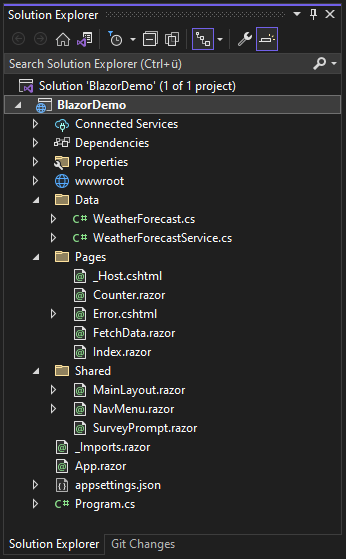
The Data folder contains the data types and services used within the Blazor components. Those files do not contain anything Blazor-specific. For example, the WeatherForecastService class looks like this:
public class WeatherForecastService
{
  private static readonly string[] Summaries = new[]
  {
      "Freezing", "Bracing", "Chilly", "Cool", "Mild", "Warm", "Balmy", "Hot",
      "Sweltering", "Scorching"
  };

  public Task<WeatherForecast[]> GetForecastAsync(DateOnly startDate)
  {
      return Task.FromResult(Enumerable.Range(1, 5).Select(index =>
      new WeatherForecast
      {
          Date = startDate.AddDays(index),
          TemperatureC = Random.Shared.Next(-20, 55),
          Summary = Summaries[Random.Shared.Next(Summaries.Length)]
      }).ToArray());
  }
}
It contains a GetForecastAsync method that randomly generates objects of the type WeatherForecast and returns a list.
The general objects and data types used for a Blazor application can also be in a different project and added to the Blazor application as a project reference. It would make sense in a scenario where you want to share your data objects or services with another, perhaps existing, application.
The Shared folder contains Blazor components that can be used on different pages. The default template also puts the MainLayout, a layout component, within the Shared folder. In my projects, I create
a dedicated folder to hold all layout components, but that is up to the developer’s preference.
The Pages folder contains Blazor components that act as pages. We will explore a page later in more detail.
The wwwroot folder contains static assets that can be accessed from the running web application. It contains images, fonts, CSS libraries and custom CSS definitions.
The project root folder contains the following files:
- _Imports.razor: This file contains all using statements that import namespaces that are available within all the Blazor components. Besides the ASP.NET Core namespaces, it also includes two using statements for project-specific namespaces.
- App.razor: This file contains the Router definition. Routing is done by convention in Blazor. We do not need to add an entry for every route we want to create. However, you can specify the default layout for existing pages and a route for pages that do not exist. For most beginner projects, we do not change the content of this file.
- Program.cs: This file contains the ASP.NET Core code required to start a .NET application. Here you register services to the dependency injection container, add middleware, set up routing and eventually start the application.
Starting the Blazor Application for the First Time
Before taking a closer look at the Blazor components and pages, let’s start the application to get an overview of what features the application offers. In Visual Studio, you can use F5 to launch the application.
Visual Studio starts a local web server and serves the application from a local port.
The application has a two-column layout defined in the MainLayout.razor file. The menu contains links to the three pages, the Index page, the Counter page and the FetchData page.
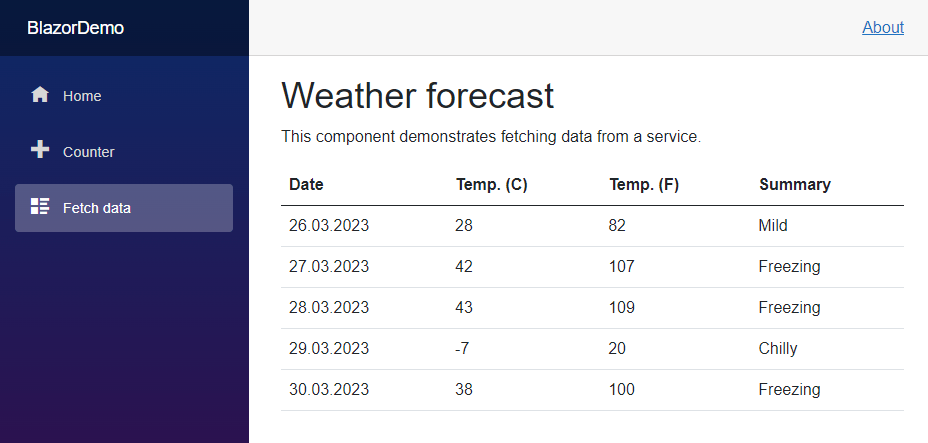
The Fetch Data menu leads us to the FetchData page that contains a table with four columns and the data of the WeatherData class seen earlier.
What Makes a Blazor Component a Page?
Blazor uses directives as a clever tool to make development simple. Directives start with an @ symbol followed by the name of the directive. Let’s look at the Pages/FetchData.razor component.
@page "/fetchdata"
@using BlazorDemo.Data
@inject WeatherForecastService ForecastService
The @page directive declaratively defines the component as a page. It also adds the page to the router and makes it accessible using the URL defined as the argument of the page directive.
The @using directive allows us to import namespaces that we can use within the whole component. For example, the FetchData component uses the BlazorDemo.Data namespace
that contains the data objects defined in the /Data folder of the project.
The @inject directive provides an instance of a type from the dependency container. It’s the dependency injection mechanism for Blazor components. In this example, we inject the WeatherForecastService type and make the created instance available within the entire component as the ForecastService variable.
<PageTitle>Weather forecast</PageTitle>
The PageTitle component is a component and not a directive. However, it is equally as helpful. It allows us to conveniently define the page title displayed in the browser tab or window.
Editing a Blazor Component
We open the FetchData.razor file to edit the Blazor component.
First, let’s explore the structure of a Blazor component. The template section uses plain HTML with some C# code snippets. The C# code always starts with an @ symbol.
@if (forecasts == null)
{
  <p><em>Loading...</em></p>
}
else
{
  <table class="table">
    <thead>
      <tr>
        <th>Date</th>
        <th>Temp. (C)</th>
        <th>Temp. (F)</th>
        <th>Summary</th>
      </tr>
      </thead>
      <tbody>
        @foreach (var forecast in forecasts)
        {
          <tr>
            <td>@forecast.Date.ToShortDateString()</td>
            <td>@forecast.TemperatureC</td>
            <td>@forecast.TemperatureF</td>
            <td>@forecast.Summary</td>
          </tr>
        }
      </tbody>
  </table>
}
For example, the if/else checks if data is loaded. If there is data, the component shows the HTML table, or else the “Loading…” text.
@code {
  private WeatherForecast[]? forecasts;

  protected override async Task OnInitializedAsync()
  {
    forecasts = await ForecastService.GetForecastAsync(
        DateOnly.FromDateTime(DateTime.Now));
  }
}
Below the template section is a code block introduced with a @code directive. It contains the C# class that backs the component’s template. We can define variables that can be accessed within the template,
such as the forecasts variable in this example.
The C# class uses callback methods to hook it into the lifecycle of a Blazor component. This example uses the OnInitializedAsync method to execute code to load data from a service
when the component has been initialized.
As you can see, the binding mechanism is very developer friendly. We can use the variable prefixed with an @ symbol within a code block in the template. For example, we see the foreach that loops
through all the forecast items, and for each item, it adds a row to the HTML table.
We can also use methods on the properties of the data objects, such as the ToShortDateString to format the output.
Using .NET Hot Reload
While single-page web applications usually start very fast at the beginning of the project, they often take longer with every component and every page added.
Luckily, based on the .NET platform, we can use .NET Hot Reload when working with Blazor components.
For example, you can comment out one of the columns in the table of the FetchData component, and either use the flame icon in the Visual Studio toolbar or press the keyboard shortcut ALT+F10 to
execute the .NET Hot Reload.

When using .NET Hot Reload, the application keeps running, and the DLLs get patched at runtime. You can immediately see the changes reflected in the web browser.
It allows for rapid development because the developer lifecycle is very short.
However, be aware that not all operations are supported at this time. Depending on the change, it might be that you still need to restart the application from time to time. But it is definitely a huge time saver in day-to-day Blazor component development.
This content originally appeared on Telerik Blogs and was authored by Claudio Bernasconi
Claudio Bernasconi | Sciencx (2023-06-02T07:11:09+00:00) Blazor Basics: Getting Started with Blazor Development in Visual Studio 2022. Retrieved from https://www.scien.cx/2023/06/02/blazor-basics-getting-started-with-blazor-development-in-visual-studio-2022/
Please log in to upload a file.
There are no updates yet.
Click the Upload button above to add an update.
