This content originally appeared on Telerik Blogs and was authored by Leomaris Reyes
Let’s learn how to use the ScreenRecording plugin created by Gerald Versluis in a .NET MAUI application (available for Android, iOS and macOS).
Requirements can vary significantly when working with different applications. Some may use conventional features like photo-taking or light and dark mode support, while others may require less common functionalities like app screen recording.
Fortunately, implementing screen recording is quite simple. In this article, I’ll show you how to do it for your .NET MAUI applications, equipping you with this knowledge for when you need it.
The explanation will be divided into the following points:
What is the Plugin.Maui.ScreenRecording
Initial setup & platform integration
How to use it
App demo
What Is the Plugin.Maui.ScreenRecording?
This is a plugin created by Gerald Versluis. It enables screen recording from .NET MAUI applications and is available for Android, iOS and macOS.
Initial Setup
To start the implementation, you need to follow the steps below:
➖ Add the NuGet Package.
Start by opening the NuGet Package Manager in your Visual Studio and search for the Plugin.Maui.ScreenRecording. At the time of writing this article, this NuGet Package is in a preview version. To access it, check the “Include prereleases” option.

➖ Go to your MauiProgram.cs file.
In the CreateMauiApp method, find the line .UseMauiApp<App>(). Just below it, insert the .UseScreenRecording() extension method, as I show you below:
var builder = MauiApp.CreateBuilder();
builder
.UseMauiApp<App>()
.UseScreenRecording() // Line added
.ConfigureFonts(fonts =>
{
fonts.AddFont("OpenSans-Regular.ttf", "OpenSansRegular");
fonts.AddFont("OpenSans-Semibold.ttf", "OpenSansSemibold");
});
⚠ Don’t forget to add the using Plugin.Maui.ScreenRecording; at the top of the class.
Platform Integration
Let’s continue by adding some platform settings. Follow the instructions below:
 On Android
Go to Platform ➖ Android ➖ AndroidManifes.cs ➖ Right click ➖ Open with ➖ Source code editor, and add the following Permission:
<uses-permission android:name="android.permission.READ_EXTERNAL_STORAGE" />
<uses-permission android:name="android.permission.WRITE_EXTERNAL_STORAGE" />
<uses-permission android:name="android.permission.RECORD_AUDIO" />
<uses-permission android:name="android.permission.FOREGROUND_SERVICE" />

<!-- This one is only needed when targeting API 34 and up -->
<uses-permission android:name="android.permission.FOREGROUND_SERVICE_MEDIA_PROJECTION" /
You also need to add the service specified below. Ensure it’s placed within the <application> tags.
<application>
    <service android:name="Plugin.Maui.ScreenRecording.ScreenRecordingImplementation.ScreenRecordingService" android:exported="false" android:foregroundServiceType="mediaProjection" />
</application>
 On iOS / macOS
If you want to save recordings in Photo apps, you need to apply the Privacy - Photo Library Additions Usage permission.
To do this, navigate to Platform ➖ iOS /MacCatalyst ➖ info.plist, and add the NSPhotoLibraryAddUsageDescription permission. After adding it, you should see something similar to the following image:

Windows is not supported (yet).
How to Use Screen Recording?
On the page where you wish to record the screen, add a variable and access the static instance of the ScreenRecording object as follows:
readonly IScreenRecording screenRecording;

this.screenRecording = ScreenRecording.Default;
Available Methods
The screenRecording variable will allow you to access the following methods:
➖ StartRecording: This method enables you to initiate screen recording. It can optionally receive a ScreenRecordingOptions parameter, which interacts with the following properties:
- EnableMicrophone: Receives a bool as a value. Gets or sets whether to also record microphone input. Default value is false.
- NotificationContentTitle: Receives a string as a value. Gets or sets the notification content title. Default value is “Screen recording in progress…”.
- NotificationContentText: Receives a string as a value. Gets or sets the notification content text. Default value is “A screen recording is currently in progress, be careful with any sensitive information.”
- SaveToGallery: Receives a bool as a value. Gets or sets whether to make this recording available in the device’s gallery app(s). Default value is false.
- SavePath: Receives a string as a value. Gets or sets the path to save the recording to. The default is the device’s temporary folder with a timestamped file, e.g., screenrecording_20230101_133700.mp4.
Code sample:
ScreenRecordingOptions options = new()
{
    EnableMicrophone = true,
    NotificationContentTitle = “Hey! You screen is benign recorded”,
    NotificationContentText = “Please keep you screen exactly on the screen that you want to record.”,
    SaveToGallery = true,
    SavePath = Path.Combine(Path.GetTempPath(), "myRecording.mp4"),
};

screenRecording.StartRecording(options);
➖ StopRecording: Stops the recording and saves the video file to the device’s gallery. To use it, you just have to add the following line:
ScreenRecordingFile screenResult = await screenRecording.StopRecording();
Available Properties
➖ IsRecording: Returns a bool as value, gets whether or not screen recording is currently happening.
if (!screenRecording.IsRecording)
{
    await DisplayAlert("Not recording", "You are not recording the screen.", "OK");
}
➖ IsSupported: Returns a bool as value. Gets whether or not screen recording is supported on this device.
if (!screenRecording.IsSupported)
{
    await DisplayAlert("Not supported", "Screen recorder is not supported", "OK");
    return;
}
Building an App Demo
Now, let’s see it in practice with an example. To better guide your exploration of the screen recorder’s uses, we will illustrate with a step-by-step example. This one is referenced from Gerald Versluis’s YouTube channel.
Step 1: Defining the UI
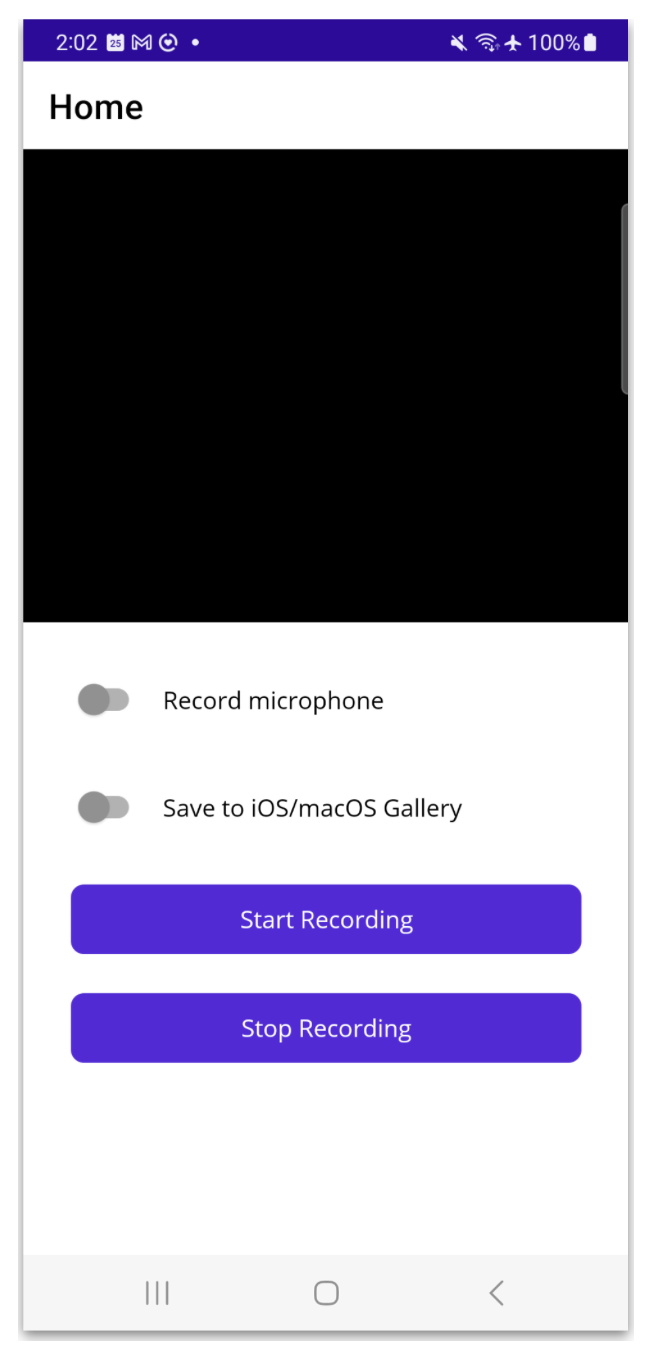
Our screen will feature five elements:
- A video box to play the recorded video
- A switch to control whether the microphone is recorded
- Another switch to determine if we will be saving the video (remember that in our initial configuration I mentioned that this is only for iOS/macOS)
- Lastly, two buttons for starting and stopping the screen recording
Now, let’s add each of these elements to the code:
Video Box to Play the Recorded Video
As a bonus, we will utilize a valuable resource from the .NET MAUI Community Toolkit: the Media Element. Although it isn’t the main focus of the article, we’ll provide brief instructions for its implementation in your project, enabling you to construct the example from beginning to end.
➖ First add the CommunityToolkit.Maui.MediaElement NuGet package.

➖ Second, above the line where you add the .UseScreenRecording() extension method, insert the following: .UseMauiCommunityToolkitMediaElement().
➖ Third, in your XAML, add the following namespace:
xmlns:toolkit="http://schemas.microsoft.com/dotnet/2022/maui/toolkit"
➖ Fourth, finally, you can add the element to your UI as follows:
<toolkit:MediaElement x:Name="videoRecorded" WidthRequest="400" HeightRequest="300"></toolkit:MediaElement>
And that’s all. For more information about MediaElement, you can see this video.
Switches for Controlling the Microphone and Saving Video
<Grid RowDefinitions="Auto,Auto"
    ColumnDefinitions="Auto,*"
    RowSpacing="20"
    ColumnSpacing="10">

    <Switch Grid.Row="0" Grid.Column="0" x:Name="recordMicrophone"/>
    <Label Grid.Row="0" Grid.Column="1" Text="Record microphone" VerticalTextAlignment="Center"/>

    <Switch Grid.Row="1" Grid.Column="0" x:Name="saveToGallery" />
    <Label Grid.Row="1" Grid.Column="1" Text="Save to iOS/macOS Gallery" VerticalTextAlignment="Center"/>

</Grid>
Start and Stop Recording Buttons
<Button x:Name="btnStart" Text="Start Recording" Clicked="btnStart_Clicked"/>

<Button x:Name="btnStop" Text="Stop Recording" Clicked="btnStop_Clicked"/>
At this point, you should have a result like the following:

Step 2: Registering the Interface with Dependency Injection
Return to the Mauiprogram.cs file and add the following line just before the return statement:
builder.Services.AddTransient<MainPage>();
Step 3: Go the MainPage.xaml.cs
Now that it’s registered for dependency injection, you can inject it into the main page. This is also a good opportunity to experiment with the Start and Stop buttons by manipulating the IsEnabled property.
readonly IScreenRecording screenRecording;

public MainPage(IScreenRecording screenRecording)
{
    InitializeComponent();
    this.screenRecording = screenRecording;
    btnStart.IsEnabled = true;
    btnStop.IsEnabled = false;
}
⚠️ Another option is that you can use a static implementation using ScreenRecording.Default.
Step 4: Adding the Start Button Event
For this button, we first ensure recording is possible, then we enable the corresponding buttons and finally initiate screen recording.
async void btnStart_Clicked(System.Object sender, System.EventArgs e)
{
    if (!screenRecording.IsSupported)
    {
    await DisplayAlert("Not supported", "Screen recorder is not supported.", "OK");
    return;
    }

    btnStart.IsEnabled = false;
    btnStop.IsEnabled = true;

    screenRecording.StartRecording(new()
    {
    EnableMicrophone = recordMicrophone.IsToggled,
    SaveToGallery = saveToGallery.IsToggled,
    });
}
Step 5: Adding the Stop Button Event
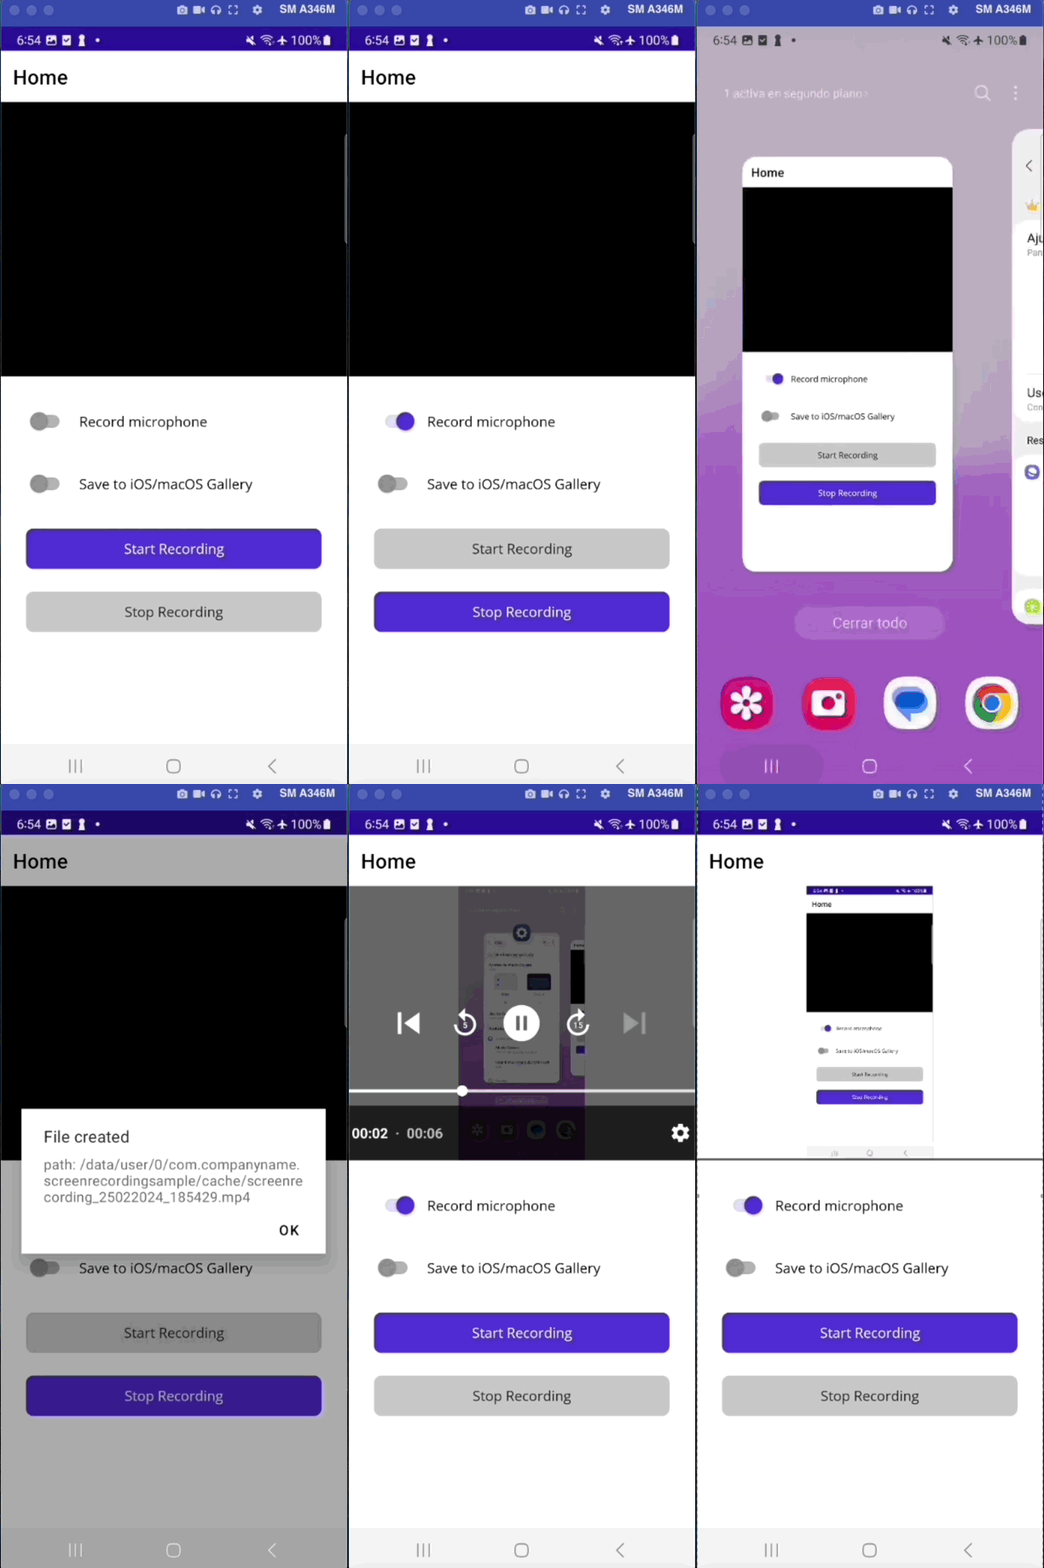
In this final event, we will ensure to stop the recording, generate the file and display it in the previously added video box.
async void btnStop_Clicked(System.Object sender, System.EventArgs e)
{
    ScreenRecordingFile screenResult = await screenRecording.StopRecording();

    if (screenResult != null)
    {
    FileInfo file = new FileInfo(screenResult.FullPath);
    await Shell.Current.DisplayAlert("File created", $"path: {screenResult.FullPath}", "OK");
    videoBox.Source = screenResult.FullPath;
    }
    else
    {
    await Shell.Current.DisplayAlert("No Screen Recording","", "OK");
    }

    btnStart.IsEnabled = true;
    btnStop.IsEnabled = false;

}
Great! We’re done! Now, let me show you the live demo that we’ve built!

Limitations
- On Android you can navigate through your entire phone screen and everything you do will be recorded, even if you exit the application.
- On iOS only what is displayed on the screen of your .NET MAUI App will be recorded.
Conclusion
That’s all! I hope that from now on you can implement screen recording in your .NET MAUI applications! See you next time!
References
This article was based on the plugin author’s documentation:
- https://www.youtube.com/watch?v=M9lDKEYzwn0
- https://github.com/jfversluis/Plugin.Maui.ScreenRecording
This content originally appeared on Telerik Blogs and was authored by Leomaris Reyes
Leomaris Reyes | Sciencx (2024-06-17T19:53:29+00:00) Beyond the Basics: Screen Recording in .NET MAUI. Retrieved from https://www.scien.cx/2024/06/17/beyond-the-basics-screen-recording-in-net-maui/
Please log in to upload a file.
There are no updates yet.
Click the Upload button above to add an update.
