This content originally appeared on Level Up Coding - Medium and was authored by Varsha Das
I have been working with AWS for close to 6 years now, and this is my first article on AWS.
Why Should This Be Your First AWS Project?
If you are starting your AWS journey, this project should be your first. Many, including myself, began with serverless components like Lambda, API Gateway, SQS, etc. While these services are effective for solving business problems, they don’t build a solid foundation in the cloud. To really understand AWS, you need hands-on experience with two key components: EC2 and VPC.
What are we building?
We will create a simple Spring Boot app, but instead of testing it locally, we will deploy it on the cloud using our own rented web server (EC2). We’ll also configure the network settings ourselves, then use the server’s public IP to interact with the app.
To be able to work with servers and understand networking intricacies will be a great headstart for beginners, an underrated skill and a great refresher for the experienced.
Pre-requisite — You know how to write a hello world app in Spring Boot in Java.
Major Takeaways:
- AWS EC2: Learn how to install Java and deploy a Spring Boot jar file.
- VPC Setup: Create subnets, an Internet gateway, route tables, and security groups.
- AWS S3: Host your jar file for easy access.
Steps:
Step 1. Create a simple hello world app in spring boot
Not going through these steps , because the pre-requisite is that you know how to create a Spring boot app. And create a jar out of it.
Step 2. Setup new VPC, subnets and Internet Gateway
This is the most important part because usually when you launch EC2 instances , they get launched in the default VPC but it is crucial to know how to create your own VPC, how to create the subnet, assign CIDR blocks, attach Internet Gateway to it, manipulate route tables and so on.
We will do this step-by-step, but before that, a brief overview of each of these components.
VPC (Virtual Private Cloud):
A VPC is a virtual network dedicated to your AWS account. It is isolated from other networks in AWS. Creating your own VPC allows you to define your network configuration, improving security and network control.
Subnet:
A subnet is a range of IP addresses within a VPC. Subnets allow you to segment your VPC into different networks. You can have public subnets (connected to the internet) and private subnets (not directly connected to the internet). We will talk about this later in this article.
CIDR Blocks:
Classless Inter-Domain Routing (CIDR) blocks define the range of IP addresses available in a network or subnet. Again on this in some time.
Internet Gateway:
An Internet Gateway is a (horizontally scaled, redundant, and highly available ) VPC component that allows communication between instances in your VPC and the internet.
Attaching an Internet Gateway to your VPC enables instances in your public subnets to connect to the internet.
Route Tables:
A route table contains a set of rules, called routes, that determine where network traffic is directed. Manipulating route tables allows you to control the traffic flow within your VPC, directing it to the internet, other VPCs, or on-premises networks.
2.1 : Create a New VPC
- Log in to the AWS Management Console and navigate to the VPC Dashboard.
- Create a VPC:
- Click on “Create VPC”.
- Provide a Name (e.g., My-EC2-VPC).
- Set the IPv4 CIDR block (e.g., 10.0.0.0/16).
A brief note on IPv4 CIDR blocks , how should you choose one:
Choosing an IPv4 CIDR Block for Your VPC
An IPv4 CIDR block is a range of IP addresses that defines the network space for your VPC.
What is a CIDR Block?
CIDR stands for Classless Inter-Domain Routing. A CIDR block is written in the format a.b.c.d/n, where a.b.c.d is the network address and n is the prefix length, which indicates the size of the network.
How to Choose a CIDR Block ?
Size of Your VPC:
Determine how many IP addresses you need. For example, 10.0.0.0/16 gives you 65,536 IP addresses, while 10.0.0.0/24 gives you 256 IP addresses.
Avoid Overlapping:
Ensure the CIDR block does not overlap with any existing networks you have or might connect to (e.g., on-premises networks or other VPCs).
Private IP Ranges:
Use private IP ranges as specified by RFC 1918:
10.0.0.0 – 10.255.255.255 (10/8 prefix)
172.16.0.0 – 172.31.255.255 (172.16/12 prefix)
192.168.0.0 – 192.168.255.255 (192.168/16 prefix)
Future Growth:
Consider future expansion. Choose a CIDR block that allows for the addition of more subnets or IP addresses without conflicts.
Subnetting:
Plan how you will divide the CIDR block into subnets. Make sure the chosen block can be effectively split into smaller subnets as needed.
- Select Tenancy (default is default).
- Click on “Create VPC”.
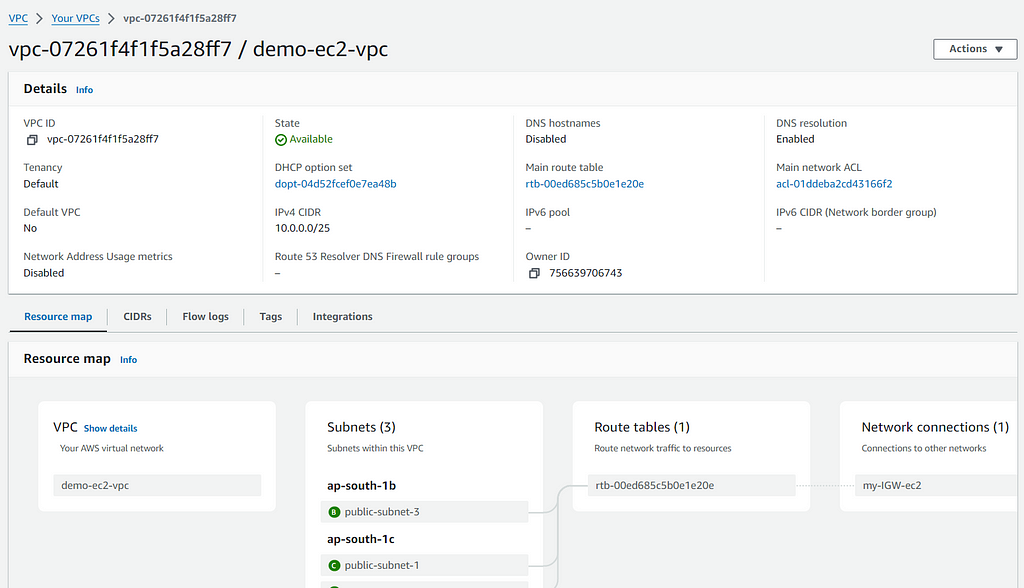
2.2: Create Subnets
- Create Public Subnet:
- In the VPC Dashboard, click on “Subnets”.
- Click on “Create Subnet”.
- Provide a Name tag (e.g., PublicSubnet-EC2).
- Select the VPC you just created.
- Specify an Availability Zone.
- Set the IPv4 CIDR block (e.g., 10.0.1.0/24).
- Click on “Create Subnet”.
Example: Dividing a VPC with a 10.0.0.0/25 CIDR Block
Let’s say you have a VPC with a CIDR block of 10.0.0.0/25. This CIDR block provides 128 IP addresses, which can be divided into smaller subnets. Here's how you can plan and divide this CIDR block:
Step-by-Step Subnet Division
- Initial CIDR Block:
- VPC CIDR Block: 10.0.0.0/25 (128 IP addresses)
Why 128?
An IPv4 address is 32 bits in total.
- Subtract the 25 network bits from the total 32 bits: 32 - 25 = 7.
- The remaining 7 bits are for the host addresses.
The number of possible IP addresses in a subnet is calculated as 2^(number of host bits).
For a /25 subnet: 2^7 = 128.
Thus, a /25 CIDR block provides 128 IP addresses.
- Divide into Two /26 Subnets:
- Each /26 subnet provides 64 IP addresses.
Subnets Breakdown:
Public Subnet:
- CIDR Block: 10.0.0.0/26 (64 IP addresses)
- Use: For public-facing web servers and services.
- Range: 10.0.0.0 - 10.0.0.63
Private Subnet:
- CIDR Block: 10.0.0.64/26 (64 IP addresses)
- Use: For private internal services like application servers.
- Range: 10.0.0.64 - 10.0.0.127
Use website — https://www.ipaddressguide.com/cidr for validating and practice.

- Select the newly created public subnet.
- Click on the “Actions” button, then select “Modify auto-assign IP settings”.
- Check the “Enable auto-assign public IPv4 address” option and click “Save”.
This is important for you to do EC2 Instance Connect.
2.3 : Create Internet Gateway (IGW)
- Create an Internet Gateway:
- In the VPC Dashboard, click on “Internet Gateways”.
- Click on “Create internet gateway”.
- Provide a Name tag (e.g., MyInternetGateway).
- Click on “Create internet gateway”.
- Attach Internet Gateway to VPC:
- Select the newly created internet gateway.
- Click on “Actions” and then “Attach to VPC”.
- Select the VPC that you created above and click on “Attach internet gateway”.

2.4: Configure Route Tables
Best practice — create 2 route tables — public route table and a private route table.
Create Route Table for Public Subnet:
- Go to the Route Tables section in the VPC Dashboard.
- Click on “Create route table”.
- Provide a Name tag (e.g., PublicRouteTable).
- Select your VPC.
- Click on “Create route table”.
- Select the newly created route table and click on the “Routes” tab.
- Click “Edit routes”, then “Add route”.
- Set Destination to 0.0.0.0/0 and Target to Internet Gateway.
- Click on “Save routes”.
Associate Public Route Table with Public Subnet:
- Go to the Subnets tab in the selected route table.
- Click “Edit subnet associations”.
- Select your Public Subnet.
- Click on “Save associations”.
Or,
you could edit the default route table of your VPC
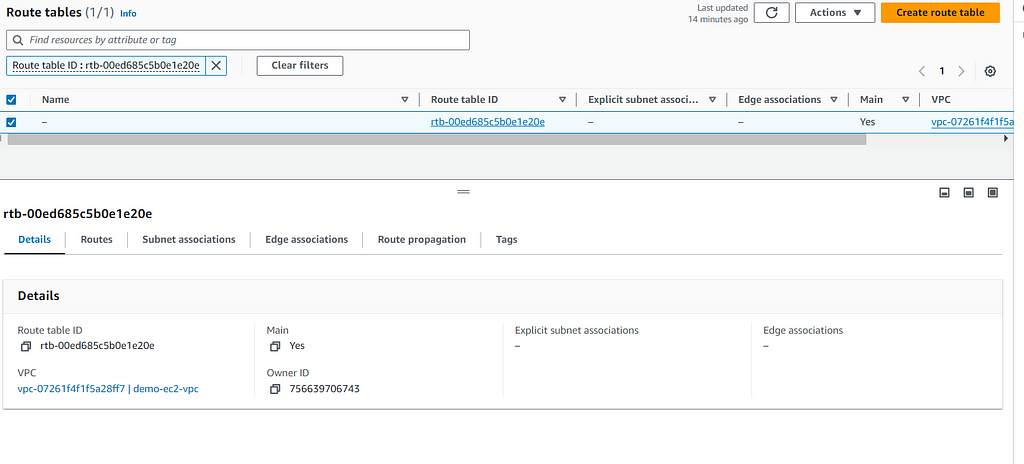
and add IGW to the routes

2.5: Configure Security Groups
- Create a Security Group for Public Subnet:
- In the VPC Dashboard, click on “Security Groups”.
- Click on “Create security group”.
- Provide a Name tag (e.g., PublicSG).
- Select your VPC.
- Add an Inbound rule for Custom TCP — port 8080 (add your Spring boot app port)
- Click on “Create a security group”.
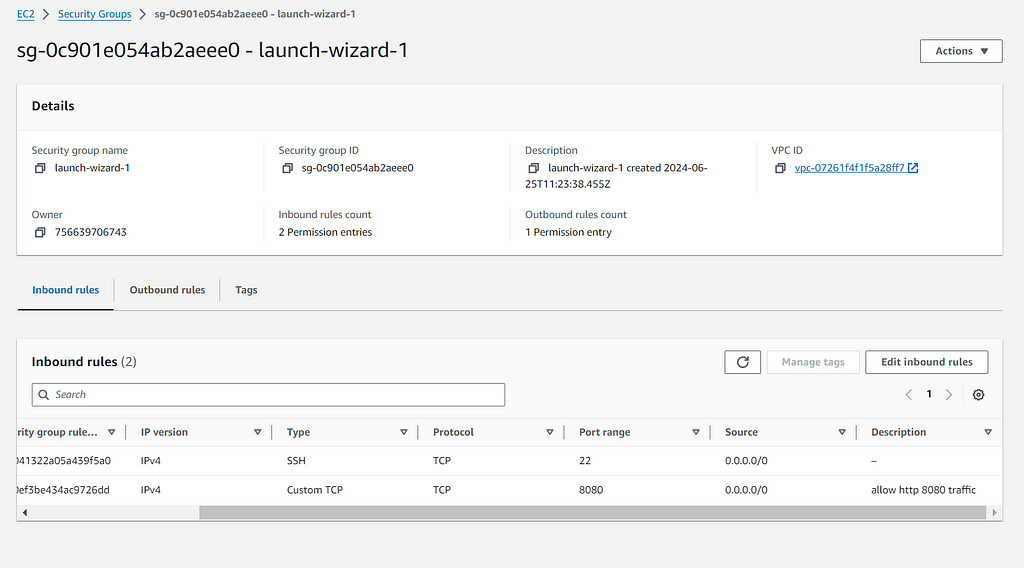
Summary
- Create VPC with a specified CIDR block.
- Create Public and Private Subnets within the VPC.
- Configure Route Tables and associate them with subnets.
- Create and Attach Internet Gateway to the VPC.
- Set up Security Groups for controlling traffic to instances in each subnet.
Step 3: Launch an EC2 instance
Navigate to the EC2 Dashboard:
- Sign in to the AWS Management Console.
- In the console, click on “Services” in the top left corner.
- Select “EC2” under the “Compute” category.
Start the Launch Instance Wizard:
- On the EC2 Dashboard, click on the “Launch Instance” button.
- Choose an Amazon Machine Image (AMI)
- Select an AMI from the list. You can choose a pre-configured AMI like Amazon Linux 2, Ubuntu, or a Windows Server.
- Click “Select” next to the AMI you want to use.
- Choose an Instance Type:
- Select an instance type that meets your needs. The instance type determines the hardware of the host computer used for your instance.
- For example, you can choose “t2.micro” for general purposes.
- Click “Next: Configure Instance Details”.
- Configure Instance Details:
- Number of Instances: Enter the number of instances you want to launch.
- Network: Select the VPC you created earlier (e.g., 10.0.0.0/25 VPC).
- Subnet: Select the subnet you want to launch the instance in (e.g., Public Subnet 10.0.0.0/26 or Private Subnet 10.0.0.64/26).
- Auto-assign Public IP: Enable this if you are launching in a public subnet and want your instance to have a public IP.
- Configure other settings as needed.
- Click “Next: Add Storage”.
- Configure Security Group:
- Use the existing security group that we created above.
- Select or Create a Key Pair: (optional, not recommended)
- Choose an existing key pair: If you have one, select it.
- Create a new key pair: If you don’t have one, create a new key pair. Download the key pair file (.pem) and keep it safe, as you will need it to access your instance.
- Check the acknowledgment box to confirm that you have access to the selected key pair.
- Click “Launch Instances”.
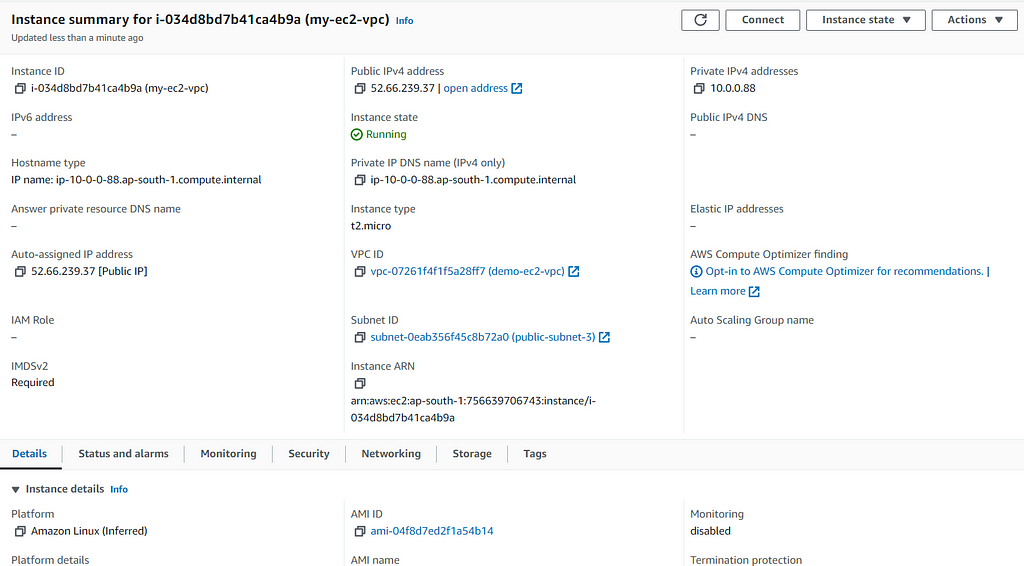
- View Your Instances:
- Click on “View Instances” to go to the EC2 dashboard.
- Your new instance will be listed there. It may take a few minutes for the instance to transition from “pending” to “running”.
Step 4: Upload the jar to AWS S3
Other places where we could upload the jar:
Upload directly from your local machine to the EC2 instance using tools like scp (secure copy protocol).
Or,
Package your JAR file into a Docker container and store the container image in ECR for deployment.
Navigate to the S3 Console:
- Sign in to the AWS Management Console.
- Click on “Services” and select “S3” under the “Storage” category.
- Create an S3 Bucket (if you don’t have one already):
- Click on the “Create bucket” button.
- Enter a unique name for your bucket.
- Select a region for the bucket.
- Configure additional settings as needed (e.g., versioning, encryption).
- Click “Create bucket”.
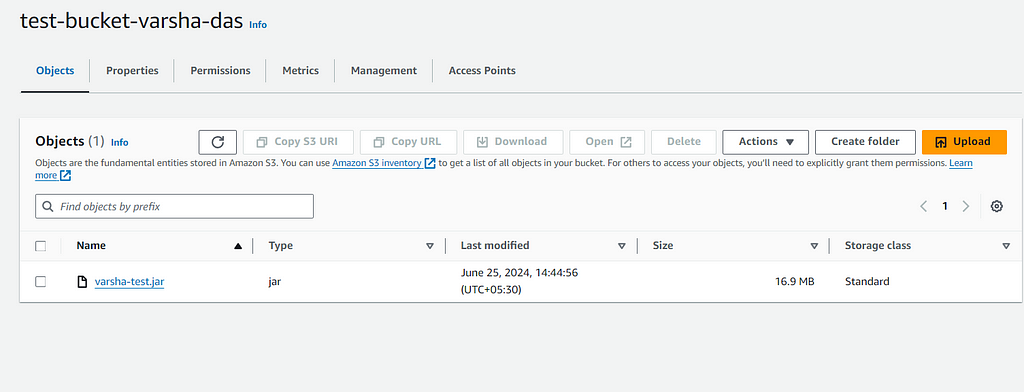
- Upload the JAR File:
- Click on the bucket name where you want to upload the JAR file.
- Click on the “Upload” button.
- Click “Add files” and select the JAR file from your local machine.
- Click “Upload” to start the upload process.
Step 5: Deploy the Spring Boot jar to EC2
AWS provides a convenient way to connect to your EC2 instance directly from the console without needing a separate SSH client. Here’s how you can do it:
Connecting to a Linux Instance Using EC2 Instance Connect:
- Navigate to the EC2 Dashboard:
- Sign in to the AWS Management Console.
- Click on “Services” and select “EC2” under the “Compute” category.
- Locate Your Instance:
- In the left-hand menu, click on “Instances” under the “Instances” section.
- Find the instance you want to connect to from the list of running instances.
- With your instance selected, click on the “Connect” button at the top of the screen.
- In the “Connect to instance” dialog, choose the “EC2 Instance Connect” tab.
- Click the “Connect” button.
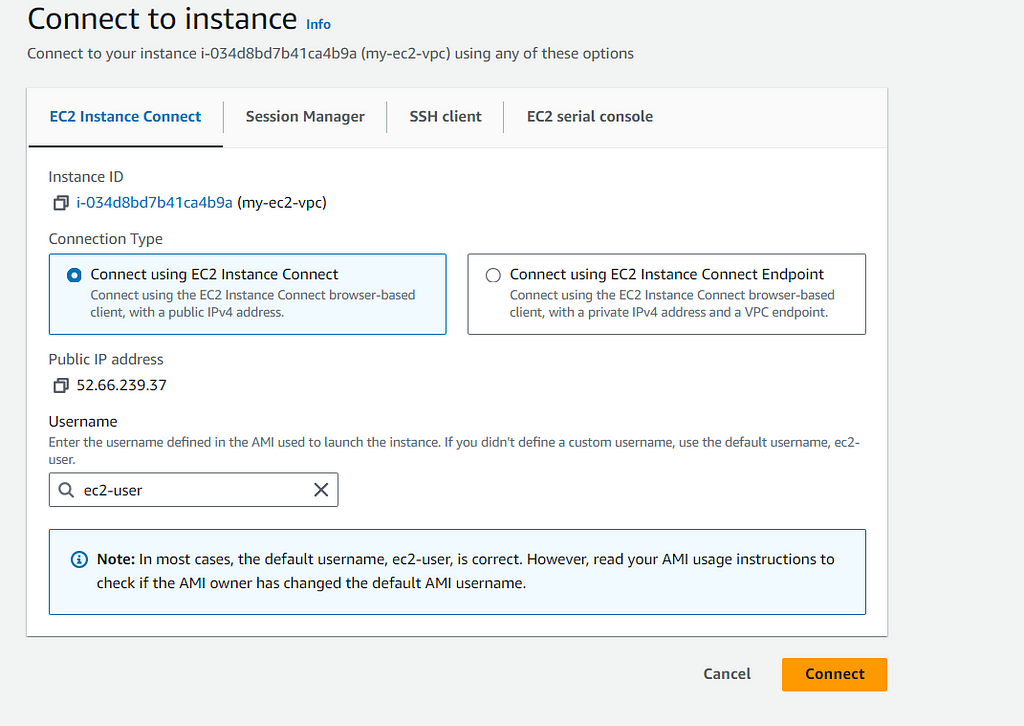
A new browser window will open, providing a terminal session directly connected to your instance.
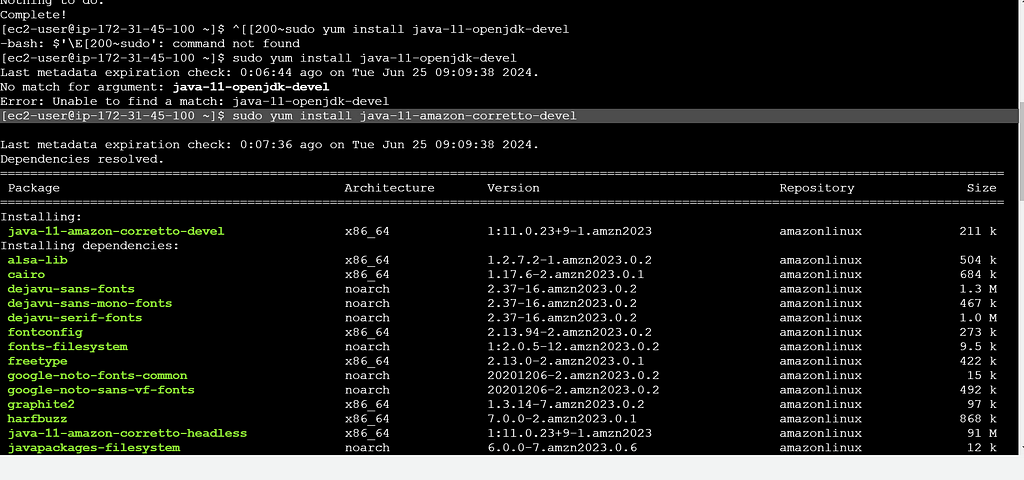
Now we need to do Java installation. We are doing java 11 installation.
Command to execute:
sudo yum install java-11-amazon-corretto-devel
Next, we need to do wget from s3 to copy the jar to our EC2 instance.
Command:
wget https://s3.amazonaws.com/your-bucket-name/your-file-name.jar
Next, we finally run the jar, like below:
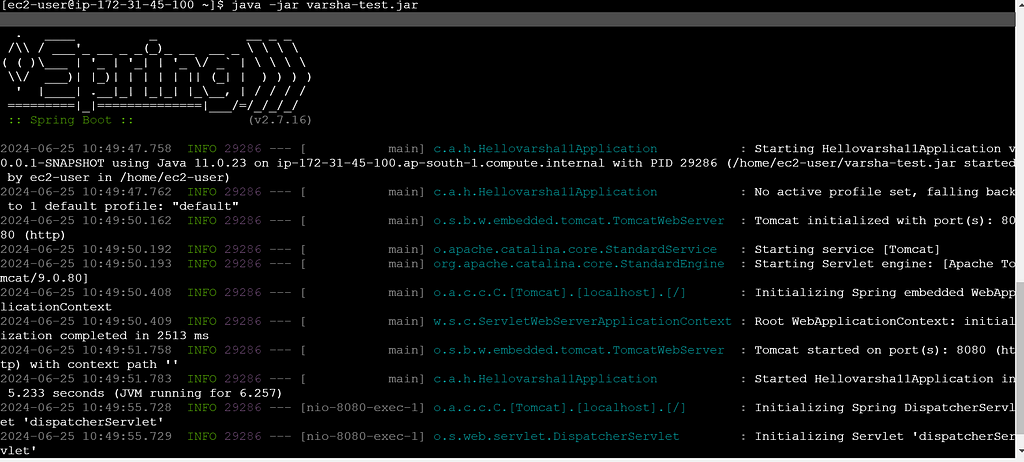
Now that the jar is running , we can test it with a client like Postman
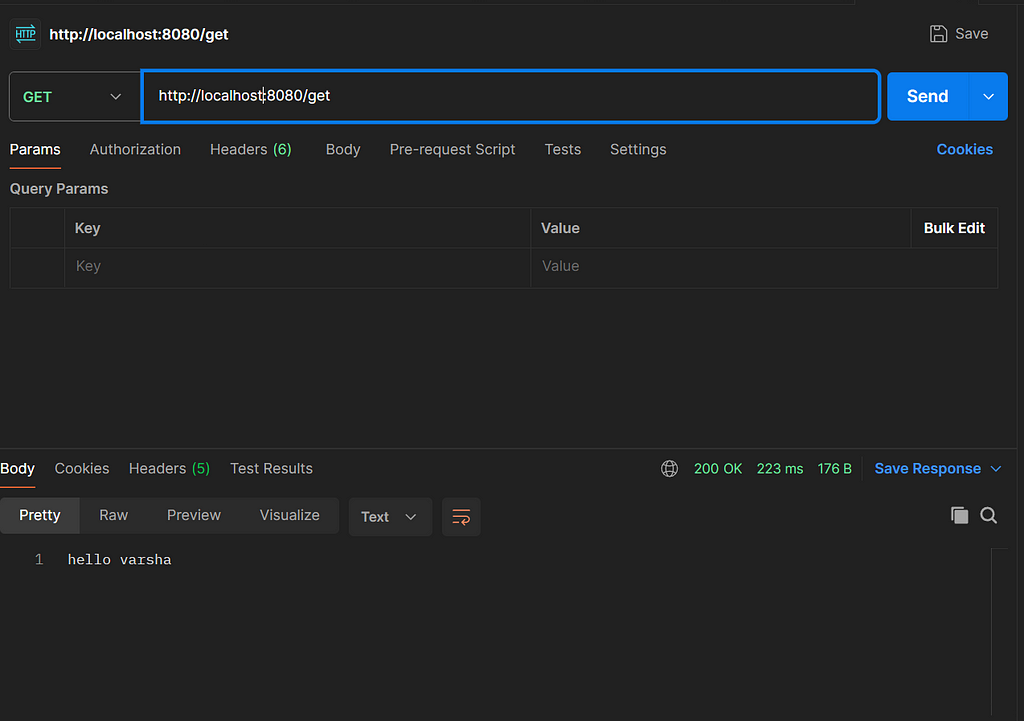
That’s it folks.
Thanks for reading.
If you liked this article, please click the “clap” button 👏 a few times.
It gives me enough motivation to put out more content like this. Please share it with a friend who you think this article might help.
Connect with me — Varsha Das | LinkedIn
If you’re seeking personalized guidance in software engineering, career development, core Java, Systems design, or interview preparation, let’s connect here.
Rest assured, I’m not just committed; I pour my heart and soul into every interaction. I have a genuine passion for decoding complex problems, offering customised solutions, and connecting with individuals from diverse backgrounds.
Follow my Youtube channel — Code With Ease — By Varsha, where we discuss Java & Data Structures & Algorithms and so much more.
Subscribe here to receive alerts whenever I publish an article.
Happy learning and growing together.
This should be your first AWS Project if you are a beginner using AWS EC2, VPCs and Spring Boot was originally published in Level Up Coding on Medium, where people are continuing the conversation by highlighting and responding to this story.
This content originally appeared on Level Up Coding - Medium and was authored by Varsha Das
Varsha Das | Sciencx (2024-07-02T21:31:37+00:00) This should be your first AWS Project if you are a beginner using AWS EC2, VPCs and Spring Boot. Retrieved from https://www.scien.cx/2024/07/02/this-should-be-your-first-aws-project-if-you-are-a-beginner-using-aws-ec2-vpcs-and-spring-boot/
Please log in to upload a file.
There are no updates yet.
Click the Upload button above to add an update.
