
This content originally appeared on Telerik Blogs and was authored by Hassan Djirdeh
You can use different methods for component communication and state management in Vue.js. Let’s explore the provide and inject pattern, which allows data flow between components without prop drilling.
Vue.js offers a variety of approaches for component communication and state management. Among these, the provide/inject pattern stands out for its efficiency in handling data flow between components, bypassing the conventional “prop drilling” method. This pattern is particularly beneficial in complex applications, offering a streamlined way to manage application-level state.
In this article, we’ll delve into Vue’s provide/inject pattern, juxtaposed with how it plays a role when building forms with the Progress Kendo UI for Vue component library.
Props
When managing data between parent and child components, Vue gives us the ability to use something known as props to pass data down from parent to child. Props can only flow in one direction, from parent components to child components (and further down). When state changes occur on parent elements, Vue will re-render components that depend on those values.
This method, while straightforward for shallow component trees, becomes cumbersome and less maintainable as the application grows and the component hierarchy deepens. Consider a scenario where we have a ParentComponent that needs to pass data down through multiple levels of child components:
ParentComponent → ChildComponent1 → ChildComponent2 → ChildComponent3 → etc.
In such cases, each level of component must explicitly declare and pass down the props, leading to an increase in boilerplate code and complexity. This process, sometimes known as “prop drilling,” can make the application harder to understand and maintain, especially when the data needs to be shared across many components or when components are deeply nested.
The provide/inject pattern in Vue is a way to pass data down through a component tree without having to pass props down through every level. This can be very helpful for reducing the complexity and improving maintainability in applications with deep component hierarchies or when needing to share data across components that are not directly related, such as siblings or deeply nested descendants.
Provide/Inject
The provide/inject pattern allows an ancestor component to serve as a dependency provider for all its descendant components, regardless of how deep they are nested within the component tree.
Let’s look at a simple example using Vue 3’s Composition API with the <script setup> syntax. In this example, a parent component will provide a piece of data, and a child component will inject that data for its use.
We’ll have the parent component use the provide() function from Vue’s Composition API to provide a piece of data (message) that can be injected by any descendant component in the component tree. The first argument to provide() is a unique key (messageKey in this case) that child components will use to inject this data.
<template>
  <ChildComponent />
</template>

<script setup>
import { provide } from 'vue';
import ChildComponent from './ChildComponent.vue';

// Data we want to provide to child components
const message = 'Hello from Parent';

// Use the provide function to make this data available to all child components
provide('messageKey', message);
</script>
In the child component, we can use the inject() function to access the data provided by an ancestor component. The argument to inject() is the unique key that was used in the parent component to provide the data (messageKey).
<template>
  <p>{{ message }}</p>
</template>

<script setup>
import { inject } from 'vue';

// Use the inject function to access the data provided by the ancestor component
const message = inject('messageKey');
</script>
Lastly, we’ll have the main application file render the ParentComponent as the root component of our Vue application.
import { createApp } from 'vue';
import ParentComponent from './components/ParentComponent.vue';

const app = createApp(ParentComponent);

app.mount('#app');
With this example, the rendered app will show a simple interface where the ChildComponent directly accesses and displays the “Hello from Parent” message with the help of the provide/inject pattern.

This behavior would be the same even if the child component were multiple levels below the parent component in the component tree. The provide/inject pattern allows data to “skip” intermediate components, making it directly accessible to any descendant, no matter how deeply nested it is.
This capability of passing data is particularly useful for deep component hierarchies where passing props down through every layer would be impractical and cumbersome.
Kendo UI for Vue Form
Expanding on the foundation laid out in the previous section, let’s explore how the Vue provide/inject pattern plays an important role in a more complex scenario: building a form using Kendo UI components within a Vue application.
Kendo UI provides a suite of Vue components that are highly customizable and easy to integrate into Vue applications. For our example, we’ll construct a form that utilizes Kendo UI for Vue components focusing on input fields for user data submission.
In particular, we’ll want our form to:
- Display a field-level validation when an invalid email is entered.
- Disable the Submit button until all required fields are correctly filled and validated.
- When the form is successfully submitted, an alert message will be displayed notifying the user that the form was submitted successfully.
We’ll build out the majority of the form before exploring how the provide/inject patterns helps allow us to access form state and data within nested components.
Before we begin, let’s first install the necessary @progress/kendo-vue-form package. We’ll also install some additional packages we’ll use in our form, such as @progress/kendo-vue-inputs, @progress/kendo-vue-labels and @progress/kendo-vue-buttons.
npm install @progress/kendo-vue-form @progress/kendo-vue-inputs @progress/kendo-vue-labels @progress/kendo-vue-buttons @progress/kendo-drawing @progress/kendo-svg-icons @progress/kendo-vue-intl @progress/kendo-theme-default @progress/kendo-licensing
FormInput
To get started, we’ll first construct a FormInput component to be a form input field with validation feedback, making it a reusable component within our form that require validation. The <script> section of the component will look like the following:
<script setup>
import { ref, computed, defineProps, defineEmits } from 'vue';
import { FieldWrapper } from '@progress/kendo-vue-form';
import { Error, Label } from '@progress/kendo-vue-labels';
import { Input } from '@progress/kendo-vue-inputs';


const { touched, validationMessage } = defineProps({
  touched: Boolean,
  label: String,
  validationMessage: String,
  id: String,
  valid: Boolean,
  value: String
});


const emit = defineEmits(['change', 'focus']);
const showValidationMessage = computed(() => touched && validationMessage);


const handleChange = (e) => {
  emit('change', e);
};


const handleFocus = (e) => {
  emit('focus', e);
};
</script>
In the <script setup> section of the FormInput component, we define a Vue component using the Composition API. We import the FieldWrapper, Error, Label and Input components from Kendo UI for Vue that we’ll use to help structure our form elements and messages. We define props for handling form field attributes and employ a computed property to control the display of validation messages. Through the setup function, we specify and return event emitting methods like handleChange() and handleFocus() that help enable interaction with parent components.
The template of the component will look like the following:
<template>
  <FieldWrapper>
    <Label :class="'k-form-label'" :editor-id="id" :editor-valid="valid">
      {{ label }}
    </Label>
    <div class="k-form-field-wrap">
      <Input
        :valid="valid"
        :id="id"
        :value="value"
        @input="handleChange"
        @focus="handleFocus"
      />
      <Error v-if="showValidationMessage">
        {{ validationMessage }}
      </Error>
    </div>
  </FieldWrapper>
</template>
In the template, we define the visual structure of the FormInput component, utilizing Kendo UI for Vue components for labeling and input fields and dynamically displaying a validation message based on the component’s state (e.g., if a validation message exists, show it).
FormContent
Next, we’ll create the FormContent component to structure our entire form and implement the necessary validation logic. In the <script setup> snippet, we’ll establish the FormContent component, incorporating Kendo UI for Vue components and the custom FormInput component we created. We’ll define an email validation function using a regular expression to ensure user input matches the email format. This function will be made available within the component’s context, enabling its use for email field validation.
<script setup>
import { ref } from 'vue';
import { Field, FormElement } from '@progress/kendo-vue-form';
import FormInput from './FormInput.vue';
import { Button } from '@progress/kendo-vue-buttons';


const emailRegex = new RegExp(/\S+@\S+\.\S+/);


const emailValidator = (value) =>
  emailRegex.test(value) ? '' : 'Please enter a valid email.';
</script>
In the template of the component, we’ll organize input fields for name and email within a fieldset, utilizing the custom FormInput component for each field. The email field will specifically be associated with the emailValidator to provide immediate feedback on input validity. A submit button, controlled by the form’s validation state, is included to initiate form submission only when the form is valid.
<template>
  <form-element>
    <fieldset>
      <div>
        <field :name="'name'" :component="'myTemplate'" :label="'Name'">
          <template v-slot:myTemplate="{ props }">
            <form-input
              v-bind="props"
              @change="props.onChange"
              @blur="props.onBlur"
              @focus="props.onFocus"
            />
          </template>
        </field>
      </div>
      <div>
        <field
          :name="'email'"
          :type="'email'"
          :component="'myTemplate'"
          :label="'Email'"
          :validator="emailValidator"
        >
          <template v-slot:myTemplate="{ props }">
            <form-input
              v-bind="props"
              @change="props.onChange"
              @blur="props.onBlur"
              @focus="props.onFocus"
            />
          </template>
        </field>
      </div>
    </fieldset>
    <div class="k-form-buttons">
      <kendo-ui-button type="submit">
        Submit
      </kendo-ui-button>
    </div>
  </form-element>
</template>
In the template of the root component of our app, we’ll render the FormContent component, and we’ll need to ensure that we wrap our FormContent component within the Kendo UI for Vue Form component. This encapsulation ensures that our form benefits from Kendo UI for Vue’s seamless integration and styling capabilities while maintaining the structure and validation logic defined in the FormContent component.
<template>
  <Form>
    <FormContent />
  </Form>
</template>

<script setup>
import { Form } from '@progress/kendo-vue-form';
import FormContent from './FormContent.vue';
</script>
We can enhance our form setup by including a method to handle form submission. The parent component (kendo-ui-form) provides the form state and a handleSubmit() method, which child components can utilize. With this handleSubmit() method, we’ll trigger an alert pop-up whenever this function is run (i.e., when the form is submitted).
<template>
  <Form @submit="handleSubmit">
    <FormContent />
  </Form>
</template>

<script setup>
// ...

export default {
  // ...,
  methods: {
    handleSubmit(dataItem) {
      alert(JSON.stringify(dataItem, null, 2));
    },
  },
};
</script>
Provide/Inject & KendoForm
Our form is mostly complete except that it doesn’t handle the capability of having the submit button be disabled when the form email field is invalid.
To achieve this, in the FormContent component, we need to find a way to access a Kendo UI for Vue Form property to determine if the form is in a valid state. If not, we’ll conditionally disable the submit button.
<template>
  <FormElement>
    <fieldset>
      <!-- ... -->
    </fieldset>
    <div class="k-form-buttons">
      <Button type="submit" :disabled=...>
        Submit
      </Button>
    </div>
  </FormElement>
</template>
By wrapping our FormContent component with the Kendo UI Form component, we enable a seamless integration with Kendo UI for Vue’s form validation and state management mechanisms. To access the properties passed down from the Kendo UI for Vue Form, we can inject the kendoForm object into the FormContent component.
<script setup>
// ...
import { inject } from 'vue';

const kendoForm = inject('kendoForm', { default: () => ({}) });
// ...
</script>
With the Kendo UI for Vue Form properties available to us in the component, we’re then able to leverage various form state properties such as:
- allowSubmit: Determines whether the form is valid and can be submitted.
- modified: Indicates if any of the form’s fields have been modified since the initial render.
- submitted: Shows whether the form was submitted successfully.
- touched: Flags if any of the form fields have been interacted with by the user.
- and a lot more.
For our use case, we’ll primarily utilize the allowSubmit property to dynamically disable the submit button. This ensures that the form can only be submitted when all fields are valid, enhancing user experience by preventing the submission of an incomplete or invalid email.
<template>
  <FormElement>
    <fieldset>
      <!-- ... -->
    </fieldset>
    <div class="k-form-buttons">
      <Button type="submit" :disabled="!kendoForm.allowSubmit">
        Submit
      </Button>
    </div>
  </FormElement>
</template>
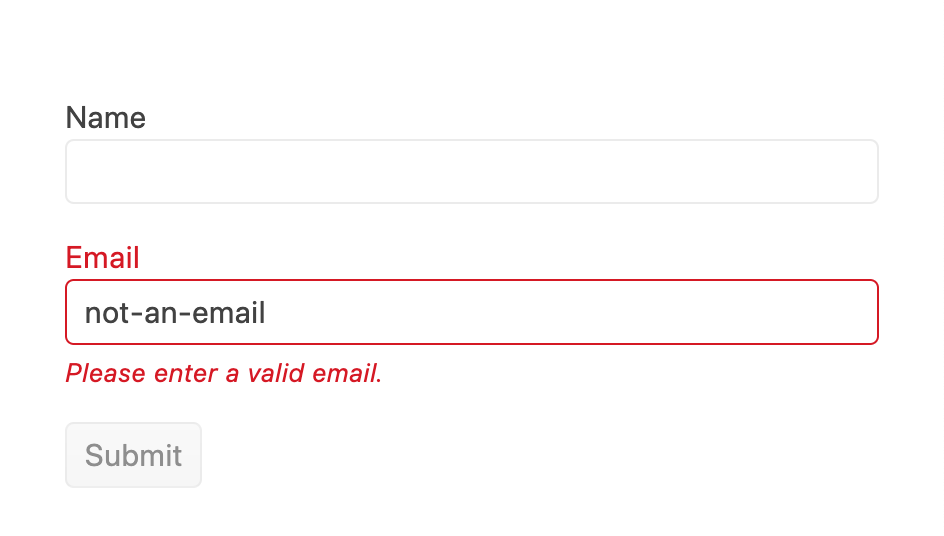
With this change, when we now attempt to submit the form with an invalid email, we’re presented with a field-level validation error prompting the user to enter a valid email address correctly.
If we were to enter a valid email address, the form would be submitted successfully, and the intended alert notification would appear.
Test out the above example using the following StackBlitz link. Note that we’re not using the
<script setup>syntatic sugar in this StackBlitz version of the app.
The ability to inject Kendo UI for Vue form data into any component nested within the Vue Form component offers significant advantages, particularly in complex applications with deep component trees. This approach simplifies state management and validation logic sharing across components, ensuring that form state and control (such as validation, submission status and form field states) are centrally managed and easily accessible.
Wrap-up
In conclusion, Vue’s provide/inject pattern presents a powerful method for managing and sharing state across complex component trees, reducing the need for prop drilling and enhancing application maintainability. When combined with rich UI components, like those offered by Progress Kendo UI, developers can efficiently build applications with advanced form functionality. This blend of Vue’s reactivity system and the Kendo UI for Vue component library allows for the creation of dynamic, user-friendly forms that are both easy to manage and extend.
For more details, be sure to check out the official Vue documentation on provide/inject and the Kendo UI for Vue Form component documentation! And don’t forget, Kendo UI for Vue comes with a free 30-day trial, so you can try it out for yourself.
This content originally appeared on Telerik Blogs and was authored by Hassan Djirdeh
Hassan Djirdeh | Sciencx (2024-07-15T08:12:02+00:00) Vue Basics: Exploring Vue’s Provide/Inject Pattern. Retrieved from https://www.scien.cx/2024/07/15/vue-basics-exploring-vues-provide-inject-pattern/
Please log in to upload a file.
There are no updates yet.
Click the Upload button above to add an update.