This content originally appeared on Level Up Coding - Medium and was authored by Arseniy Tomkevich
Setting up your own Kubernetes Cluster with Multipass — A Step by Step Guide
Have you ever wanted to build your own Kubernetes setup? In this article I will take you on an ambitious journey to create a scalable infrastructure from scratch, a local AWS if you like. This endeavor was driven by a desire for hands-on experience and a deeper understanding of Kubernetes’ inner workings.
I will be using a Mac but I don’t think that matters much, because all of these commands and configuration can be useful on any platform where you can run Multipass because a lot of settings are applied to VMs themselves.
In Multipass, VMs are assigned dynamic IP addresses, that can change after a reboot. This behavior can disrupt a Kubernetes cluster, as changing IP addresses interfere with cluster communication and stability. Therefore, it is crucial to provision VMs with static IP addresses.
Setting up a new bridge with a static IP on the Mac
Here I go creating a new bridge with a static IP on my host.
To create a new bridge with a static IP on macOS, you can use the built-in ifconfig utility and modify network settings accordingly. Here is a step-by-step guide:
Create the Bridge Interface
Open Terminal.
Use the ifconfig command to create a new bridge interface. This example will use bridge0.
sudo ifconfig bridge0 create
Add the physical network interface to the bridge. Replace en0 with your network interface name.
sudo ifconfig bridge0 addm en0
Step 2: Configure the Bridge with a Static IP
Assign a static IP to the bridge. Replace 192.168.1.2 with your desired IP address and 255.255.255.0 with your subnet mask.
sudo ifconfig bridge0 inet 192.168.1.2 netmask 255.255.255.0 up
Set the default gateway if needed. Replace 192.168.1.1 with your gateway IP.
sudo route add default 192.168.1.1
Step 3: Persist Configuration
To make these changes persistent across reboots, you need to create a launch daemon.
Create a new launch daemon plist file in /Library/LaunchDaemons/. For example, com.local.bridge.plist.
sudo nano /Library/LaunchDaemons/com.local.bridge.plist
Add the following content to the plist file:
<?xml version="1.0" encoding="UTF-8"?>
<!DOCTYPE plist PUBLIC "-//Apple//DTD PLIST 1.0//EN" "http://www.apple.com/DTDs/PropertyList-1.0.dtd">
<plist version="1.0">
<dict>
    <key>Label</key>
    <string>com.local.bridge</string>
    <key>ProgramArguments</key>
    <array>
        <string>/usr/sbin/ifconfig</string>
        <string>bridge0</string>
        <string>create</string>
        <string>addm</string>
        <string>en0</string>
        <string>inet</string>
        <string>192.168.1.2</string>
        <string>netmask</string>
        <string>255.255.255.0</string>
        <string>up</string>
    </array>
    <key>RunAtLoad</key>
    <true/>
</dict>
</plist>
Set the appropriate permissions for the plist file.
sudo chown root:wheel /Library/LaunchDaemons/com.local.bridge.plist
sudo chmod 644 /Library/LaunchDaemons/com.local.bridge.plist
Load the plist file to apply the settings.
sudo launchctl load /Library/LaunchDaemons/com.local.bridge.plist
Step 4: Verify the Configuration
Check that the bridge is active and has the correct IP configuration.
ifconfig bridge0
This process sets up a network bridge with a static IP on macOS Monterey, and the configuration persists across reboots.
Setup a Control-Plane Instance
A control-plane is essentially the VM thats going to be the master within our cluster, it will coordinate and schedule jobs on other nodes within the cluster.
We need to launch a virtual machine instance using Multipass.
We are going to call it kubemaster and put it on the en0 network. We’ll allocate 10gb of disk space for the instance and 3gb RAM, 2CPU cores and thats going to be using the base name “Jammy” which reffers to the codename for Ubuntu 22.04 LTS (Jammy Jellyfish)
multipass launch --disk 10G --memory 3G --cpus 2 --name kubemaster --network name=en0,mode=manual,mac="02:42:ac:11:00:02" jammy
You should see the kubemaster spinning up and then
Launched: kubemaster
Run the command to see the kubemaster IP address:
multipass list or you could actually shell into the instance with multipass shell kubemaster
My IP address for kubemaster is 192.168.64.4. So the static IP should end with 100, but when setting up you can pick your own IP, so let’s configure the extra interface for the instance.
Just run this command, which executes multipass exec, which means it will execute this command within the kubemaster instance
multipass exec kubemaster -- sudo bash -c 'cat << EOF > /etc/netplan/10-custom.yaml
network:
  version: 2
  ethernets:
    extra0:
      dhcp4: no
      match:
        macaddress: "52:54:00:d5:d5:11"
      addresses: [192.168.64.100/24]
EOF'
Then run this to apply the configuration, which will run another command within the kubemaster instance
multipass exec -n kubemaster - sudo netplan apply
You should get this output, ignore any warnings

Go ahead and confirm that its working, run this command:
multipass info kubemaster
You should see this type of output:
Name: kubemaster
State: Running
Snapshots: 0
IPv4: 192.168.64.5
 192.168.64.100
Release: Ubuntu 22.04.4 LTS
Image hash: 769f0355acc3 (Ubuntu 22.04 LTS)
CPU(s): 2
Load: 0.00 0.00 0.00
Disk usage: 1.6GiB out of 9.6GiB
Memory usage: 180.8MiB out of 2.9GiB
Go ahead and ping these IPs to make sure everything is in order
ping 192.168.64.5
ping 192.168.64.100
You can also execute a command from within the instance and ping your local machine, make sure to replace the following IP with your local host IP
multipass exec -n kubemaster -- ping 192.168.132.63

PING 192.168.132.63 (192.168.132.63) 56(84) bytes of data.
64 bytes from 192.168.132.63: icmp_seq=1 ttl=64 time=0.835 ms
64 bytes from 192.168.132.63: icmp_seq=2 ttl=64 time=0.797 ms
64 bytes from 192.168.132.63: icmp_seq=3 ttl=64 time=0.735 ms
64 bytes from 192.168.132.63: icmp_seq=4 ttl=64 time=0.511 ms
64 bytes from 192.168.132.63: icmp_seq=5 ttl=64 time=0.627 ms
64 bytes from 192.168.132.63: icmp_seq=6 ttl=64 time=0.999 ms
64 bytes from 192.168.132.63: icmp_seq=7 ttl=64 time=0.826 ms
64 bytes from 192.168.132.63: icmp_seq=8 ttl=64 time=0.767 ms
64 bytes from 192.168.132.63: icmp_seq=9 ttl=64 time=0.758 ms
64 bytes from 192.168.132.63: icmp_seq=10 ttl=64 time=1.03 ms
Create both mules
Now we’ll go ahead and setup both of our mule nodes kubesmule101 & kubesmule102
Run these commands one after the other:
multipass launch --disk 10G --memory 3G --cpus 2 --name kubesmule01 --network name=en0,mode=manual,mac="44:33:00:4b:ba:e1" jammy

multipass launch --disk 10G --memory 3G --cpus 2 --name kubesmule02 --network name=en0,mode=manual,mac="44:33:00:4b:cd:ee" jammy
After that run these commands to make sure both instances have been created:
multipass info kubesmule01

multipass info kubesmule02
You should see this in the output
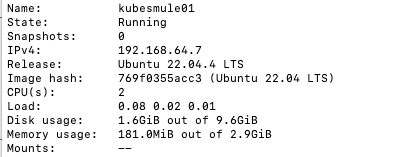
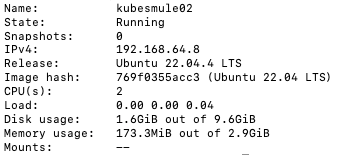
Notice the IPs I have here are 192.168.64.X, we’ll use this, now lets create an extra interface for both of these instances by running these commands. Here we are running the command within each instance that assigns it a static IP, I used 192.168.64.120 and 192.168.64.130:
multipass exec -n kubesmule01 -- sudo bash -c 'cat << EOF > /etc/netplan/10-custom.yaml
network:
  version: 2
  ethernets:
    extra0:
      dhcp4: no
      match:
        macaddress: "44:33:00:4b:ba:e1"
      addresses: [192.168.64.120/24]
EOF'


multipass exec -n kubesmule02 -- sudo bash -c 'cat << EOF > /etc/netplan/10-custom.yaml
network:
  version: 2
  ethernets:
    extra0:
      dhcp4: no
      match:
        macaddress: "44:33:00:4b:cd:ee"
      addresses: [192.168.64.130/24]
EOF'
Run these commands to apply the configuration:
multipass exec -n kubesmule01 -- sudo netplan apply

multipass exec -n kubesmule02 -- sudo netplan apply
Lets check if our instances have static IPs, run this:
multipass info kubesmule01
multipass info kubesmule02
You should see two IPs in the output of each command:
Name:           kubesmule01
State:          Running
Snapshots:      0
IPv4:           192.168.64.7
                192.168.64.120
Release:        Ubuntu 22.04.4 LTS
Image hash:     769f0355acc3 (Ubuntu 22.04 LTS)
CPU(s):         2
Load:           0.00 0.00 0.00
Disk usage:     1.6GiB out of 9.6GiB
Memory usage:   173.8MiB out of 2.9GiB

Name:           kubesmule02
State:          Running
Snapshots:      0
IPv4:           192.168.64.8
                192.168.64.130
Release:        Ubuntu 22.04.4 LTS
Image hash:     769f0355acc3 (Ubuntu 22.04 LTS)
CPU(s):         2
Load:           0.00 0.00 0.00
Disk usage:     1.6GiB out of 9.6GiB
Memory usage:   182.5MiB out of 2.9GiB
Now for the final test, lets ping all of these IPs from the local host and ping the local host from within each instance:
ping 192.168.64.7
ping 192.168.64.120

ping 192.168.64.8
ping 192.168.64.130

multipass exec -n kubesmule01 -- ping 192.168.132.63

multipass exec -n kubesmule02 -- ping 192.168.132.63
Configuring the local DNS
Now we have to change the hosts file inside each of the instances in order to configure the local DNS for each of the instances, you can do it one after the other or just open three Terminal tabs and do it in paralell:
multipass shell kubemaster
multipass shell kubesmule01
multipass shell kubesmule02
Run the following command in each instance:
sudo vi /etc/hosts
and add this information to the file. If you aren’t familiar with vi then press “a” once you enter the editor to start editing the file, once done press “Esc” and “:wq” to save and exit vi.
192.168.64.100 kubemaster
192.168.64.120 kubemule01
192.168.64.130 kubemule02
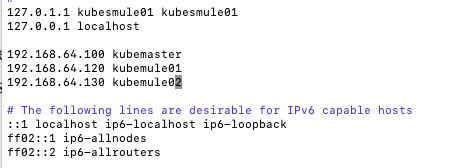
Now that we are done with setting up our instances, time to setup Kubernetes itself.
Finally, Setting up Kubernetes
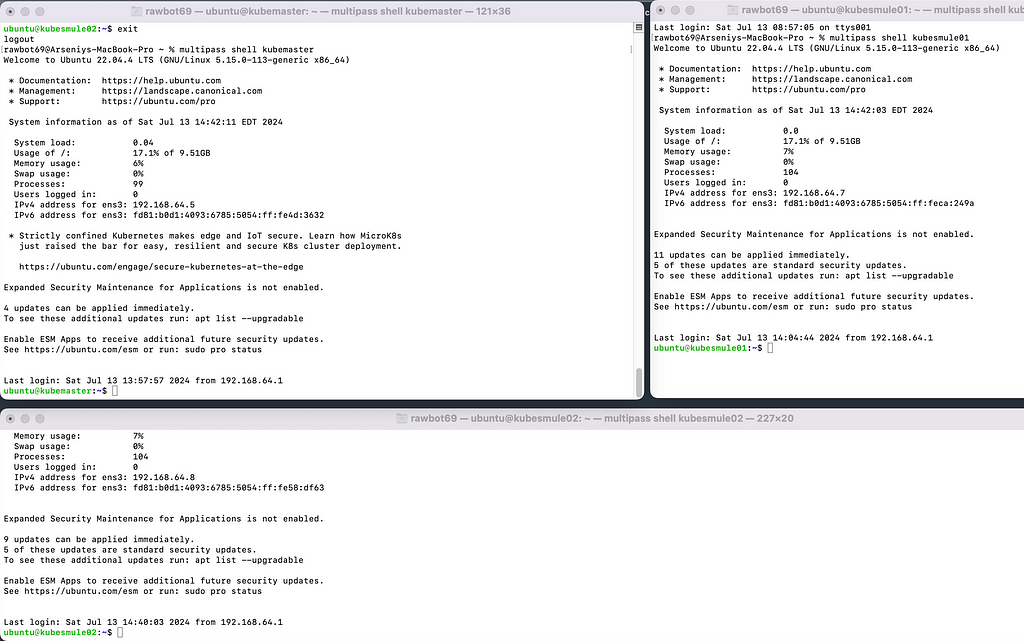
Open up 3 terminals and shell inside each of the instances like this and run the following commands in each of the instances:
The following commands are used to configure a Linux system for Kubernetes (k8s) setup by ensuring necessary kernel modules are loaded and sysctl parameters are set correctly. Here’s a breakdown of what each part does:
Loading Kernel Modules (k8s.conf):
cat <<EOF | sudo tee /etc/modules-load.d/k8s.conf
overlay
br_netfilter
EOF
- This command writes the strings overlay and br_netfilter to the file /etc/modules-load.d/k8s.conf.
- These modules (overlay and br_netfilter) are required by Kubernetes for networking and container runtime management.
sudo modprobe overlay
sudo modprobe br_netfilter
- These commands manually load the kernel modules overlay and br_netfilter into the kernel immediately after adding them to the configuration file.
- modprobe is used to load kernel modules into the kernel dynamically.
Setting Sysctl Parameters (k8s.conf):
cat <<EOF | sudo tee /etc/sysctl.d/k8s.conf
net.bridge.bridge-nf-call-iptables  = 1
net.bridge.bridge-nf-call-ip6tables = 1
net.ipv4.ip_forward                 = 1
EOF
- This command writes the specified sysctl parameters to the file /etc/sysctl.d/k8s.conf.
- These parameters (net.bridge.bridge-nf-call-iptables, net.bridge.bridge-nf-call-ip6tables, and net.ipv4.ip_forward) are required for Kubernetes networking and IP forwarding.
sudo sysctl --system
- This command applies the changes made in /etc/sysctl.d/k8s.conf immediately without needing a system reboot.
- It reads and applies sysctl settings from all files under /etc/sysctl.d/ and /run/sysctl.d/.
Verification:
- After configuring the modules and sysctl parameters, the script verifies if everything is set correctly.
lsmod | grep br_netfilter
lsmod | grep overlay

These commands check if the kernel modules br_netfilter and overlay are currently loaded.
sysctl net.bridge.bridge-nf-call-iptables net.bridge.bridge-nf-call-ip6tables net.ipv4.ip_forward
This command verifies that the sysctl parameters net.bridge.bridge-nf-call-iptables, net.bridge.bridge-nf-call-ip6tables, and net.ipv4.ip_forward are set to 1 as expected.

In summary, we’ve automated the configuration steps required to set up Linux for running Kubernetes, ensuring that necessary kernel modules are loaded and sysctl parameters are correctly configured. These steps are essential for Kubernetes to manage networking and IP forwarding effectively on the host system.
Now that the networking is setup, we can setup the runtime.
Setting up the Instance Runtime
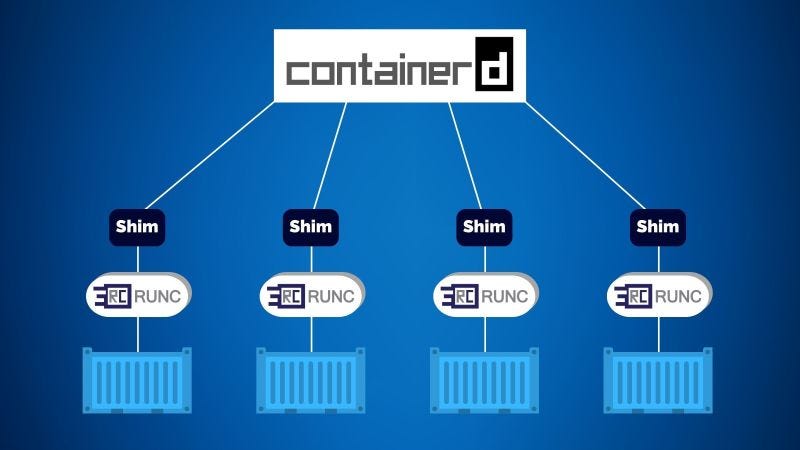
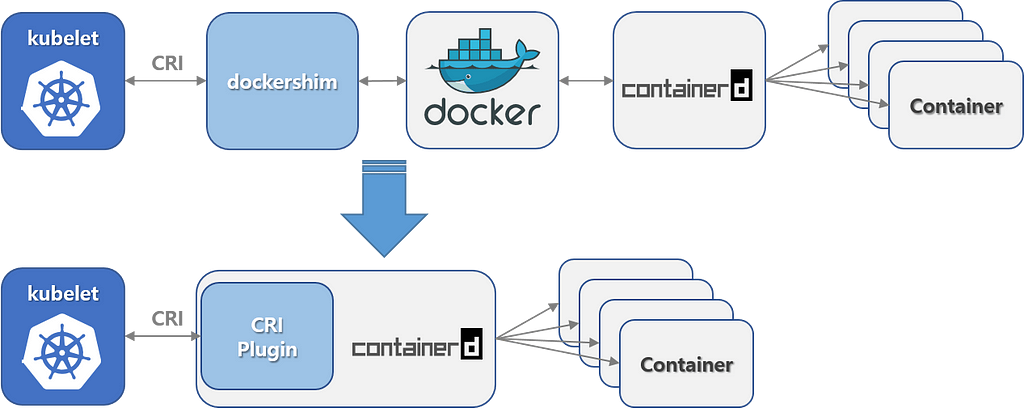
We will be configuring containerd, an industry-standard container runtime recognized for its simplicity, robustness, and portability.
As a daemon, containerd oversees the entire container lifecycle on its host system, encompassing tasks from image transfer and storage to container execution and supervision, as well as low-level storage management and network attachments.
We’ll be using the latest version 1.7.14, so lets execute the following commands on every instance, but first you need to understand your current system architecture, execute “uname -m” to find out. Mine is x86_64, which means we’ll be installing the amd64 versions of containerd. You can find these links here https://github.com/containerd/containerd/releases
# Download containerd binaries:
curl -LO https://github.com/containerd/containerd/releases/download/v1.7.19/containerd-1.7.19-linux-amd64.tar.gz

# Extract containerd binaries to /usr/local/:
sudo tar Cxzvf /usr/local containerd-1.7.19-linux-amd64.tar.gz

# Download containerd systemd service file:
curl -LO https://raw.githubusercontent.com/containerd/containerd/main/containerd.service

# Move systemd service file to appropriate directory:
sudo mkdir -p /usr/local/lib/systemd/system/
sudo mv containerd.service /usr/local/lib/systemd/system/

# Configure containerd with default settings:
sudo mkdir -p /etc/containerd/
sudo containerd config default | sudo tee /etc/containerd/config.toml > /dev/null

# Modify containerd configuration file to enable systemd cgroup integration:
sudo sed -i 's/SystemdCgroup \= false/SystemdCgroup \= true/g' /etc/containerd/config.toml

# Reload systemd manager configuration:
sudo systemctl daemon-reload

# Enable and start containerd service:
sudo systemctl enable --now containerd

# Check status of containerd service:
systemctl status containerd
Here is the break down of these commands:
- Download containerd binaries:
curl -LO https://github.com/containerd/containerd/releases/download/v1.7.19/containerd-1.7.19-linux-amd64.tar.gz
- We need to obtain the containerd binaries to install and configure containerd on these Linux instances. So we use curl to download the containerd binary
2. Extract containerd binaries to /usr/local/:
sudo tar Cxzvf /usr/local containerd-1.7.19-linux-amd64.tar.gz
- Here we use atar tool for handling archives to extract (x), compress (z), and show verbose output (v) of the contents of the containerd-1.7.14-linux-arm64.tar.gz file. The C flag ensures the operation is executed in /usr/local/
- By extracting the binaries to /usr/local/, you make them accessible system-wide, allowing containerd to be executed from anywhere on your system.
3. Download containerd systemd service file:
curl -LO https://raw.githubusercontent.com/containerd/containerd/main/containerd.service
- Again, we are using curl command to download the containerd.service file from the containerd GitHub repository (https://raw.githubusercontent.com/containerd/containerd/main/).
- The containerd.service file is needed to manage containerd as a systemd service, allowing it to start automatically and manage its lifecycle.
4. Move systemd service file to appropriate directory:
sudo mkdir -p /usr/local/lib/systemd/system/
sudo mv containerd.service /usr/local/lib/systemd/system/
- These commands create a directory (mkdir -p /usr/local/lib/systemd/system/) if it doesn't exist (-p flag), then move (mv) the containerd.service file to that directory.
- Placing containerd.service in /usr/local/lib/systemd/system/ ensures that systemd can locate and manage the containerd service effectively.
5. Configure containerd with default settings:
sudo mkdir -p /etc/containerd/
sudo containerd config default | sudo tee /etc/containerd/config.toml > /dev/null
- These commands create a directory (mkdir -p /etc/containerd/) if it doesn't exist, then generate the default configuration for containerd (containerd config default). The output (|) of this configuration command is redirected (tee) to /etc/containerd/config.toml. The tee command also outputs to /dev/null to discard unnecessary console output.
- This step ensures that containerd has a basic configuration file (config.toml) in place with default settings, which is necessary for its proper operation.
6. Modify containerd configuration file to enable systemd cgroup integration:
sudo sed -i 's/SystemdCgroup \= false/SystemdCgroup \= true/g' /etc/containerd/config.toml
- This command uses sed (stream editor) to replace (s) occurrences of SystemdCgroup = false with SystemdCgroup = true in the /etc/containerd/config.toml file.
- Enabling systemd cgroup integration ensures that containerd uses systemd for managing cgroups (control groups), which is the preferred method for managing resource limits and isolation in modern Linux distributions.
7. Reload systemd manager configuration:
sudo systemctl daemon-reload
- systemctl daemon-reload instructs systemd to reload its configuration files and units.
- After making changes to systemd service files or configurations, you need to reload systemd to apply those changes.
8. Enable and start containerd service:
sudo systemctl enable --now containerd
- systemctl enable --now containerd enables (enable) the containerd service to start on boot (--nowalso starts it immediately).
- Enabling the service ensures that containerd starts automatically when the system boots up (enable), and starting it immediately (--now) ensures that it is running without requiring a manual start.
9. Check status of containerd service:
systemctl status containerd
- systemctl status containerd displays the current status of the containerd service.
- This command is used to verify that containerd has started successfully and is running without any errors. Here is my output:

Now we need to install Runc

runc is a command-line tool for spawning and running containers according to the Open Container Initiative (OCI) specification. It is the industry-standard runtime used by container engines like Docker, containerd, and others to execute containers based on OCI-compliant container images.
You can find the latest release here: https://github.com/opencontainers/runc/releases/
Execute these commands on all 3 instances.
Here curl downloads run runtime into the home directory:
curl -LO https://github.com/opencontainers/runc/releases/download/v1.1.13/runc.amd64
This ensures that runc, a container runtime executable for the amd64 architecture, is properly installed and executable on the system:
sudo install -m 755 runc.amd64 /usr/local/sbin/runc
Install CNI plugins (https://www.cni.dev)
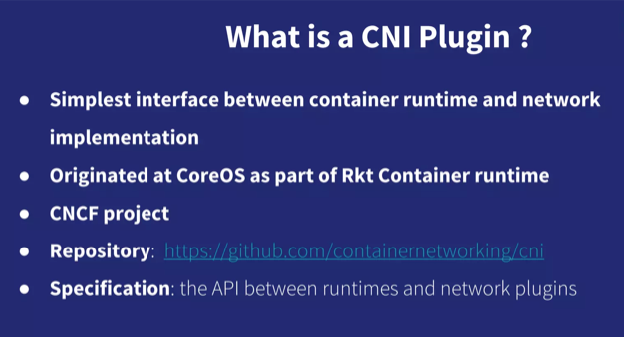
CNI (Container Network Interface) plugins are a set of specifications and plugins that define how network connectivity is established and managed for containers running on Linux-based systems.
CNI plugins provide a standardized way for container orchestrators (like Kubernetes, Docker, etc.) to configure networking for containers. They handle tasks such as assigning IP addresses, creating virtual network interfaces, setting up routing rules, and managing network policies.
You can find the latest versions here:
https://github.com/containernetworking/plugins/releases
Go ahead and run these commands on all 3 instances. These commands download and install the plugins within the instances.
curl -LO https://github.com/containernetworking/plugins/releases/download/v1.5.1/cni-plugins-linux-amd64-v1.5.1.tgz
sudo mkdir -p /opt/cni/bin
sudo tar Cxzvf /opt/cni/bin cni-plugins-linux-amd64-v1.5.1.tgz
Installing Kubernetes (kubeadm, kubelet and kubectl)
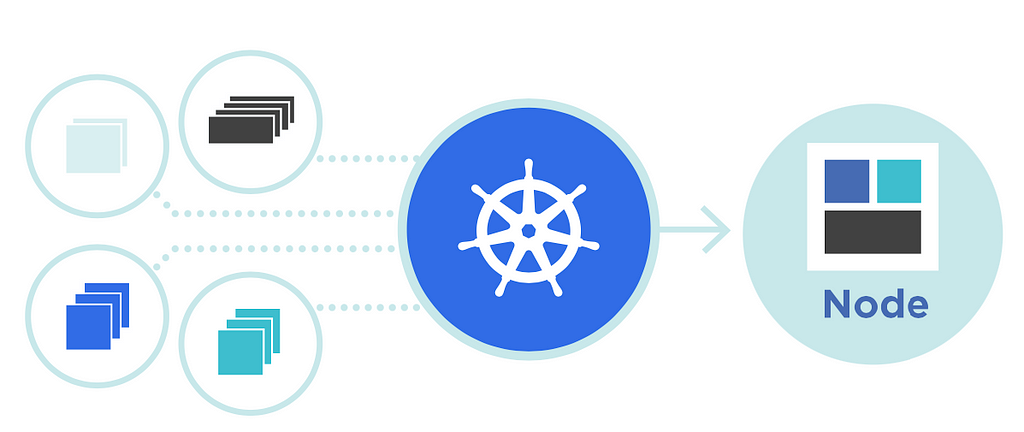
Kubernetes, also known as K8s, is an open source system for automating deployment, scaling, and management of containerized applications.
kubeadm
kubeadm is a command-line tool used for bootstrapping Kubernetes clusters. It facilitates the setup of a basic Kubernetes cluster by handling the initialization of the control plane, joining nodes to the cluster, and ensuring that the cluster meets the minimum requirements for Kubernetes operation.
System administrators and DevOps engineers use kubeadm during initial cluster setup, upgrades, and node management. It abstracts complex Kubernetes setup tasks into simpler commands.
kubelet
kubelet is an essential Kubernetes component running on each node in the cluster. It's responsible for managing the containers on the node, ensuring they run in the desired state specified by the Kubernetes manifests.
kubelet is critical for the operational health of each node in a Kubernetes cluster. It ensures that applications defined in Pods are correctly scheduled, launched, and maintained on the node.
kubectl
kubectl is the command-line tool used for interacting with the Kubernetes cluster. It allows users to deploy and manage applications, inspect and manage cluster resources, and view logs and metrics.
Developers, system administrators, and operators use kubectl extensively to interact with Kubernetes clusters. It provides a powerful interface for managing and troubleshooting applications and resources in Kubernetes.
Together, kubeadm, kubelet, and kubectl form the core toolset for deploying, managing, and operating Kubernetes clusters, catering to different aspects of cluster lifecycle management and application deployment in Kubernetes environments.
Run these commands on every instance:
# Update the local package database on your Linux system
sudo apt-get update

# Install necessary packages required for securely downloading packages over HTTPS
sudo apt-get install -y apt-transport-https ca-certificates curl gpg

# Download and install the Kubernetes package repository signing key
curl -fsSL https://pkgs.k8s.io/core:/stable:/v1.29/deb/Release.key | sudo gpg --dearmor -o /etc/apt/keyrings/kubernetes-apt-keyring.gpg

# Add the Kubernetes package repository to your system's package sources
echo 'deb [signed-by=/etc/apt/keyrings/kubernetes-apt-keyring.gpg] https://pkgs.k8s.io/core:/stable:/v1.29/deb/ /' | sudo tee /etc/apt/sources.list.d/kubernetes.list

# Update the local package database again to include the newly added Kubernetes repository
sudo apt-get update

# Install Kubernetes components (kubelet, kubeadm, kubectl) on your system
sudo apt-get install -y kubelet kubeadm kubectl

# Prevent apt from automatically updating the specified packages
sudo apt-mark hold kubelet kubeadm kubectl
And now verify that the installation is a success by running these commands:
# Displays the version of kubeadm installed on your system
kubeadm version

# Displays the version of kubelet installed on your system
kubelet --version

# Displays the client version of kubectl installed on your system.
kubectl version --client

Now configure crictl to work with containerd
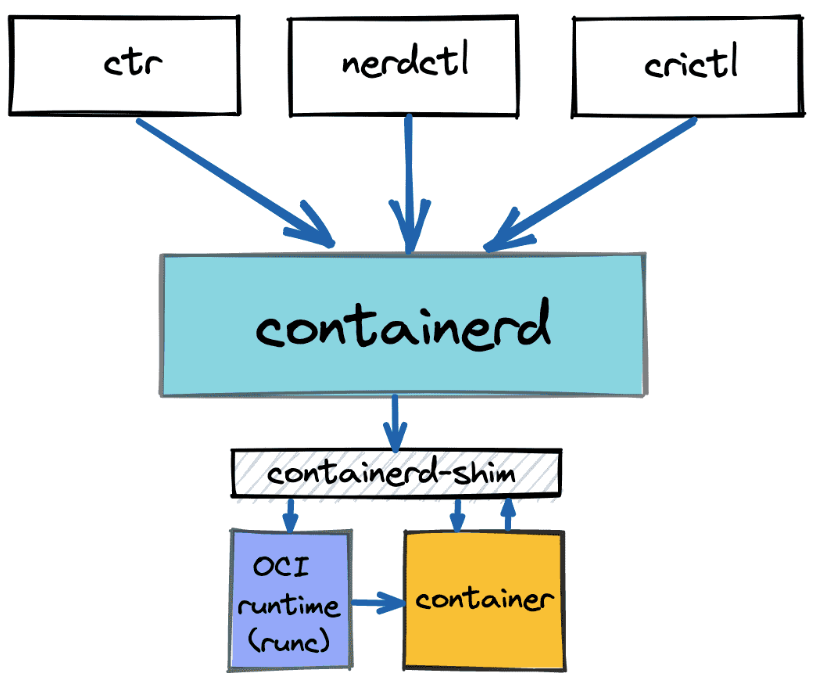
Configuring crictl to work with containerd involves specifying the runtime endpoint where containerd listens for container runtime requests. Let's break down why this configuration step is necessary and what it entails:
crictl is a command-line interface (CLI) tool for interacting with container runtimes that adhere to the Container Runtime Interface (CRI) specification.
It allows administrators and developers to manage containers and pods directly, inspect container runtime configuration, and perform troubleshooting tasks.
containerd communicates with tools like crictl over a Unix socket (unix:///var/run/containerd/containerd.sock).
This socket acts as a communication channel through which crictl sends commands to containerd and receives responses.
By configuring crictl with the runtime-endpoint option (sudo crictl config runtime-endpoint unix:///var/run/containerd/containerd.sock), you specify where crictl should send its commands related to container management.
This step ensures that crictl interacts with containerd correctly and can perform operations such as creating, inspecting, starting, stopping, and deleting containers managed by containerd.
Kubernetes uses crictl (via cri-containerd) as an interface to manage containers on nodes that run containerd.
Configuring crictl to point to containerd's Unix socket ensures that Kubernetes can orchestrate containers using containerd as the underlying runtime without issues.
This configuration step is essential for maintaining operational continuity and ensuring that container operations are managed correctly within Kubernetes clusters using containerd as the runtime engine.
Run this on every instance:
sudo crictl config runtime-endpoint unix:///var/run/containerd/containerd.socSe the controlplane node
Setting up the control-plane node
These commands should only be run on kubemaster. Kubemaster will control our mules and schedule to run the containers there.
The following command Initializes a new Kubernetes control plane. The apiserver-advertise-address parameter should be our Kubemaster static IP.
sudo kubeadm init --pod-network-cidr=10.244.0.0/16 --apiserver-advertise-address=192.168.64.100
When complete you should get the following output, which contains the kubeadm commands that you need to save to run on mule nodes.
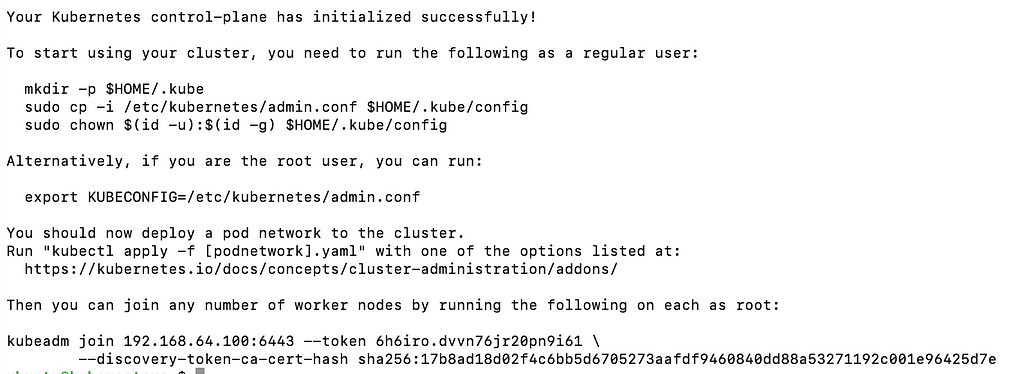
When we run sudo kubeadm init, Kubernetes performs several crucial steps to set up the control plane:
- It generates the necessary TLS certificates needed for secure communication within the cluster.
- It starts essential components like the API Server, Controller Manager, and Scheduler.
- It generates a kubeconfig file for the kubectl command-line tool, which allows administrative access to the cluster.
- It generates a token that other nodes can use to join the cluster.
Post-Initialization Steps:
After running sudo kubeadm init, Kubernetes provides instructions and commands that you should run on worker nodes to join them to the cluster. These commands typically include using the kubeadm join command with a token and discovery token hash generated during initialization. Here is my output:
Your Kubernetes control-plane has initialized successfully!

To start using your cluster, you need to run the following as a regular user:

  mkdir -p $HOME/.kube
  sudo cp -i /etc/kubernetes/admin.conf $HOME/.kube/config
  sudo chown $(id -u):$(id -g) $HOME/.kube/config

Alternatively, if you are the root user, you can run:

  export KUBECONFIG=/etc/kubernetes/admin.conf

You should now deploy a pod network to the cluster.
Run "kubectl apply -f [podnetwork].yaml" with one of the options listed at:
  https://kubernetes.io/docs/concepts/cluster-administration/addons/

Then you can join any number of worker nodes by running the following on each as root:

kubeadm join 192.168.64.100:6443 --token 6h6iro.dvvn76jr20pn9i61 \
 --discovery-token-ca-cert-hash sha256:17b8ad18d02f4c6bb5d6705273aafdf9460840dd88a53271192c001e96425d7e
Configuring kubectl
kubectl is a command-line tool for interacting with Kubernetes clusters. This command is part of setting up kubectl to interact with the Kubernetes cluster that was initialized using sudo kubeadm init.
Once configured, kubectl commands can be executed directly by the user without needing to specify the configuration file location each time.
Run these commands on the kubemaster:
# Creates the .kube directory in the user's home directory
mkdir -p $HOME/.kube

# Copies the Kubernetes cluster configuration file (admin.conf) to the .kube/config file in the user's home directory.
sudo cp -i /etc/kubernetes/admin.conf $HOME/.kube/config

# Changes the ownership of the config file in .kube directory to the current user.
sudo chown $(id -u):$(id -g) $HOME/.kube/config
Now lets verify that cluster is reached via kubectl, execute on kubemaster:
kubectl -n kube-system get pods

Install Weave Net
Next we need to make sure our Pods can communicate with each other, which is why we must deploy a Container Network Interface (CNI) based Pod network add-on. We’ll use kubectl to initiate the service.
Execute the following command on kubemaster:
kubectl apply -f https://reweave.azurewebsites.net/k8s/v1.28/net.yaml

By now, the control plane node should be operational, with all pods in the kube-system namespace. Please verify this to ensure the control plane’s functionality and health. Run:
kubectl -n kube-system get pods

Time to join the mules into the cluster
Connect to each mule and execute the entire kubeadm join command that was copied earlier from the output of the kubeadm init command.
This step integrates each mule into the Kubernetes cluster's control plane, allowing them to join and contribute to cluster operations.
It guarantees that all nodes are synchronized and capable of participating in workload distribution and management tasks across the Kubernetes cluster.
This process is essential for achieving a functional and scalable Kubernetes environment where nodes collaborate seamlessly to run containerized applications.
sudo kubeadm join 192.168.64.100:6443 --token 6h6iro.dvvn76jr20pn9i61 \
 --discovery-token-ca-cert-hash sha256:17b8ad18d02f4c6bb5d6705273aafdf9460840dd88a53271192c001e96425d7e

Also, you can always get a new join command from control-pane instance by running this in the kubemaster, which will generate a new join token:
kubeadm token create --print-join-command
Now check that all the mules joined the cluster by running this command in the kubemaster:
kubectl get nodes
You should get this output:

Validating the Kubernetes setup
To ensure the Kubernetes setup functions correctly, verify by deploying an nginx pod within the cluster.
Execute the following commands on the Kubernetes master node:
kubectl run test-nginx --image=nginx
then run this command to check the status of the service:
kubectl get pod test-nginx
At first you will see the following output where the READY status is 0/1 but then after a few seconds you should get READY 1/1 just like I have it in the following output:
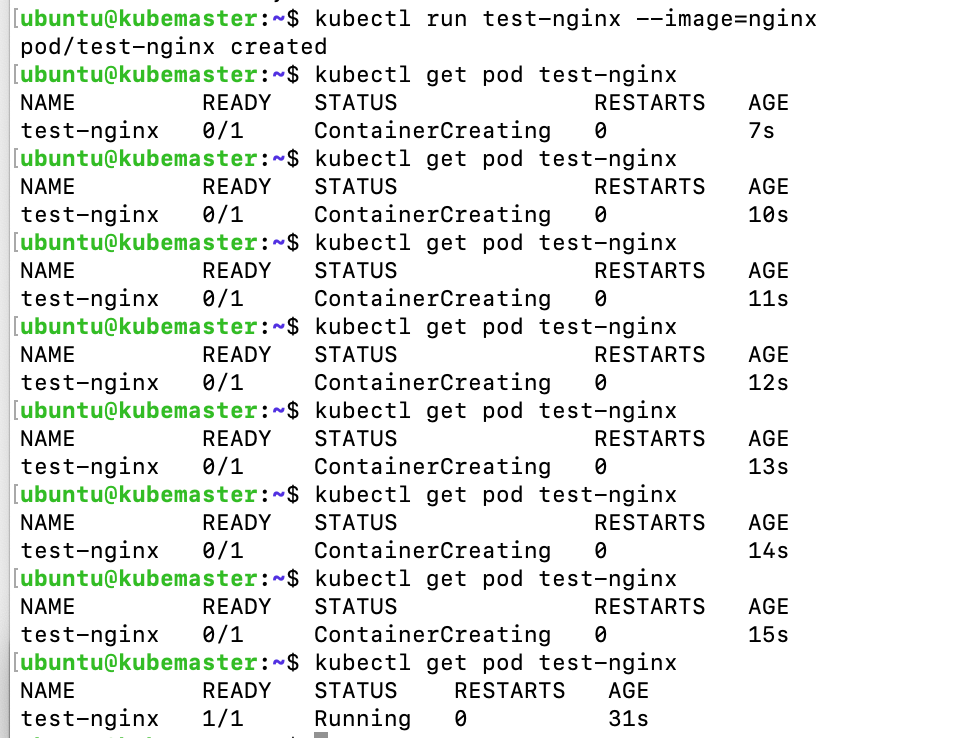
Congratulations! You have setup Kubernetes!!!

To stop the nginx pod that you deployed using kubectl run, you can delete the pod using kubectl delete pod. Here's how you can do it:
kubectl delete pod test-nginx
Kubernetes manages resources like pods, and deleting a pod stops the associated container(s) and removes the pod from the cluster.
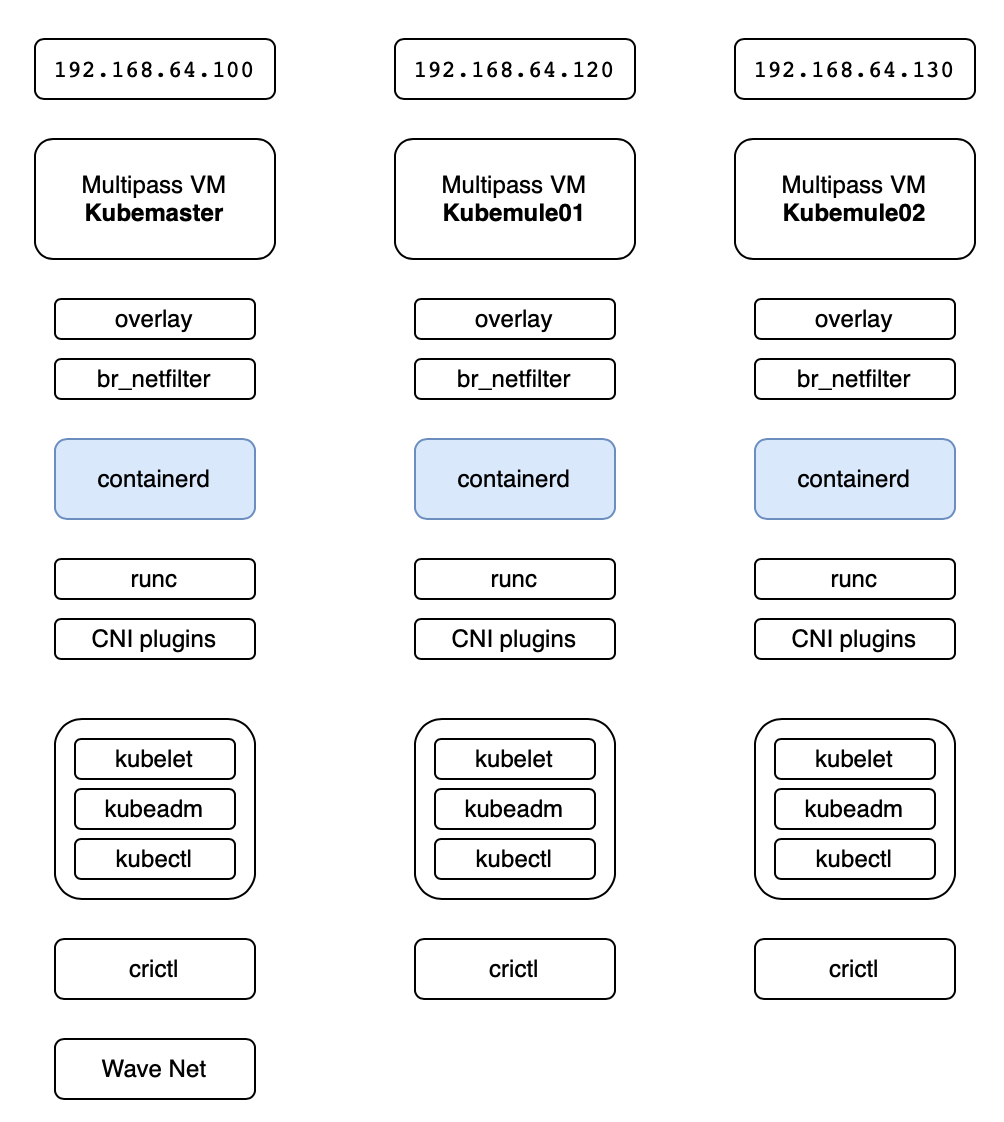
And finally, the following diagram describes perfectly our current setup.
Enjoy it and Happy Kuberneting!
Setting up Kubernetes Cluster with Multipass on A Mac — A Step by Step Guide was originally published in Level Up Coding on Medium, where people are continuing the conversation by highlighting and responding to this story.
This content originally appeared on Level Up Coding - Medium and was authored by Arseniy Tomkevich
Arseniy Tomkevich | Sciencx (2024-07-16T16:31:59+00:00) Setting up Kubernetes Cluster with Multipass on A Mac — A Step by Step Guide. Retrieved from https://www.scien.cx/2024/07/16/setting-up-kubernetes-cluster-with-multipass-on-a-mac-a-step-by-step-guide/
Please log in to upload a file.
There are no updates yet.
Click the Upload button above to add an update.
