
This content originally appeared on Level Up Coding - Medium and was authored by Sam Armentrout
Why Did I Decide to Utilize Golang for This?
To begin,
I’m a business analyst. I’m no developer and I don’t play one on TV. But I’ve led multiple development teams, and know a thing or two about building a product in increments. I know when to solicit feedback, and have helped deliver products that people are excited about.
For this hobbyist project, I started with a not-so-revolutionary idea. The notion that I could learn programming constructs more quickly if I were to avoid all the fluff. I’ve built android apps for fun, but I wanted something that could natively compile to windows without emulators or worrying so much about cross-platform development.
So I settled with Golang. It’s designed to be simple, fast, and idiomatic. I wanted something that felt natural to type. And equally important, I wanted code that I could rubber duck debug with (in Layman’s terms, articulate to an inanimate object). That way if I had to speak to a human about what my program is doing as it executes, I’d have a shot at explaining structs, functions, and more to that person.
What Did I Build Exactly?
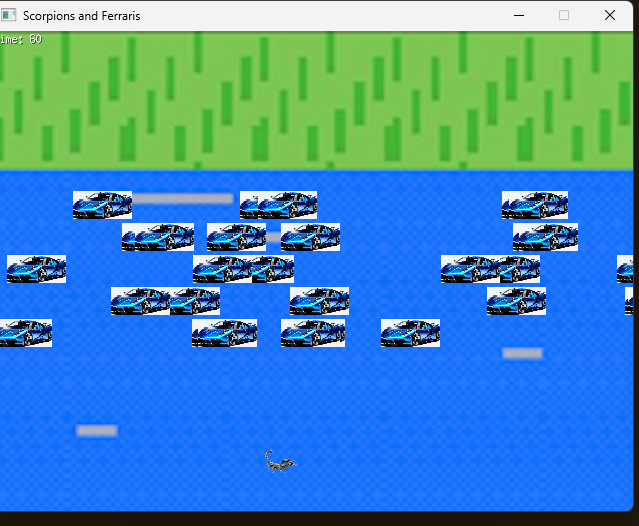
I developed a 2D game called Scorpions and Ferraris (inspired by Frogger and its mechanics). The concept is absurd but I learned a lot of game development rather quickly. For this project, I used a library called Ebiten, which is exclusively an open source game engine for Golang. With Ebiten, I leveraged its simple API and functions. That allowed me to quickly and easily develop this game that can be deployed across multiple platforms.
Now again, I am deploying to windows but you can leverage macOS and Linux as well. At the end of the day, we have an executable that’s outputted in the same directory as our code when we build it. That means we could even build the program on windows, and run that same program on Linux later, which is very cool.
How Do We Get Started?
1) Install Golang on Your OS
2) Run Ebiten’s Example as a POC
To get moving quickly, I’d actually recommend the hello world example that Ebiten has out there : https://ebitengine.org/en/tour/hello_world.html
3) Follow Along Below !
Create New Go Project
I recommend using VS Code as your IDE for this project. That’s because this VS Code has a Go extension with features like IntelliSense, code navigation, symbol search, testing, debugging, and many more things that’ll help you in Go development.
Open Git Bash or CMD
mkdir yourgame cd yourgame go mod init foo # or github.com/yourname/yourgame or anything
cd yourgame
Run "code ." within terminal to open VScode (Or open created directory in any ide)
We need to grab the ebiten module
The command to run in our terminal at the directory where your go.mod file is located :
go get github.com/hajimehoshi/ebiten/v2
Create Main.go File
If you’ve already probably guessed by now, this is where the main logic is stored for your program
Let’s start with adding package main and our imports:
When creating reusable code, you’ll develop a package intended to function as a shared library. However, for building executable programs, you should use the “main” package, which indicates to the Go compiler that the package is meant to compile as an executable rather than a shared library. The main function within the “main” package serves as the entry point for the executable program.
So in your Main.go file thus far we should add the code below
package main

import (
 "fmt"
 "image"
 _ "image/png"
 "log"
 "math/rand"
 "os"
 "time"

 "github.com/hajimehoshi/ebiten/v2"
 "github.com/hajimehoshi/ebiten/v2/ebitenutil"
 "github.com/hajimehoshi/ebiten/v2/vector"
 "image/color"
)
If you’re not new to programming, you’ll see some familiar libraries that have similar functionality in other programming languages. Package fmt implements formatted I/O with functions analogous to C’s printf and scanf.
You’ll see image, image/png for image loading and decoding, and math/rand for random number generation.
However, none of this is super important at the moment for understanding the programming logic.
If you’re new to programming, all you need to know is that we’re taking code from elsewhere (Licensed reusable code) and we’re importing this functionality into our program at the beginning of our file. In this way, when our program executes, and needs to say, decode an image later on, it can do that because we’ve pulled that code in.
Integer Constant Declaration
In this section, I defined a series of constants: That includes things like screen dimensions, grid size, player speed, number of lanes, and car parameters (speed, gap).
Now remember, I built a game similar to Frogger
My game involves controlling a player character (a scorpion) to avoid moving cars that are somehow crossing a watery highway at a high velocity. The goal is to not get hit by a pixelated ferrari, and reach the other side of the screen within a time limit.
So that first step is creating constants. Don’t worry about the numbers in particular. You could set any number for your program. I just picked what I felt was right, and that part took some fine tuning
const (
 screenWidth     = 640
 screenHeight    = 480
 gridSize        = 32
 gridWidth       = screenWidth / gridSize
 gridHeight      = screenHeight / gridSize
 playerSpeed     = 5
 numLanes        = 5
 numCarsPerLane  = 6 // Reduced number for clearer spacing
 carSpeedMin     = 1.5
 carSpeedMax     = 3.0
 minCarGap       = 3   // Minimum gap between cars in grid units
 maxCarGap       = 6   // Maximum gap between cars in grid units
)
Structs
Since Go is not purely object-oriented, it does not offer classes but instead provides structs. Methods can be associated with structs, allowing data and the methods that operate on it to be bundled together, similar to a class.
GameObject Struct: Represents game entities with properties like position, speed, image, size, and direction.
Game Struct: Contains the player, background image, object images, cars, current time, last update time, and game state.
type GameObject struct {
 x, y    float64
 speed   float64
 image   *ebiten.Image
 width   int
 height  int
 isRight bool
}

type Game struct {
 player         *GameObject
 background     *ebiten.Image
 objects        map[string]*ebiten.Image
 cars           []*GameObject
 currentTime    int
 lastUpdateTime time.Time
 gameState      string
}
New Game Func
NewGame Function: Initializes a new game with default values, loads images, and sets up the initial game state.
func NewGame() *Game {
 g := &Game{
  currentTime:    60,
  lastUpdateTime: time.Now(),
  objects:        make(map[string]*ebiten.Image),
  gameState:      "playing",
  player:         &GameObject{}, // Initialize the player
 }
 g.loadImages()
 g.initializeGame()
 return g
}
InitializeGame Method
This method in Sets the initial player position and populates the lanes with cars at random positions and speeds.
This part took the longest to determine exactly how much space we’d need for my scorpion player to get between cars at a given volume and speed.
func (g *Game) initializeGame() {
 // Set initial player position
 g.player.x = float64(gridWidth / 2 * gridSize)
 g.player.y = float64((gridHeight - 1) * gridSize)

 // Clear existing cars
 g.cars = []*GameObject{}

 // Initialize more cars in each lane
 for lane := 0; lane < numLanes; lane++ {
  lastCarX := -float64(gridSize) // Start position before the screen
  for i := 0; i < numCarsPerLane; i++ {
   // Calculate gap between cars
   minGap := lastCarX + float64(minCarGap*gridSize)
   maxGap := lastCarX + float64(maxCarGap*gridSize)
   carX := minGap + rand.Float64()*(maxGap-minGap)

   g.cars = append(g.cars, &GameObject{
    x:       carX,
    y:       float64(5+lane) * gridSize,  // Different lanes for cars
    speed:   carSpeedMin + rand.Float64()*(carSpeedMax-carSpeedMin),
    image:   g.objects["car"],
    width:   gridSize * 2,
    height:  gridSize,
    isRight: rand.Intn(2) == 0,
   })

   lastCarX = carX
  }
 }
}
Update Method
Handles game updates including player movement, car movement, and time updates
func (g *Game) Update() error {
 if g.gameState != "playing" {
  if ebiten.IsKeyPressed(ebiten.KeySpace) {
   g.initializeGame()
   g.currentTime = 60
   g.gameState = "playing"
  }
  return nil
 }

 now := time.Now()
 elapsed := now.Sub(g.lastUpdateTime).Seconds()
 g.lastUpdateTime = now

 if ebiten.IsKeyPressed(ebiten.KeyArrowLeft) {
  g.player.x -= gridSize * elapsed * playerSpeed
 }
 if ebiten.IsKeyPressed(ebiten.KeyArrowRight) {
  g.player.x += gridSize * elapsed * playerSpeed
 }
 if ebiten.IsKeyPressed(ebiten.KeyArrowUp) {
  g.player.y -= gridSize * elapsed * playerSpeed
 }
 if ebiten.IsKeyPressed(ebiten.KeyArrowDown) {
  g.player.y += gridSize * elapsed * playerSpeed
 }

 g.player.x = clamp(g.player.x, 0, screenWidth-gridSize)
 g.player.y = clamp(g.player.y, 0, screenHeight-gridSize)

 // Update cars
 for _, car := range g.cars {
  if car.isRight {
   car.x += car.speed * elapsed * gridSize
   if car.x > screenWidth {
    car.x = -float64(car.width)
   }
  } else {
   car.x -= car.speed * elapsed * gridSize
   if car.x < -float64(car.width) {
    car.x = screenWidth
   }
  }
 }
checkCollisions Method
Checks if the player collides with any cars and updates the game state accordingly.
This one is crucial — without it, our scorpion here would not face any resistance and would glide over ferraris on the virtual road
func (g *Game) checkCollisions() {
 playerRect := image.Rect(int(g.player.x), int(g.player.y), int(g.player.x)+g.player.width, int(g.player.y)+g.player.height)

 // Check car collisions
 for _, car := range g.cars {
  carRect := image.Rect(int(car.x), int(car.y), int(car.x)+car.width, int(car.y)+car.height)
  if playerRect.Overlaps(carRect) {
   g.gameState = "lose"
   return
  }
 }
}
Draw Method
Renders the game including the background, cars, player, time, and game state messages.
For further understanding, read this piece of Ebiten’s Documentation about Geometry Matrices
unc (g *Game) Draw(screen *ebiten.Image) {
 // Draw background
 op := &ebiten.DrawImageOptions{}
 screen.DrawImage(g.background, op)

 // Draw cars
 for _, car := range g.cars {
  op := &ebiten.DrawImageOptions{}
  op.GeoM.Translate(car.x, car.y)
  screen.DrawImage(car.image, op)
 }

 // Draw player
 if g.player.image != nil {
  op := &ebiten.DrawImageOptions{}
  op.GeoM.Translate(g.player.x, g.player.y)
  screen.DrawImage(g.player.image, op)
 } else {
  log.Println("Player image is nil, cannot draw")
  // Draw a placeholder rectangle for the player
  vector.DrawFilledRect(screen,
   float32(g.player.x),
   float32(g.player.y),
   float32(g.player.width),
   float32(g.player.height),
   color.RGBA{255, 0, 0, 255},
   false)
 }

 // Draw time
 ebitenutil.DebugPrint(screen, fmt.Sprintf("Time: %d", g.currentTime))

 // Draw game state
 if g.gameState == "win" {
  ebitenutil.DebugPrint(screen, "\n\nYou Win! Press SPACE to restart")
 } else if g.gameState == "lose" {
  ebitenutil.DebugPrint(screen, "\n\nGame Over! Press SPACE to restart")
 }
}
Layout Method
All this does is return the screen dimensions.
func (g *Game) Layout(outsideWidth, outsideHeight int) (int, int) {
 return screenWidth, screenHeight
}
The Most Important function in the Game ! : The Main Function
Sets the window size and title, and starts the game using Ebiten’s RunGame function.
func main() {
 ebiten.SetWindowSize(screenWidth, screenHeight)
 ebiten.SetWindowTitle("Scorpions and Ferraris")

 if err := ebiten.RunGame(NewGame()); err != nil {
  log.Fatal(err)
 }
}
Clamp Function
Ensures values stay within a specified range
func clamp(value, min, max float64) float64 {
 if value < min {
  return min
 }
 if value > max {
  return max
 }
 return value
}
Final Code

See My Github repo for complete code and a readme.md included !
The only thing missing from this tutorial are the image files, which you can pull down and place in your own directory, however I would encourage you to find your own background, object, and player images in the section below, because you’ll learn a thing or two about pixels, image editing, collisions and more from doing so
Selecting Your Own Images and Paint.net
This part is optional of course
I would recommend installing Paint.net from their github releases
Releases · paintdotnet/release
This is freeware that allows you to modify Raster graphics
This is needed as we’ll shrink images down to pixels and apply them as 2D objects essentially
For My background image, I chose the blank frogger background below

Now in Paint.net for the background it should be no smaller than the size of the window we defined
 screenWidth     = 640
 screenHeight    = 480
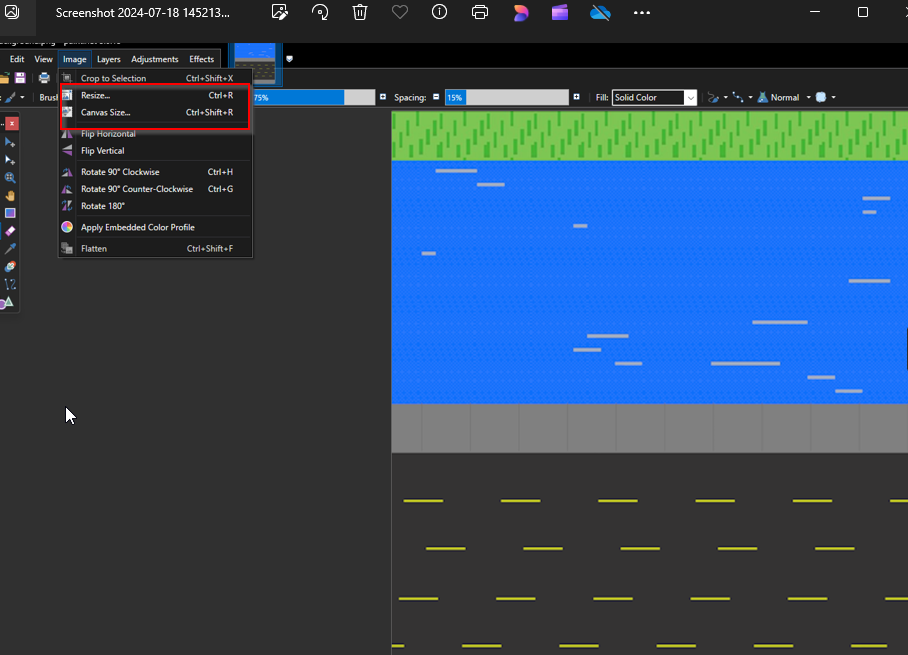
In my program I have it set as such,
Only you can determine what feels natural for the background you’ve chosen
For The Player and Car Size
Based on the window size defined in our program, the player and object sizes should be proportional to the grid size and screen dimensions for a balanced and visually coherent game
Player Size
Width and Height: The player size should be around the grid size to maintain good visibility and maneuverability. Since the grid size is 32 pixels, the player’s width and height can be around 32x32 pixels.
Positioning: Ensure the player’s initial position and movement adhere to the grid to prevent overlapping with other objects unexpectedly.
Cars:
Width: Cars can be wider than the grid size to create a sense of scale and difficulty. A width of 64 pixels (2 grid cells) is a good size, as you have already set in the code.
Height: The height can be the same as the grid size, 32 pixels, to ensure it fits well within the lanes.
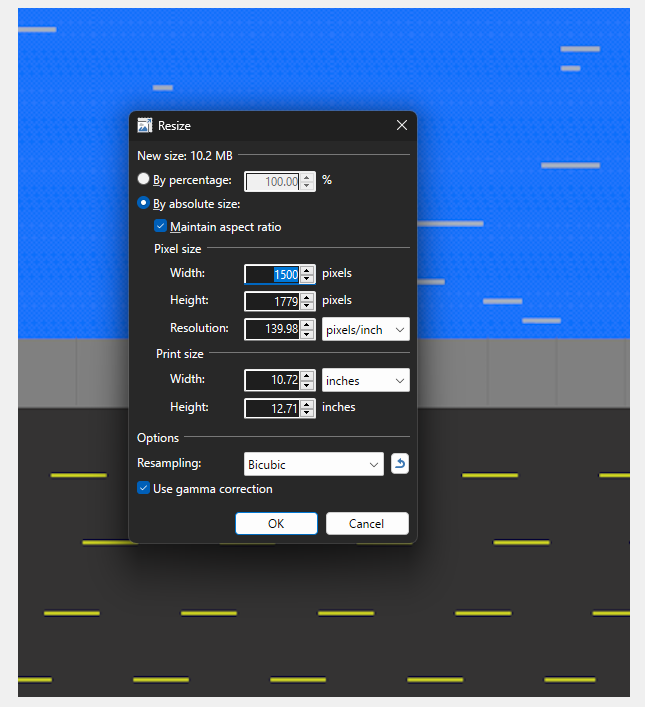
Recommendation with Paint.net
Shrink your player and car objects down to the recommended size with the resize button seen above
In my game you can see I did not adequately remove all the white space around my object.
This is where I can only go so far. Paint.net has some great documentation and tutorials, but I believe to remove the whitespace, you’d want to do a lasso or rectangle selection and then use the crop to selection functionality highlighted. That would give you your best odds at cleaning up the image
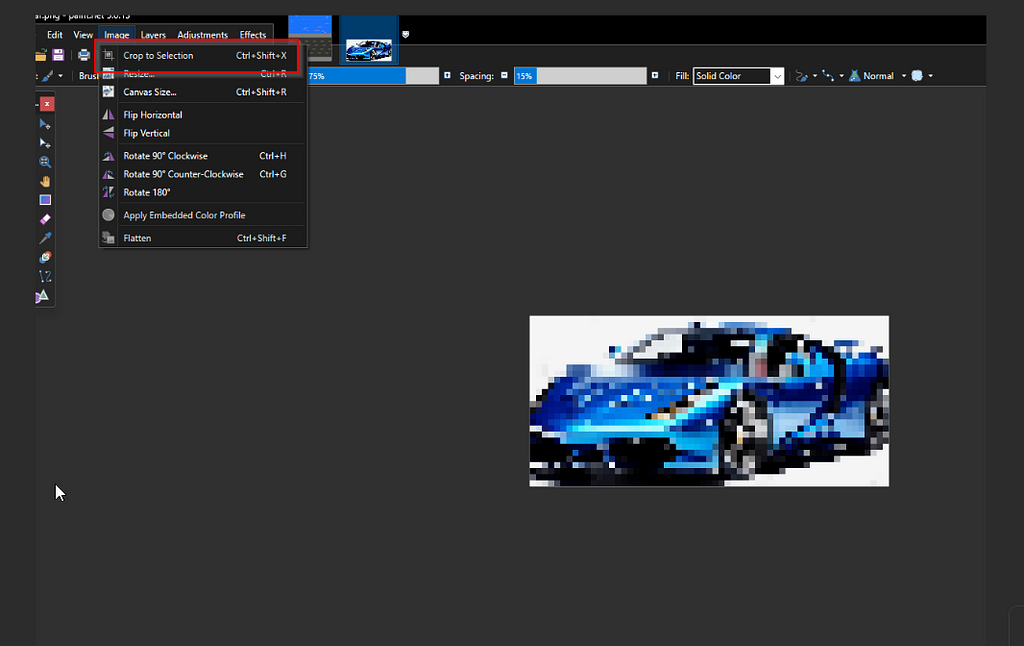
But the best way sometimes to test the image you’ve selected with the size you’ve chosen is simply to run the program and see how it looks — it may look comical !
Thanks for reading, and feel free to connect with me on Linkedin : https://www.linkedin.com/in/samuel-armentrout/
I Built a 2D Game in 40 Minutes with Ebiten was originally published in Level Up Coding on Medium, where people are continuing the conversation by highlighting and responding to this story.
This content originally appeared on Level Up Coding - Medium and was authored by Sam Armentrout
Sam Armentrout | Sciencx (2024-07-26T16:01:27+00:00) I Built a 2D Game in 40 Minutes with Ebiten. Retrieved from https://www.scien.cx/2024/07/26/i-built-a-2d-game-in-40-minutes-with-ebiten/
Please log in to upload a file.
There are no updates yet.
Click the Upload button above to add an update.