This content originally appeared on Telerik Blogs and was authored by Assis Zang
JSON is one of the most popular data types for communicating between web applications. Check out this post for the main features of ASP.NET Core for handling data in JSON format.
When working with ASP.NET Core web APIs, it is common to use JSON to serialize and deserialize objects between the client and server. This is done efficiently and transparently thanks to ASP.NET Core’s built-in capabilities for handling JSON.
In this post, we will learn what the JSON data format is, then we will create an application from scratch, integrate it with a database and perform some persistence operations to check what resources are available in ASP.NET Core and third-party libraries like Newtonsoft.Json.
What Is JSON?
JSON (JavaScript Object Notation) is a data format. JSON is one of the most popular data formats today. This is because it is lightweight and easy to read and write by humans and machines. Furthermore, it does not rely on a specific programming language; instead, it uses some conventions familiar to programmers from the C family of languages, including C, C++, C#, Java, JavaScript and others, making it a versatile choice for interoperability between modern systems.
The JSON structure follows the format of a collection of name/value pairs, where a collection is declared within two brackets [ ], and an object is declared through two braces { } containing the name/value pairs.
Imagine you are preparing a party and need to make a guest list, but you want your list to be easy to understand. JSON is like a sheet of paper where you write down all the information about your guests in a simple and very organized way.
Let’s say you’re making a guest list for your birthday party. In JSON you could have something like this:
{
  "guests": [
    {
      "name": "John",
      "age": 25,
      "phone": "123-456-789",
      "confirmed": true
    },
    {
      "name": "Aisha",
      "age": 30,
      "phone": "987-654-321",
      "confirmed": false
    }
  ]
}
Here, we have a set of information about each guest. A set of keys and values represents each guest. For example, we have the key name and the value John for the first guest. Note that each guest is separated by characters { } and a comma between them.
What Is in ASP.NET Core to Work with JSON?
ASP.NET Core is a popular web development framework with powerful tools and libraries, including robust support for handling JSON data.
Through the integrated features of ASP.NET Core, we can easily implement the serialization/deserialization of JSON data, being able to serialize C# objects to JSON format and deserialize JSON into C# objects. This allows for effective communication between the client and the server.
Another important feature available in ASP.NET Core is parameter binding, which automatically deserializes JSON data from HTTP requests into C# objects. This simplifies the processing of JSON data in controller actions, also allowing the response to be sent in JSON format through the JsonResult class.
In addition to integrated features, ASP.NET Core allows integration with popular JSON libraries such as Newtonsoft.Json (Json.NET), which has several advanced tools for working with JSON data.
Overall, ASP.NET Core allows you to simplify communication between web applications through its built-in and third-party features, making it a perfect choice for developers building APIs and modern web applications.
Exploring the JSON Resources
To explore the resources available in ASP.NET Core to work with JSON, let’s create a web API to register a product catalog in a database. This project will not consider good project architecture practices, such as separating into layers, as the focus is on exploring the resources to work with JSON so that the application will be as simple as possible.
To create the example in the post, you need to have the latest version of .NET installed. You can access the complete source code here: StockSync Source code.
Creating the Application and Installing the NuGet Packages
To create the sample application, you can use the following command:
dotnet new web -o StockSync
Open the project with your favorite IDE. This post will use Visual Studio Code.
To deal with the database, first you need to install the EF Core NuGet packages. Open a terminal inside the project and execute the following commands:
dotnet add package Microsoft.EntityFrameworkCore.Sqlite
dotnet add package Microsoft.EntityFrameworkCore.Design
dotnet add package Microsoft.EntityFrameworkCore.Tools
If you don’t have the EF Core local installation you can use the command below:
dotnet tool install --global dotnet-ef
Serialization and Deserialization
The first JSON resources we’ll talk about are serialization and deserialization.
Creating the Model Class
Let’s create the model class. Inside the project create a new folder called “Models” and inside it create the classes below:
- Product
using System.Text.Json;

namespace StockSync.Models;

public class Product
{
    public Guid Id { get; private set; }
    public string Name { get; set; }
    public string Description { get; set; }
    public decimal Price { get; set; }
    public int QuantityInStock { get; set; }
    public string Details { get; set; }
    public DateTime CreatedAt { get; private set; }


    public Product()
    {
        Id = Guid.NewGuid();
        CreatedAt = DateTime.UtcNow;
    }

    public Product(string name, string description, decimal price, int quantityInStock, string details) : this()
    {
        Name = name;
        Description = description;
        Price = price;
        QuantityInStock = quantityInStock;
        Details = details;
    }

    public string ToJson()
    {
        return JsonSerializer.Serialize(this);
    }

    public static Product FromJson(string json)
    {
        return JsonSerializer.Deserialize<Product>(json);
    }
}
- ProductHistory
namespace StockSync.Models;

public class ProductHistory
{
    public Guid Id { get; set; }
    public string Product { get; set; }
}
Note that in the Product class, two methods are declared that use the System.Text.Json class to serialize and deserialize objects in JSON format, allowing conversion to JSON and vice versa.
The ToJson() method returns a JSON representation of the Product class. This method will be useful in this context because all content received in the request will be converted to JSON and stored in a single column of the history table.
The FromJson(string json) method takes a JSON string as a parameter and uses the JsonSerializer.Deserialize<Product>(json) method to deserialize it back to an object of the Product class. This means that it is possible to pass a JSON string that represents a Product object and this method will return a Product object with its properties filled with the values provided in the JSON.
Creating the Context Class and the Connection String
Now let’s create the context class to make the connection with the database. Create a new folder called “Data” and inside it create the class below:
- ProductDbContext
using Microsoft.EntityFrameworkCore;
using StockSync.Models;

namespace StockSync.Data;

public class ProductDbContext : DbContext
{
    public ProductDbContext(DbContextOptions options) : base(options)
    {
    }

    public DbSet<Product> Products { get; set; }
    public DbSet<ProductHistory> ProductHistories { get; set; }
}
Then, open the file “appsettings.json” and add the snippet code below in it:
"ConnectionStrings": {
    "DefaultConnection": "DataSource=stockSyncDb.db;Cache=Shared"
  },
Creating the Endpoints
In the Program.cs file, replace the content for this code:
using Microsoft.EntityFrameworkCore;
using StockSync.Data;
using StockSync.Models;

var builder = WebApplication.CreateBuilder(args);
var connectionString = builder.Configuration.GetConnectionString("DefaultConnection");
builder.Services.AddDbContext<ProductDbContext>(x => x.UseSqlite(connectionString));

var app = builder.Build();

app.MapPost("/products/create", async (HttpContext context, ProductDbContext dbContext) =>
{
    using (var reader = new StreamReader(context.Request.Body))
    {
        string requestBody = await reader.ReadToEndAsync();

        Product deserializedProduct = Product.FromJson(requestBody);

        if (string.IsNullOrEmpty(deserializedProduct.Name))
            return Results.BadRequest("Name cannot be empty or null");

        dbContext.Products.Add(deserializedProduct);
        await dbContext.SaveChangesAsync();

        await SaveProductHistory(deserializedProduct, dbContext);

        return Results.Created($"/products/create/{deserializedProduct.Id}", deserializedProduct);
    }
});

async Task SaveProductHistory(Product product, ProductDbContext dbContext)
{
    var ProductHistory = new ProductHistory()
    {
        Id = Guid.NewGuid(),
        Product = product.ToJson()
    };

    dbContext.ProductHistories.Add(ProductHistory);
    await dbContext.SaveChangesAsync();
}

app.Run();
In the code above, we have an HTTP route, /products/create, where the body of the request received is read through the StreamReader class that receives the contents of context.Request.Body.
The body of the request usually contains the data sent by the customer—in this case, the details of a product to be created.
The request body is then read as a string (await reader.ReadToEndAsync()) and is deserialized using the Product.FromJson(requestBody) method, which converts the JSON string into a Product object.
A check is also made whether the product name is null or empty. If so, a BadRequest error response indicates that the name cannot be empty or null. This is why deserialization into objects is important, as otherwise, it would be necessary to obtain the property value directly from JSON, which would require more effort and in some scenarios may not be possible.
The JSON is then serialized, where the product is converted to JSON using the Product.ToJson() method and stored in the Product property of the history class. In scenarios where it is necessary to record data for history, serialization is very useful as it allows data to be transformed into JSON format, facilitating the storage of this data.
Finally, the data is written to the database and an HTTP status 201 - Created is returned.
Generating the Database Schema with Migrations
Now let’s generate the database schema by running the EF Core Migrations commands. So, open a terminal at the root of the application and execute the following commands:
dotnet ef migrations add InitialCreate– Creates the files used to generate the schemas.dotnet ef database update– Executes commands from previously generated files.
Testing the Serialization and Deserialization Methods
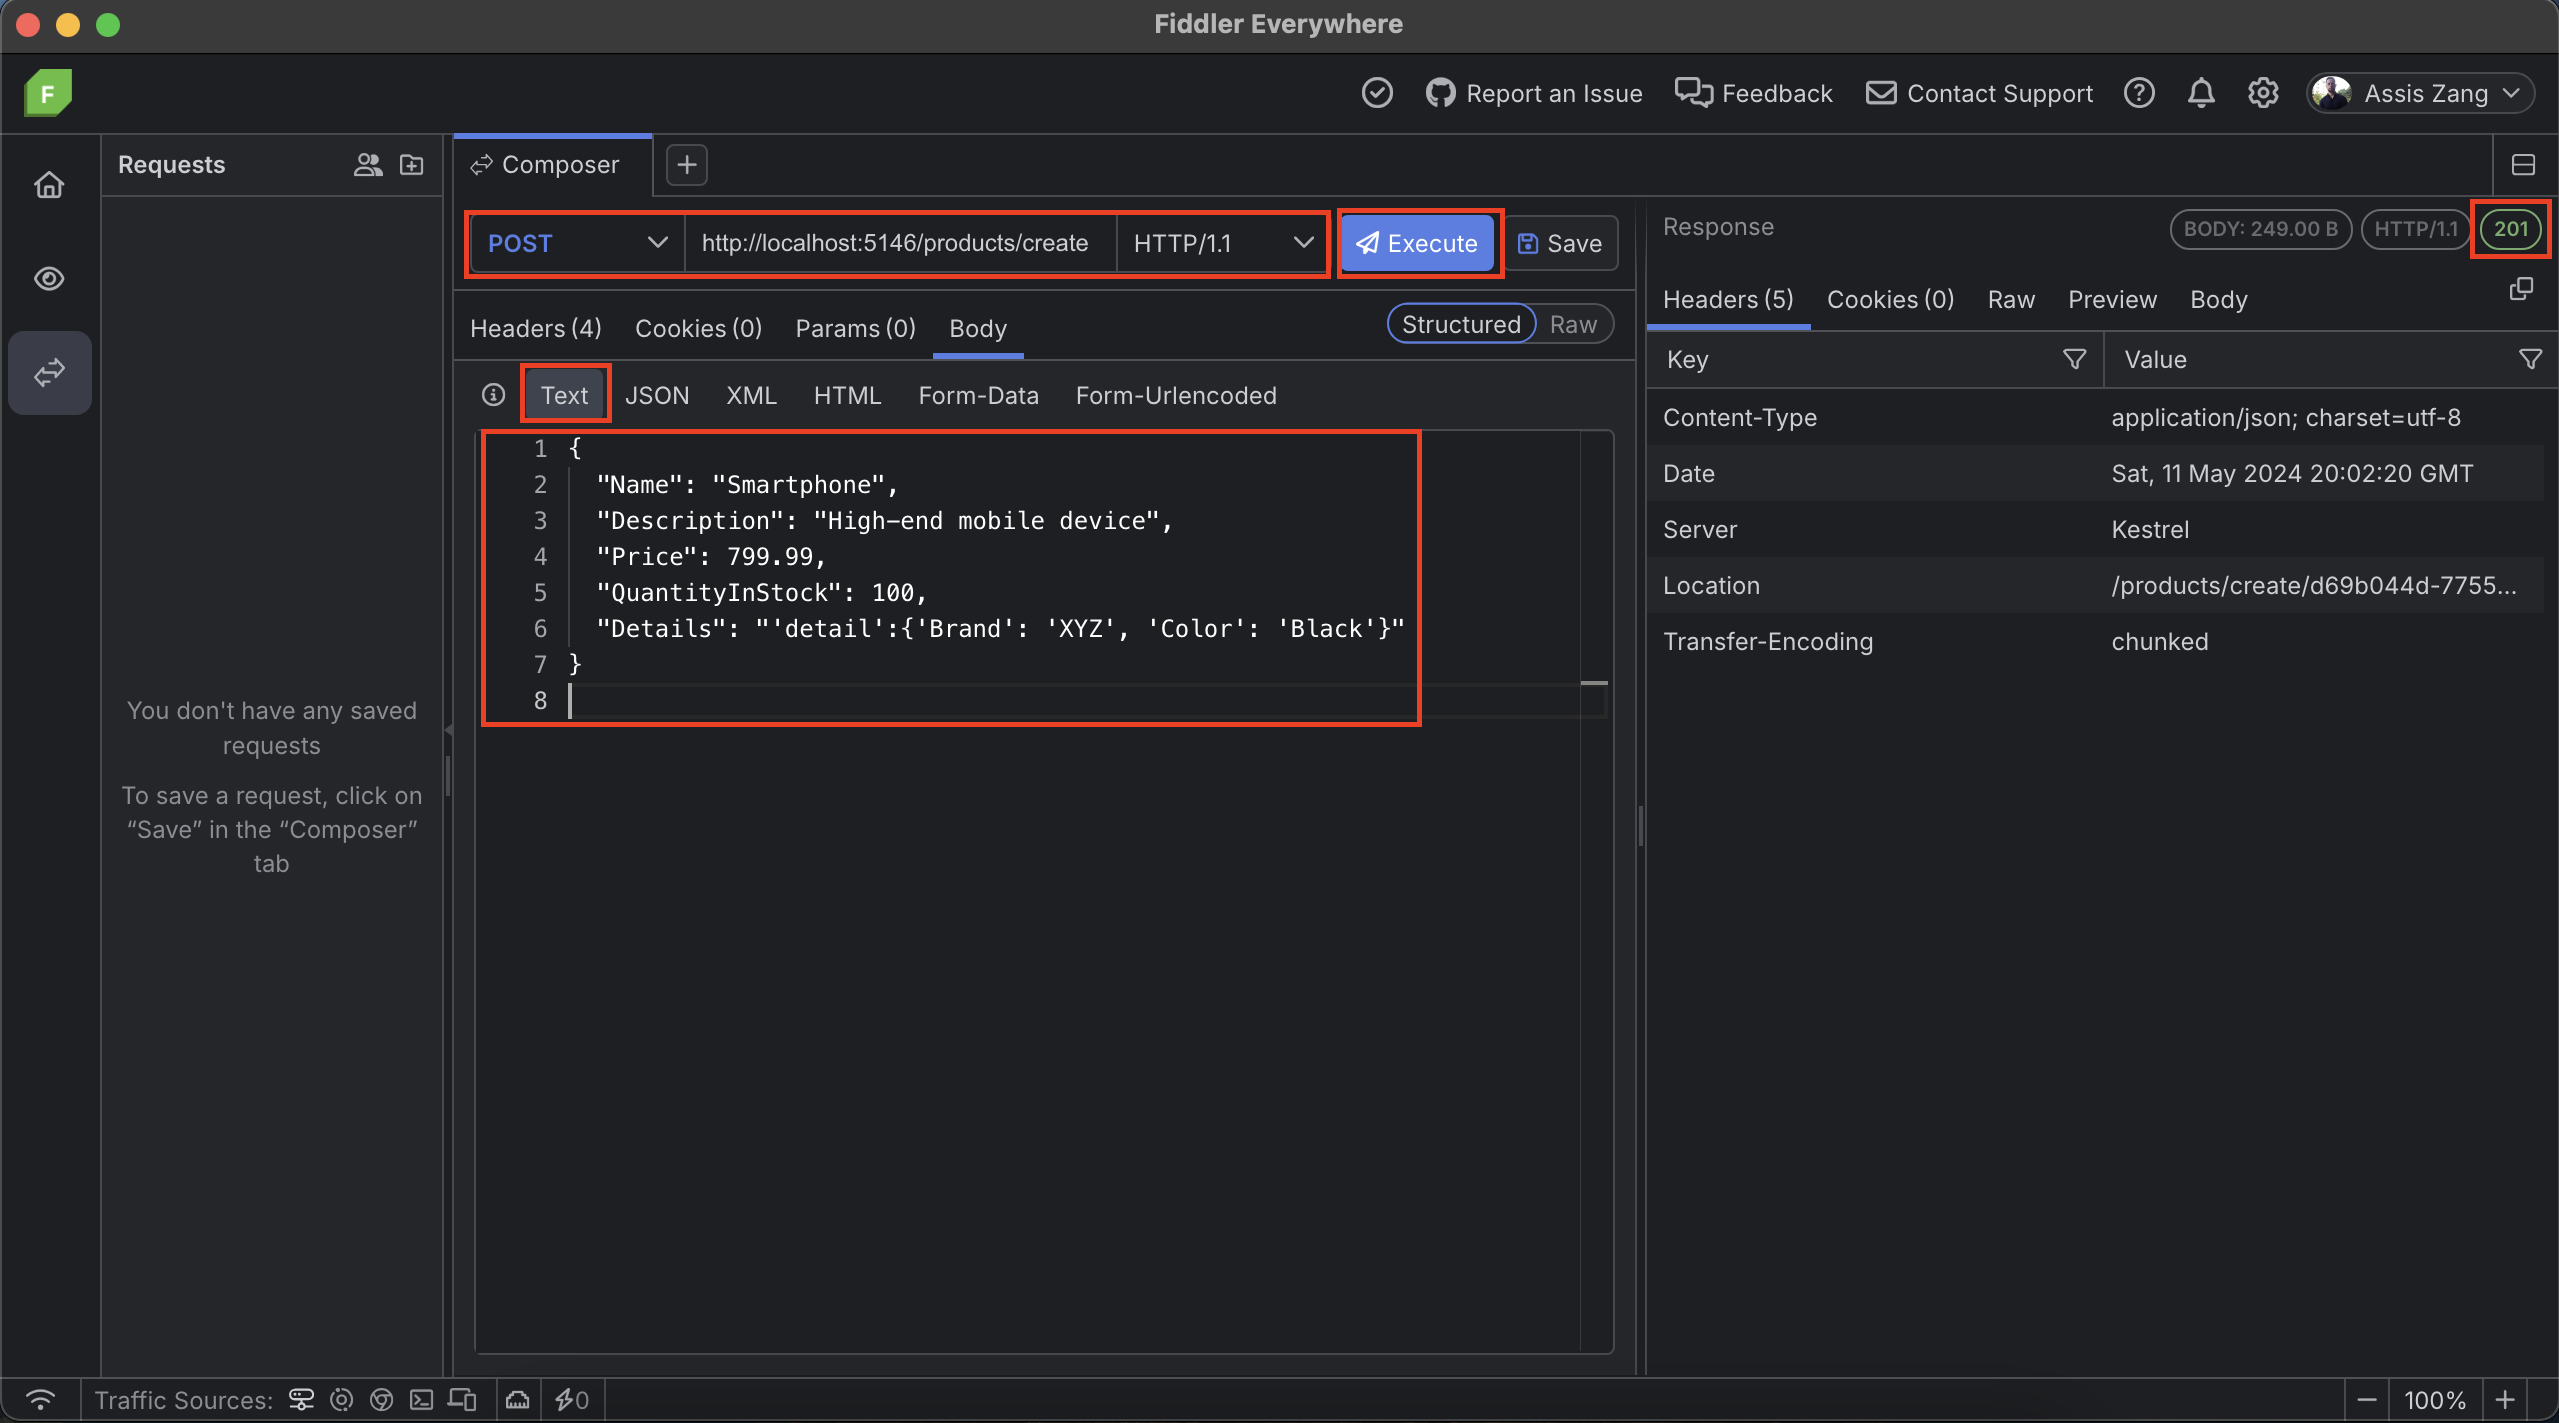
Let’s test the serialization and deserialization methods with the database and tables created. To do this, just run the application and request the /products/create route. In this post, Progress Telerik Fiddler Everywhere will be used.
Here a request was made for the route created previously, note that the type of data was sent as text and used the following data in the request:
{
     "Name": "Smartphone",
     "Description": "High-end mobile device",
     "Price": 799.99,
     "QuantityInStock": 100,
     "Details": "'detail':{'Brand': 'XYZ', 'Color': 'Black'}"
}
The endpoint code took this data as a string, deserialized it into an object and saved it in the database. The same was done for the history table, but it serialized the object in JSON, then saved it in the table, and finally returned the success status 201.
Functions to serialize and deserialize data are very useful in web applications, especially in scenarios where it is not possible to receive data in JSON format, so your application receives the data in text or another format and transforms it into JSON to manipulate it according to the need.
Parameter Binding
Parameter binding is the way request data is converted into strongly typed parameters.
This data can be obtained from the query string, request body, request headers and other sources, depending on how the route is configured.
The idea behind parameter binding is to provide a simplified and flexible mechanism for defining HTTP routes without the need for complex configurations, such as directly converting the data received in the request into JSON format.
As an example, we can create a route that returns product data. Add the following endpoint in the Program.cs file.
app.MapGet("/products/get-all", async (ProductDbContext dbContext) =>
{
    var products = await dbContext.Products.ToListAsync();

    return Results.Ok(products);
});
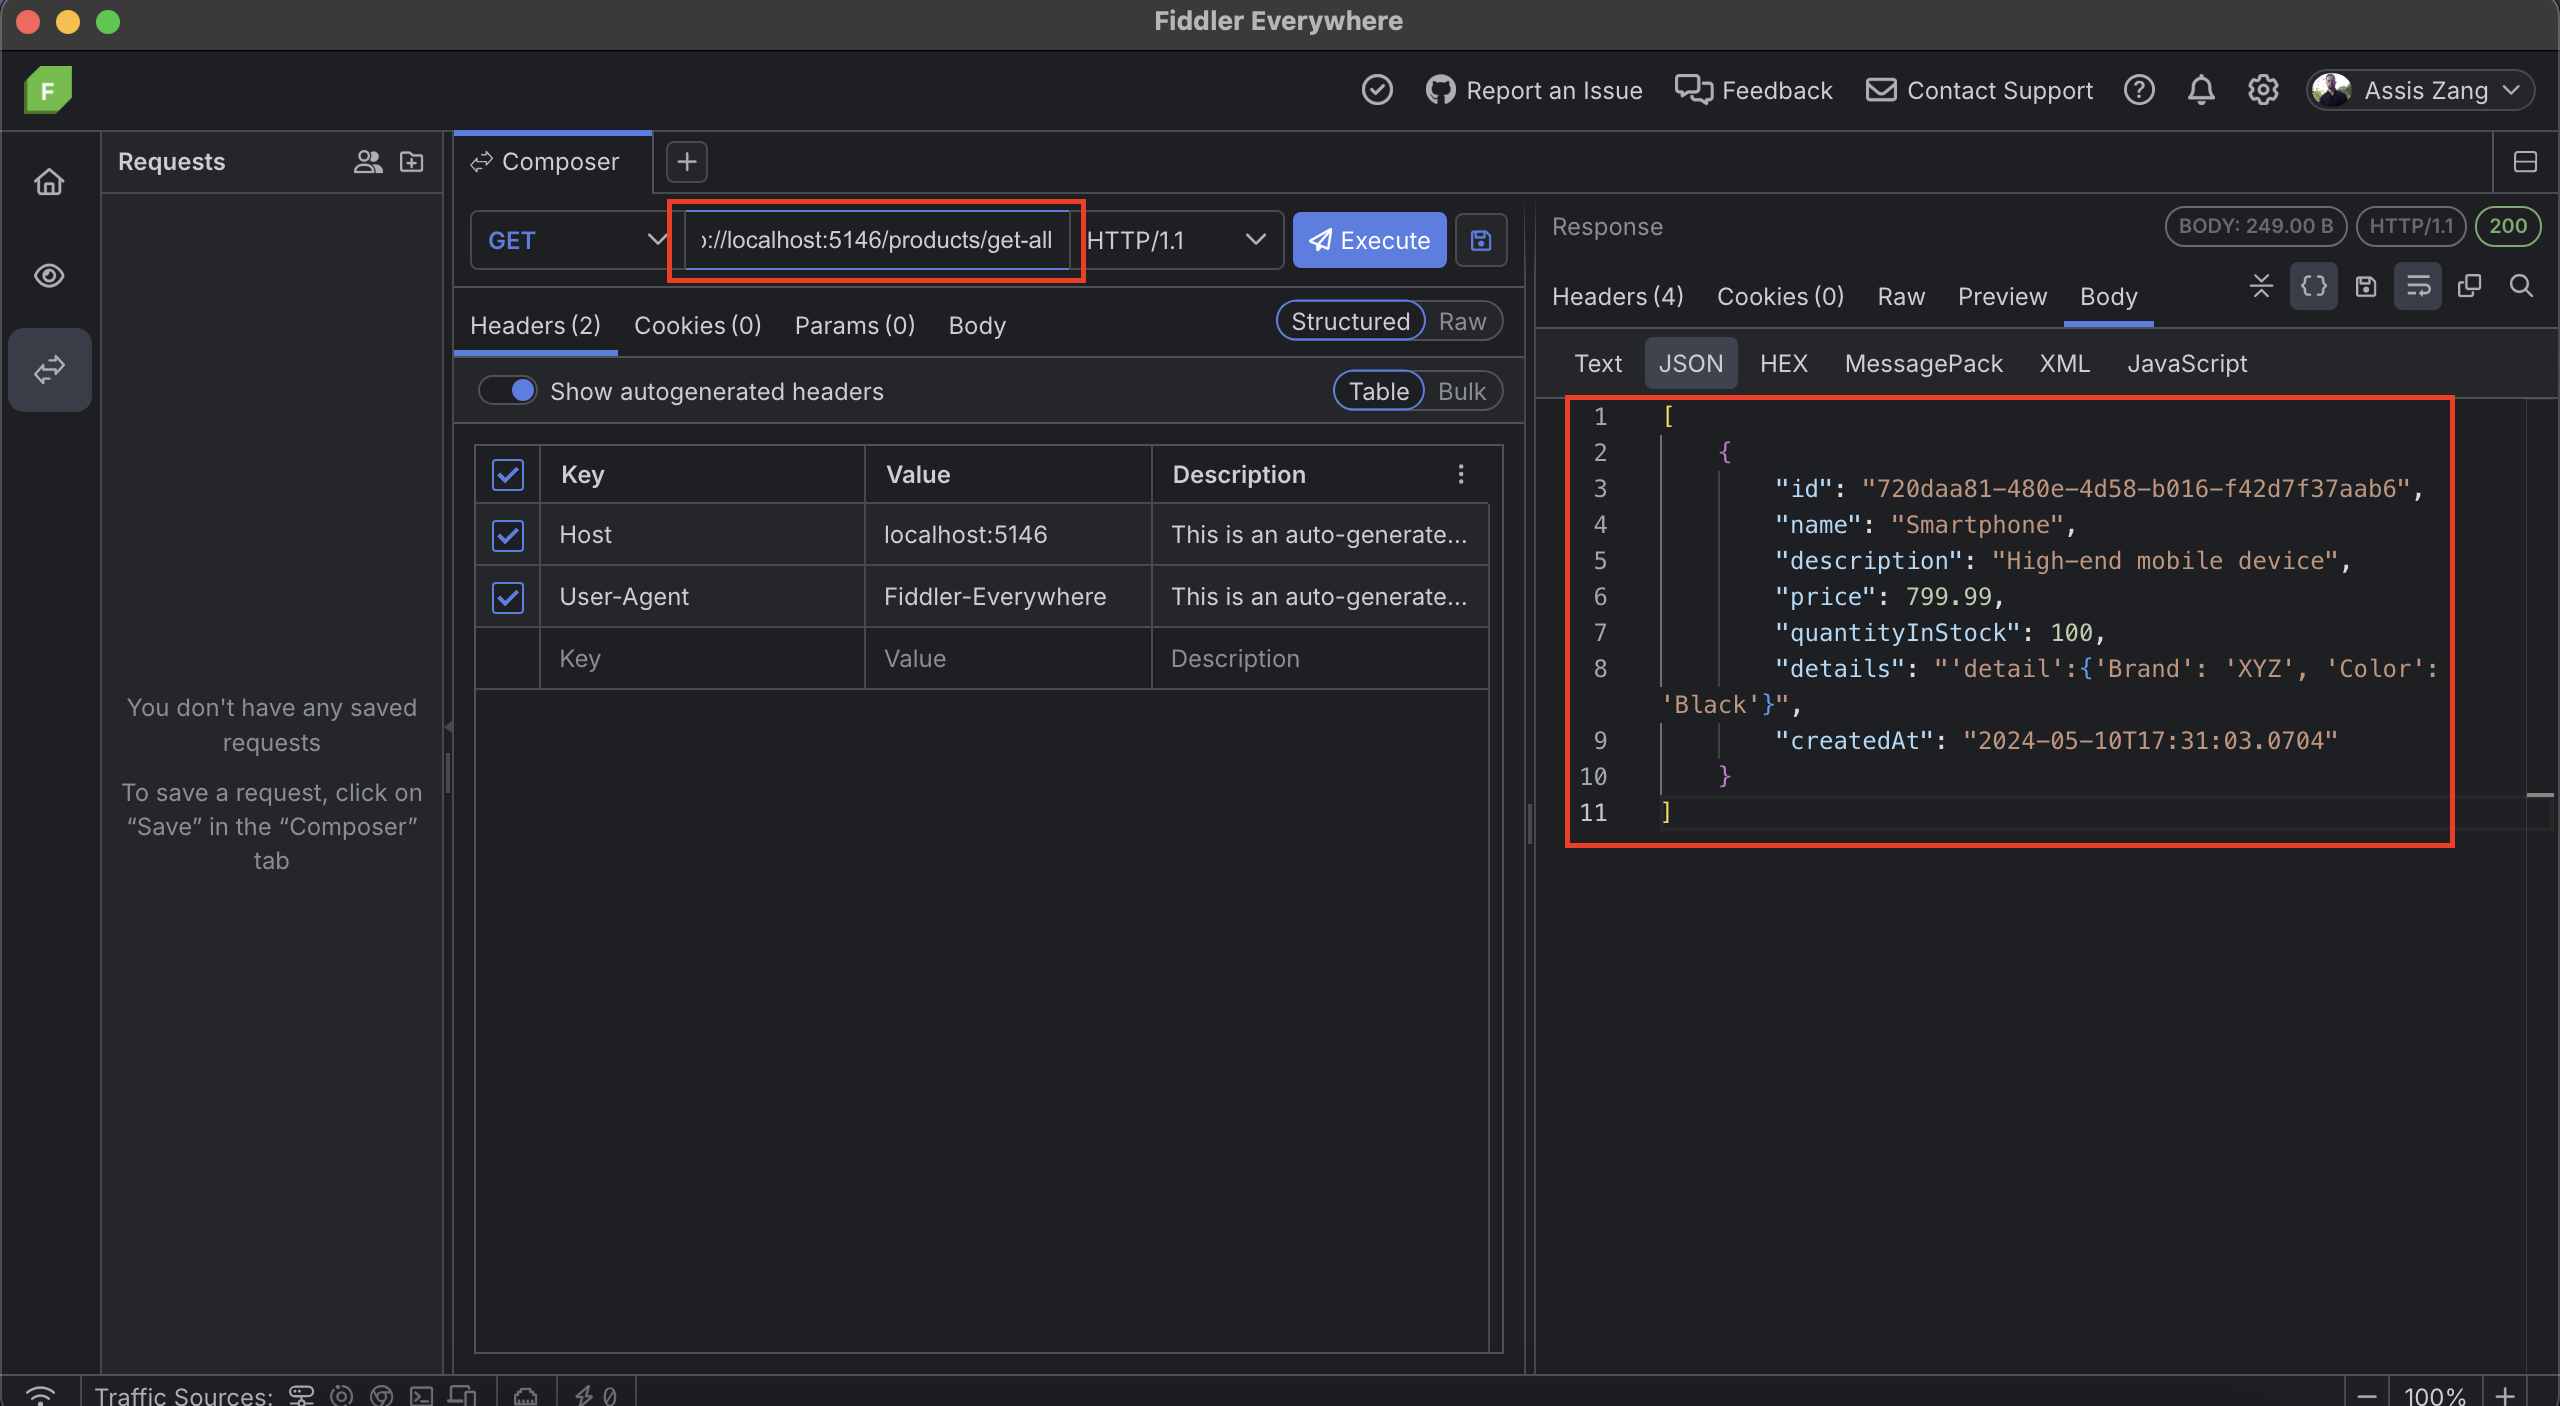
Now run the application again and request the new route “/products/get-all”:
Note that the variable products in the get-all endpoint represent a list of products, that is, an object of type List<Product>(). And it is being returned directly in the method parameter Results.Ok(products) without any type of conversion, just the object as it is, and when returned in Fiddler it is in a perfect JSON format. This seems like magic, but what happens is that parameter binding is doing its job, converting objects and strongly typed data into JSON parameters.
Parameter binding can also do the opposite process, transforming JSON into an object. To do this, add the following code to the Program.cs file.
app.MapPut("/products/update/{id}", async (ProductDbContext dbContext, Product product, Guid id) =>
{
    var existingProduct = await dbContext.Products.FindAsync(id);

    if (existingProduct == null)
        return Results.NotFound("Product not found");

    existingProduct.Name = product.Name ?? existingProduct.Name;
    existingProduct.Description = product.Description ?? existingProduct.Description;
    existingProduct.Price = product.Price != default ? product.Price : existingProduct.Price;
    existingProduct.QuantityInStock = product.QuantityInStock != default ? product.QuantityInStock : existingProduct.QuantityInStock;
    existingProduct.Details = product.Details ?? existingProduct.Details;

    await dbContext.SaveChangesAsync();

    return Results.NoContent();
});
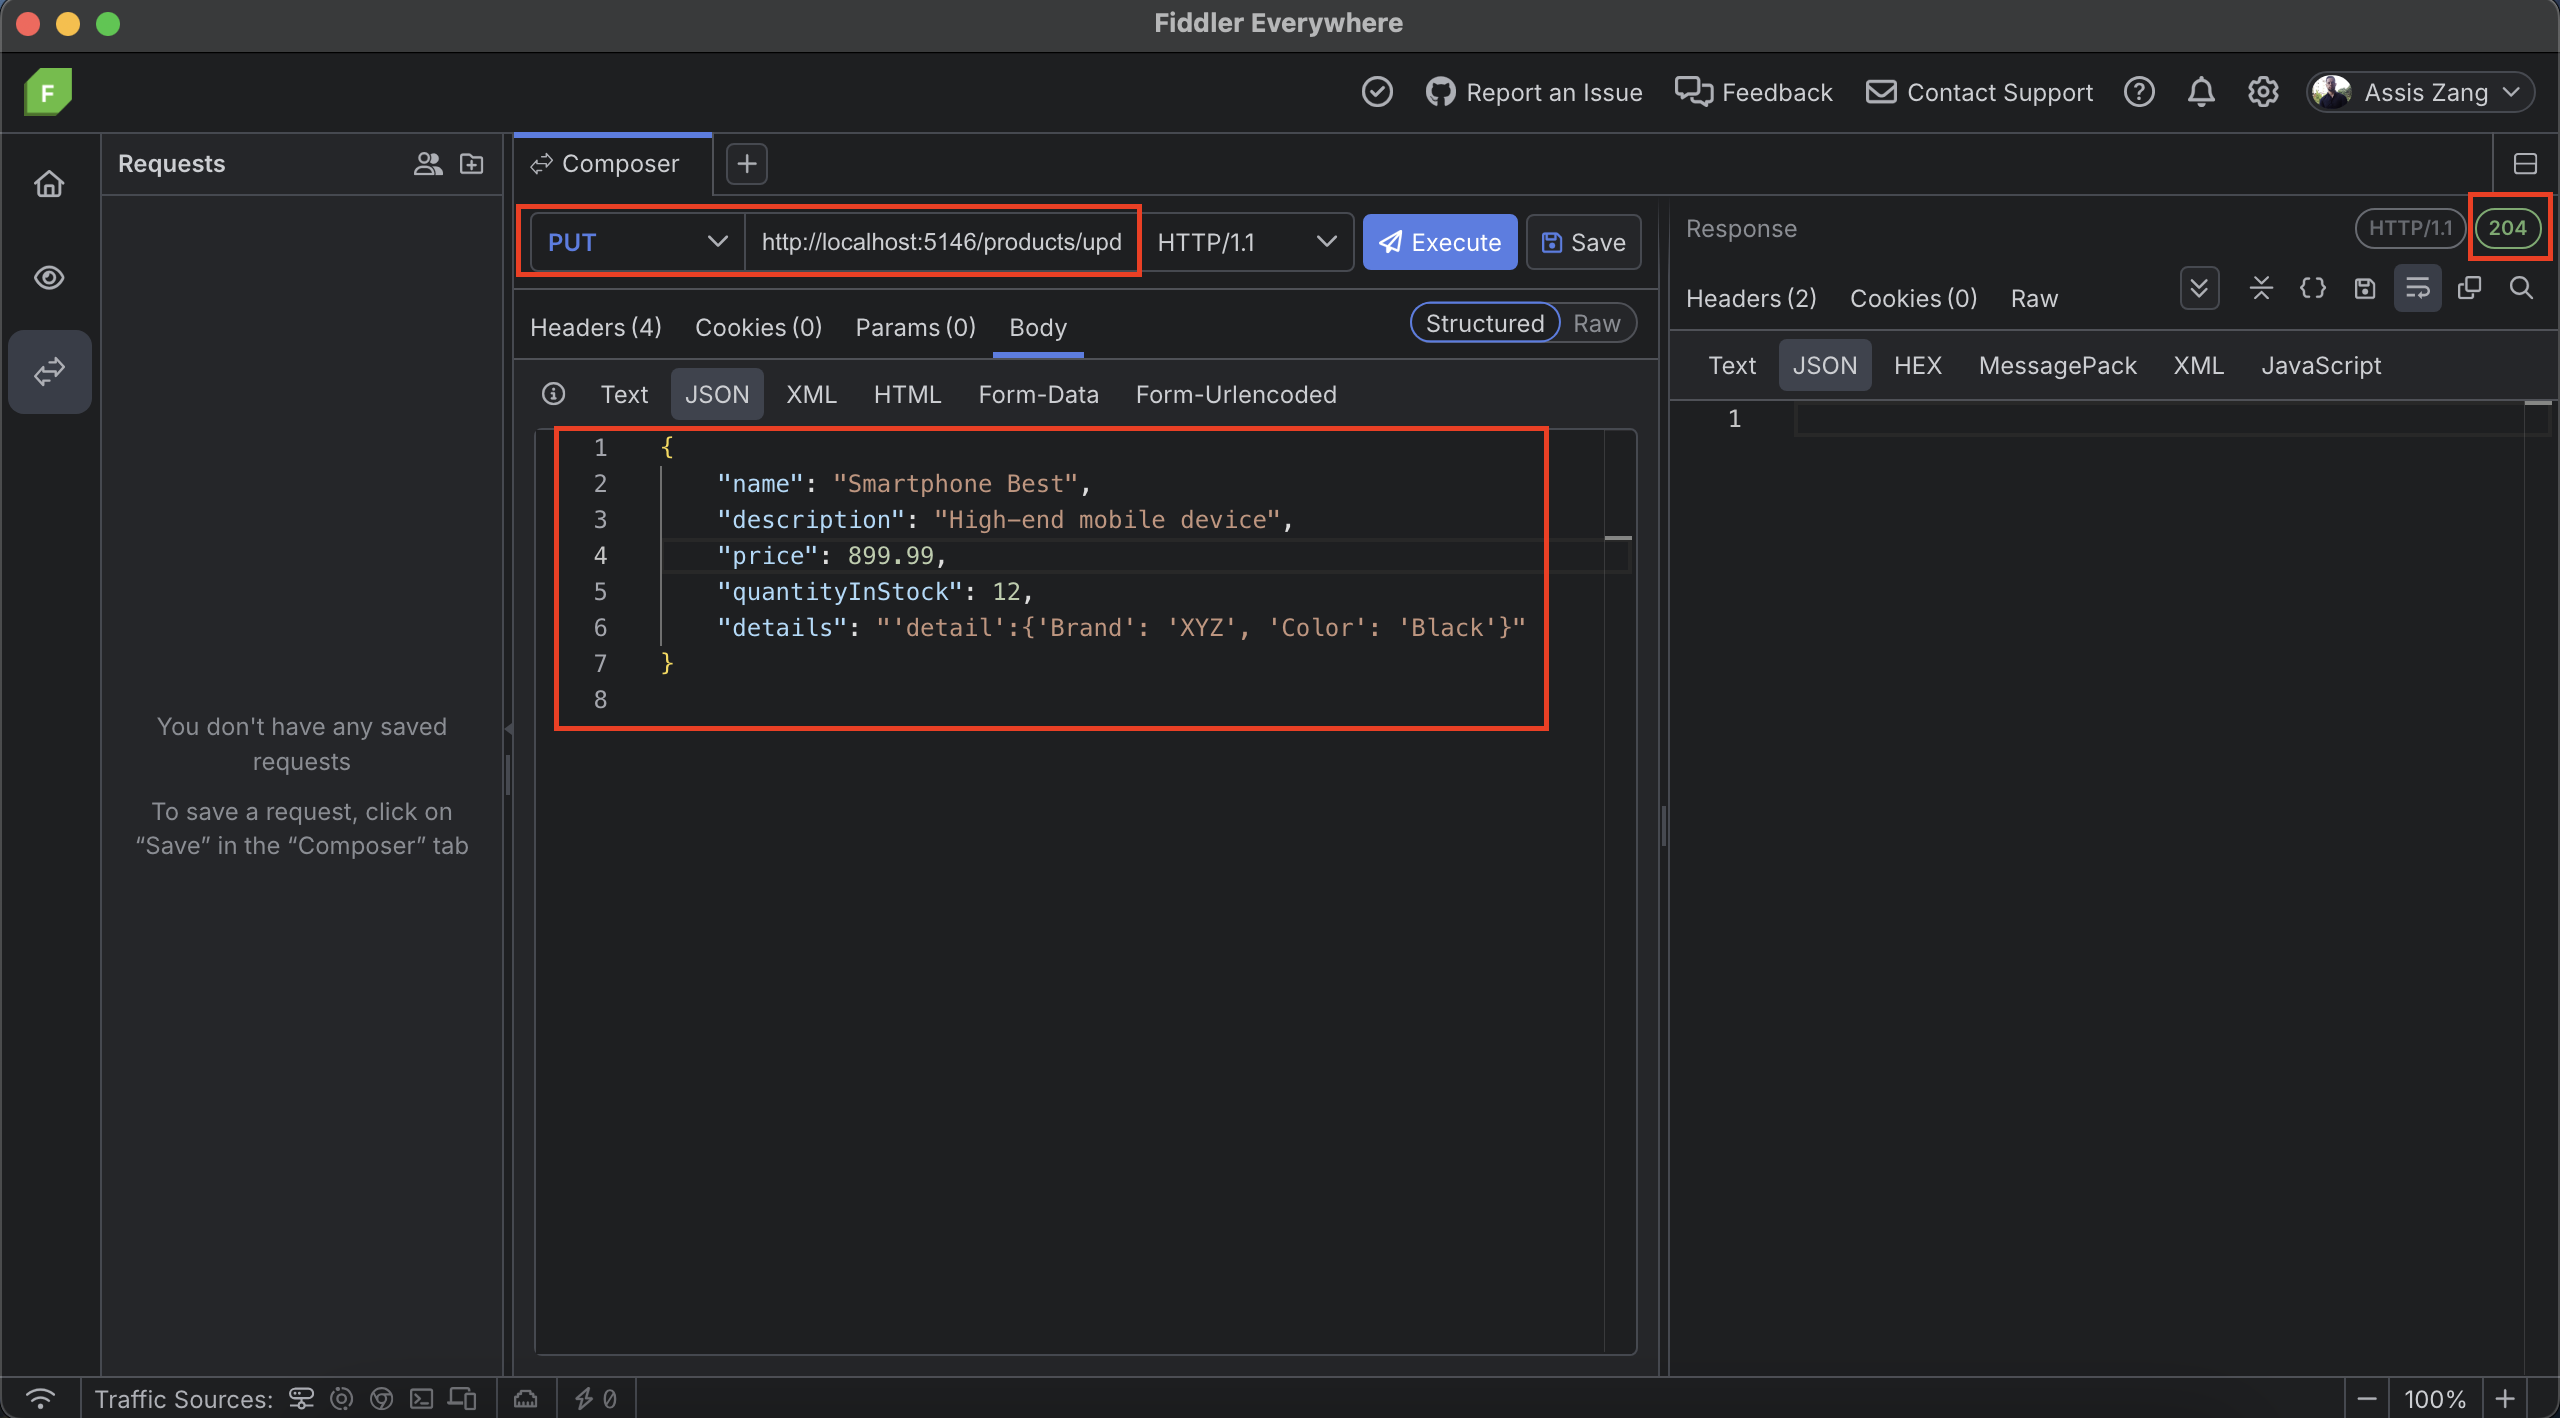
Now, run the application and request to route /products/update/{id}. In the body request send the following JSON:
{
    "name": "Smartphone Best",
    "description": "High-end mobile device",
    "price": 899.99,
    "quantityInStock": 12,
    "details": "Details": "'detail':{'Brand': 'XYZ', 'Color': 'Black'}"
}

Note that now we did the reverse process: We sent data in JSON format through Fiddler, and the API received it as an object of type Product through the route app.MapPut("/products/update/{id}", async (ProductDbContext dbContext, Product product, Guid id). Again, no conversion was necessary, as parameter binding encapsulates the mechanism required to transform the request’s JSON into a typed object.
Serialization Attributes
Serialization attributes allow the conversion of JSON-typed properties and objects to be customized.
We can use the attribute [JsonPropertyName] as an example, which allows the identification of a property with different names.
To use this attribute, change the Product class, and add the [JsonPropertyName("display-name")] attribute above the Description property, which should look like this:
     [JsonPropertyName("display-text")]
     public string Description { get; set; }
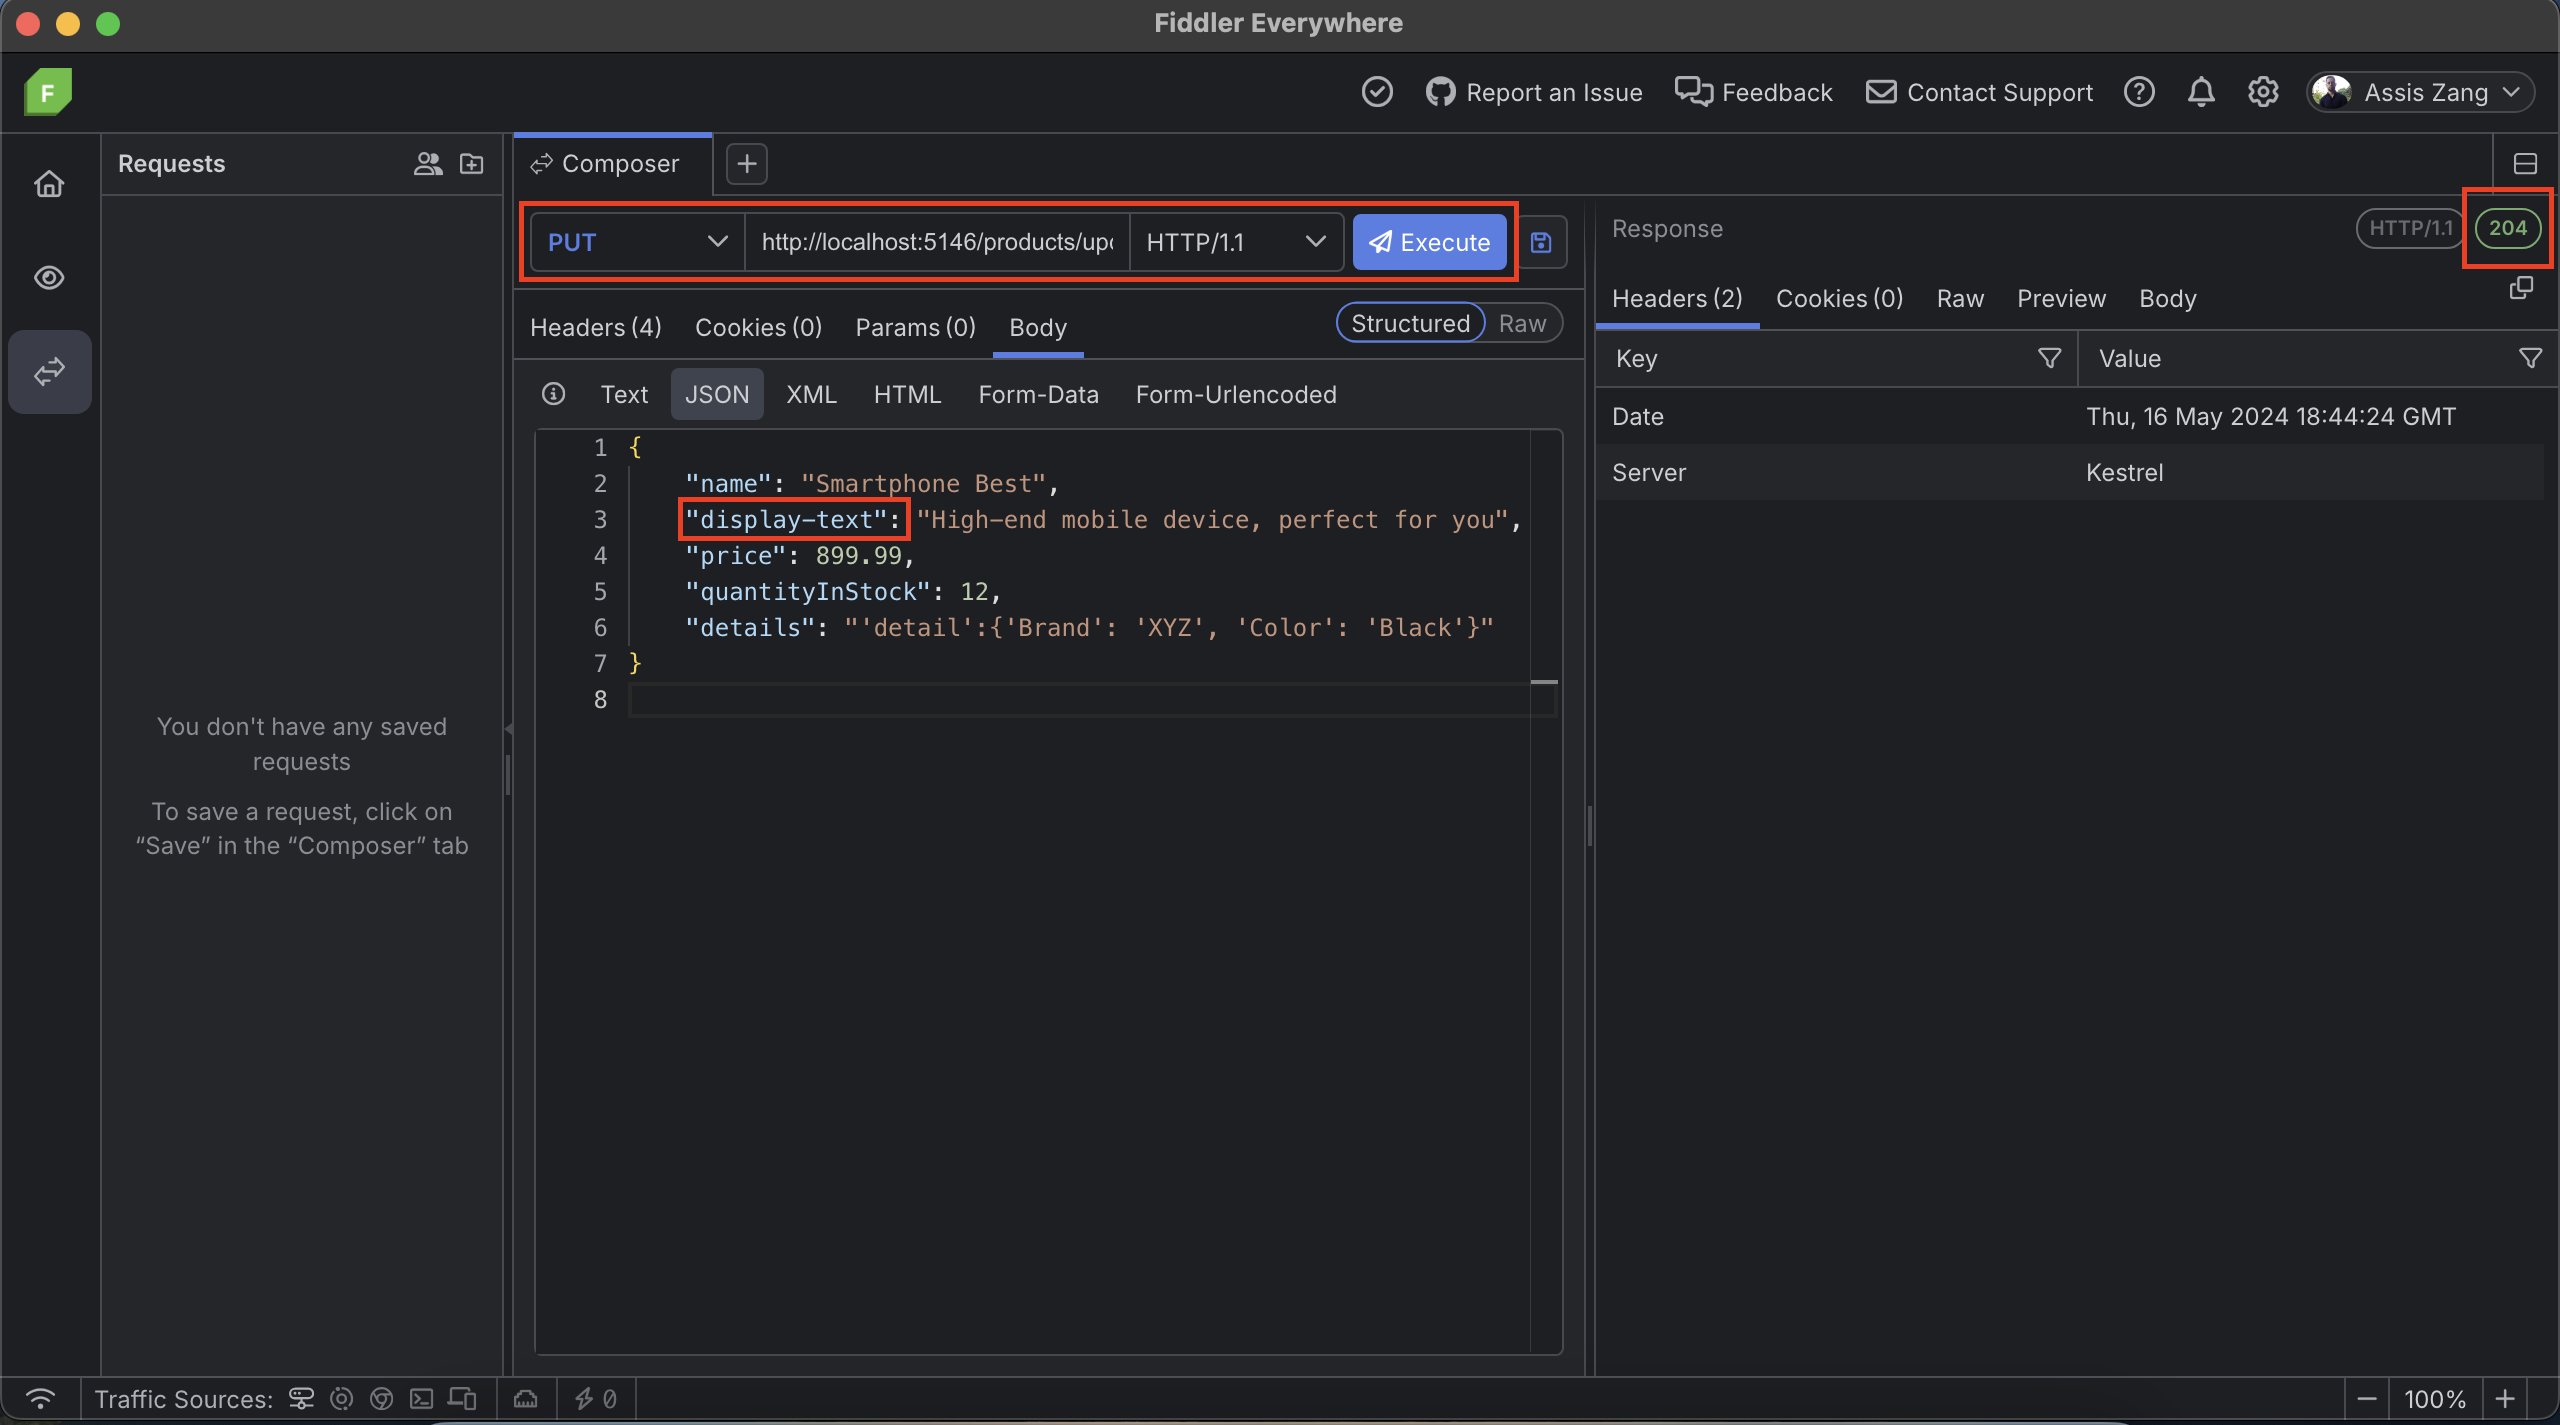
Now run the /products/update route again sending the following JSON in the request body:
{
    "name": "Smartphone Best",
    "display-text": "High-end mobile device, perfect for you",
    "price": 899.99,
    "quantityInStock": 12,
    "details": "'detail':{'Brand': 'XYZ', 'Color': 'Black'}"
}

Note that the display-text property was sent in the request’s body, which was recognized by the serialization attribute and defined the value sent in the Description property.
The serialization attribute [JsonPropertyName("")] is useful in scenarios where there is a change in the name of properties sent in the body of the request. In this case, you do not need to violate the SOLID “Open Closed” principle, which says that “software entities must be open for extension, but closed for modification.” That is, if your requester changed the contract, you do not need to change your entity, just add a serialization attribute, maintaining the consistency and quality of the system.
Data Formatting
Using the features of the latest versions of .NET, it is possible to format application logs in JSON format, which makes it easier to read the information as it is displayed in an organized way.
To demonstrate log formatting, add the following code snippet below where the builder variable is created in the Program.cs file:
builder.Logging.AddJsonConsole(options =>
{
    options.IncludeScopes = false;
    options.TimestampFormat = "HH:mm:ss ";
    options.JsonWriterOptions = new JsonWriterOptions
    {
        Indented = true
    };
});
This configuration defines that the logs are displayed in JSON format. In addition, it allows customization of these logs, such as date formatting and not including scopes in the logs.
To test this configuration, add the following endpoint:
app.MapPost("/products/validate", async (ProductDbContext dbContext, Product product, [FromServices] ILogger<Program> logger) =>
{
    try
    {
        var existingProduct = dbContext.Products.First(p => p.Name == product.Name);

        if (existingProduct != null)
            return Results.BadRequest("The product name must be unique");

        return Results.Ok();
    }
    catch (Exception ex)
    {
        logger.LogError(ex, $"Error validating the product.");
        return Results.BadRequest(ex.Message);
    }
});
Now, request to the /products/validate endpoint using the following JSON in the request body:
{
    "name": null,
    "display-text": "High-end mobile device, perfect for you",
    "price": 899.99,
    "quantityInStock": 12,
    "details": "'detail':{'Brand': 'XYZ', 'Color': 'Black'}"
}
So the log displayed in the console is formatted in JSON and is easy to read:
If we did not add JSON formatting, the same log would be displayed as follows:
Note that without JSON settings and formatting, in addition to little information, there is no formatting. The example in the post brings a simple log, but imagine if there were a very long log—it would be tough to read it.
Third-party Resources
So far we have only seen native ASP.NET Core resources through the System.Text.Json library, but in addition to these, we can also count on third-party resources. One of the best-known NuGet packages for dealing with JSON is Newtonsoft.Json, an open-source, simple-to-use ASP.NET Core-compatible library that has several functionalities.
To download the NuGet package to the project, you can use the command below:
dotnet add package Newtonsoft.Json
In addition to the previously seen functions such as serialization, deserialization and attributes, Newtonsoft.Json also has other features, such as LINQ to JSON that allows you to transform LINQ queries into JSON objects easily and with excellent performance.
To check this functionality, add the following endpoint to your Program class.
app.MapGet("/products/get-by-id/{id}", async (ProductDbContext dbContext, Guid id) =>
{
    var product = await dbContext.Products.FirstOrDefaultAsync(p => p.Id == id);

    if (product == null)
        return Results.NotFound();

    JObject productJson = JObject.FromObject(new
    {
        product.Id,
        product.Name,
        Description = product.Description ?? string.Empty,
        product.Price,
        product.QuantityInStock,
        product.Details,
        product.CreatedAt
    });

    var productHistories = dbContext.ProductHistories.ToList();

    var foundProductHistory = (
        from ph in productHistories
        let productObj = JObject.Parse(ph.Product)
        let name = productObj["Name"].ToString()
        where name == product.Name
        select ph
    ).FirstOrDefault();

    if (foundProductHistory is null)
    {
        var ProductHistory = new ProductHistory()
        {
            Id = Guid.NewGuid(),
            Product = productJson.ToString()
        };

        dbContext.ProductHistories.Add(ProductHistory);
        await dbContext.SaveChangesAsync();
    }

    return Results.Ok(product);
});
Note that here a route is created that responds to GET requests to obtain product details by ID.
In it we retrieve a product from the database using the ID provided in the request. Then we search the history to see if there is any record with the same name as the product.
To do this, we first use the Newtonsoft.JSON function JObject.FromObject which converts a C# object to a JSON JObject object. Here, it is used to convert the product details into a JSON object.
Then the JObject.Parse function is used, which does the opposite of the previous one. It parses a JSON string and converts it to a JObject object. It is then checked whether there is a product within the history with the name retrieved from the database. If not, the record is then saved in the history database.
These functions are useful in scenarios where you need to transform JSON information into objects to manipulate them as needed, and Newtonsoft.JSON is perfect for working side by side with LINQ queries.
Conclusion
JSON is one of the best-known data formats used in modern small and large web systems due to its simplicity and versatility, allowing integration between applications in a standardized and widely used way. Furthermore, applications that use JSON allow developers to be more productive through a simple and readable data format, facilitating the storage, reading and transport of information between different systems and platforms.
In this post, we saw a brief introduction to JSON in ASP.NET Core applications, such as Minimal APIs through practical examples.
Using JSON in web applications can be the best choice in many cases due to its simplicity, flexibility and compatibility. In the context of ASP.NET Core and Minimal APIs, using JSON to represent data is particularly convenient due to its native integration with the platform and the possibility of extending resources through NuGet packages.
This content originally appeared on Telerik Blogs and was authored by Assis Zang
Assis Zang | Sciencx (2024-07-30T15:13:11+00:00) ASP.NET Core Basics: Working with JSON. Retrieved from https://www.scien.cx/2024/07/30/asp-net-core-basics-working-with-json/
Please log in to upload a file.
There are no updates yet.
Click the Upload button above to add an update.


