
This content originally appeared on Level Up Coding - Medium and was authored by Arseniy Tomkevich

Continuing with the Kubernetes adventure I realized my setup had flaws. I couldn’t access the localhost within a multipass VM from my host (Mac), and I had difficulty setting up persistent storage for my cluster.
Here is a link to my first article Setting up your own Kubernetes Cluster with Multipass — A Step by Step Guide:
https://medium.com/gitconnected/setting-up-kubernetes-cluster-with-multipass-on-a-mac-a-step-by-step-guide-4645f8f30c45
Today we’ll continue with getting up and running the Persistent Volumes (PVs) and Persistent Volume Claims (PVCs), while bringing in Longhorn for some fancy, reliable storage magic. Get ready to supercharge our local Kubernetes setup!
To give Kubernetes apps disk storage, we are going to need Persistent Volumes. While HostPath and LocalPersistentVolumes work, they’re limited to single nodes and fail if the node does. For more reliable, redundant storage, Longhorn comes to the rescue!
Why Longhorn?
You have two main choices for self-hosted PersistentVolumes. Rook offers a powerful CEPH-based solution with block storage, but it needs extra drives, which isn’t great for smaller setups.
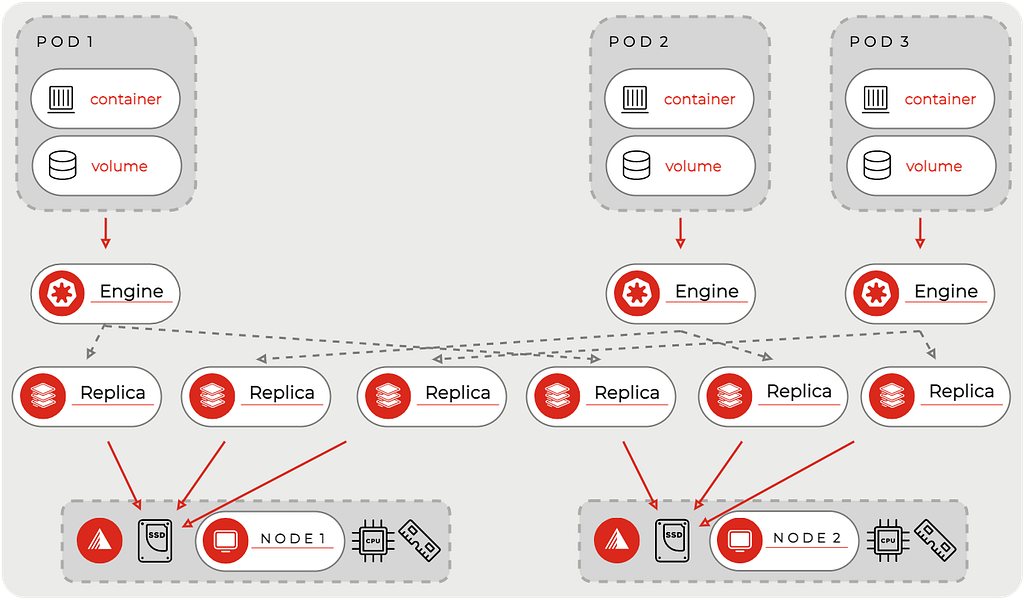
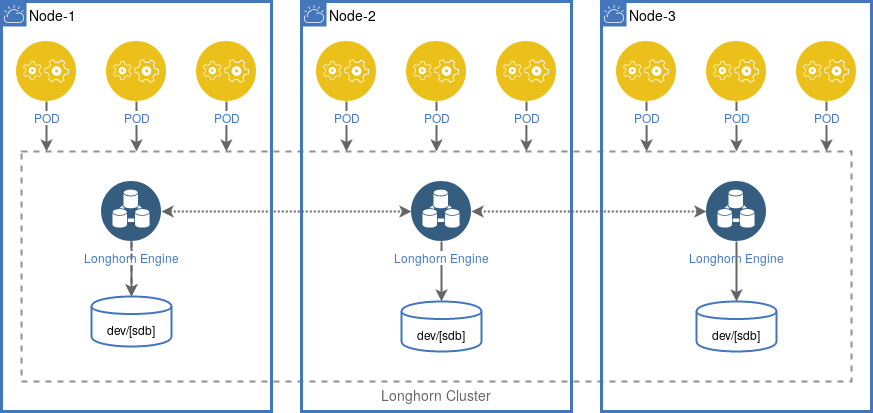
Longhorn, on the other hand, uses HostPath volumes and adds a layer to turn them into fault-tolerant PersistentVolumes. It spreads data across nodes to keep it safe from failures and manages storage that way, leaving room for system files and container caches.
Key Features of HostPath Volumes
HostPath volumes give containers direct access to files on the node, which is useful for sharing files or logs between container and the host.
Generally Not for Production: HostPath Volumes are not recommended for production because they tie your pod to a specific node. Due to immutable architecture of Kubernetes, the pod will not have access to the same HostPath volume if its rescheduled to a different node, which causes issues with data consistency.
BUT Longhorn while using HostPath volumes as part of its underlying architecture abstracts away many of the complexities and limitations of raw HostPath volumes to make them suitable for production environments.
Longhorn replicates data across multiple nodes, providing redundancy and fault tolerance. This actually makes it suitable for production environments where data availability is critical.
It automates many aspects of storage management, including provisioning, backups, and snapshots, simplifying storage operations.
Getting Longhorn Installed
Getting Longhorn up and running is a no brainer! It mostly takes care of itself, but you need to have open-iscsi and NFSv4 on each node. Instead of manually installing these on every single node, we are going to use DaemonSet to automate the process. DaemonSets are Kubernetes API objects that allow you to run Pods as a daemon on each of your Nodes. It’s quick and easy!
Just run this command within the kubemaster, all of our kubectl commands should run there:
kubectl apply -f https://raw.githubusercontent.com/longhorn/longhorn/v1.5.2/deploy/prerequisite/longhorn-iscsi-installation.yaml
kubectl apply -f https://raw.githubusercontent.com/longhorn/longhorn/v1.5.2/deploy/prerequisite/longhorn-nfs-installation.yaml
The installation might take a minute to wrap up. You can keep an eye on the progress with these commands:
kubectl get pod | grep longhorn-iscsi-installation

kubectl get pod | grep longhorn-nfs-installation
These commands show you the details of pods related to the Longhorn iSCSI installation by filtering out other pods from the list.
# You should see something like:

longhorn-nfs-installation-flnhs     1/1     Running   2 (10h ago)   14h
longhorn-nfs-installation-sfhmr     1/1     Running   2 (10h ago)   14h
After installing the dependencies, you’re ready to install Longhorn itself.
kubectl apply -f https://raw.githubusercontent.com/longhorn/longhorn/v1.5.2/deploy/longhorn.yaml
to monitor the progress use the — watch flag:
kubectl get pods -n longhorn-system --watch
Once ready, you should see a similar output:
NAME                                                READY   STATUS    RESTARTS      AGE
csi-attacher-6d8779d485-6nk6t                       1/1     Running   5 (9h ago)    14h
csi-attacher-6d8779d485-6qcng                       1/1     Running   2 (10h ago)   14h
csi-attacher-6d8779d485-dwxr9                       1/1     Running   1 (10h ago)   14h
csi-provisioner-69ffbb8c5b-2l7k7                    1/1     Running   2 (10h ago)   14h
csi-provisioner-69ffbb8c5b-5zcrr                    1/1     Running   3 (9h ago)    14h
csi-provisioner-69ffbb8c5b-ffbkg                    1/1     Running   4 (9h ago)    14h
csi-resizer-7b98f6fbc4-gs7zk                        1/1     Running   1 (10h ago)   14h
csi-resizer-7b98f6fbc4-hxshw                        1/1     Running   5 (9h ago)    14h
csi-resizer-7b98f6fbc4-ph6ms                        1/1     Running   2 (10h ago)   14h
csi-snapshotter-65d845d4f4-8bnp6                    1/1     Running   2 (10h ago)   14h
csi-snapshotter-65d845d4f4-gg5hl                    1/1     Running   5 (9h ago)    14h
csi-snapshotter-65d845d4f4-xg5mb                    1/1     Running   2 (10h ago)   14h
engine-image-ei-65224a4b-2fqjq                      1/1     Running   2 (10h ago)   14h
engine-image-ei-65224a4b-7brjg                      1/1     Running   1 (10h ago)   14h
instance-manager-84d479227caee7de34d45408517eeca0   1/1     Running   0             10h
instance-manager-ba2939744e154f4f95b7a2e527d76378   1/1     Running   0             10h
longhorn-csi-plugin-nd224                           3/3     Running   8 (10h ago)   14h
longhorn-csi-plugin-r48fx                           3/3     Running   4 (10h ago)   14h
longhorn-driver-deployer-74bf9cb677-f45fm           1/1     Running   3 (10h ago)   14h
longhorn-manager-kqk9k                              1/1     Running   1 (10h ago)   14h
longhorn-manager-x2ld9                              1/1     Running   2 (10h ago)   14h
longhorn-ui-fd949ccd4-24ghm                         1/1     Running   1 (10h ago)   14h
longhorn-ui-fd949ccd4-w2gdb                         1/1     Running   2 (10h ago)   14h
csi-attacher
The CSI Attacher is responsible for attaching volumes to nodes. It works in conjunction with the Kubernetes Controller Manager to ensure that volumes are properly attached to the correct nodes.
csi-provisioner
The CSI Provisioner handles the management of PersistentVolumes (PVs) based on PersistentVolumeClaims (PVCs). It ensures that storage resources are allocated and deallocated as required per the PVCs.
csi-resizer
The CSI Resizer manages the resizing of volumes. When a PVC requests a larger volume, the Resizer adjusts the size of the underlying PersistentVolume to accommodate the request.
csi-snapshotter
CSI Snapshotter handles the creation and management of volume snapshots. It enables backup and restore operations by taking snapshots of the volume data.
engine-image-ei
This component manages Longhorn engine images. Engine images are used to create and manage the Longhorn storage engines that interact with volumes.
instance-manager
Instance Managers are responsible for managing Longhorn volumes and their associated instances. They handle tasks like provisioning and maintaining the Longhorn volumes’ instances.
longhorn-csi-plugin
The Longhorn CSI Plugin interfaces with the Kubernetes CSI (Container Storage Interface) to provide Longhorn volumes to Kubernetes pods. It acts as a bridge between Kubernetes and the Longhorn storage system.
longhorn-driver-deployer
This pod deploys and manages the Longhorn driver components. It ensures that the necessary drivers are correctly set up and operational within the Kubernetes cluster.
longhorn-manager
The Longhorn Manager oversees the overall operation of the Longhorn system. It manages volume operations, health monitoring, and configuration tasks.
longhorn-ui
This pod runs the Longhorn user interface, providing a web-based dashboard for managing Longhorn storage, viewing volume status, and performing administrative tasks.
Check if Volumes are Working
To confirm that installation was successful and your storage is ready, create a PersistentVolumeClaim. This will prompt Longhorn to automatically provision a PersistentVolume, which takes care of that headache for you.
The same will work with deleting, Longhorn will remove the PersistentVolume once you delete the PersistentVolumeClaim.
At first I was manually setting up my own PVs and PVCs but various reasons Kubernetes had trouble managing them, especially deleting the volumes and I had to use all sorts of tricks to force Kubernetes do what I want.
For example a PV would get stuck Terminating and hang there, which meant I couldn’t create a PV with the same name and had to wait:
NAME          CAPACITY   ACCESS MODES   RECLAIM POLICY   STATUS        CLAIM                                         STORAGECLASS   VOLUMEATTRIBUTESCLASS   REASON   AGE
c-registry-pv 5Gi        RWO            Retain           Terminating   cybernetically-utils/container-registry-pvc   standard       <unset>
Longhorn makes all these problems go away, the modules I described above do all the management.
Here’s an example, this YAML defines a PersistentVolumeClaim named container-registry-pvc that requests 1GB of read-write storage from Longhorn, which will handle provisioning the actual PersistentVolume.
apiVersion: v1
kind: PersistentVolumeClaim
metadata:
  namespace: container-registry-pvc
  name: longpvc
spec:
 accessModes:
   - ReadWriteOnce
 resources:
   requests:
     storage: 1Gi
 storageClassName: longhorn
Save this into “longhorn-pvc.yaml” and apply the Yaml file
kubectl apply -f longhorn-pvc.yaml
Inspect the claim by running:
kubectl describe pvc longpvc
You should see something like this, the most important part is the Status which should be Bound.
Name:          container-registry-pvc
Namespace:     default
StorageClass:  longhorn
Status:        Bound
Volume:        pvc-d462441d-0348-4325-a90c-f783a4481547
Labels:        <none>
Annotations:   pv.kubernetes.io/bind-completed: yes
               pv.kubernetes.io/bound-by-controller: yes
               volume.beta.kubernetes.io/storage-provisioner: driver.longhorn.io
               volume.kubernetes.io/storage-provisioner: driver.longhorn.io
Finalizers:    [kubernetes.io/pvc-protection]
Capacity:      1Gi
Access Modes:  RWO
VolumeMode:    Filesystem
Used By:       <none>
Events:        <none>
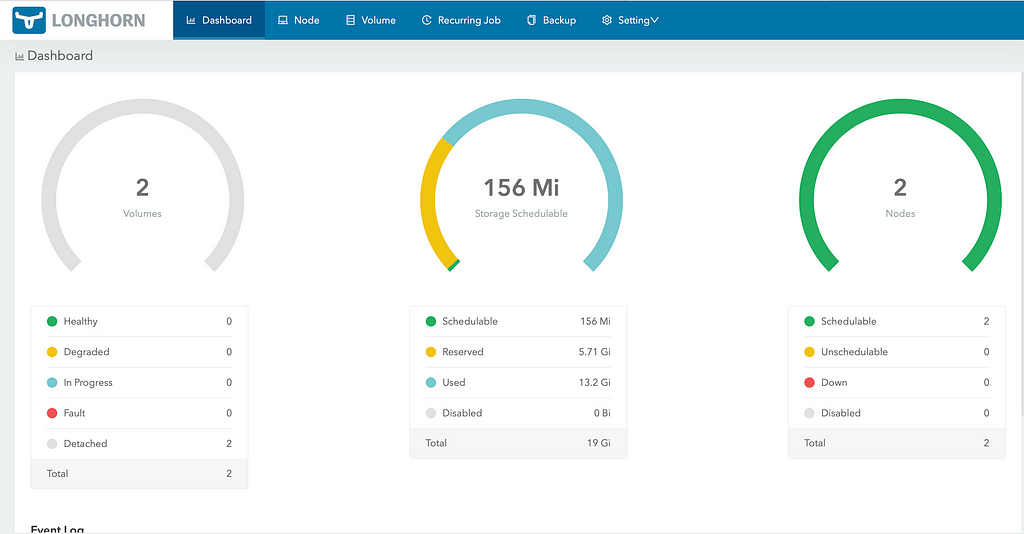
LongHorn Dashboard
Longhorn has a dashboard and you can access it by port forwarding from your multipass into your host, but there is trick with our setup.
I’ve spent many hours trying to figure this part out and apparently multipass has a problem with forwarding TCP6 requests that are coming from a host into the multipass VM.
I could ping my multipass VM, which I believe uses the TCP4, but I couldn’t access the localhost which uses TCP6, so I used the following technique to make it work.
First, port forward the long-horn frontend by running on the kubemaster.
kubectl port-forward service/longhorn-frontend -n longhorn-system 8080:80
Now the longhorn front end will be available for access within kubemaster, but we want to access it on a host through the browser. I have searched the internet for a couple of days and the only thing I found is that TCP6 requests are not forwarded by multipass. So here is the trick:
Install socat on kubemaster
sudo apt-get update
sudo apt-get install socat
And then have socat forward the TCP6 requests, thats it! At this point you are port forwarding from Kubernetes into the VM and from VM into the host.
kubemaster -- sudo socat "TCP6-LISTEN:8088",fork "TCP6:[::1]:8080"
For ease of use, you can run the above command via multipass exec from the host:
multipass exec -n kubemaster -- kubemaster -- sudo socat "TCP6-LISTEN:8088",fork "TCP6:[::1]:8080"

Once executed, now point the browser to 8088 port of your kubemaster, for example my browser URL is http://192.168.64.100:8088 and you should see the longhorn control panel:
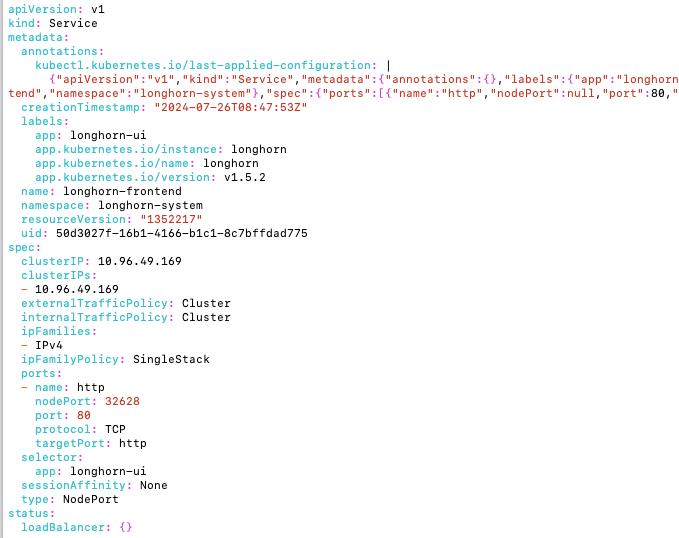
Another way to expose the front end is by editing the service/longhorn-frontend:
kubectl edit service/longhorn-frontend -n longhorn-system
You should change the type to a NodePort as bellow:
Find the name of the kubernetes longhorn dashboard pod, run this command:
kubectl get pods -n longhorn-system
You should see a pod it starts with longhorn-ui for example:
longhorn-ui-fd949ccd4-24ghm                         1/1     Running   5 (93m ago)     3d13h
longhorn-ui-fd949ccd4-w2gdb                         1/1     Running   7 (93m ago)     3d13h
Whenever you modify the service type, you must delete the pod. Kuberntes creates a new one for you, essentially restarting the pod. So lets run these commands (make sure you use your pod uids you got from the previous command):
kubectl delete pod longhorn-ui-fd949ccd4-24ghm -n longhorn-system
kubectl delete pod longhorn-ui-fd949ccd4-w2gdb -n longhorn-system
Now to make sure Kubernetes restarted the pods run the command, you should see another set of pods starting:
kubectl get pods -n longhorn-system
Verify that the service is of a correct type and run this command:
kubectl get svc -n longhorn-system
You should see this:
NAME                          TYPE        CLUSTER-IP       EXTERNAL-IP   PORT(S)        AGE
longhorn-admission-webhook    ClusterIP   10.101.1.14      <none>        9502/TCP       3d13h
longhorn-backend              ClusterIP   10.106.19.214    <none>        9500/TCP       3d13h
longhorn-conversion-webhook   ClusterIP   10.103.237.212   <none>        9501/TCP       3d13h
longhorn-engine-manager       ClusterIP   None             <none>        <none>         3d13h
longhorn-frontend             NodePort    10.96.49.169     <none>        80:32628/TCP   3d13h
longhorn-recovery-backend     ClusterIP   10.104.4.107     <none>        9503/TCP       3d13h
longhorn-replica-manager      ClusterIP   None             <none>        <none>         3d13h
Now open your favorite browser and navigate to a URL, where 192.168.64.100 is the kubemaster static IP.
https://192.168.64.100:32628
Wrap up
We’ve successfully set up Longhorn for Persistent Volumes in our Kubernetes cluster, boosting the local development setup with reliable, fault-tolerant storage.
With Longhorn’s automation and robust features, managing storage has never been easier!
If you’ve navigated any challenges or have questions, feel free to reach out.
Happy deploying!
Setting Up and Managing Persistent Volumes with Longhorn in Your Kubernetes Cluster was originally published in Level Up Coding on Medium, where people are continuing the conversation by highlighting and responding to this story.
This content originally appeared on Level Up Coding - Medium and was authored by Arseniy Tomkevich
Arseniy Tomkevich | Sciencx (2024-08-04T17:28:47+00:00) Setting Up and Managing Persistent Volumes with Longhorn in Your Kubernetes Cluster. Retrieved from https://www.scien.cx/2024/08/04/setting-up-and-managing-persistent-volumes-with-longhorn-in-your-kubernetes-cluster/
Please log in to upload a file.
There are no updates yet.
Click the Upload button above to add an update.