This content originally appeared on Telerik Blogs and was authored by Christian Nwamba
Let’s look the TanStack Query library, its fundamental principles and the problems it solves, and then at how to use it in an Angular application.
TanStack Query, previously known as React Query, is an important library for frontend developers that implements sophisticated data-fetching solutions in web applications. It handles various use cases and solves common problems developers face when fetching data in their apps. The library has evolved and is now compatible with many frontend frameworks, including React, Vue, Solid, Svelte and Angular.
In this guide, we will first go through the TanStack Query library, its fundamental principles and the problems it solves. Next, we will look at some of the internals of its Angular adapter and how to use the library in a simple Angular application. We will build a small app that displays a list of users. When a user is clicked, the app will navigate to a new page showing the user’s details and a button to delete the user.
TanStack Query
In the TanStack Query world, the server state is king. This is because the frontend UI just mirrors the data stored on the server. In the grand scheme of things, this means that the frontend developer needs to account for a lot so that the current state of the frontend app accurately mirrors the server. Managing this can be daunting due to the dynamic nature of the server and its data, which are constantly being modified by numerous users.
The creators of the TanStack Query library understand this and have effectively addressed this problem. In summary, the library’s goal is to enable the front end to:
- Fetch necessary data from the server efficiently and in a declarative way
- Keep the server state and the user interface in sync
- Retrieve correctly cached data from the server for a responsive and fast UI, and only refetch the data when required
Detailed below are some of the key advantages this solution offers for frontend developers:
- It helps the developer easily manage errors and loading states for each request.
- It eliminates duplicate requests. If
nparts of the UI make the same requests for a resource from the server, the library combines these requests into a single server request. - It fetches and updates outdated data.
- It caches data from requests and discards it when it’s no longer needed.
- It provides developer tools that make it easy to debug and monitor queries during development.
Simply put, this library allows developers to focus on the business aspects of building their applications without dealing with all these data-fetching problems.
A Few TanStack Query Terminologies
Two terms are used in the context of the TanStack Query framework: queries and mutations. Queries are the functions used to fetch data in association with the TanStack Query library, while mutations are functions that modify data, also tied to this library.
Queries are declarative. When you define a query, the TanStack library handles the rest, allowing you to go ahead and consume it in your UI template. A term we will use quite in this context is “query invalidation,” which means the data retrieved from a query is outdated and needs to be re-fetched. This can happen due to several reasons:
- An action is performed in our UI modified data on the server, such as a POST request.
- The data received from the query function earlier has been in the cache for too long.
In the second scenario, the library typically performs query invalidation for us. However, we can also do it manually using the invalidateQueries function on the instance of the query client.
On the other hand, mutations are imperative. As a developer, you still need to do some work when mutations are defined. Typically, this includes passing the required data to the server, and you may also need to specify what data needs to be pre-fetched and invalidated when mutation is performed.
Also, the data received from running queries and mutations are stored in separate caches. If necessary, developers can access these caches to retrieve and modify previous queries or mutations.
Project Setup
If you have the Angular CLI installed, create a new Angular project by running this command in your terminal:
ng new angular-data-fetching-with-tanstack-query
The command above creates an Angular project in our current directory, named angular-data-fetching-with-tanstack-query. Next, let’s install the dependencies we will need for this project:
cd angular-data-fetching-with-tanstack-query
npm install axios @tanstack/angular-query-experimental
TanStack Query Angular Adapter
At this point, it’s important to understand the internals of the TanStack Query Adapter. The most important takeaway is that it is solely based on Signals, a reactive primitive introduced in Angular 16.
Both queries and mutations use Angular Signals to interact with the core TanStack Query library. It wraps what it gets from the library and gives us back as a read-only signal.
What We Will Build
Our application will consist of two parts: a server and a client. The server has three routes. The first route, GET /users, retrieves a list of all users. The second route, GET /users/uid, retrieves a specific user based on their unique identifier (uid). The third route, DELETE /users/uid, deletes a specific user using their uid. You can clone the code for the server code by running this command in your terminal:
git clone https://github.com/christiannwamba/nestjs-users-server-ng-query
Here is an example of a user’s information:
{
  fullName: 'sam smith',
  email: 'samsmith@yopmail.com',
  id: '1',
}
Our client-side Angular application will consume the server APIs. This application will consist of two routes:
- The home route (
/) which will display a list of users.
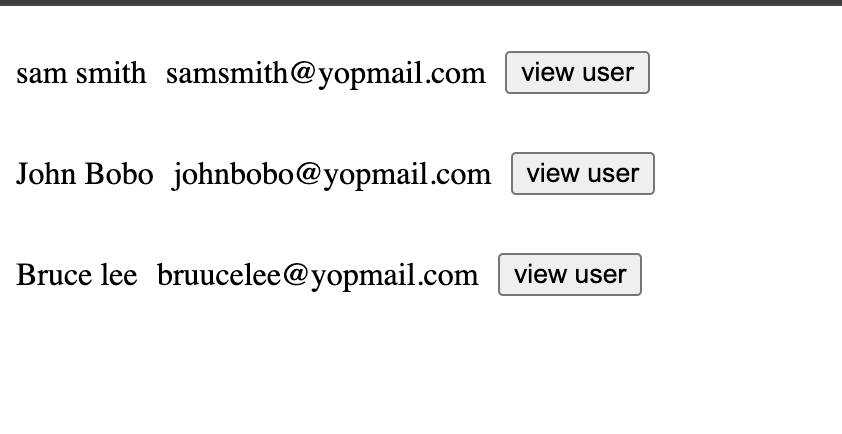
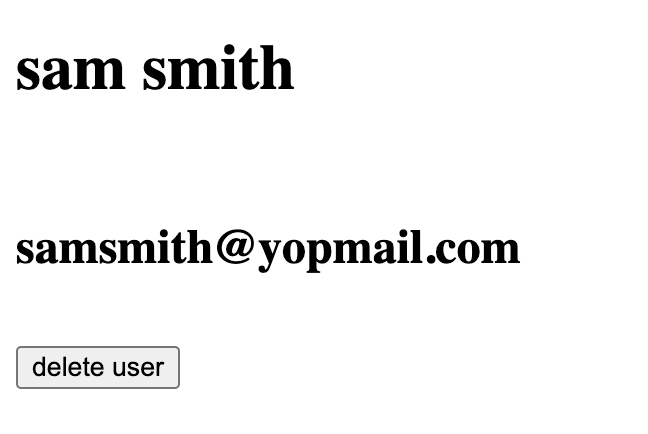
- When you click on a single user, you will be directed to the second route—
/user/uid—where you can view the user’s data.
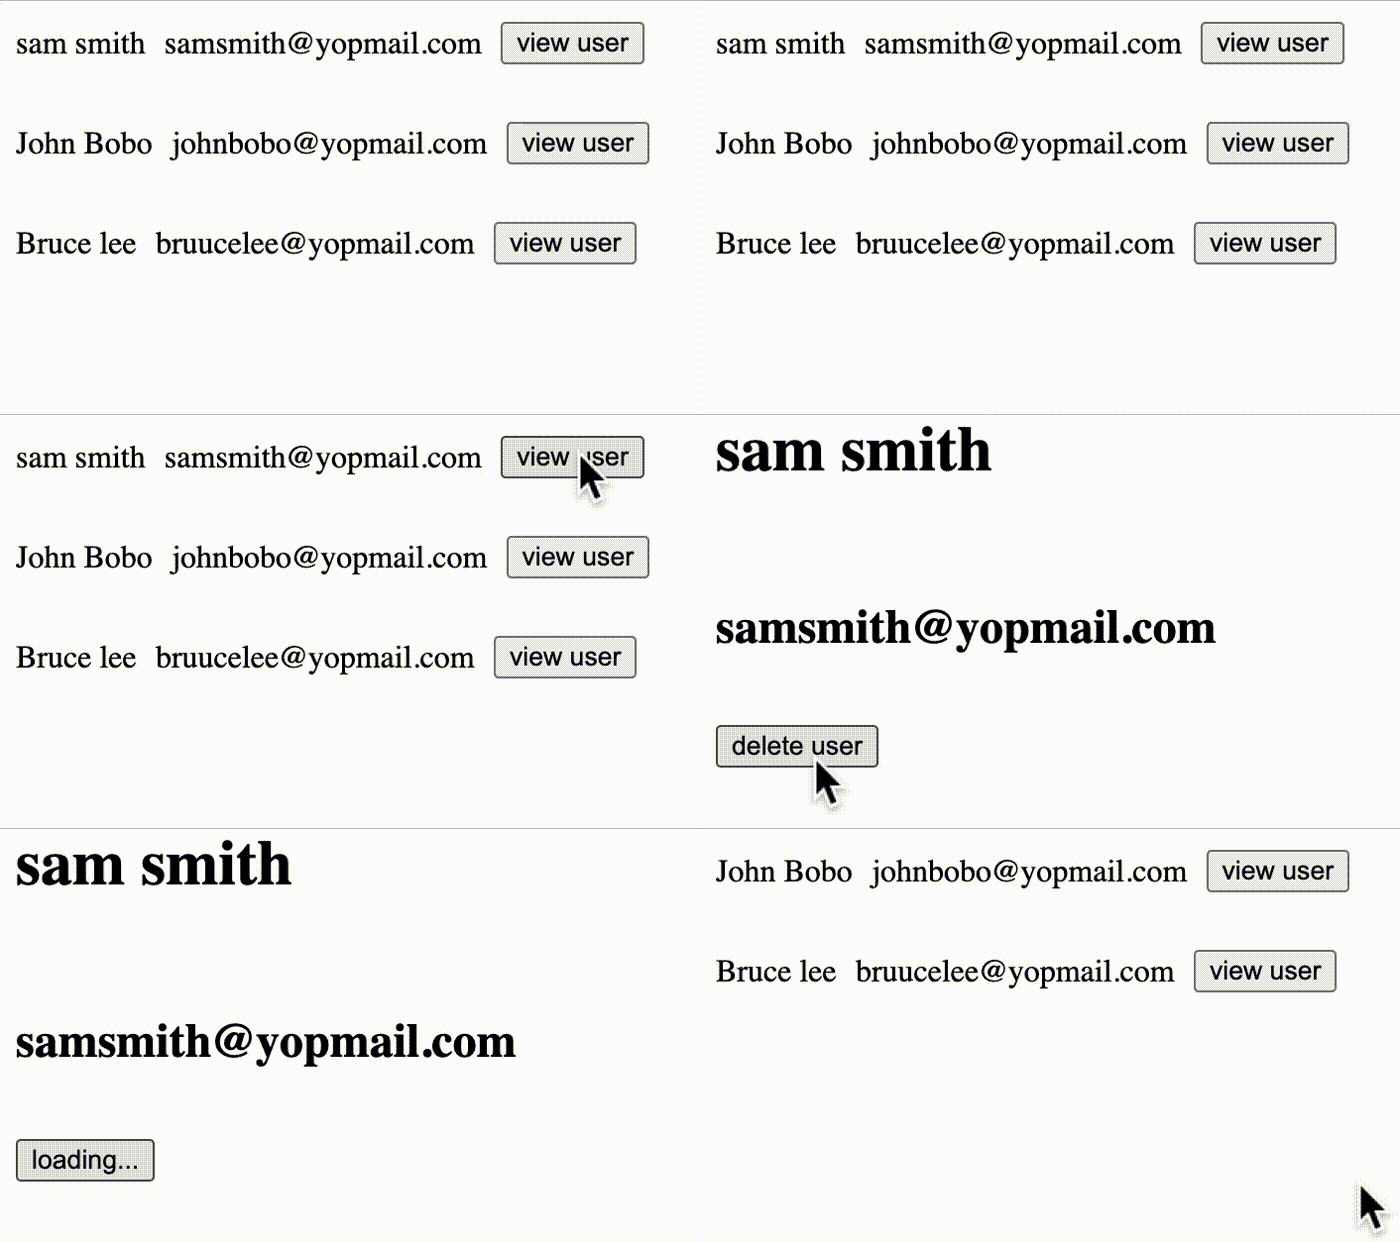
When you click the delete button, the user’s data will be deleted, and you will be redirected to the home screen, where you can see a list of the remaining users.
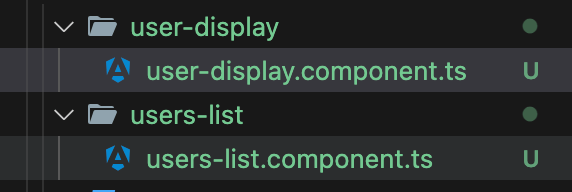
We will need two components. The first is users-list, which will contain the list of users. The second component, named user-display, will show the details of each user. Let’s create these components using the Angular CLI. Run this command in your terminal to create the first component:
ng g component --inline-style --inline-template --standalone users-list
Run this command in your terminal to create the second component:
ng g component --inline-style --inline-template --standalone user-display
After successfully executing these commands, you should see two new folders containing the components as shown below.
Let’s add some routing functionality to link to the components we’ve just created. Update the app.routes.ts file with the two new routes.
import { Routes } from "@angular/router";
import { UserDisplayComponent } from "./user-display/user-display.component";
import { UsersListComponent } from "./users-list/users-list.component";
export const routes: Routes = [
  {
    path: "",
    component: UsersListComponent,
  },
  {
    path: "user/:uid",
    component: UserDisplayComponent,
  },
];
Let’s add the Angular Router to our app. Updates your app.config.ts file with the following:
import { ApplicationConfig } from "@angular/core";
import { provideRouter, withComponentInputBinding } from "@angular/router";
import { routes } from "./app.routes";

export const appConfig: ApplicationConfig = {
  providers: [provideRouter(routes, withComponentInputBinding())],
};
This file allows us to expose multiple providers in our Angular application. Here, we have provided routing functionality using the provideRouter function. This function receives an array of routes and an optional function to allow route components to retrieve route params using the @Input decorator.
Setting Up TanStack Query
First, let’s update the contents of the app.config.ts file to look like this:
import {
  QueryClient,
  provideAngularQuery,
} from "@tanstack/angular-query-experimental";
const qc = new QueryClient();
export const appConfig: ApplicationConfig = {
  providers: [
    provideRouter(routes, withComponentInputBinding()),
    provideAngularQuery(qc),
  ],
};
We provided the QueryClient globally for our app with the provideAngularQuery function. This is important because every mutation and query in our app heavily depends on the instance of the query client we have created.
You can think of the query client as the primary messenger in the library. Behind the scenes, it handles all the interaction with the various components in the TanStack Query library.
This means that any code you write to manipulate cache contents, invalidate queries, pre-fetch data, perform mutations, etc., will need access to the query client instance.
Our First Query
Let’s update the contents of the user-list.component.ts file to match with the following:
import { Component } from "@angular/core";
import { RouterLink, RouterLinkActive } from "@angular/router";
import { injectQuery } from "@tanstack/angular-query-experimental";
import axios from "axios";

export type user = {
  id: string;
  fullName: string;
  email: string;
};

@Component({
  selector: "app-users-list",
  standalone: true,
  imports: [RouterLink, RouterLinkActive],
  template: `
    @if(usersQuery.isLoading()){
    <h1>loading users...</h1>
    } @if(usersQuery.data()){ @for( user of usersQuery.data()?.data; track
    user.id){
    <div class="flex">
      <p>{{ user.fullName }}</p>
      <p>{{ user.email }}</p>
      <div class="flex">
        <a
          [routerLink]="'user/' + user.id"
          routerLinkActive="active"
          ariaCurrentWhenActive="page"
        >
          <button>View user</button>
        </a>
      </div>
    </div>
    } } @else if (usersQuery.error()) {
    <h2>An error occured while getting users. Please try again</h2>
    <button (click)="usersQuery.refetch()">Refetch users</button>
    }
  `,
  styles: ``,
})
export class UsersListComponent {
  usersQuery = injectQuery((qc) => ({
    queryKey: ["users"],
    queryFn: async () => await axios.get<user[]>("http://localhost:3009/users"),
  }));
}
In the code above, we use the injectQuery function to create queries. This function accepts a callback that returns the options required for the query. Although there are a lot of options that can be passed, the query key (queryKey) and the query function (queryFn) are required.
The queryKey is an array of serializables and is very important because it allows the library to cache responses/data gotten from making API calls using the query function. It checks that queries are fetched correctly when there’s a change in any element within the query key array.
Internally, the injectQuery function uses the query client instance we provided earlier in our app.config.ts file to set everything up for us automatically. We are now set to consume the query in our app’s UI template.
The call to the injectQuery function returns a lot of properties we can use. A simple way to think of these properties is to associate them with either the current state of the query function (e.g., the loadingStatus) or the data returned from the API call made using the query function (e.g., the data property).
We bind the result to a variable named usersQuery, and then use this to update our UI template:
- We render some UI content based on the loading state of the query function using
isLoading. - If the query function returns data, we render a list of users.
- If there is an error response from the query function, we get the error from the result and use the
refetchproperty to allow users to try fetching the data again.
As seen above, queries are declarative in nature. We just need to specify the query options, and the TanStack Query library handles the rest. Then, you can proceed to consume all the properties in your application UI.
Run npm start in your terminal to see the running application. You should now see the list of users displayed, with links to navigate to their user details page.
Configure Queries with Query Options
While queryKey and queryFn are the only required options for queries, there are other options that can be passed as well, many of which are automatically specified by the library.
Here are a few commonly used options:
retry: This option allows us to specify the number of attempts the query should make before it fails. For example, settingretryto5will allow the query to try and fetch data five times before giving up.
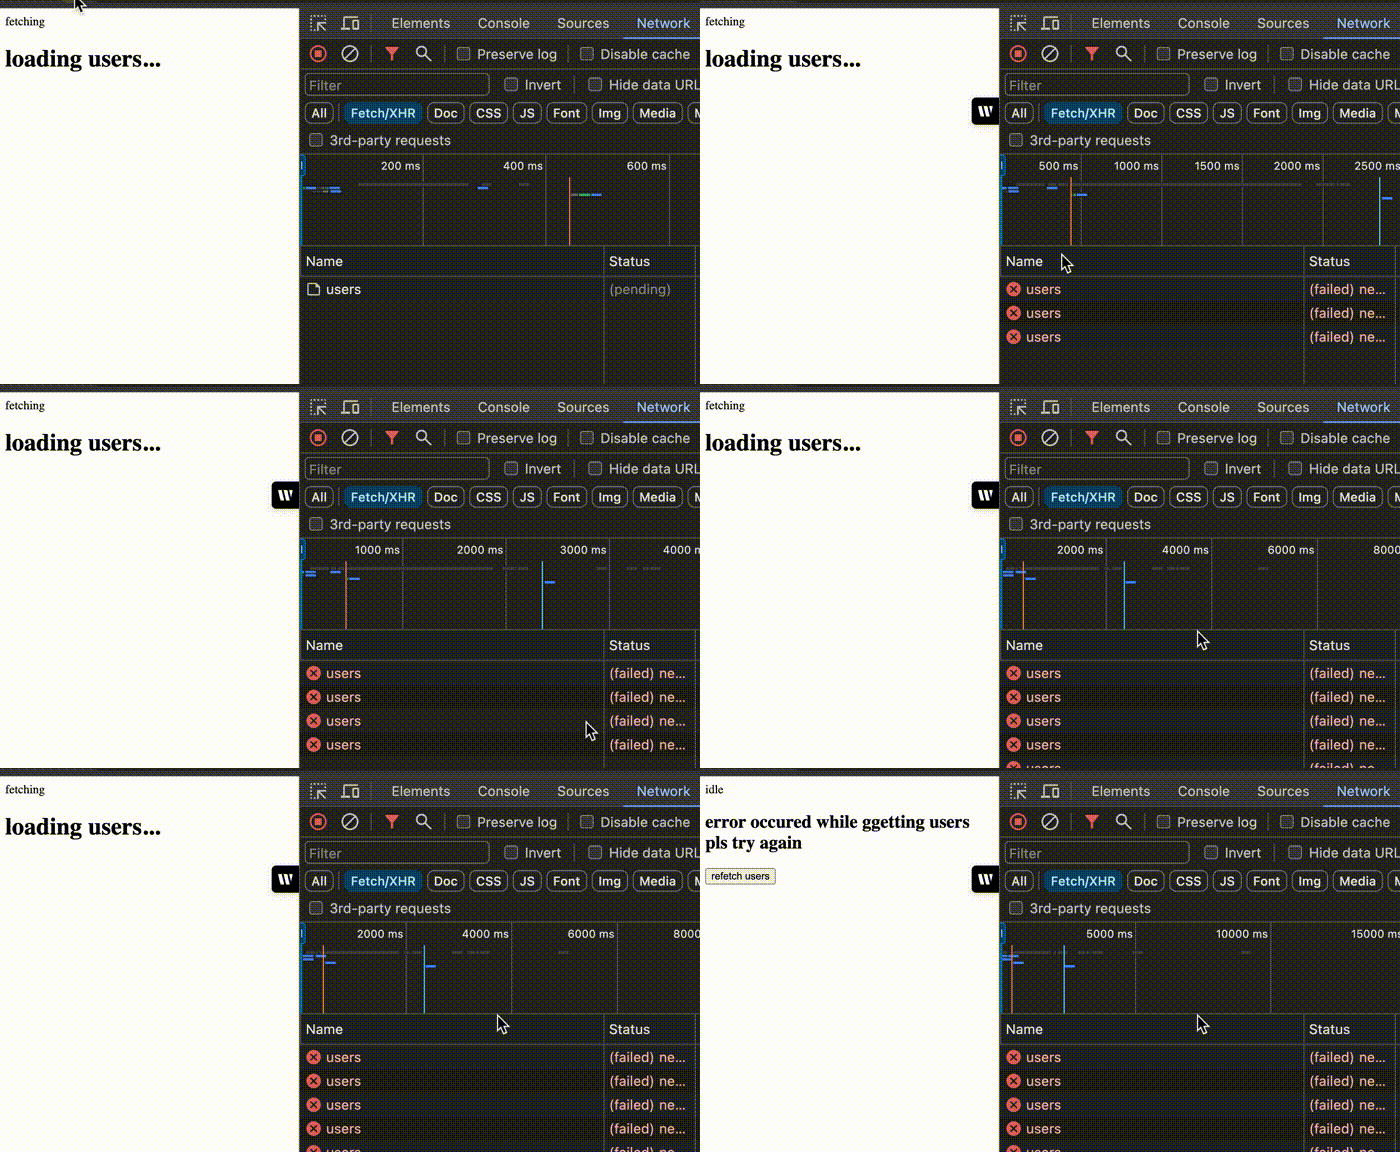
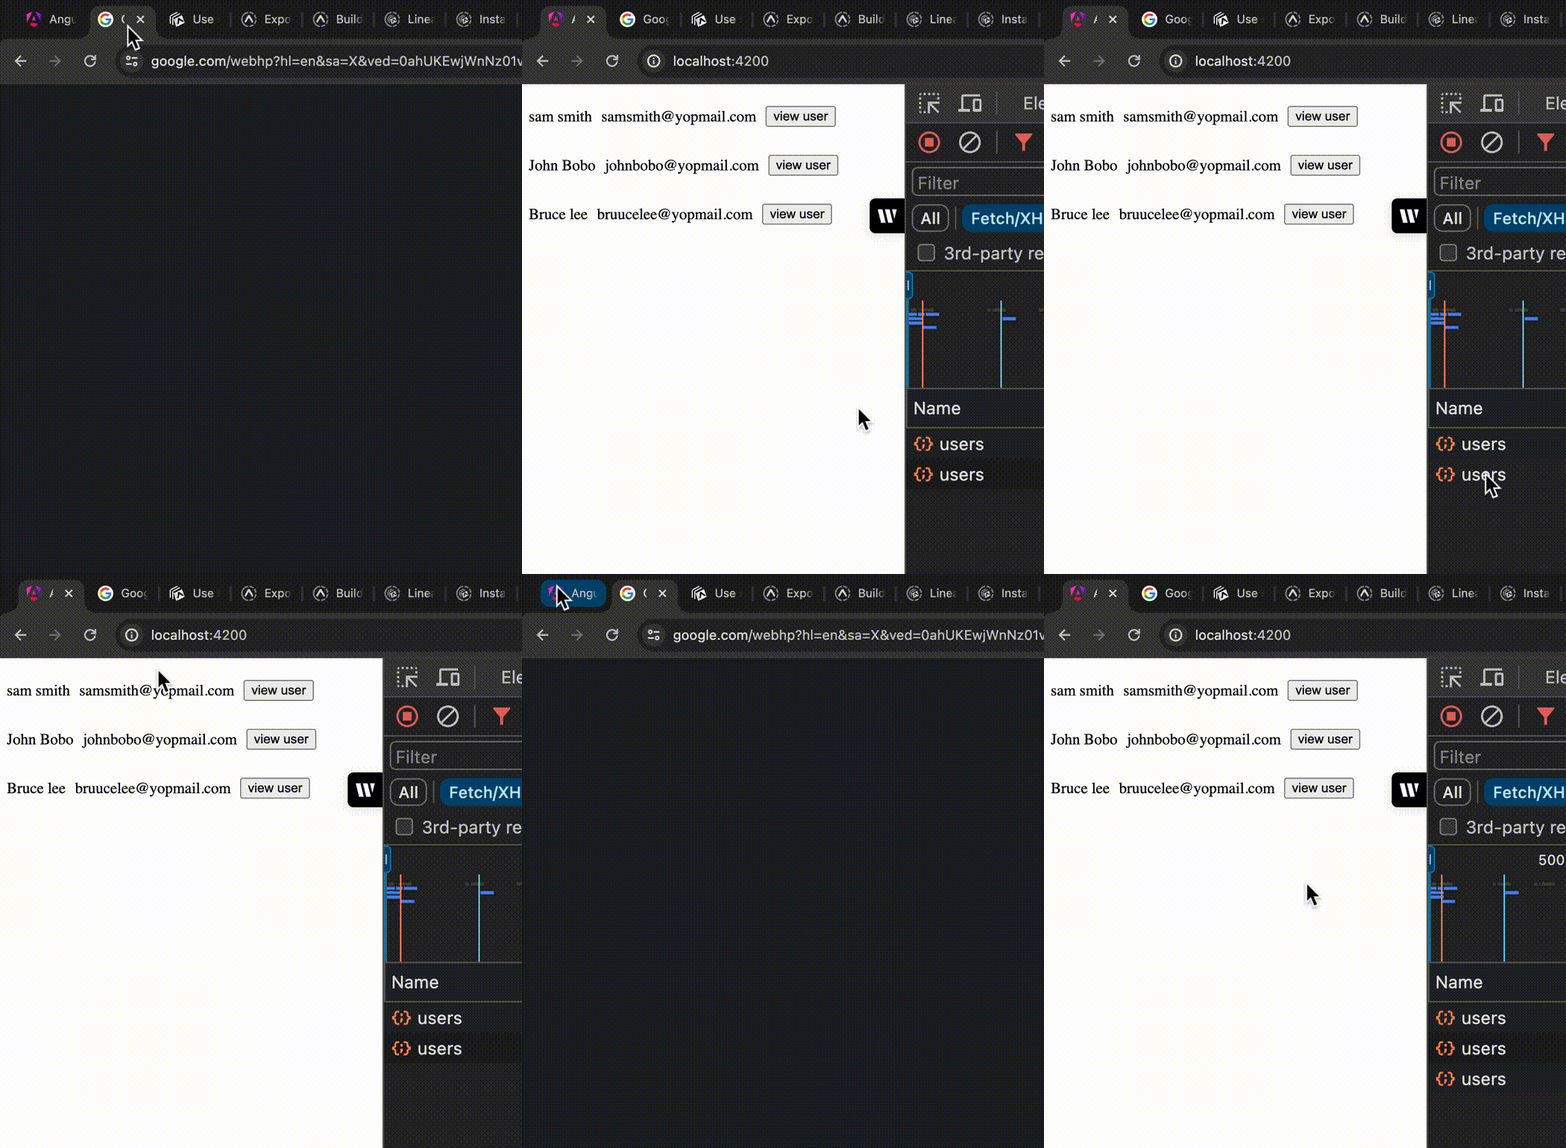
staleTime: This option is a number given in milliseconds. It specifies how long the data from a query stays before it is considered stale.cacheTime: This is another option measured in milliseconds. It specifies how long the fetched data will stay in the cache before it is discarded.enabled: Queries typically execute immediately after they are created. However, you can change this behavior by passing a boolean value to this parameter. It’s useful when you want to initiate a query based on the truth value of some other variable.refetchOnMount: Setting this option to true ensures that the data is re-fetched each time the component holding the query is mounted.refetchOnWindowFocus: This option ensures that active queries are prefetched each time the user focuses on the current tab. See the demo below for more details.
Our Second Query
Now let’s update the user-display.component.ts file to add a query that retrieves the details of a specific user.
import { Component, Input, inject } from "@angular/core";
import { user } from "../app.component";
import axios from "axios";
import {
  injectMutation,
  injectQuery,
} from "@tanstack/angular-query-experimental";
import { ActivatedRoute, Router } from "@angular/router";
import { Location } from "@angular/common";
@Component({
  selector: "app-user-display",
  standalone: true,
  imports: [],
  template: `
    @if (userQuery.data()) {
    <div class="grid">
      <h1>{{ userQuery.data()?.fullName }}</h1>
      <h2>{{ userQuery.data()?.email }}</h2>
      <div class="">
        <button (click)="handleDeleteUser()">delete user</button>
      </div>
    </div>
    }
  `,
  styles: ``,
})
export class UserDisplayComponent {
  @Input() uid: string = "";

  userQuery = injectQuery((qc) => ({
    queryKey: ["users", this.uid],
    queryFn: async ({ queryKey }) =>
      // queryKey[1] is the users id
      (await axios.get<user>(`http://localhost:3009/users/${queryKey[1]}`))
        .data,
  }));

  async handleDeleteUser() {}
}
To fetch the user’s data on this page, we first need to get the user’s id. We retrieve this using the @Input decorator. Once we have the user’s id, we can add another query using the injectQuery function. You’ll notice that the query key includes the user’s id.
When building applications that need to fetch data when some parameter changes, it’s important to include these parameters in the query key. In our case, we include the user’s id. The query key can be a simple value, as in our example, or it could be a signal.
You may be wondering why the @injectQuery option receives a callback instead of just a plain JavaScript object. The straightforward answer is that the library needs to ensure that the options are reactive. The callback passed to @injectQuery is called internally by the library. The options returned by this callback are wrapped in a signal using the computed signal method provided by Angular.
Because of how signals work in general, including a signal in the callback passed to @injectQuery makes it so that if, like in our example above, the pageSize signal changes maybe to a value of 30 because the user clicks a button for example, TanStack Query will recall the @injectQuery callback again, thanks to the computed Angular function it uses internally.
In our case, the new value is 30, which means that in the options, the queryKey property will be modified. Hence, the TanStack Query library automatically re-fetches the query using the new options, so our Angular app stays reactive.
A Note on Query Keys
As mentioned earlier, query keys are important in the TanStack Query library. While there are no defined ways of specifying these keys, we will explore some reasonable practices that developers have adopted to specify them correctly in this section.
- Make sure that the names of your query keys accurately describe the data that will be fetched. For example, when fetching a list of users, you can name your key like this:
cost someQuery = injectQuery((qc) => ({
queryKey: ["users","list"]
//... other opts
}))
For a single user you can have something like this:
queryKey: ["users", userID];
One thing you will notice is that it is easy to spot that both queries are about fetching data for "users". How is this important? Keeping our query keys organized makes it easy to invalidate queries.
For example, if a user performs an action, such as creating a user, we can easily invalidate all queries with the users key.
- Include any dependency of the query in the query key. For example, if we are fetching data for a specific user, using their unique user ID:
queryKey: ["users", userID];
Fetching payments based on some filters:
filters = { from: "2024-1-1", to: "2024-4-30" };

queryKey: ["payments", filters];
Instead of repeatedly hardcoding query keys, you can store them in factories. For instance, for users in our app, we can have something like:
const users = {
  base:"users",
  listOfUsers:[users.base,"list"],
  userDisplay(userId:string)=>([users.base,"display",userId])
}
For a query, we can have a key like this:
queryKey: users.listOfUsers;
Mutations
While queries are used to fetch from the server, mutations are used to modify the data on our server’s database. This is why when mutations are performed, the frontend application needs to be synced to reflect the new data on the server, and this is done by invalidating any queries in our app that are affected by the mutation.
Let’s add a simple mutation that deletes the user’s data on our server. Earlier, we included a button in the user-list.component.ts file that triggers a function called handleDeleteUser, which currently does nothing. Let’s update the code to include a mutation:
@Component({
  //...
})
export class UserDisplayComponent {
  private _router = inject(Router);
  deleteUserMutation = injectMutation((qc) => ({
    onSuccess: async (data) => {
      alert("successfully delete user 0");
      await qc.invalidateQueries({
        queryKey: ["users"],
      });
      await this._router.navigate(["/"], {
        replaceUrl: true,
      });
    },
    onError() {
      console.log("error occured pls try again");
    },
    mutationFn: (userId: string) =>
      axios.delete(`http://localhost:3009/users/${userId}`),
  }));

  async handleDeleteUser() {
    const user = this.userQuery.data();
    if (!user) {
      return;
    }
    const id = user.id;
    try {
      await this.deleteUserMutation.mutateAsync(id);
      alert("user deleted successfully 1");
    } catch (error) {
      console.log("error occurred pls try again 1");
    }
  }
}
Mutations are created using the injectMutation function, which similarly expects a callback that will receive the query client instance as its only parameter. This callback returns the mutation options. Of all the options the callback returns, the most important one required for a mutation is the mutation function—mutationFn, which is the function that makes the HTTP request to the server to perform the mutation. Let’s now briefly take a look at the other options.
onSuccess: This function is executed if the mutation function resolves successfully. In our case, we invalidated our users query and redirect them back to that page using the router:
await qc.invalidateQueries({
  queryKey: ["users"],
});
onError: This function will be executed if the mutation function fails. Here, we just print an error message to the console when the mutation function fails.
Unlike queries, mutations defined using the injectMutation function are not triggered automatically. We need to trigger them manually. We defined a handleDeleteUser function that first checks if the user’s data has been fetched and, if so, retrieves the user’s ID.
Mutations can be triggered using the mutate or mutateAsync properties; we used the latter in our case. The argument passed to the mutateAsync call is the same as the one specified in the mutation function. Within a try-catch block, if the mutation tries to delete a user and succeeds, we alert a message; if an error occurs, we print an error message.
<button (click)="handleDeleteUser()">
  {{ deleteUserMutation.isPending() ? 'loading...' : 'delete user' }}
</button>
We also updated our UI template to use the returned mutation properties to change the content of our UI dynamically. Every mutation has a pending state, which is just a boolean showing whether the mutation is actively running.
Let us walk through how this mutation runs when the user visits the page that displays a single user detail.
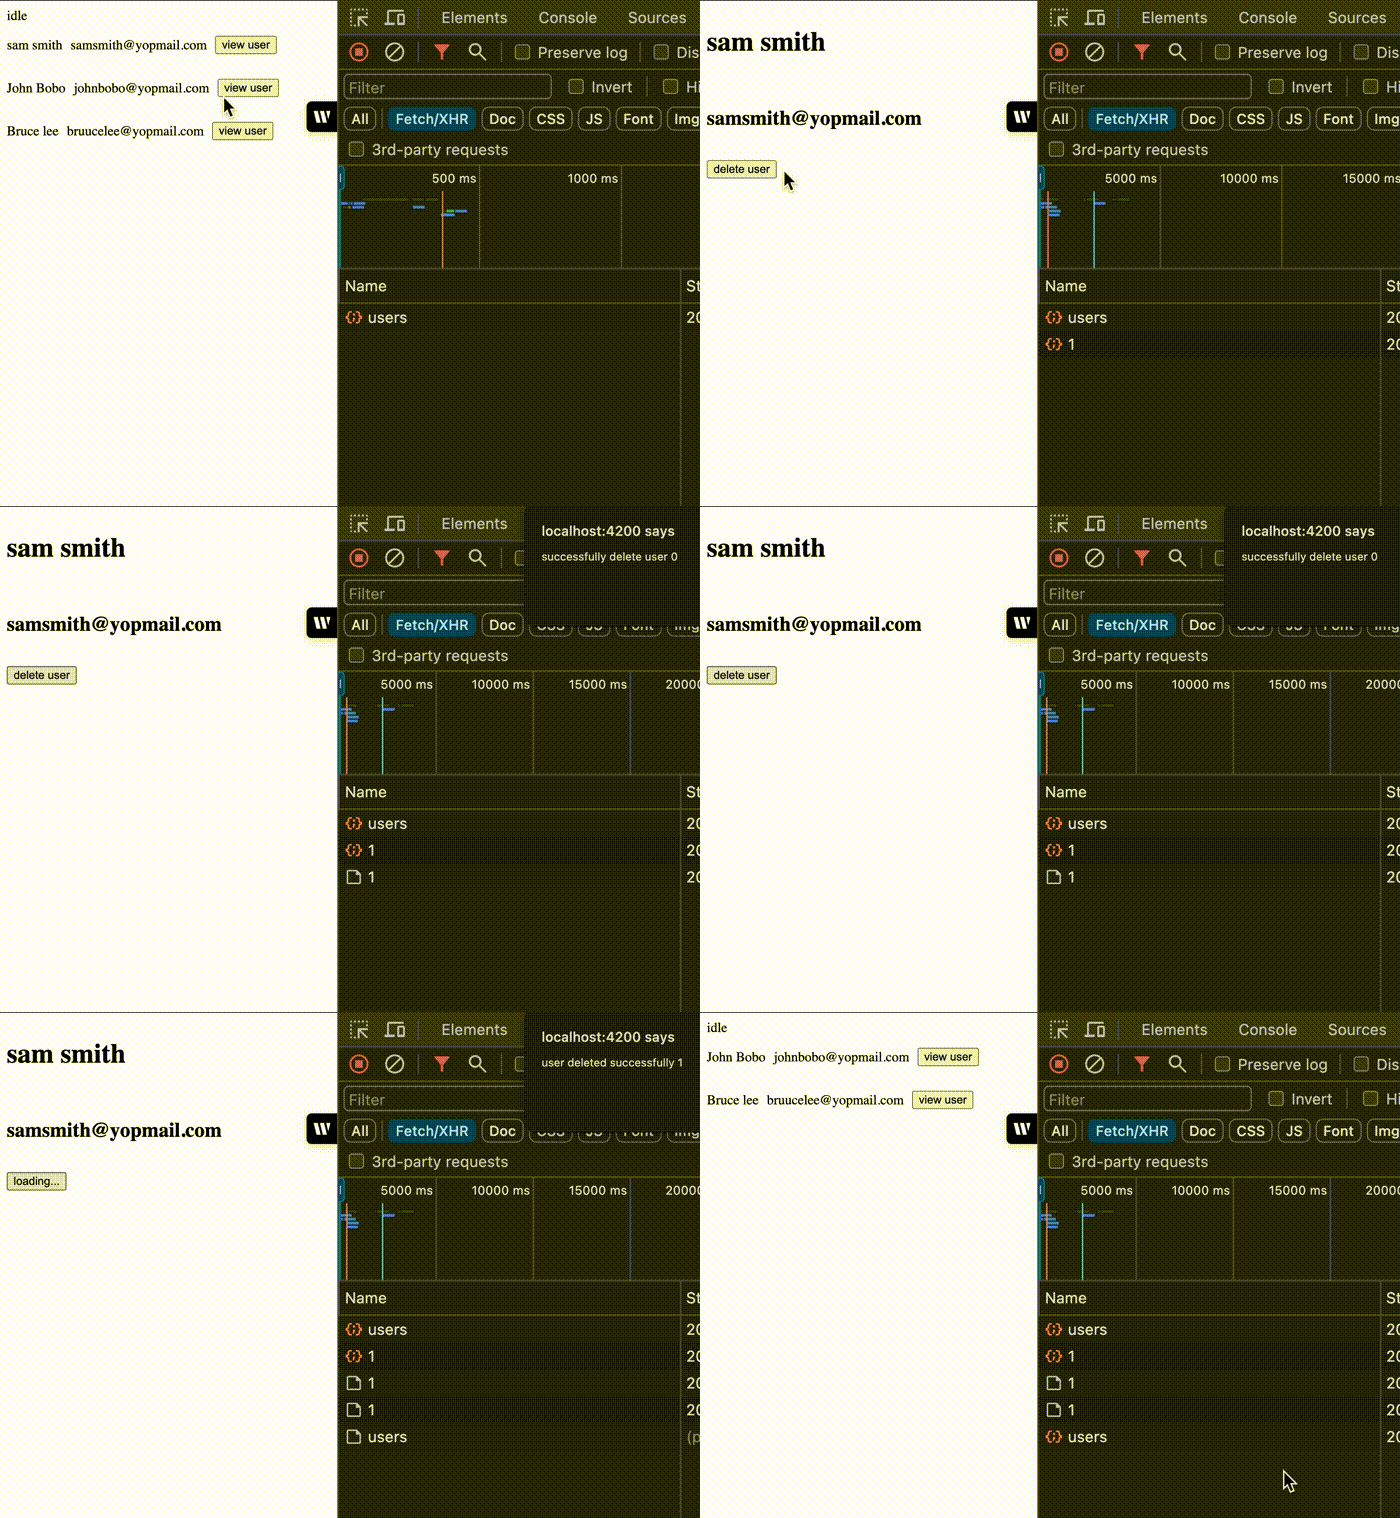
Let’s walk through how this mutation runs when the user visits the page that displays a single user detail.
- The page loads and triggers the user query.
- If the query resolves successfully, the user data is displayed on the screen with a button to delete the user.
- When the user clicks the delete button, it triggers the
handleDeleteUserfunction. - If the user is deleted successfully, the
onSuccessfunction is called. This invalidates the user query and redirects the user back to the/userspage. - On the
/userspage, the user data is re-fetched because it was invalidated in Step 4. The page is then updated to display the remaining users.
Conclusion
In this guide we built a simple Angular application that shows how easy the TanStack Query library makes data fetching in web applications.
This content originally appeared on Telerik Blogs and was authored by Christian Nwamba
Christian Nwamba | Sciencx (2024-08-07T08:50:02+00:00) Data Fetching in Angular Using TanStack Query. Retrieved from https://www.scien.cx/2024/08/07/data-fetching-in-angular-using-tanstack-query/
Please log in to upload a file.
There are no updates yet.
Click the Upload button above to add an update.
