This content originally appeared on HackerNoon and was authored by Kazakov Kirill
A brief overview of the problem
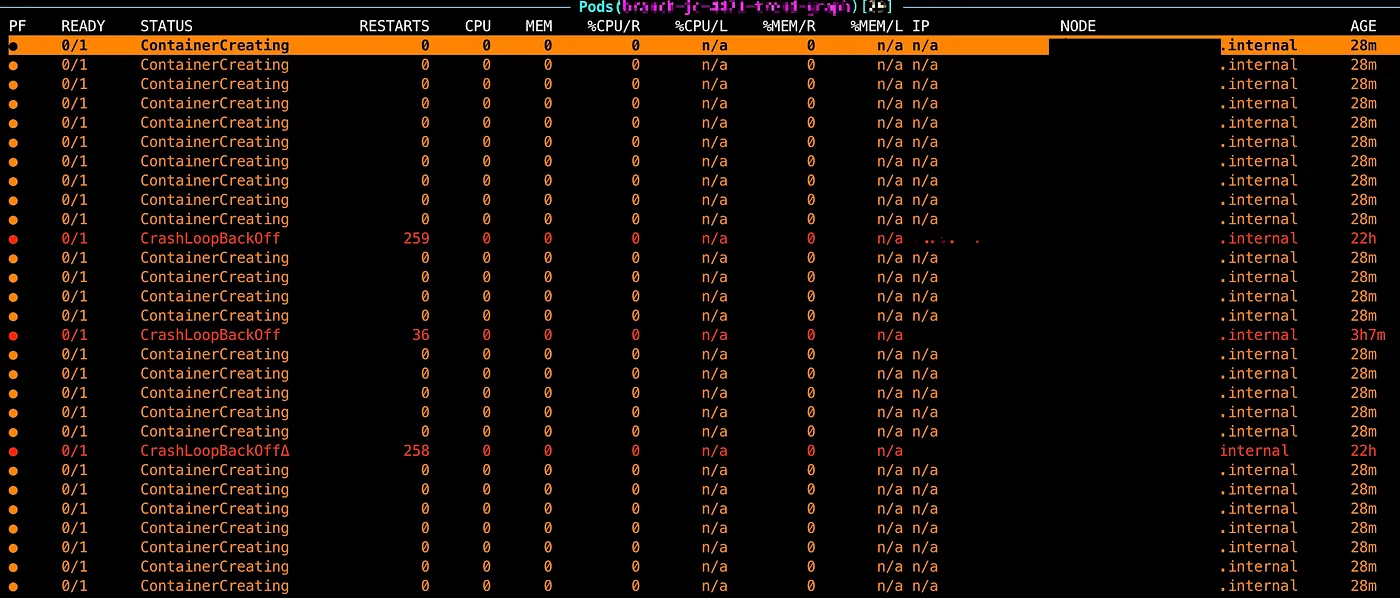
One day, during a planned update of the k8s cluster, we discovered that almost all of our PODs (approximately 500 out of 1,000) on new nodes were unable to start, and the minutes quickly turned into hours. We are actively searched for the root cause, but after three hours, the PODS were still in the ContainerCreating status.
\

Thankfully, this was not the prod environment and the maintenance window was scheduled for the weekend. We had time to investigate the issue without any pressure.
Where should you begin your search for the root cause? Would you like to learn more about the solution we found? Strap in and enjoy!
More details about the problem
The problem was that we had a large number of docker images that needed to be pulled and started on each node in the cluster at the same time. This was because multiple concurrent docker image pulls on a single node can lead to high disk utilization and extended cold start times.
\ From time to time, the CD process takes up to 3 hours to pull the images. However, this time it was completely stuck, because the amount of PODS during the EKS upgrade (inline, when we replace all nodes in the cluster) was too high.
\
All our apps live in the k8s (EKS based). To save on our costs for DEV env, we use spot instances.
We use the AmazonLinux2 image for the nodes.
We have a large number of feature branches (FBs) in the development environment that are continuously deployed to our Kubernetes cluster. Each FB has its own set of applications, and each application has its own set of dependencies(inside an image).
In our project, almost 200 apps and this number is growing. Each app uses one of the 7 base docker images with a size of ~2 GB. The max total size of the archived image (in the ECR) is about 3 GB.
All images are stored in the Amazon Elastic Container Registry (ECR).
We use the default gp3 EBS volume type for the nodes.
\
Issues Faced
Extended Cold Start Time: Starting a new pod with a new image can take more than 1 hour, particularly when multiple images are pulled concurrently on a single node.
ErrImagePull Errors: Frequent
ErrImagePullor stuck with theContainerCreatingstates, indicating issues with image pulling.High Disk Utilization: Disk utilization remains near 100% during the image pulling process, primarily due to the intensive disk I/O required for decompression (e.g., “unpigz”).
System DaemonSet Issues: Some system DaemonSets(like
aws-nodeorebs-csi-node) moved to the "not ready" state due to disk pressure, impacting node readiness.No image cache on the nodes: Because we are using spot instances, we cannot use the local disk for caching images.
\
This results in many stalled deployments on feature branches, particularly because the different FB has a diff sets of base images.
After fast investigation, we found that the main issue was the disk pressure on the nodes by the unpigz process. This process is responsible for decompressing the docker images. We did not change the default settings for the gp3 EBS volume type, because not suitable for our case.
Hotfix to recovery the cluster
As the first step, we decided to reduce the number of PODs on the nodes.
- We move the new nodes to the “Cordon” state
- Remove all stuck PODS to reduce the disk pressure
- Run one by one the PODs to warm up the nodes
- After that, we move warmed-up nodes to the normal state (“unCordon”)
- Removed all nodes in the stuck state
- All PODS started successfully using the Docker image cache
\
An original CI/CD design
The main idea of the solution is to warm up the nodes before the CD process starts by the largest part of the docker image (JS dependencies layer), which uses as the root image for all our apps. We have at least 7 types of the root images with the JS dependencies, which are related to the type of the app. So, let’s analyze the original CI/CD design.
\
In our CI/CD pipeline, we have 3 pillars: 
An original CI/CD pipeline:
On the
Initit step: we prepare the environment/variables, define the set of images to rebuild, etc…On the
Buildstep: we build the images and push them to the ECROn the
Deploystep: we deploy the images to the k8s (update deployments, etc…)\
More details about the original CICD design:
- Our feature branches (FB) forked from the
mainbranch. In the CI process, we always analyze the set of images which were changed in the FB and rebuild them. Themainbranch is always stable, as the definition, there is should be always the latest version of the base images. - We separately build the JS dependencies docker images (for each environment) and push it to the ECR to reuse it as the root(base) image in the Dockerfile. We have around 5–10 types of the JS dependencies docker image.
- The FB is deployed to the k8s cluster to the separate namespace, but to the common nodes for the FB. The FB can have ~200 apps, with the image size up to 3 GB.
- We have the cluster autoscaling system, which scales the nodes in the cluster based on the load or pending PODS with the according nodeSelector and toleration.
- We use the spot instances for the nodes.
Implementation of the warm-up process
There are requirements for the warm-up process.
Mandatory:
- Issue Resolution: Addresses and resolves
ContainerCreatingissues. - Improved Performance: Significantly reduces startup time by utilizing preheated base images(JS dependencies).
Nice to have improvements:
- Flexibility: Allows for easy changes to the node type and its lifespan (e.g., high SLA or extended time to live).
- Transparency: Provides clear metrics on usage and performance.
- Cost Efficiency: Saves costs by deleting the VNG immediately after the associated feature branch is deleted.
- Isolation: This approach ensures that other environments are not affected.
Solution
After analyzing requirements and constraints, we decided to implement a warm-up process that would preheat the nodes with the base JS cache images. This process would be triggered before the CD process starts, ensuring that the nodes are ready for the deployment of the FB, and we have a max chance to hit the cache.
\ This improvement we split into tree big steps:
Create the set of the nodes (Virtual Node Group) per each FB
Add base images to the cloud-init script for the new nodes
Add a pre-deploy step to run the DaemonSet with the
initContainerssection to download the necessary docker images to the nodes before the CD process starts.\
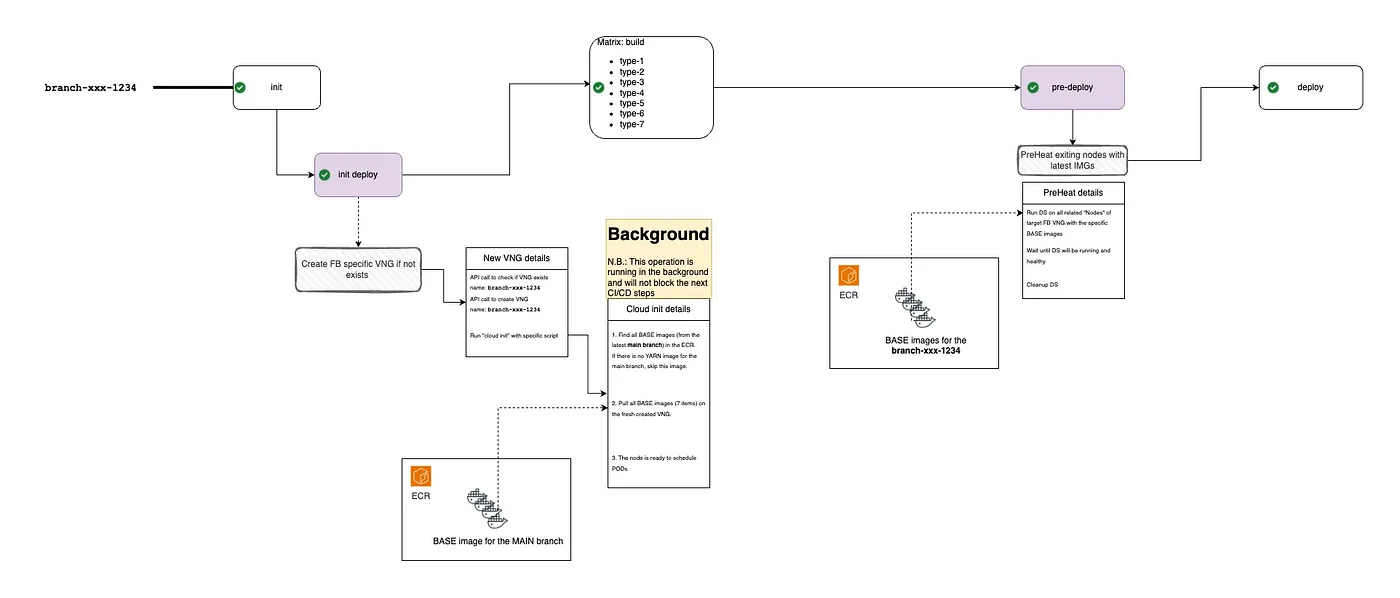
An updated CI/CD pipeline would look like this: 
\
An updated CI/CD pipeline:
- Initstep \n 1.1.(new step)Init deploy: If it’s a first start of the FB, then create a new personal set of the node instances (in our terms it’s Virtual Node Group or VNG) and download all JS base images (5–10 images) from the main branch. It’s fair enough to do it, because we forked the FB from the main branch. An important point, it’s not a blocking operation.
- Build step
- Pre deploystep Download fresh baked JS base images with the specific FB tag from the ECR. \n 3.1.(new step)Important points: It’s a blocking operation, because we should reduce the disk pressure. One by one, we download the base images for each related node. \n Btw, thanks for the “init deploy” step, we already have the base docker images from the main branch, that is give us a big chance to hit the cache on the first start.
- **Deploy \n **There are no changes in this step. But thanks to the previous step, we already have all heavy docker image layers on the necessary nodes.
Init deploy step
Create a new set of the nodes for each FB via API call (to the 3rd party autoscaling system) from our CI pipeline.
\ Resolved issues:
Isolation: Each FB has its own set of nodes, ensuring that the environment is not affected by other FBs.
Flexibility: We can easily change the node type and its lifespan.
Cost Efficiency: We can delete the nodes immediately after the FB is deleted.
Transparency: We can easily track the usage and performance of the nodes (each node has a tag related to the FB).
Effective usage of the spot instances: The spot instance is starting with already predefined base images, that means, after the spot node starts, there already the base images on the node (from the main branch).
\
Download all JS base images from the main branch to the new nodes via cloud-initscript.
\n While the images are being downloaded in the background, the CD process can continue to build new images without any issues. Moreover, the next nodes (which will be created by autoscaling system) from this group will be created with the updatedcloud-init data, which already have instructions to download images before start.
\ Resolved issues:
Issue Resolution: Disk pressure is gone, because we updated the
cloud-initscript by adding the download of the base images from the main branch. This allows us to hit the cache on the first start of the FB.Effective usage of the spot instances: The spot instance is starting with updated
cloud-initdata. It means, that after the spot node starts, there already the base images on the node (from the main branch).Improved Performance: The CD process can continue to build new images without any issues.
\
This action added ~17 seconds(API call) to our CI/CD pipeline.
This action makes sense only the first time when we start the FB. Next time, we deploy our apps to already existing nodes, which already have the base images, which we delivered on the previous deployment.
Pre deploy step
We need this step, because the FB images are different from the main branch images. We need to download the FB base images to the nodes before the CD process starts. This will help to mitigate the extended cold start times and high disk utilization that can occur when multiple heavy images are pulled simultaneously.
\ Objectives of the Pre-Deploy Step
Prevent Disk Pressure: Sequentially download docker most heavy images. After the init-deploy step, we already have the base images on the nodes, which means we have a big chance to the hit cache.
Improve Deployment Efficiency: Ensure nodes are preheated with essential docker images, leading to faster(almost immediately) POD startup times.
Enhance Stability: Minimize the chances of encountering
ErrImagePull/ContainerCreatingerrors and ensure system daemon sets remain in a “ready” state.\
Under this step, we add 10–15 minutes to the CD process.
Pre deploy step Details:
- In the CD we create a DaemonSet with the
initContainerssection. - The
initContainerssection is executed before the main container starts, ensuring that the necessary images are downloaded before the main container starts. - In the CD we are continuously checking the status of the daemonSet. If the daemonSet is in a “ready” state, we proceed with the deployment. Otherwise, we wait for the daemonSet to be ready.
Comparison
Comparison of the original and updated steps with the preheat process.
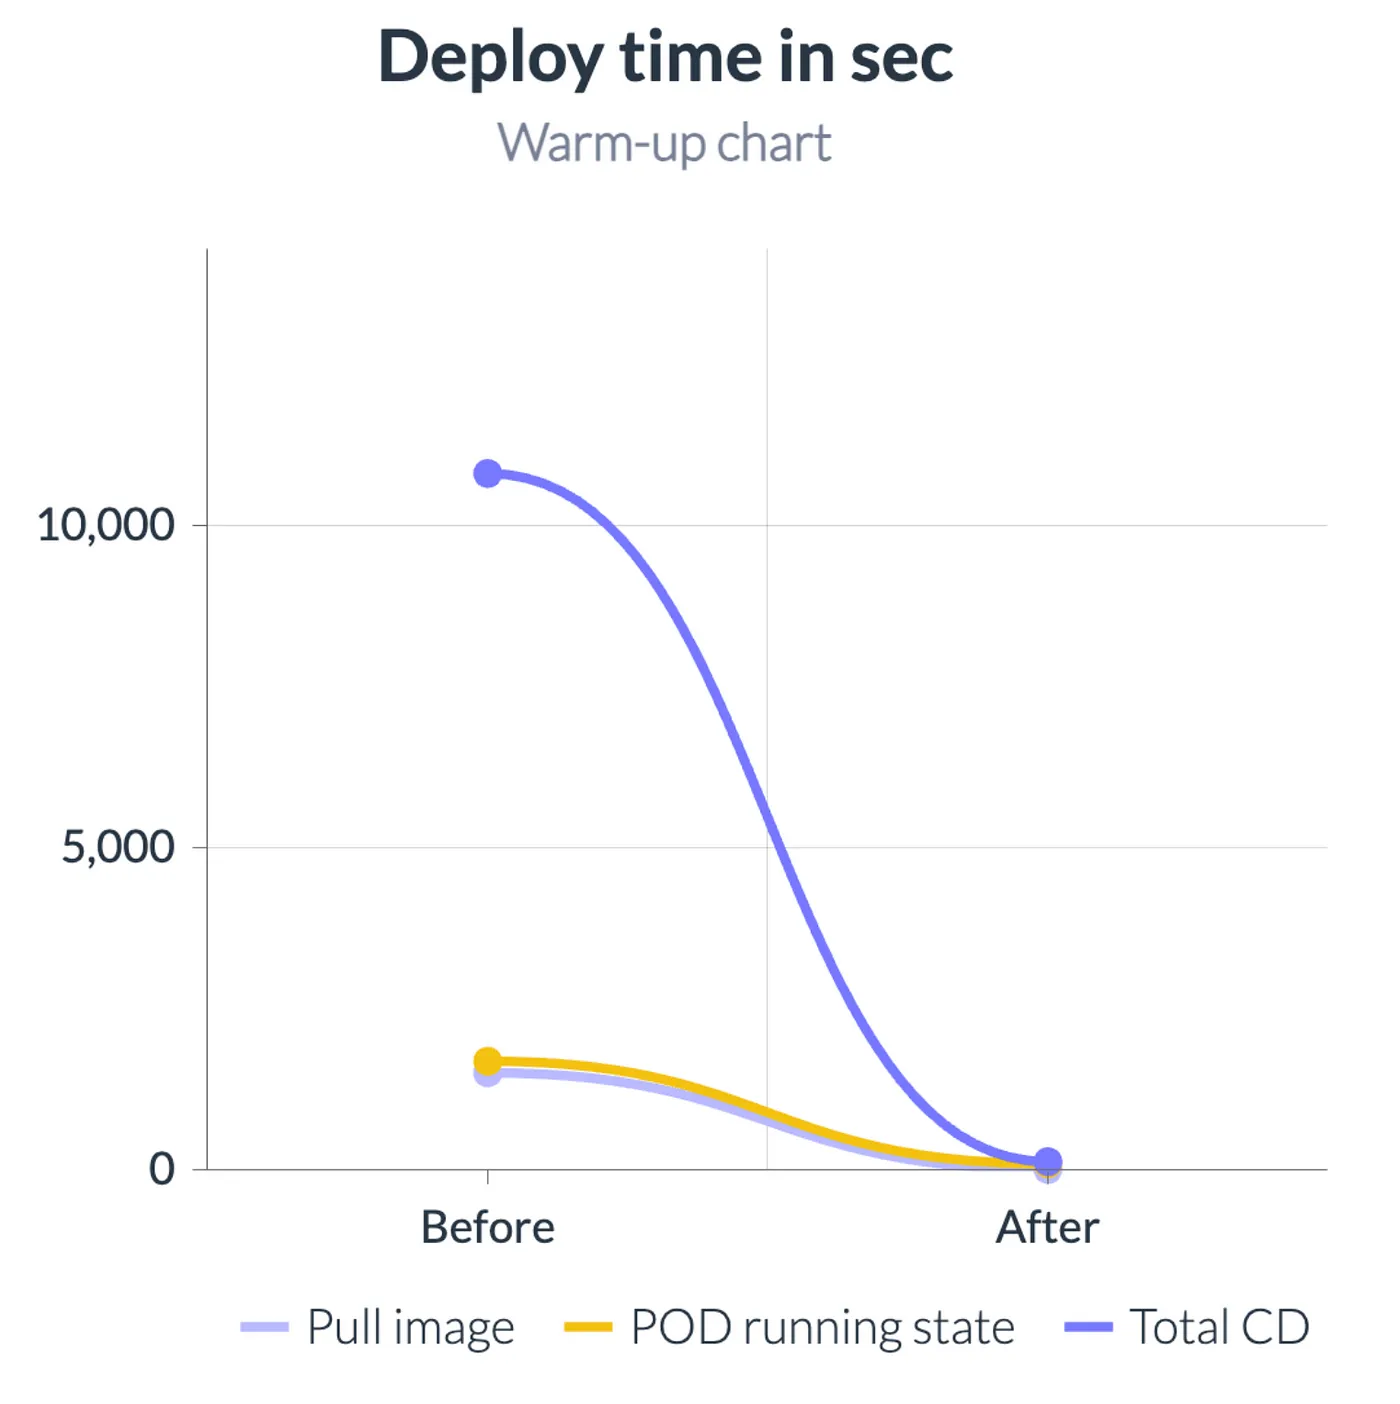
| Step | Init deploy step | Pre deploy step | Deploy | Total time | Diff | |----|----|----|----|----|----| | Without preheat | 0 | 0 | 11m 21s | 11m 21s | 0 | | With preheat | 8 seconds | 58 seconds | 25 seconds | 1m 31s | -9m 50s |
\
The main thing, the “Deploy” time changed (from the first apply command to the Running state of the pods) from 11m 21s to 25 seconds. The total time changed from 11m 21s to 1m 31s. 
An important point, if there are no base images from the main branch, then the “Deploy” time will be the same as the original time or a little bit more. But anyway, we resolved an issue with the disk pressure and the cold start time.
\
Conclusion 
The main issue ContainerCreatingwas resolved by the warm-up process. As a benefit, we significantly reduced the cold start time of the PODs. \n The disk pressure was gone, because we already have the base images on the nodes. The system daemonSets are in a "ready" and “healthy”state (because there is no disk pressure), and we have not encountered anyErrImagePull errors related to this issue.
\
Possible solutions and links
- Use on demand instances for the nodes instead of the spot instances \n We can’t use this way, because it’s out of the scope of our budget for non-production environments.
- Use the Amazon EBS gp3(or better) volume type with the increased IOPS \n We can’t use this way, because this feature also outs for the scope of our budget for non-production environments. Moreover, AWS has thelimits of th IOPS for your account per region.
- Reduce container startup time on Amazon EKS with Bottlerocket data volume \n Actually we can’t move this way, because it’s too high impact on the production and other environments, but it’s also a good solution to our issue.
- Troubleshoot Kubernetes Cluster Autoscaler takes 1 hr to scale 600 pods up
:::tip P.S: I’d like to give a shout-out to the great technical team at Justt (https://www.linkedin.com/company/justt-ai)for the tireless work and really creative approach to any issue they are faced with. In particular, a shout-out to Ronny Sharaby, the superb lead who is responsible for the great work that the team is doing. I am looking forward to seeing more and more great examples of how your creativity impacts the Justt product.
:::
\n
This content originally appeared on HackerNoon and was authored by Kazakov Kirill
Kazakov Kirill | Sciencx (2024-09-30T17:05:39+00:00) How to Optimize Kubernetes for Large Docker Images. Retrieved from https://www.scien.cx/2024/09/30/how-to-optimize-kubernetes-for-large-docker-images/
Please log in to upload a file.
There are no updates yet.
Click the Upload button above to add an update.
