This content originally appeared on Level Up Coding - Medium and was authored by TUSHAR KANJARIYA
Next.js
Supercharge your SEO by automating sitemaps with Next.js and APIs

The Problem Every Developer Faces
You’ve spent hours, if not days, polishing the design of your website, ensuring that it loads quickly. But what if I told you that none of this matters if search engines are unable to find your pages?
You might already be using a sitemap — a simple XML file that lists all your site’s pages for Google and Bing to crawl. But here’s the catch: your content isn’t static. You’ve got new blog posts rolling in, product pages being added, and let’s not forget those dynamic routes driven by APIs.
The outdated “static sitemap” paradigm seems inadequate all of a sudden. It’s like handing Google a dirty map when you’re regularly developing new highways.
Here’s when dynamic sitemaps are useful. And it’s now easier than ever to create and maintain these, due to Next.js and the npm package next-sitemap. I’ll walk you through creating dynamic sitemaps in this blog that update on their own as your content increases.
The Dynamic Sitemap Solution
So, what exactly defines a dynamic sitemap? Simply said, it’s a sitemap that automatically updates based on the current status of your website. A new blog post? It is in the sitemap. Updated product page? Already added.
However, doing this manually is difficult. Every time your site changes, you’ll need to build new sitemaps.
That’s where next-sitemap comes in: it does all the work for you. Your sitemap is always up to date because it is generated dynamically using APIs.
Source Code
Let us step through the setup.
Step 1: Create a Next.js app
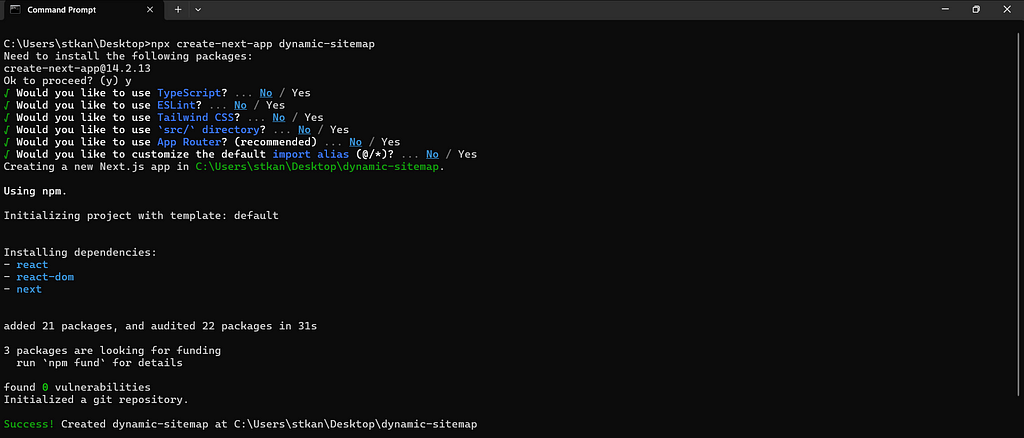
Open up your terminal and run the following command to create a Next.js app.
npx create-next-app dynamic-sitemap

Step 2: Installing next-sitemap
Open up your terminal and run the following command to install next-sitemap in your Next.js project:
npm install next-sitemap
Step 3: Configuring next-sitemap
create a file called next-sitemap.config.js in your root directory. This file is where all your sitemap settings will live.
const siteUrl = process.env.NODE_ENV === "development" ? "http://localhost:3000" : "https://www.yourwebsite.com";

module.exports = {
    siteUrl,
    generateRobotsTxt: true,
    robotsTxtOptions: {
        policies: [
            {
                userAgent: '*',
                disallow: '/thank-you', // Disallow a specific folder/file
            },
            {
                userAgent: '*',
                allow: '/', // Allow all pages by default
            }
        ],
        additionalSitemaps: [`${siteUrl}/sitemap-blog.xml`, `${siteUrl}/sitemap-posts.xml`]
    },
    exclude: [
        '/exclude-file', // for specific page/file
        '/exclude/*', // for Folder
    ],
};
In the above file
siteUrl: This is the base URL of your website. You should replace it with your actual site URL, for example: https://www.yourwebsite.com. This URL will be used to generate all the links in your sitemap.
generateRobotsTxt: When set to true, Next.js will automatically generate a robots.txt file during the build process. This file helps search engines understand which parts of your site should be crawled and indexed. The configuration for the generated robots.txt is managed through the robotsTxtOptions array, where you can specify custom rules if needed.
additionalSitemaps: This is an array where you can define additional sitemaps. For instance, if you want to create separate sitemaps for different content types—such as blogs, posts, or other sections—you can add the full path to each sitemap file here. Each entry in the array should be a full URL pointing to the respective sitemap, e.g., https://www.yourwebsite.com/sitemap-blogs.xml. This allows you to organize your content better for search engines.
Step 4: Creating APIs for Blogs and Posts to provide dynamic data to the sitemap
Create file into API folder /api/blogs.js and paste this code.
Note: I am using dummy data for blogs and posts. You can also use a database connection to fetch dynamic data into these API files.
export const Blogs = [
    {
        "id": 1,
        "title": "Understanding JavaScript Closures",
        "slug": "understanding-javascript-closures",
        "author": "Jane Doe",
        "content": "JavaScript closures are a fundamental concept that allows functions to retain access to their outer scope, even when the outer function has finished executing.",
        "tags": ["JavaScript", "Closures", "Programming"],
        "publishedDate": "2024-09-15T12:00:00Z",
        "views": 150,
        "likes": 45,
        "comments": [
            {
                "id": 1,
                "author": "John Smith",
                "content": "Great explanation of closures! Thanks for sharing.",
                "publishedDate": "2024-09-16T10:00:00Z"
            },
            {
                "id": 2,
                "author": "Emily Davis",
                "content": "I still find closures a bit confusing. Can you elaborate more?",
                "publishedDate": "2024-09-17T14:30:00Z"
            }
        ]
    },
    {
        "id": 2,
        "title": "A Guide to CSS Grid Layout",
        "slug": "guide-to-css-grid-layout",
        "author": "Alice Johnson",
        "content": "CSS Grid Layout is a two-dimensional layout system for the web that allows you to design web pages using rows and columns.",
        "tags": ["CSS", "Grid", "Web Design"],
        "publishedDate": "2024-09-18T09:00:00Z",
        "views": 200,
        "likes": 60,
        "comments": []
    },
    {
        "id": 3,
        "title": "Getting Started with React",
        "slug": "getting-started-with-react",
        "author": "Mark Lee",
        "content": "React is a popular JavaScript library for building user interfaces. This article will cover the basics of getting started with React.",
        "tags": ["React", "JavaScript", "Frontend"],
        "publishedDate": "2024-09-20T15:00:00Z",
        "views": 300,
        "likes": 80,
        "comments": [
            {
                "id": 1,
                "author": "Sara Brown",
                "content": "This is a perfect starter guide for beginners!",
                "publishedDate": "2024-09-21T11:00:00Z"
            }
        ]
    }
];

export default async function handler(req, res) {
    switch (req.method) {
        case "GET":
            res.status(200).send(Blogs);
            break;

        default:
            break;
    }
}
Now create API for Posts /api/posts.js and paste the following code.
export const Posts = [
    {
        "id": 1,
        "title": "Understanding Promises in JavaScript",
        "slug": "understanding-promises-in-javascript",
        "author": "Alex Taylor",
        "content": "Promises in JavaScript are objects that represent the eventual completion (or failure) of an asynchronous operation and its resulting value.",
        "tags": ["JavaScript", "Promises", "Asynchronous"],
        "publishedDate": "2024-09-22T10:00:00Z",
        "views": 100,
        "likes": 30,
        "comments": [
            {
                "id": 1,
                "author": "Lucy Green",
                "content": "I love this topic! Very helpful.",
                "publishedDate": "2024-09-23T09:00:00Z"
            }
        ]
    },
    {
        "id": 2,
        "title": "CSS Flexbox Explained",
        "slug": "css-flexbox-explained",
        "author": "Tom White",
        "content": "Flexbox is a layout model that allows you to design complex layouts with ease and is a great alternative to CSS Grid in some cases.",
        "tags": ["CSS", "Flexbox", "Web Design"],
        "publishedDate": "2024-09-24T11:00:00Z",
        "views": 250,
        "likes": 55,
        "comments": []
    },
    {
        "id": 3,
        "title": "An Introduction to TypeScript",
        "slug": "introduction-to-typescript",
        "author": "Diana Black",
        "content": "TypeScript is a superset of JavaScript that compiles to plain JavaScript, adding static typing and other features.",
        "tags": ["TypeScript", "JavaScript", "Programming"],
        "publishedDate": "2024-09-25T14:00:00Z",
        "views": 400,
        "likes": 95,
        "comments": [
            {
                "id": 1,
                "author": "Max Steel",
                "content": "Can't wait to dive deeper into TypeScript!",
                "publishedDate": "2024-09-26T16:00:00Z"
            }
        ]
    }
];

export default async function handler(req, res) {
    switch (req.method) {
        case "GET":
            res.status(200).send(Posts);
            break;

        default:
            break;
    }
}
Step 5: Create a separate file config for Blogs Sitemap
Create a file in the pages folder named sitemap-blog.xml/index.js and paste the following code.
import axios from "axios";
import { getServerSideSitemapLegacy } from "next-sitemap";

export const getServerSideProps = (async (context) => {

    const { req } = context;
    const baseUrl = process.env.NODE_ENV === "development" ? 'http://localhost:3000' : 'https://www.yourwebsite.com';
    let result = await axios.get(`${baseUrl}/api/posts`);

    const fields = result.data.map((d) => {
        return {
            loc: `${baseUrl}/blogs/${d.slug}`,
            lastmod: new Date(d.publishedDate).toISOString(),
            priority: 0.7,
            changefreq: "weekly",
        }
    })

    return getServerSideSitemapLegacy(context, fields);
})

export default function siteUrl() { }
In above file
I have called the API route for blogs and converted JSON data to bind with sitemap-supported parameters like loc (location), lastmod (Last Modified Date), Priority, and changefreq (Change Frequency)
Now, Let’s add the same for the Posts sitemap
Create a file in the Pages folder named sitemap-posts.xml/index.js and paste the following code.
import axios from "axios";
import { getServerSideSitemapLegacy } from "next-sitemap";

export const getServerSideProps = (async (context) => {

    const { req } = context;
    const baseUrl = process.env.NODE_ENV === "development" ? 'http://localhost:3000' : 'https://www.yourwebsite.com';
    let result = await axios.get(`${baseUrl}/api/posts`);

    const fields = result.data.map((d) => {
        return {
            loc: `${baseUrl}/posts/${d.slug}`,
            lastmod: new Date(d.publishedDate).toISOString(),
            priority: 0.7,
            changefreq: "weekly",
        }
    })

    return getServerSideSitemapLegacy(context, fields);
})

export default function siteUrl() { }

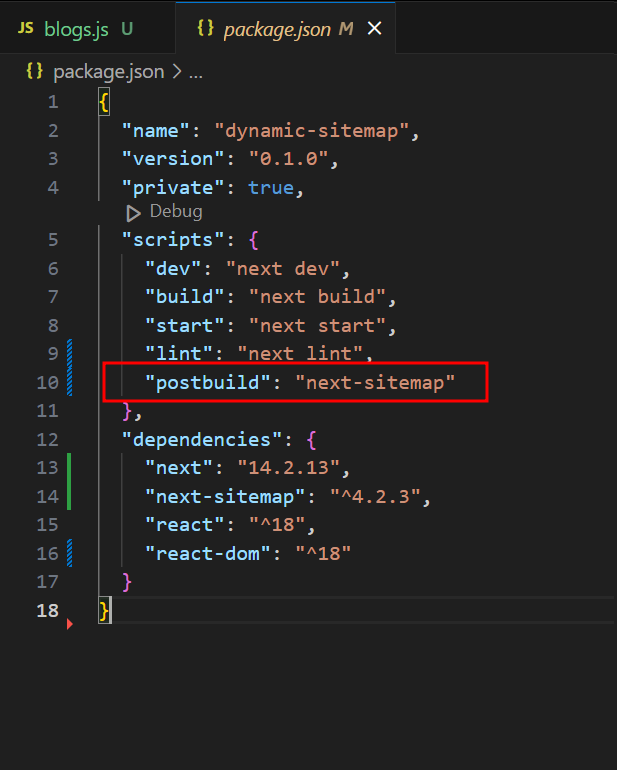
Step 6: Add the Post Build command into package.json
In the package.json file and add the following command into the scripts object.
"postbuild": "next-sitemap"

Step 7: Building and Testing the Sitemap
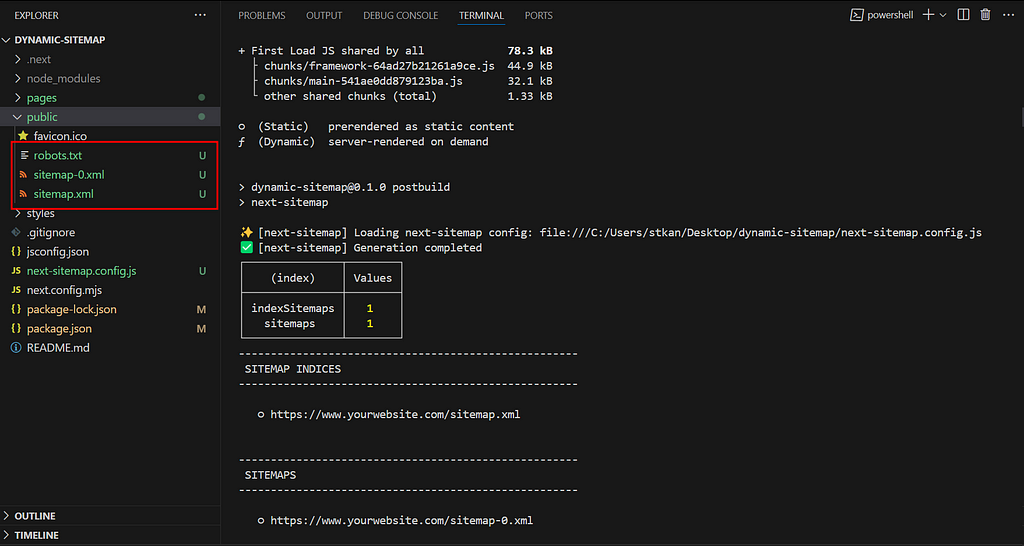
Now that everything is set up, let’s generate the dynamic sitemap. Simply run the following command to build the Next.js project:
npm run build
Once the build is complete, the sitemap will be automatically generated and placed in the public folder.

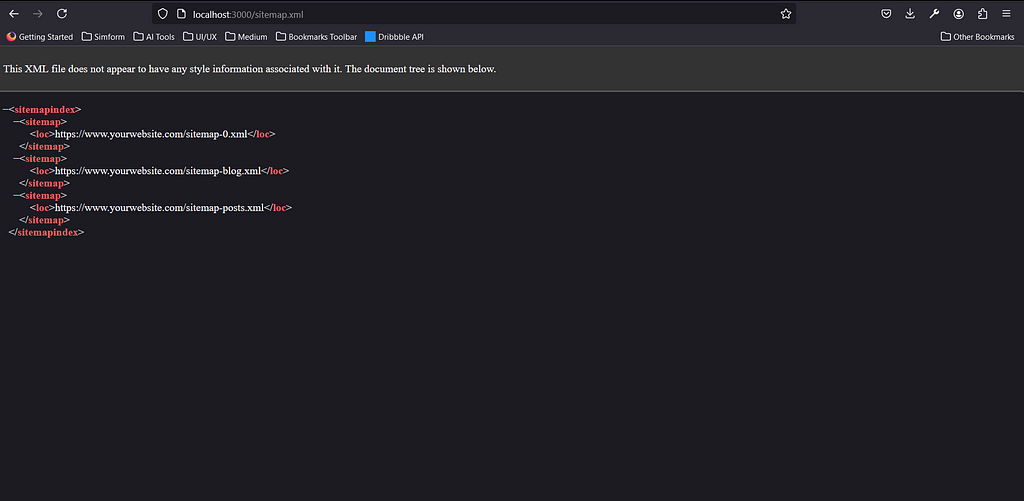
For testing the generated sitemap run the app using the command:
npm start
and open the browser and access the generated sitemap using the link: localhost:3000/sitemap.xml

You can see a total of 3 file locations mentioned in the above sitemap XML file
- sitemap-0.xml: This file contains all our static pages. It helps search engines like Google find and index our content efficiently.
- sitemap-blog.xml: We created this dynamic file in the pages/sitemap-blog.xml/index.js. When Google crawls this URL, it automatically fetches fresh blog data from our API, ensuring that the latest content is always available.
- sitemap-posts.xml: Similar to the blog sitemap, this dynamic file is also located in pages/sitemap-blog.xml/index.js. It pulls in updated post data from the API whenever crawled by Google, keeping our site up-to-date in search results.
With this configuration, we ensure that both static and dynamic content are easily available to search engines, which improves our site’s exposure and indexing.
Source Code
Conclusion
Sitemaps are an important tool in the SEO toolkit, but manually updating them is difficult, especially for dynamic content sites. Including next-sitemap in your Next.js app makes this process simple. In a few simple steps, you can automate the process and ensure that your site is always search engine-friendly.
Thanks for Reading 😊🙏
Connect with Me 👇
Mastering Dynamic Sitemaps in Next.js with APIs: A Step-by-Step Guide was originally published in Level Up Coding on Medium, where people are continuing the conversation by highlighting and responding to this story.
This content originally appeared on Level Up Coding - Medium and was authored by TUSHAR KANJARIYA
TUSHAR KANJARIYA | Sciencx (2024-10-01T17:49:22+00:00) Mastering Dynamic Sitemaps in Next.js with APIs: A Step-by-Step Guide. Retrieved from https://www.scien.cx/2024/10/01/mastering-dynamic-sitemaps-in-next-js-with-apis-a-step-by-step-guide/
Please log in to upload a file.
There are no updates yet.
Click the Upload button above to add an update.
