This content originally appeared on Bits and Pieces - Medium and was authored by Ashan Fernando
Different ways to create a reusable, independent, and composable React component using Bit

Creating reusable, independent, and composable React components is essential for building scalable front-end applications. React components encapsulate logic, style, and behavior, making them ideal building blocks for your UI.
Bit platform simplifies this process by offering multiple methods to create independent React components.

In this post, we’ll explore five techniques to create React components using Bit, complete with commands and guidance on different situations in which each approach becomes useful.
1. Using Templates to Create New Components
Bit provides various templates that enable developers to create React components quickly. These templates can be customized to suit your team’s unique requirements, ensuring all components adhere to specific standards and patterns.
Steps:
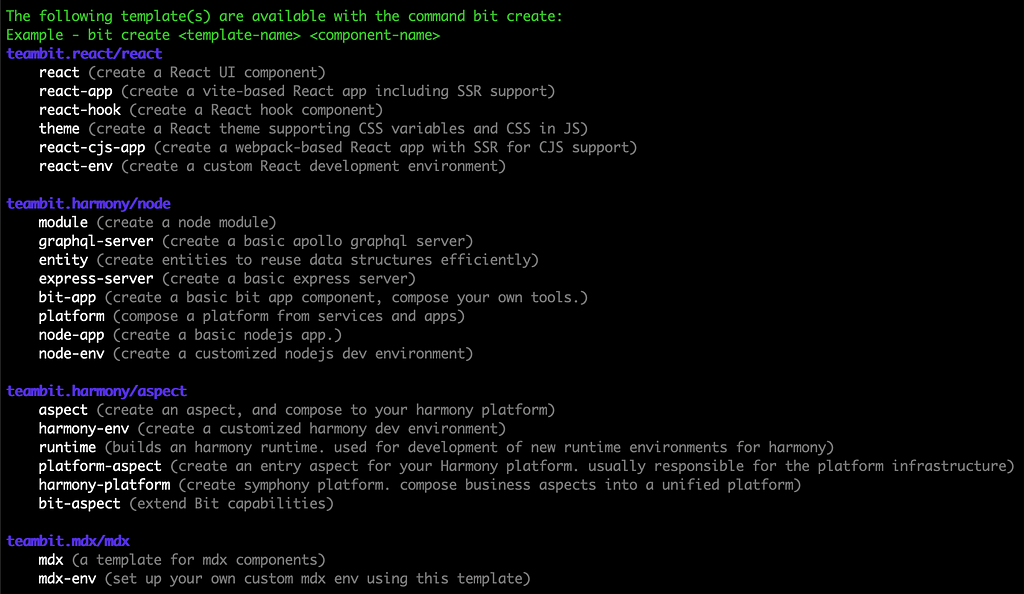
- List available templates by running the following command:
bit templates
This will display a list of available templates, such as react, react-app, react-hook etc.

2. Create a new component using a specific template (e.g., react):
bit create react my-new-component
Optionally, you can define your component's scope by adding--scope <scope-name> flag.
bit create react my-new-component --scope my-new-scope
Customizing Templates: Using Generators
Sometimes, you may want to create various templates according to your project standards. It is helpful if you need to include a fixed set of dependencies, customized comments, or to include boilerplate code. This can be achieved by creating a component generator.
Use the examples given in the Bit documentation to create custom generators.
2. Use Fork Command to Clone a Component
The fork command allows you to clone an existing component into a new one, which is especially useful for extending or modifying a component without impacting the original. You can also change the scope of the forked component during the process, which helps when moving components between workspaces.
Steps:
- Find the component you want to clone (either locally or from the Bit Platform). Use the bit list command to find it:
bit list
2. Fork the component into a new one:
bit fork my-scope/old-component my-new-component
Replace my-scope/old-component with the original component name and my-new-component with the new component name.
Adding a New Scope
If you need to change the scope of the forked component (for example, moving it to a different workspace or using a default scope), you can specify the new scope in the fork command:
bit fork my-scope/old-component new-scope/my-new-component
This will place the forked component in the new-scope, which is useful when transitioning components between different parts of your project or workspace.
Tip:
When forking, ensure that the dependencies and versions are aligned with the new component. Use the following command to check:
bit show my-new-component --dependents
Use forking to experiment with new features or ideas. If the forked component doesn’t work as expected, you can always revert without worrying about breaking the original component.
3. Generate Components using HopeAI
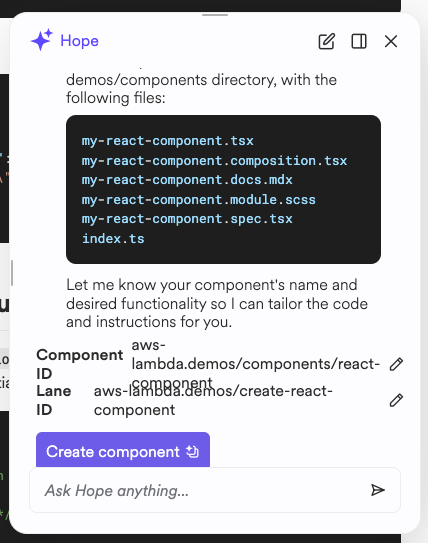
HopeAI is Bit’s native AI coding assistant that simplifies generating components by using existing modules from your codebase. Instead of creating everything from scratch, HopeAI intelligently combines reusable components to help you maintain consistency and avoid unnecessary duplication.
Steps:
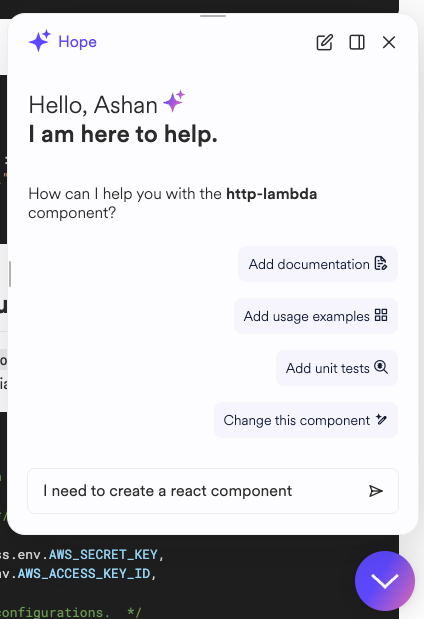
Go to the relevant scope in the Bit platform and click the HopeAI icon in the bottom right corner.
- Provide a clear prompt: When generating a component, describe what you need.


2. Reuses existing components: HopeAI looks through your codebase for existing components (like input fields and buttons) and combines them into the new component.
This approach ensures that the code it generates is efficient and adheres to the same design standards as the rest of your project.
Tip: Keep your components modular and well-documented, as it helps HopeAI provide more accurate and useful suggestions.
4. Manually Copy-Paste a Component and Modify
When templates are unavailable, you may want to create a component from scratch. Manually copying an existing component code into your project is a simple method for quick duplication. This approach works well for quick fixes or when you don’t need to start from scratch.
Steps:
1. Locate the component files you want to duplicate.
2. Copy the files to a new directory and rename them as needed.
3. Modify the copied component by editing the relevant files (e.g., changing styles, logic, or structure).
4. Run the following command to add it as a component.
bit add my-new-component
5. Check the component is in the component list by running the following command.
bit ls
6. Finally, build your workspace components to ensure the newly added component works properly.
bit build
Use this method for internal, small-scale projects where speed is more important than perfect architecture. However, consider using more formal methods like templates or forking for long-term maintainability.
Tip:
Ensure you update the component’s dependencies and references after copying it. Be careful of duplicate code and version misalignment in larger projects.
5. Manually Create Files One by One
This is a hands-on method, where you manually create each file and structure your component from scratch. Typically, we need to follow this approach when no templates are available for the component being created.
It’s time-consuming but gives you complete control over the component’s architecture and implementation.
Steps:
- Create a new component directory:
mkdir my-new-component
cd my-new-component
2. Create the required files, such as:
touch index.js my-new-component.js my-new-component.spec.js
3. Write the necessary code in each file, starting with my-new-component.js, where you define your React component logic.
4. Add the component to Bit Workspace for tracking and versioning.
bit add my-new-component
5. Tag and export your component to the Bit Platform:
bit tag --all
bit export
Tip: Manually creating components is useful when implementing highly customized logic or structure. However, document the component clearly for future use or team collaboration.
Conclusion
There are many ways to create React components, and Bit provides a robust platform to support various workflows. Whether you’re using templates, forking components, generating with AI, or taking a more manual approach, each method has its place depending on the project's needs.
With the right tools, commands, and tips, you can streamline the component development process and create scalable, reusable React components that fit seamlessly into your applications.
Learn More
- Optimizing Your Codebase for AI Coding Assistants
- A Modern Approach to React Development
- A Modern Approach to React with Rspack for Web Development
- Creating Extensible React UI Components
5 Different Techniques to Create React Components was originally published in Bits and Pieces on Medium, where people are continuing the conversation by highlighting and responding to this story.
This content originally appeared on Bits and Pieces - Medium and was authored by Ashan Fernando
Ashan Fernando | Sciencx (2024-10-09T17:47:11+00:00) 5 Different Techniques to Create React Components. Retrieved from https://www.scien.cx/2024/10/09/5-different-techniques-to-create-react-components/
Please log in to upload a file.
There are no updates yet.
Click the Upload button above to add an update.
