This content originally appeared on Telerik Blogs and was authored by Jon Hilton
In .NET 9, you can use Blazor’s interactive render modes for most of your app, then drop down to static server-side rendering for specific pages.
So you’ve built your shiny new app using Blazor. Everything works as you hoped, and you’re pleased with how Blazor worked out for this project.
But now you have to market your app!
Which begs the question, which framework/approach should you use for your landing pages?
Landing pages typically have different requirements to the rest of your app. Where your app needs to respond to user interactions like button clicks and dynamic content, landing pages are much more likely to be static in nature. Text, a few images, maybe a form or two.
You might be tempted to reach for a different framework for these pages, maybe Razor pages or MVC.
But with .NET 8, and now .NET 9, your Blazor web application already has everything you need to add fast, responsive, SEO-friendly landing pages to your app.
Static Server Side Rendering
Since .NET 8, you can choose to render your components using static server-side rendering. With this, your components are rendered on the server and HTML is returned to the browser.
This works well for landing pages as these pages load fast and play nice with search engine robots because the content is available straight away (no waiting for WASM or JavaScript to kick in).
But what if you’ve configured your app to use one of Blazor’s interactive modes?
<!DOCTYPE html>
<html>
<head>
    ...
    <HeadOutlet @rendermode="InteractiveServer" />
</head>
<body>
    <Routes @rendermode="InteractiveServer" />
    ...
</body>
</html>
With this configuration, your app will render all your components using interactive-server rendering. This is ideal when you want users to be able to click buttons, dynamically fetch and update data, view charts etc.
But what about those landing pages?
In .NET 8, the above configuration effectively locks your entire app into running interactively. If you want to mix and match static and interactive render modes, you would have to remove this configuration and instead set render modes directly at the component level.
@page "/Contact"
@rendermode  InteractiveServer

<EditForm ...>
    <!-- interactive elements -->
</EditForm>
But then you’re forced to decorate every component with a render mode, even if you’re using the same mode for most of your app.
Exclude Components from Interactive Rendering
A new option in .NET 9 is to use the ExcludeFromInteractiveRouting attribute. With this, you can signal that a specific component should be excluded from interactive routing.
But what does that mean?
Since .NET 8, your components can run interactively or using static server-side routing.
If you choose to run components interactively, page navigations will be handled via Blazor’s interactive router.
This router kicks in when a user attempts to navigate to another part of your app; it looks at the URL being requested, identifies the relevant component and renders that component interactively.
Now, in .NET 9, you can tell Blazor to opt a specific component out of this interactive routing, thereby forcing any requests for that component to be directed to the server instead (where a full page reload will take place).

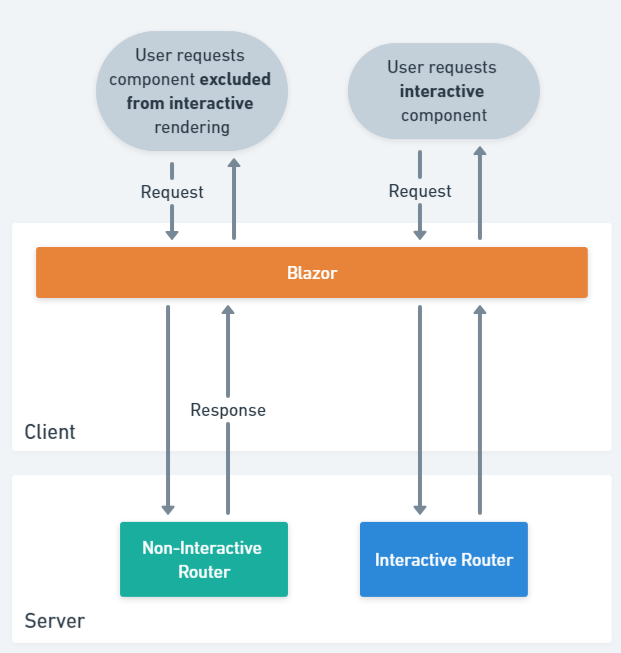
The above example shows how Blazor in .NET 9 handles requests in an app configured to use InteractiveServer render mode.
When a user requests a page that has been “opted out” of interactive routing, Blazor will direct that request to the server, which will render the relevant component and return the resulting HTML.
If, on the other hand, the user requests any other component (not opted out of interactive rendering) then Blazor will direct that request to the interactive router.
This interactive router will be running on the server if you’re using InteractiveServer or in the browser you’re using InteractiveWebAssembly render mode.
In practice, this means we can mark up our landing pages to render statically, on the server.
Here’s a concrete example.
Features.razor
@page "/features"
@attribute [ExcludeFromInteractiveRouting]

<h1>
    All about our amazing new application!
</h1>
By itself, the ExcludeFromInteractiveRouting attribute doesn’t do a whole lot.
It signals that requests for this page should bypass the interactive router, but we still need a little more code to actually make the page load statically.
App.razor
<!DOCTYPE html>
<html>
<head>
    ...
    <HeadOutlet @rendermode="@PageRenderMode" />
</head>
<body>
    <Routes @rendermode="@PageRenderMode" />
    ...
</body>
</html>

@code {
    [CascadingParameter]
    private HttpContext HttpContext { get; set; } = default!;

    private IComponentRenderMode? PageRenderMode
        => HttpContext.AcceptsInteractiveRouting() ? InteractiveServer : null;
}
In App.razor we’re now able to set the render mode conditionally.
We can use the new HttpContext.AcceptsInteractiveRouting() extension method to check if the target component has been opted out of interactive rendering.
If the component accepts interactive routing, we’ll render it using InteractiveServer as the render mode.
If we’ve decorated the target component with the ExcludeFromInteractiveRouting attribute, then we set the render mode to null, thereby triggering Blazor to bypass the interactive router and render it statically on the server.
With these changes in place, any request for the /features page will be routed to the server, where it will render the Features component and return the resulting HTML.
From there we could use forms to capture user input, but we can’t use event handlers to handle events (such as button clicks).
The rest of the app will continue to run interactively, as it did before, using one of .NET’s interactive render modes.
Organizing Your Static and Interactive Components
One last tip. If you’re adding one or more “static” marketing pages to your app, it can be useful to keep them separate in your project’s folder structure.
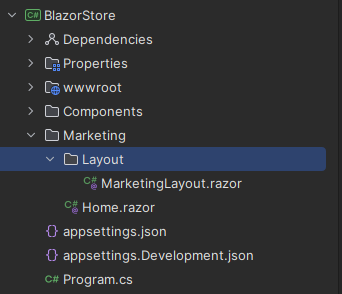
Here’s an example, where we have a marketing page in a separate Marketing folder.

Notice this folder also has its own Layout folder and MarketingLayout component.
In the marketing pages, we can explicitly choose to use this Marketing layout.
@page "/"
@attribute [ExcludeFromInteractiveRouting]
@layout Layout.MarketingLayout

<!-- marketing content -->
With this, we have a dedicated layout for marketing pages, and we can see at a glance which components are for the marketing pages and which are for the app.
If we are sure we want all components in this Marketing folder to be rendered statically, we can use an _Imports file.
Marketing/_Imports.razor
@attribute [ExcludeFromInteractiveRouting]
By declaring our attribute here, all the components within this folder will be excluded from using the interactive router.
In Summary
In .NET 8, when you configured your app to run using one of the interactive render modes globally (at the app level), you were stuck with interactive rendering for your entire app.
Now, with .NET 9, you can break specific components out of that interactive rendering loop, and instruct Blazor to render those specific components statically on the server instead.
Ideal for landing pages and similar requirements where you don’t need client/server interactivity and you want fast loading pages that work well with SEO.
You can find a sample repo demonstrating this approach here.
This content originally appeared on Telerik Blogs and was authored by Jon Hilton
Jon Hilton | Sciencx (2024-10-16T14:54:09+00:00) Add a Static Marketing Page to Your Blazor App in .NET 9. Retrieved from https://www.scien.cx/2024/10/16/add-a-static-marketing-page-to-your-blazor-app-in-net-9/
Please log in to upload a file.
There are no updates yet.
Click the Upload button above to add an update.
