
This content originally appeared on Level Up Coding - Medium and was authored by Kavindu Hapuarachchi
Productize Machine Learning Models — Dockerization
In this article series we will discuss how to develop a simple machine learning model as a microservice and deploy it in a Kubernetes cluster in GCP. For simplicity the entire process will be split into 3 parts as below.
- Create a docker image with the microservice & test locally.
- Deploy & test microservice locally using minikube.
- Deploy the microservice in GCP and open to external traffic.
💭Before we delve into the implementation it is important to fulfill the below prerequisites in your local machine. For more information on the installation steps refer to the relevant links.
- Python environment
- Docker engine
- Minikube
- Basic understanding about machine learning and data-science concepts.
Let’s get started with some formal definitions first.
In the realm of software development a microservice is known as a software architectural style that structures an application as a collection of small, independent services, each focused on a specific business capability. This is an alternative to the monolithic application where all functionalities are tightly integrated into a single codebase. Furthermore, microservices break down the application into loosely coupled services that can be developed, deployed, and scaled independently.
API (Application Programming Interface) can be defined as a set of rules and protocols which allows different applications to communicate and interact with each other. In the context of microservices APIs define methods and data formats that different microservices can use to request and exchange information in a secure manner.
Kubernetes (k8s) — is a container orchestration service which enables the deployment of containerized applications in a highly scalable way. This will also ensure the communication layer between different parts of an application.
The gist of the article series can be summarized as below.
🏃♂️First a basic xgboost classification model will be developed for a sample dataset. Then build an API using the trained model artifact to enable the communication between other applications. Next step is to containerize the application using docker and test it in the local environment. Afterwards, we will do a test run in the local k8s cluster using Minikube. Finally this will be deployed in GCP k8s cluster along with necessary services to enable communication between the application and the outside world.
Step 1 — build a simple xgboost model to predict the type of flower given few set of independent features such as sepal length (cm), sepal width (cm), petal length (cm), petal width (cm). Data science aspects such as exploratory data analysis, feature engineering and hyper-parameter tuning has not been addressed here as it is out of the scope of the article. Once we are satisfied with the performance of the model it can be saved for later use as a pickle file.
import pickle
import xgboost as xgb
from sklearn.datasets import load_iris
from sklearn.model_selection import train_test_split
from sklearn.metrics import accuracy_score


# Load the Iris dataset
iris = load_iris()
X = iris.data
y = iris.target


# Split the data into training and testing sets
X_train, X_test, y_train, y_test = train_test_split(X, y, test_size=0.2, random_state=42)


# Define the XGBoost model
model = xgb.XGBClassifier(objective='multi:softmax', num_class=3)


# Train the model
model.fit(X_train, y_train)


# Save the trained model as a pickle file
with open('xgboost_model.pkl', 'wb') as file:
    pickle.dump(model, file)


# Make predictions on the test set
y_pred = model.predict(X_test)


# Calculate accuracy
accuracy = accuracy_score(y_test, y_pred)
print(f"Accuracy: {accuracy * 100:.2f}%")
Next we will define a simple function to load the pickle file and get predictions once a request is received and to perform some post-processing steps such as converting the prediction to a meaningful name.
import xgboost as xgb
import numpy as np
import pickle

# Load your trained XGBoost model
with open('xgboost_model.pkl', 'rb') as file:
    model = pickle.load(file)

def your_model_function(input_data):
    try:
        # Assuming input_data is a list of features
        input_array = np.array([input_data])
        #dmatrix = xgb.DMatrix(input_array)


        # Make predictions
        predictions = model.predict(input_array)


        # Convert prediction to a string category
        if predictions[0]==0 :
            result = "setosa"
        elif predictions[0]==1 :
            result = "versicolor"
        else :
            result = "virginica"
        #result = 'Positive' if predictions[0] > 0.5 else 'Negative'
        return result


    except Exception as e:
        return str(e)
Step2 — Then we will develop a simple flask app to create a web application for the trained model in the above step. The relevant codes are available at app.py file. It first defines a function to take input data and produce a prediction using the model artifact obtained previously.
# app.py
import xgboost as xgb
import numpy as np
import pickle
from flask import Flask, request, jsonify
from prometheus_client import make_wsgi_app, Counter, Histogram
from werkzeug.middleware.dispatcher import DispatcherMiddleware
import time
from prometheus_flask_exporter import PrometheusMetrics

# Load your trained XGBoost model
with open('xgboost_model.pkl', 'rb') as file:
    model = pickle.load(file)


def your_model_function(input_data):
    try:
        # Assuming input_data is a list of features
        input_array = np.array([input_data])
        #dmatrix = xgb.DMatrix(input_array)

        # Make predictions
        predictions = model.predict(input_array)

        # Assuming a binary classification, adjust as needed
        if predictions[0]==0 :
            result = "setosa"
        elif predictions[0]==1 :
            result = "versicolor"
        else :
            result = "virginica"
        #result = 'Positive' if predictions[0] > 0.5 else 'Negative'
        return result

    except Exception as e:
        return str(e)


app = Flask(__name__)
app.wsgi_app = DispatcherMiddleware(app.wsgi_app, {
    '/metrics': make_wsgi_app()
})

REQUEST_COUNT = Counter(
    'app_request_count',
    'Application Request Count',
    ['method', 'endpoint', 'http_status']
)
REQUEST_LATENCY = Histogram(
    'app_request_latency_seconds',
    'Application Request Latency',
    ['method', 'endpoint']
)

metrics = PrometheusMetrics(app)

@app.route('/predict', methods=['POST'])
def predict():
    start_time = time.time()
    REQUEST_COUNT.labels('POST', '/predict', 200).inc()
    try:
        data = request.get_json(force=True)
        input_data = data['input']  # adjust based on your model's input format
        result = your_model_function(input_data)
        response = {'result': result}
        REQUEST_LATENCY.labels('POST', '/predict').observe(time.time() - start_time)
        return jsonify(response)

    except Exception as e:
        return jsonify({'error': str(e)})

if __name__ == '__main__':
    app.run(debug=True,host="0.0.0.0",port=5000)
Here we have defined relevant end points and ports where the service will be accessible. These endpoints can be tested using curl commands. We have defined predict endpoint to get predictions from the model and metrics endpoint where metrics will be available for a monitoring framework such as Prometheus. The service will be available at port 5000 of the localhost. Also before testing make sure all the dependency packages have been installed in your python environment.
xgboost==1.7.4
numpy==1.25.0
flask==3.0.0
scikit-learn==1.2.2
prometheus-flask-exporter==0.23.0
prometheus-client==0.19.0
Moreover its a best practice to use a separate python virtual environment for testing to avoid any package conflicts.
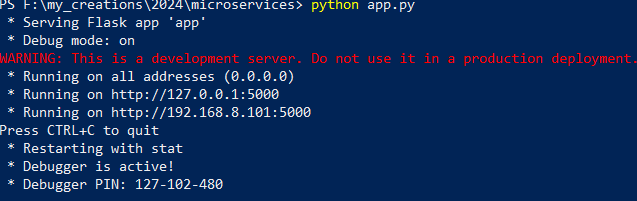
Step3 — To see if our app.py is working as intended navigate to the dir with app.py and run the below commands in the terminal or powershell.
python app.py
You should see an output similar to the below.
Then we can test our service using a curl command. Open another powershell and run the following commands. For windows users below commands can be used to create a json request and send a curl command.
# JSON data to be sent in the request
$jsonData = @{
    input = @(5.2, 4.1, 6.2, 0.5)
} | ConvertTo-Json

# Endpoint URL
$endpoint = "http://127.0.0.1:5000/predict"

# Send a POST request with JSON data
$response = Invoke-RestMethod -Uri $endpoint -Method Post -Body $jsonData -ContentType "application/json"
For linux users it’s less hassle.
# JSON data to be sent in the request
jsonData='{"input": [5.2, 4.1, 6.2, 0.5]}'

# Endpoint URL
endpoint="http://127.0.0.1:5000/predict"

# Send a POST request with JSON data
response=$(curl -X POST -H "Content-Type: application/json" -d "$jsonData" "$endpoint")

# Print response
echo "$response"
Upon successful execution we should see an output as below.
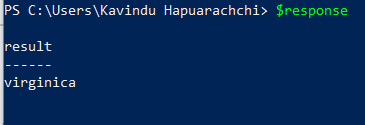
We can stop the flask app by hitting Ctrl + C
Step 4 — Since we are confident that our flask app is working fine, next we will develop a docker image to containerize our python model. Create a separate folder and place the following files inside that.
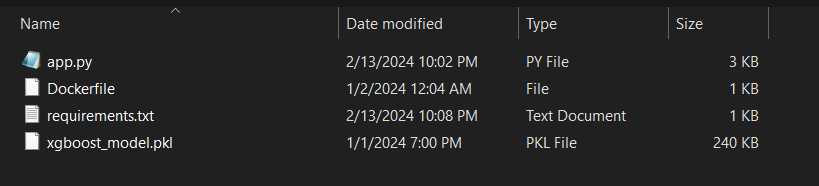
Navigate to the folder with docker daemon running and run below command in the powershell
docker build -t my-flask-app .
This will install the relevant dependency packages and create a new docker image. You can confirm running docker images command to see if a new image has been created by the name my-flask-app.
# Use an official Python runtime as a parent image
FROM python:3.9.18-slim-bullseye

# Set the working directory to /app
WORKDIR /app

# Copy the current directory contents into the container at /app
COPY . /app

# Install any needed packages specified in requirements.txt
RUN pip install -r requirements.txt

# Make port 5000 available to the world outside this container
EXPOSE 5000

ENV FLASK_APP=app.py
CMD ["flask", "run", "--host", "0.0.0.0"]
CMD ["python", "app.py"]
Before moving to the next section it is important to see whats going on behind the docker file. It will use the base image 3.9.18-slim-bullseye. Then set the working dir to app and copy the contents from our host machine to the workdir. Next it will install the relevant dependencies specified in the requirements.txt. It will then expose port 5000 of the container and start a flask app and execute app.py. Also note that it is important to specify — host 0.0.0.0 arg for flask command for the flask app to be accessible by not only the container itself but also from the host machine or other containers.
Step 5 — Finally we can do a test run and see if our prediction model is accessible from host machine. First we need to run a docker container using the image we built using below commands.
docker run -p 5000:5000 my-flask-app
This will start a docker container using the image we built during the previous stage binding port 5000 of the container with 5000 of the host port. This can be further verified running docker ps command. Same curl command can be used to double check if the container is running as expected.
🍻See you again in Part 2 of the series.
Your comments are highly appreciated 😎and reach out to me via LinkedIn.
Productize Machine Learning Models — Dockerization was originally published in Level Up Coding on Medium, where people are continuing the conversation by highlighting and responding to this story.
This content originally appeared on Level Up Coding - Medium and was authored by Kavindu Hapuarachchi
Kavindu Hapuarachchi | Sciencx (2024-10-21T23:22:17+00:00) Productize Machine Learning Models — Dockerization. Retrieved from https://www.scien.cx/2024/10/21/productize-machine-learning-models-dockerization/
Please log in to upload a file.
There are no updates yet.
Click the Upload button above to add an update.