This content originally appeared on Level Up Coding - Medium and was authored by Pragnakalp Techlabs

Introduction
Machine learning is no longer just a buzzword — it’s becoming a key part of how businesses solve problems and make smarter decisions. However, building, training, and deploying machine learning models can still be daunting, especially when trying to balance performance with cost and scalability. That’s where AWS SageMaker comes in.
AWS SageMaker is designed to simplify the machine learning process, whether you’re a data scientist, developer, or starting out. It gives you everything you need — from data preparation to model training and deployment — all in one place. With SageMaker, you don’t have to worry about setting up the infrastructure or managing the heavy lifting. You can focus on what really matters: building great models and getting insights from your data.
In this blog, we’ll walk through the basics of SageMaker, its key features, and why it’s a powerful tool for anyone looking to dive into machine learning. Whether you’re exploring AI for the first time or scaling up your existing projects, SageMaker can help you take your models from idea to production faster than ever.
Why Choose AWS SageMaker for Machine Learning?
One of the reasons AWS SageMaker has become so popular is that it takes care of the heavy lifting involved in managing machine learning infrastructure. Here’s why SageMaker is a great choice for machine learning:
Scalability
With SageMaker, scaling is seamless. You don’t need to worry about setting up complex infrastructure to handle larger datasets or more complicated models. SageMaker allows you to train models on powerful instances and automatically scales resources to meet the demand during both the training and inference phases.
Cost-Effectiveness
SageMaker offers flexible pricing options, allowing you to pay only for the resources you use. Whether you’re training a model for a few hours or deploying a model for real-time inference, you can optimize costs by leveraging features like spot instances, which offer substantial savings. Multi-model endpoints further allow you to host several models on a single endpoint, reducing operational overhead and costs.
Ease of Deployment
SageMaker makes it simple to deploy models into production with just a few clicks. Once your model is trained, you can deploy it as an endpoint for real-time or batch inference. SageMaker takes care of scaling the deployment automatically, ensuring that your application can handle sudden spikes in demand without any manual intervention.
Now we will dive into the process of deployment of the SageMaker endpoint.
Setting Up Your Environment for AWS SageMaker
Step 1: Login as a root user on AWS
Go to the Sign page of the AWS console site and click on Sign In as a root user.(https://console.aws.amazon.com/console/home?nc2=h_ct&src=header-signin)

Enter the required details and Sign in as a root user.
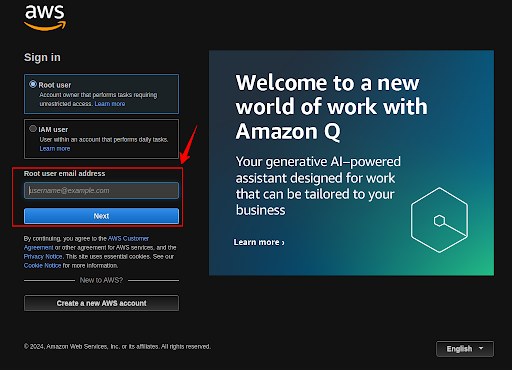
Step 2: Create a new user to use AWS SageMaker
We have to create a user to use the SageMaker Service, so click on the IAM service.
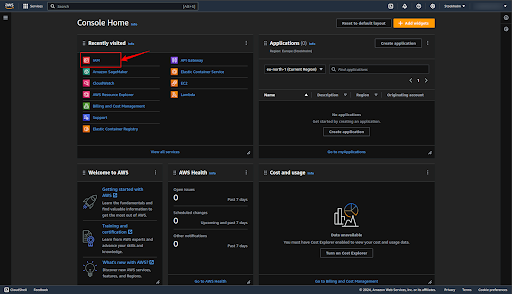
Click on the “Users” to create a user.
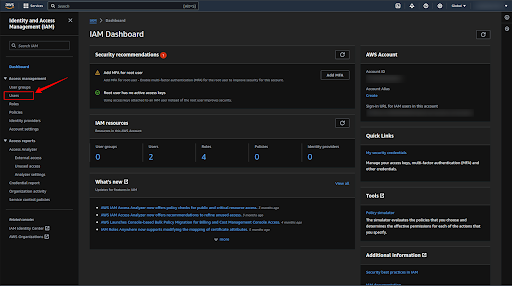
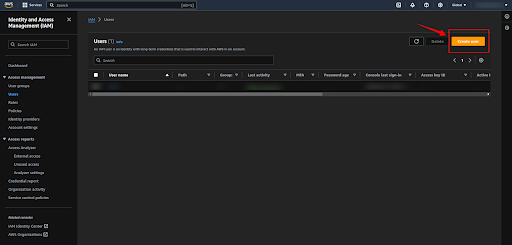
Now click enter the username whichever you want to create and click on the “Next” button.
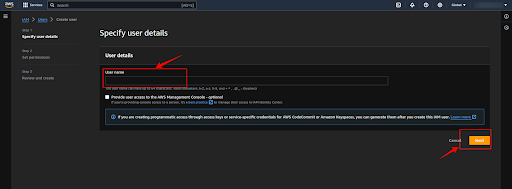
Select the “Add user to group” and click the “Next” button.
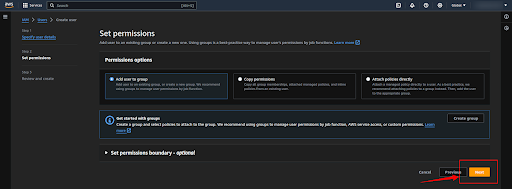
Next, click on the “Create User” button and create a user.
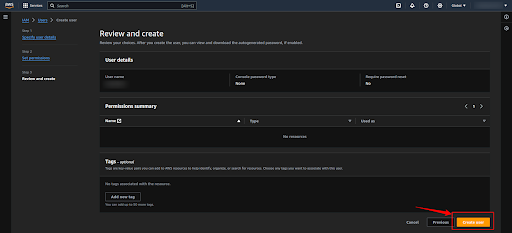
Step 3: Generate the Access key and Secret access key
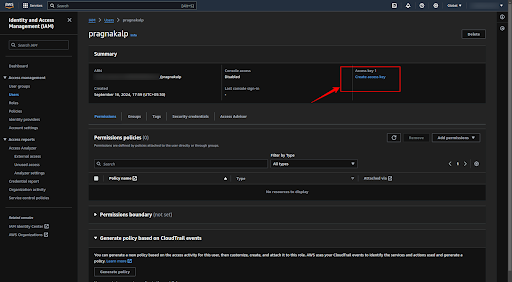
Now click on your username which will redirect you to the configuration page.
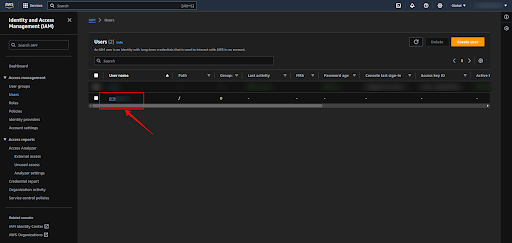
Now click on the “Create access key” button to get the “Access key ID” and “Secret Access key”.
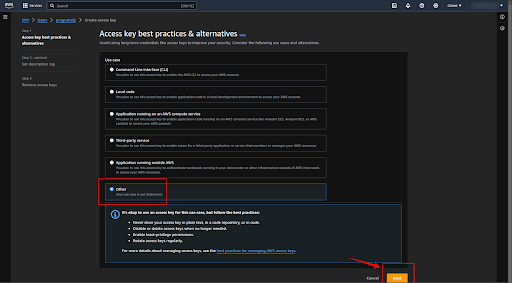
Select the “Other” option and click on the “Next” button.
If you want to add any description for the secret key then add it, else make it empty, and click on the “create secret key” button.

Now click on the “Download .csv” button to download the credentials (Access Key ID and Secret access key).
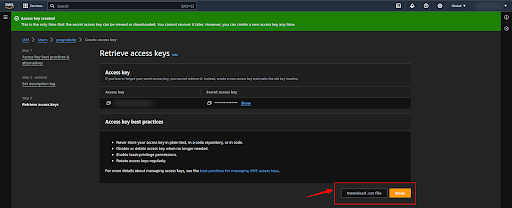
Step 4: Generate the password for the user
Now click on the “Security credentials” button and then click on the “Enable console access” button to generate the account password.
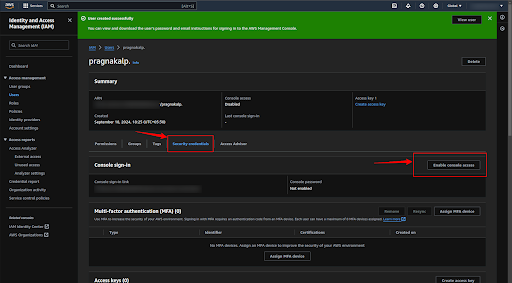
If you want to generate the autogenerated password then select the “Autogenerated password” and if you want to add your custom password then select the “Custom password” button and click on the “Enable console access” button.
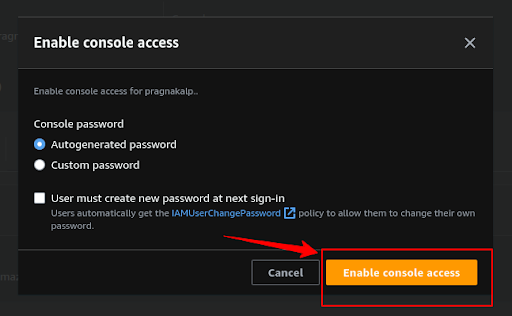
Now click on the “Download .csv file” button or copy all the credentials.

Step 5: Create a Role to use the SageMaker Services
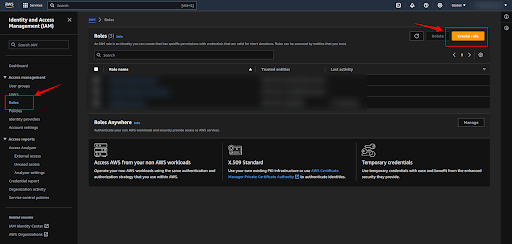
Now we have to create a new Role to use the SageMaker Service, so click on the “Roles” button and click on the “Create Role” button.
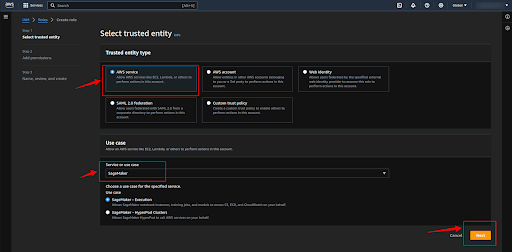
Now select the “AWS service” as the Trusted entity type, select “SageMaker” as the Service, and click on the “Next” button.
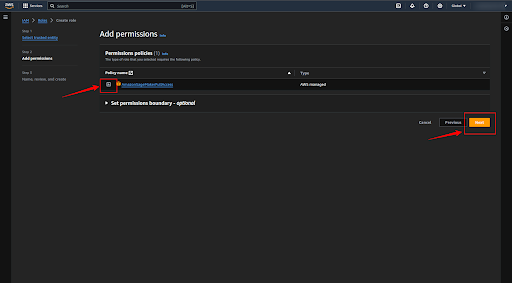
Add the “AmazonSageMakerFullAccess” policy, to do so click on the plus button and then click on the “Next” button.
Now give the name to the Role and click on the “Create role” button.
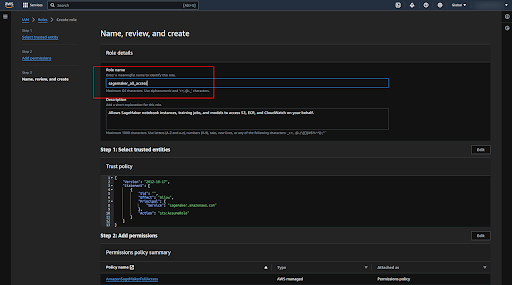
Step 6: Add necessary permissions to the Role
Now click on the role that we created recently.
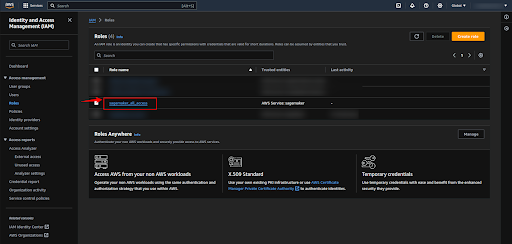
Copy the ARN of the role to use while deploying the SageMaker endpoint.
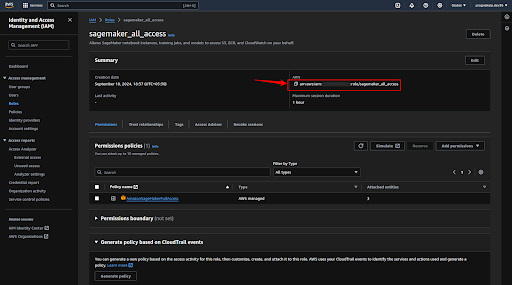
Now click on the user and click on the “Add permissions” button.
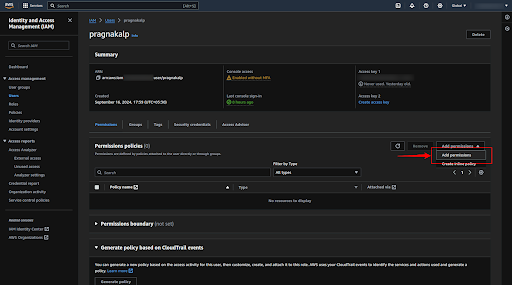
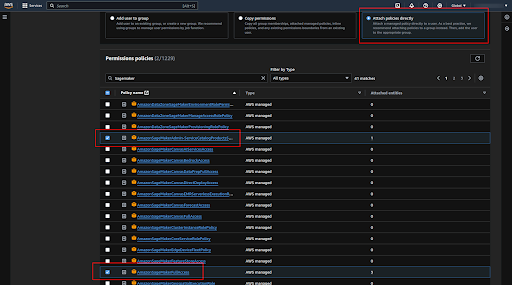
Select the “Attach policies directly” option for the policy options and select the required policies (“AmazonSageMakerFullAccess”, ”AmazonSageMakerAdmin-ServiceCatalogProductsServiceRolePolicy ”) and click on the “Next” button.
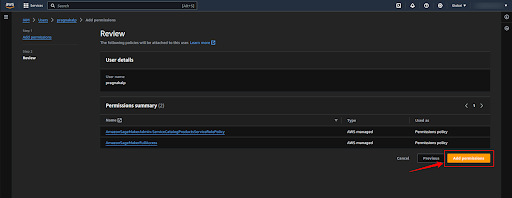
Now click on the “Add permission” button.
Deploying Models with AWS SageMaker for HuggingFace Models
Harnessing the Power of Pre-trained Models
Hugging Face has become a go-to platform for accessing a vast repository of pre-trained machine learning models, covering tasks like natural language processing, computer vision, and more. These models can significantly accelerate your AI projects. AWS SageMaker provides a robust infrastructure to deploy and manage these models, ensuring optimal performance and scalability.
Understanding Model Deployment
Deploying a model means making it accessible for real-world applications. In SageMaker, this involves creating an endpoint, which is a web service that can receive requests and return predictions. When you deploy a model, SageMaker handles the underlying infrastructure, including servers and networking so that you can focus on the model itself.
Auto-Scaling for Dynamic Workloads
One of the key benefits of using SageMaker for model deployment is its ability to auto-scale. This means that SageMaker can automatically adjust the number of instances serving your endpoint based on the incoming traffic. If your model is experiencing high demand, SageMaker can scale up to handle the load. Conversely, if traffic is low, it can scale down to save costs.
Managing Endpoints
SageMaker provides a simple interface for managing your endpoints. You can create, update, and delete endpoints as needed. Additionally, you can monitor endpoint health and performance metrics to ensure your models are running smoothly.
Deploying Hugging Face Models
Create a virtual environment and install the required libraries.
pip install sagemaker
pip install boto3
This Python code snippet demonstrates how to deploy a pre-trained DistilBERT model from Hugging Face onto AWS SageMaker for text classification tasks. Here’s a breakdown of the key steps:
1. Import Necessary Libraries:
boto3: For interacting with AWS services.
sagemaker: The AWS SageMaker SDK.
SageMaker.huggingface: A module specifically for deploying Hugging Face models on SageMaker.
2. Initialize SageMaker Session:
Create a SageMaker session using your AWS credentials and region.
3. Define Execution Role:
Specify the IAM role that SageMaker will use to access your AWS resources.
4. Define Hugging Face Model Details:
Provide the Hugging Face model ID (distilbert/distilbert-base-uncased-finetuned-sst-2-english) and the task (text-classification).
5. Initialize Hugging Face Model:
Create a HuggingFaceModel object, specifying the transformers version, PyTorch version, Python version, IAM role, and environment details.
6. Deploy Model to Endpoint:
Use the deploy method to deploy the model to an endpoint.
initial_instance_count: The initial number of instances to serve the endpoint.
instance_type: The type of instance to use (e.g., ml.t2.medium for CPU, ml.p3.2xlarge for GPU).
endpoint_name: A custom name for the endpoint.
Output:
The code will print the name of the deployed endpoint, which you can use to send requests to the model for predictions.
Note: You may need to modify the role and instance_type based on your specific requirements and available resources.
import sagemaker
from sagemaker.huggingface.model import HuggingFaceModel
import boto3

# AWS credentials and region setup
aws_access_key_id = <aws_access_key_id>
aws_secret_access_key = <aws_secret_access_key>
region = <region>

# Create a boto3 session with the specified credentials
boto_session = boto3.Session(
   aws_access_key_id=aws_access_key_id,
   aws_secret_access_key=aws_secret_access_key,
   region_name=region
)

# Create the SageMaker session
sagemaker_session = sagemaker.Session(boto_session=boto_session)

# Define your SageMaker execution role
role = '<role_arn_link>'

# Define the Hugging Face model and task details
hub = {
   'HF_MODEL_ID':'distilbert/distilbert-base-uncased-finetuned-sst-2-english',
   'HF_TASK':'text-classification'
}

# Initialize the Hugging Face model in SageMaker
huggingface_model = HuggingFaceModel(
   transformers_version='4.37.0',   # Specify the version of transformers
   pytorch_version='2.1.0',         # Specify the PyTorch version
   py_version='py310',             # Python version
   role=role,                     # AWS IAM role
   env=hub,                       # Environment for the model
   sagemaker_session=sagemaker_session
)

# Define a custom endpoint name
custom_endpoint_name = 'distilbert'

# Deploy the model to an endpoint (use 'ml.p3.2xlarge' for GPU or 'ml.t2.medium' for CPU)
predictor = huggingface_model.deploy(
   initial_instance_count=1,       # Number of instances
   instance_type='ml.t2.medium',   # Use ml.p3.2xlarge for GPU, ml.t2.medium for CPU
   endpoint_name=custom_endpoint_name  # Custom endpoint name
)

# Output the endpoint name
endpoint_name = predictor.endpoint_name
print(f"Deployed model endpoint name: {endpoint_name}")
Create an endpoint_deploy.py file, copy this code, and run the file.
Tips:
- You can find this deployment and usage code on the hugging face by following the below steps:
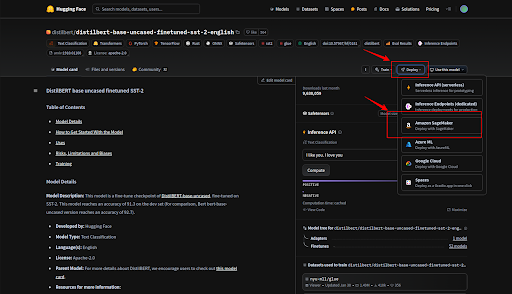
How to use the endpoints created on the Sagemaker
Once you’ve deployed a model to an endpoint on AWS SageMaker, you can send requests to the endpoint to get predictions. Here’s a breakdown of the code snippet:
1. Create a Boto3 Session:
Establish a connection to AWS using your credentials and region.
2. Create a Predictor Object:
Create a Predictor object, specifying the endpoint name and SageMaker session.
3. Prepare Input Data:
Format your input data according to the model’s requirements. In this example, the input is a JSON object with a list of strings.
4. Make a Prediction:
Use the predict method to send a request to the endpoint.
5. Handle the Response:
The response is typically a JSON object containing the prediction results. You’ll need to decode and parse it to extract the relevant information.
Additional Considerations:
Input Format: Ensure that your input data is in the correct format expected by the model. Refer to the model’s documentation for specific requirements.
Output Format: The output format may vary depending on the model and task. You’ll need to parse the response to extract the desired information.
Error Handling: Implement error handling to gracefully handle situations where the prediction fails or encounters unexpected errors.
Batch Predictions: If you need to make predictions on a large number of inputs, consider using SageMaker Batch Transform for more efficient processing.
import boto3
import json
import sagemaker
from sagemaker.predictor import Predictor
from sagemaker.serializers import JSONSerializer

aws_access_key_id = <aws_access_key_id>
aws_secret_access_key = <aws_secret_access_key>
# aws_session_token = 'YOUR_SESSION_TOKEN'  # Optional
region = <region>

# Create a boto3 session with the specified credentials
boto_session = boto3.Session(
   aws_access_key_id=aws_access_key_id,
   aws_secret_access_key=aws_secret_access_key,
   # aws_session_token=aws_session_token,
   region_name=region
)

role = '<role_arn_link>'

predictor = Predictor(
   endpoint_name='distilbert',  # Replace with your endpoint name
   sagemaker_session=sagemaker.Session(boto_session=boto_session)
)

# predictor.delete_endpoint()

# Set the serializer to handle JSON input
predictor.serializer = JSONSerializer()

# Prepare the input data
input_data = {"inputs": ["I am very happy"]}  # Simplified input for testing
try:
   # Make the prediction
   result = predictor.predict(input_data)

   # Decode and parse the result
   result = result.decode('utf-8')
   result = json.loads(result)

   # Print the result
   print(result)
except Exception as e:
   print(f"An error occurred: {e}")
Conclusion
AWS SageMaker offers a powerful and flexible platform for building, training, and deploying machine learning models. By leveraging its features and capabilities, you can accelerate your AI projects, reduce costs, and achieve remarkable results. Whether you’re a seasoned data scientist or just starting your AI journey, SageMaker has something to offer.
Originally published at Deploying HuggingFace Models with AWS SageMaker on October 7, 2024.
Deploying HuggingFace Models with AWS SageMaker was originally published in Level Up Coding on Medium, where people are continuing the conversation by highlighting and responding to this story.
This content originally appeared on Level Up Coding - Medium and was authored by Pragnakalp Techlabs
Pragnakalp Techlabs | Sciencx (2024-10-29T22:18:22+00:00) Deploying HuggingFace Models with AWS SageMaker. Retrieved from https://www.scien.cx/2024/10/29/deploying-huggingface-models-with-aws-sagemaker/
Please log in to upload a file.
There are no updates yet.
Click the Upload button above to add an update.
