This content originally appeared on HackerNoon and was authored by Emmanuel Ajala
\ As someone interested in the cryptocurrency industry, I know a major problem common to all crypto natives — the sector is overwhelming! As a result of how fast everything is in the cryptocurrency industry, it's not easy to stay atop everything going on in the industry.
\ While there are tools that can help you stay organized in this industry, it’s still very far from what most of us want. We want to have a summary of our portfolio, know the current trends in the industry, and understand how they affect our portfolio so that we can make personalized decisions in minutes and even seconds. For most of us, this tool is not yet a reality.
\
AI will not destroy humanity but enhance our capabilities, turning us into superhumans.
\ With Coze, I was able to design an AI chatbot that tracks and manages my portfolio, helps me stay atop the news, and provides market insight based on my portfolio, latest news, and market trends. I was also able to deploy this AI chatbot to the Telegram platform.
\ Want to learn about my crypto investment assistant's development process? Read on!
Why Coze?
Coze is a no-code AI chatbot builder for developing LLM-powered chatbots. It allows you to build a highly sophisticated AI Chatbot and let you integrate it into Discord, Telegram, or publish it as an API for your website.
Features of Coze
- Plugin Support
The plugin feature is like a Swiss army knife of AI capabilities at my fingertip. With this feature, my AI chatbot can perform complex tasks that were impossible before. The access to different plugins means I can include several features to build intelligent and efficient chatbots.
\ For example, integrating a news plugin into an AI chatbot makes it possible to access news websites.
\ Moreover, creating plugins from scratch offers limitless opportunities to enhance my AI chatbot.
\
- Creative Visual Workflow Builder
The ability to build and design complex chatbots by dragging and dropping nodes is a game changer. With this visual workflow builder, you can develop advanced chatbots, even without AI technical knowledge.
\
- Chatbot Customization
Coze AI lets me customize my AI agent as I want. The ability to schedule tasks, create triggers, and customize suggestions makes it easier to personalize the chatbot.
\
- Multi-Agent Mode
This feature allows multiple chatbot agents to work together within a single model. The ability to delegate tasks and the level of coordination enables the AI chatbot to tackle complex scenarios and improve efficiency.
\
Building Crypto Portfolio Management and Investment Assistant
This project aims to build an AI chatbot that provides an overview of my wallet (24-hour percentage change, total value of the wallet, best and worst performing tokens in the last 24 hours (by % change)), offer market insight based on my wallet summary, and help me stay atop the industry with the latest news summaries and how it could affect my portfolio.
\
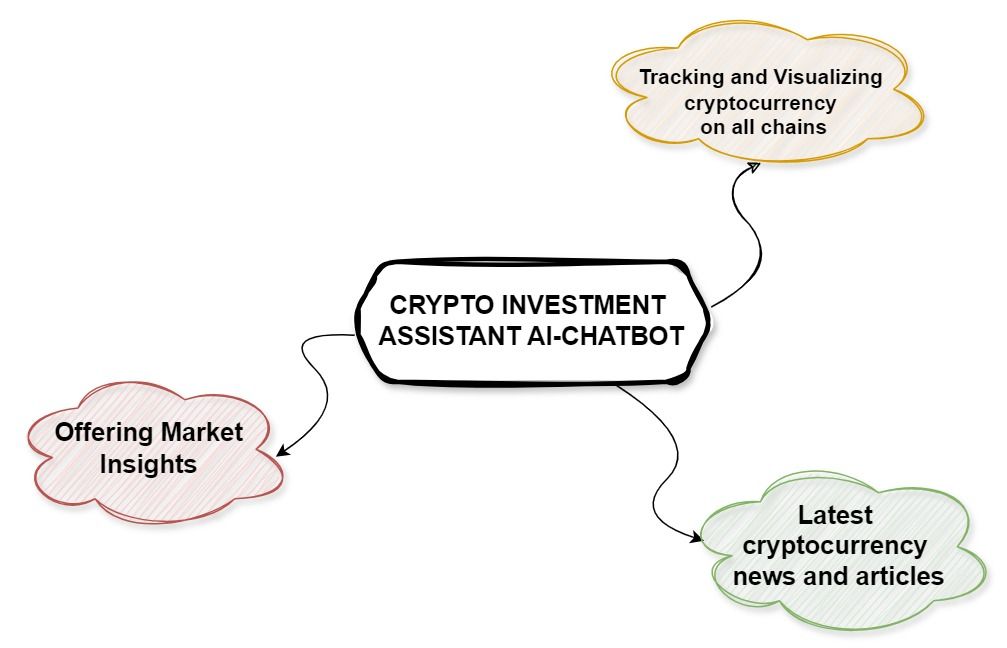
\ \ In summary, this Crypto Portfolio Assistant chatbot will focus on:
- Tracking and visualizing cryptocurrency values on all chains
- Offering Market Insights
- Offering the latest cryptocurrency news and articles.
\ Since we now understand the aim and scope of the project, here is how I built my Crypto Investment Assistant AI chatbot with Coze.
Step 1: Choosing the Framework and Prerequisites for This Project
This stage helps me select the appropriate mode, plugin, and model customization.
\
Selecting the Right Mode for Creating the Chatbot
On Coze, there are three modes:
\
- The single-agent mode
- The single-agent (workflow node) (in beta)
- The multi-agent workflow mode.
\ The single-agent mode focuses on doing a simple task. With this mode, the agent can manage a single task efficiently. It’s like a new startup founder, an all-in-one manager who handles management, marketing, product development, and sales.
\
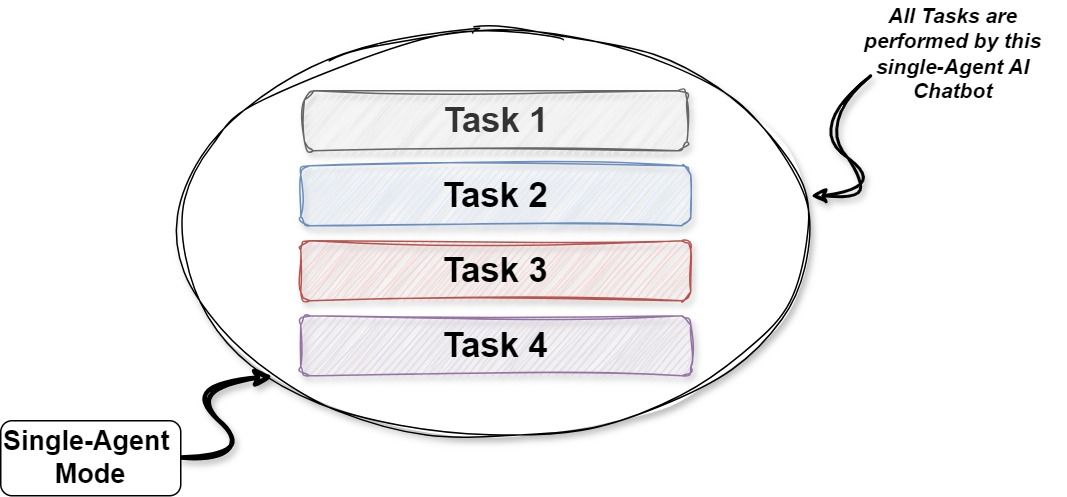
\ \ This mode is appropriate for building simple news aggregators, single-language translators, etc.
\ The multi-agent mode can handle complex logic. Unlike the single-agent mode, the chatbot contains multiple agents (nodes) configured to work under a single agent.
\
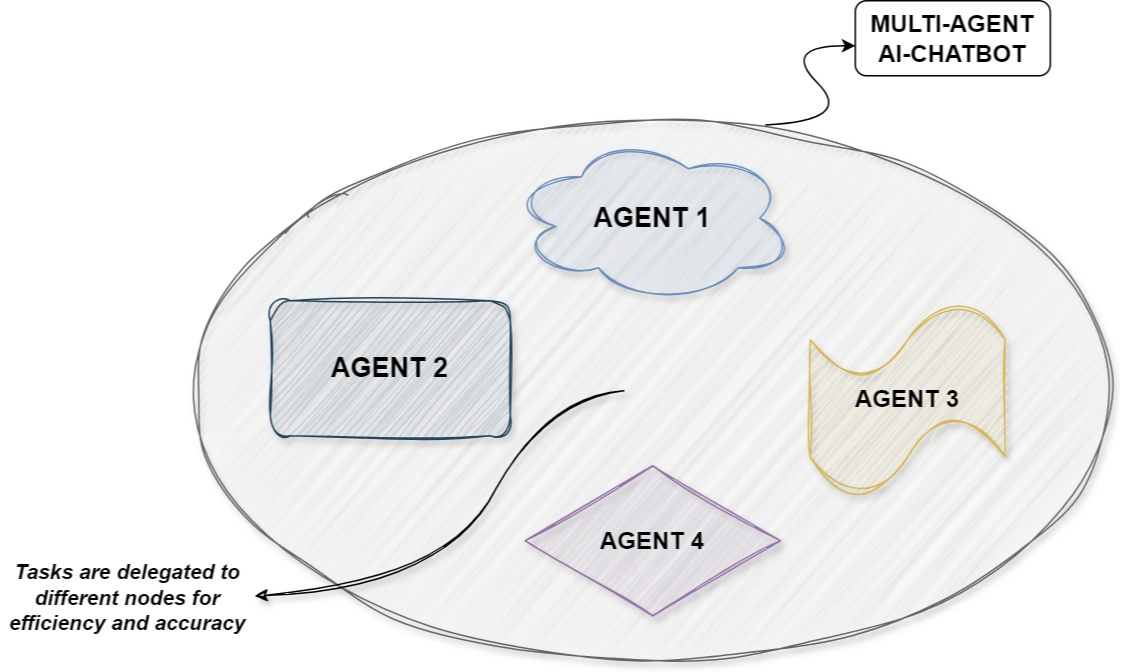
\ \ In a large organization, for example, the CEO, CFO, and CMO may work for the same company but are not employed in the same role. These officers handle different tasks but work together for quality and efficiency. Because tasks were delegated, they can also handle highly complex tasks.
\ Like these management officers in the example above, the Coze multi-agent mode helps build sophisticated AI chatbots to handle complex tasks.
\ For this project, I’ll be building an AI chatbot that can do multiple things (retrieve, summarize, and visualize crypto portfolios, provide market insights, and aggregate news). This is why I’m selecting the multi-agent mode for this project.
\
Choosing the Plugins
A plugin helps enhance the capability of an AI chatbot. It’s a set of tools that connect the chatbot to online services. An AI chatbot with a plugin can connect to the internet and do advanced tasks.
\ When X(formerly Twitter) plugin is added to a chatbot, for example, the chatbot can access social media and efficiently retrieve and use data from the platform to make decisions.
\ Creating a crypto portfolio tracker and manager requires my chatbot to access cryptocurrency wallets, crypto historical information, and the latest news and trends affecting the cryptocurrency industry.
\ For this project, I need plugins that allow my chatbot to access:
- wallet addresses
- real-time cryptocurrency data
- The social media and news websites for the latest cryptocurrency news article
\
Looking through the Coze plugin store, I found a GetTopNews() plugin, GetTwitterTrends() plugin, EChart() for visualization, and get_latest_crypto_news() plugin to access crypto news websites.
\ Since there are no plugins to access wallet addresses and cryptocurrency data, I need to build one from scratch.
\ Let’s build the Plugins!
\ To create plugins, go to:
\ Workspace —> Resource Library —> Select Resources
\
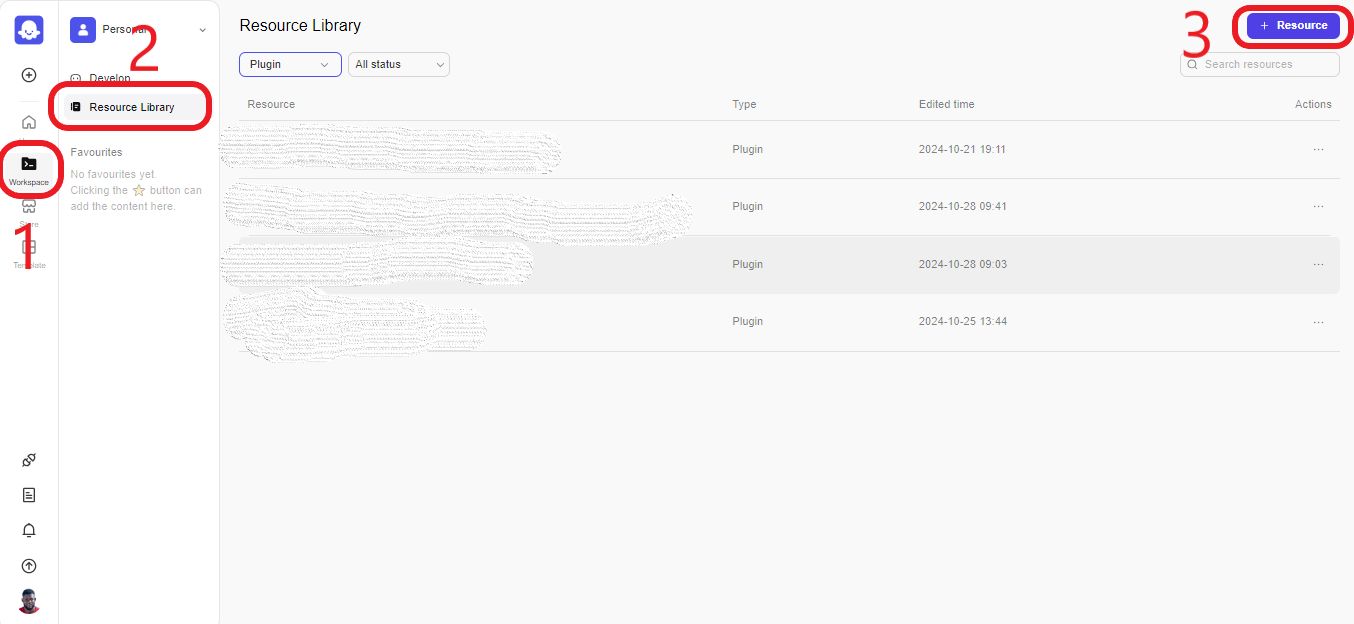
\ \ From the dropdown, select what you want to create. In this case, we want to develop a Plugin.
\ A page will pop up.
\
- Fill in the necessary information (Plugin name and description)
- Select any of the creation methods you want.
\ If you’re a developer and want to get your hands dirty, pick the Cloud Plugin — Create in Coze IDE. Here is how to build a plugin in Python.
\ For this project, we’ll create our plugin from existing API services. So, we’ll select Cloud Plugin — Create Based on Existing Services.
\ For this next section, you’ll need the documentation of the service you want to integrate and set up an API key.
\
:::warning DO NOT REVEAL YOUR API KEY TO ANYONE
:::
\
- Input the base URL of the API and the headers
- Select the Authorization method and input all the necessary information needed
- Input the service token (API key) you created, its name, and location (header or query) in the API URL.
\ After creating the plugin, you’d need to add the endpoint for your plugins.
\ Click the Create Tools and enter the necessary information “tool name, tool description, path, and the request method for the API (Get, Post, Put, Delete, and Patch).
\ The easiest way to create tools for the plugin is to import. Copy the curl for the endpoint in the API documentation and paste it into the import page.
\
- Configure the input parameter and output parameter
- Debug/verify your tool. After passing the trial run, you click the publish button.
\ And you’ve created your custom plugin,
\ Watch this YouTube video to learn about How to Create Your Own Plugin.
\
Step 2: Building the Core Features of My Chatbot
Now that the prerequisites and framework are available, it’s time to go into the main project. Here is a list of what we want to do:
\
- Creating the chatbot in a multi-agent mode. (We’ll be creating three nodes for this project)
Portfolio Tracker and Visualization
Market Insight
News Summarizer
\
- Triggers (Daily wallet update trigger and news update) and the ability for users to set up custom triggers.
- Ability to save a user’s wallet address as a variable
\ Let’s build the core features of the Chatbot!
\ Select 'Create Agent' from your home page, then fill in the name and the agent functions/descriptions, and add the icon for your AI chatbot.
\ You also need to select if you want to bear the cost of using the AI chatbot or the chatbot users to bear the cost.
\ Toggling on the user message billing means the chatbot user covers the credit cost of using the AI chatbot. If toggled off, you (the chatbot developer) cover the credit cost of using the chatbot.
\ Once you create the AI agent, you’ll be taken to the workspace. Here, the single-agent mode is automatically selected for you.
\ Since we’re building a multi-agent chatbot in this project, we’ll pick the multi-agent mode. Click the symbol at the top of the section and select the multi-agent mode.
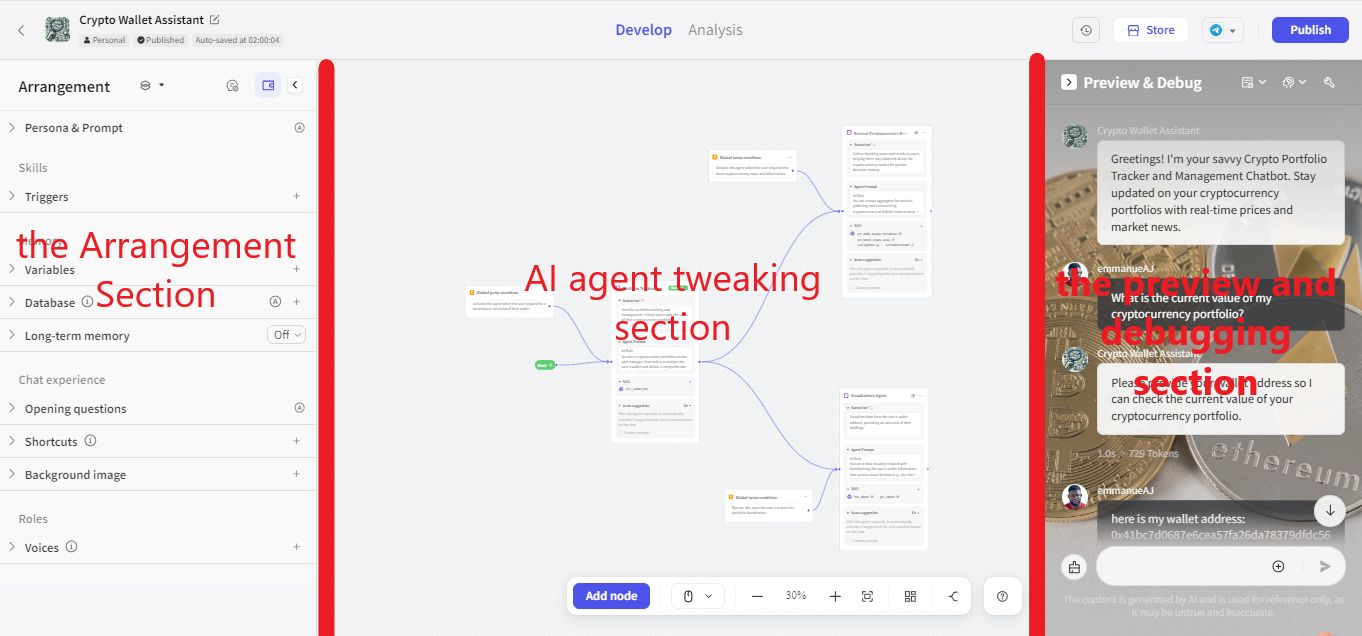
\ The page is split into three vertical sections:
\
- the Arrangement (the Chatbot global settings) section
- the AI agent tweaking section
- and the preview and debugging section.
\
\
The Arrangement Section (Chatbot Global Settings)
This section affects the chatbot's performance.
\ In the persona/prompt section, you enter the overall function of the AI chatbot.
\ In my case, I’m building an AI chatbot that provides an overview of my crypto wallet, returns news summaries, and provides market insight.
\ If you are a skilled prompt engineer, here is a framework of how to fill the prompt section:
\ #character
In my case, you’re a cryptocurrency portfolio tracker and manager who tracks a crypto wallet, provides the summary, profer market insights, and curates crypto news.
\ #Skills
You also list the different skills you want your AI agent to have. In my case,
- You return the summary of the cryptocurrency held in a wallet address
- Provide users with a summary of the latest crypto news
- Provide market insight based on the news and wallet holdings
- Help users visualize their wallet holdings
\ The above list is an extract from what I wrote. You need to be detailed about every skill.
\ #Constraint
Setting the boundaries for what your chatbot should/shouldn’t do.
\ For this project, for example:
- Only focus on cryptocurrency news
- Do not return more than 100 words per user queries
- Only return news articles posted in the last 24 hours
- Stick to the provided outline
\ ==Note: this prompt section is in markdown format==
\ If you are not good at prompting, here is a way to create a prompt for the LLM. Enter an idea of what you want and click the ‘A’ at the top of the prompt/persona section.
\ In my case, I wrote, “I’m building an AI chatbot that provides an overview of my crypto wallet, gives market insight, and returns news summaries,” and clicked the Auto-optimize prompt ‘A’ button. In no time, it created an optimized prompt.
\
Nodes Development Section
This section is where we create and tweak the agent. Each node contains the scenarios, agent prompt, skills, and auto-suggestion. For this project, I created three nodes, namely:
\
- Portfolio Tracking
- General Cryptocurrency Market Update and News
- Visualization Agent
\
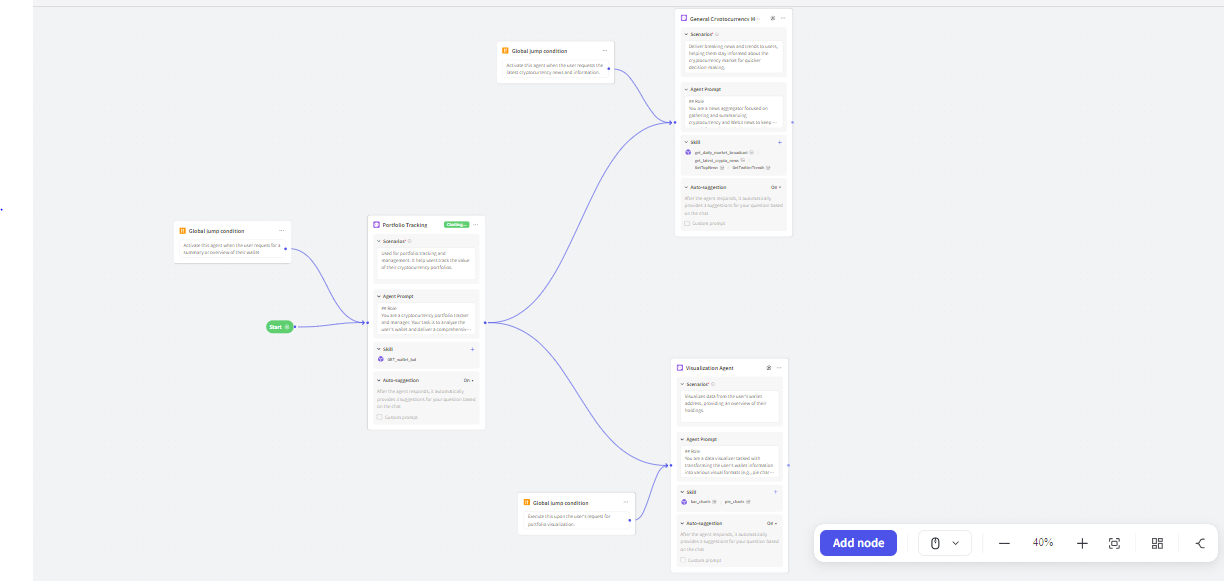
\ ==*You can create nodes by double-clicking on any part of the section and selecting Create a Node.==
\ Scenario
This section helps the LLM (Large Language Model) understand when to assign tasks to the node based on the keywords in the user prompts.
\ Since I created three AI agents, any of the agents should be called whenever a user needs to retrieve:
\
- an overview of their wallet
- visualization of their wallet
- the latest crypto news and market insights
\ The scenario I wrote for the Portfolio Tracking node is:
\ “Used for portfolio tracking and management. It helps users track and summarize the value of their cryptocurrency portfolios.”
\ So, whenever, portfolio tracking, cryptocurrency portfolio, track, and so on appear in a user's query, the Portfolio Tracking Node is called.
\ ==*You should always focus on writing prompts that the Large Language Model(LLM) can understand, else your AI chatbot will be less efficient==
\ Agent Prompt
Here is the section where I developed the agent operational logic. I wrote the role, skill, and constraint of the agent. It’s similar to what we did in the persona/prompt section above, but you have to describe the tasks of an agent in detail. Each section defines what the nodes do—not what the chatbot does.
\ If you’re not good with prompt creation, here is a trick I used:
\
- I copied the information in the persona/prompt section somewhere.
- Write an idea of what I want this node to do
- I clicked the optimized button, and an optimized prompt was generated. (you can tweak the generated prompt as much as you want)
- Copied the prompt to the ‘Agent Prompt’ section of the node, and that’s it.
\ Skill
Here is where I added the plugins to the AI agent. Click the ‘+’ and search for the plugins you need, and if it is a plugin you created as we did above,
\
- click the ‘My Tool’ on the left side of the screen
- select the plugins and add them.
\ \ \
:::info The more the plugin per node, the more inefficient your AI agent becomes. So, use fewer plugins per node for efficiency.
:::
\
For the Portfolio Tracking node, for example, I used two plugins initially, the dune_balance() plugin for retrieving wallet data and the coin_market_data() plugin for providing the necessary cryptocurrency information. However, when testing the AI chatbot, I realized my model was slow and consumed more tokens.
\
So, I decided to use a single plugin, the Get_wallet_balance() Plugin, to handle both operations. My model becomes more efficient and consumes fewer tokens.
\ The Auto-suggestion
Toggling the auto-suggestion on means that the agent can suggest questions to users after answering their questions, and toggling it off means otherwise.
\ For this project, I toggled on this setting to guide users on what they can ask.
\ Global Jump Function
This function helps assign tasks to the appropriate node based on the user’s keyword or prompt. Each node is activated based on a particular input or keyword.
\ In my case, I created Global Jump conditions for each of my agents. For example, if a user requests crypto news, the Global Jump Function automatically assigns the task to the ‘cryptocurrency news and market insight’ node without going through the Portfolio Tracking node.
\
Step 3: Personalization and User Interaction
Now, let's focus on improving user experience (UX). Building my core features is likened to the backend, in website development, while making it more interactive is frontend designing.
\ Even if the backend works well, without the frontend, users won’t interact with your website. So, no matter how accurate and efficient my core features are, without interactivity, my AI chatbot won’t be useful.
\ So let's customize/tweak the settings.
\ For this section, we’re going to focus on two settings.
\
- The Local settings
- The Global settings.
\
The Local Settings
This section focuses on the efficiency and the accuracy of each node. For my project, I focus on the Node model settings.
\ Model Settings
To access the model settings, click the three dots at the top right corner of your node and select ‘Model Settings’. A page containing the model settings will pop up.
\
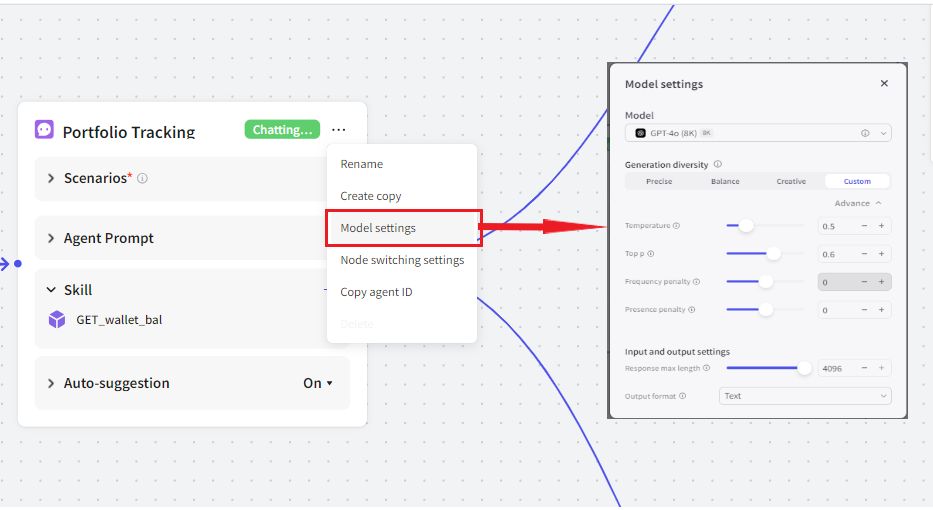
\ Here is where you will:
- Choose the type of model you want
- Tweak the Model Generation Diversity (level of creativity or precision of the Chatbot)
- Set the input and output settings
\ For this section, you can leave the setting as-is, just like I did for this chatbot. The only thing I change is the ‘Response Max Length’ under the input and output settings. This is because wallet information, sometimes, can exceed the ‘Response Max Length.’ In case a user's wallet contains more information.
The Chatbot’s Global Settings
The global settings are the general settings that affect the AI chatbot. It affects all nodes created. Here are the settings I focus on for this section.
\ Which Node Should a New Round of Conversation Be Sent To?
This setting is needed to tweak how the agent handles a new round of conversation.
\ Let’s say the user has a conversation with my chatbot in the morning and wants to start another one at night, how should the AI chatbot handle the situation? Should the node that answered the last question continue with the conversation or be sent to the start node?
\ For these settings:
Click the gear-shaped symbol beside ‘Start’
\
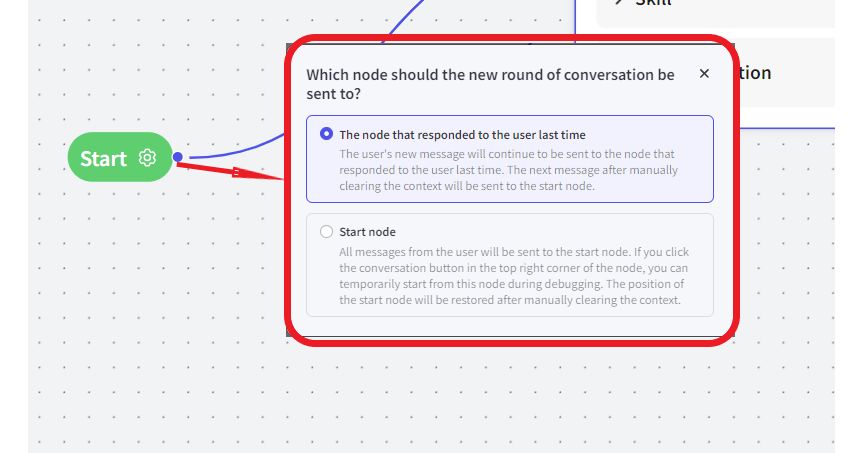
\ There are two options here,
- The node that responded to the user last time should handle the user’s message
- Restart the conversation every time.
\ For this Chatbot, I want the node to continue with the conversation to personalize users’ experience.
\ Triggers
Triggers influence the model to do a certain task at a particular time. You can either set up preset triggers for your model or allow the users to create schedule triggers during conversations.
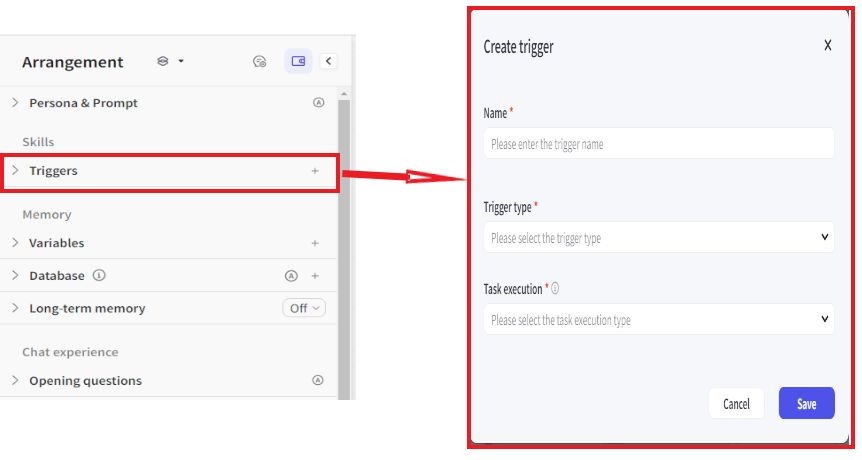
\ Toggling on the trigger button lets users customize their triggers.
For this project, I set up triggers for daily portfolio and News summary alerts. This preset trigger automatically updates the user with their portfolio summary and news alerts at 9 am (GMT) daily.
\ Variables
Assigning variables lets the AI chatbot store personal information. This enables you to access data whenever you want without needing to provide personal information every time.
\ For this project, I set up a variable to store the user’s wallet address. So, once you provide your wallet address, it’s stored in the chatbot’s memory and can be retrieved to provide you with the necessary information.
\ To create a Variable,
- Click the + button
- Fill in the necessary information on the page that pops up on your screen.
\ The Opening Text and Question Section
It introduces the AI chatbot to users and helps them with questions they can ask. Toggling this section means the introductory text and the questions will be shown to the user.
\ You can write it yourself or use the auto-generate button at the top of the section.
\ For this project, I added three questions to help users with prompting.
\ These questions are:
- Track my portfolio and provide real-time updates on its value and changes
- Can you recommend promising crypto to diversify my portfolio and why
- Give me the latest news impacting the cryptocurrency market today
\ Note: You can add as many questions as you like, but I’d recommend you add three questions not to overwhelm the users.
\
Step 4: Testing and Iteration
If you want to build an efficient and accurate Chatbot, you don’t just build and publish your creation. You should follow an extensive process of building, testing, debugging, and iterating your project until you’re satisfied with the result.
\ For example, without testing and debugging, I won’t see the high token consumption and slow response time I mentioned earlier in the article.
To test your chatbot, go to the ‘preview and debugging’ section and assume the user's position.
\ During the testing and iteration stage, here are things I did:
- I checked if tasks were delegated correctly among each node. Sometimes, a task meant for a particular node can be sent to a node not designed for the task.
\ When my chatbot incorrectly assigns tasks to nodes, this is what I do:
I assigned a task to a particular node. To assign a task to a node, click the play button at the top of the preferred node. Once tasks are assigned to nodes, the node turns green. So, when you ask any question or query, the node will answer.
\ This helped me test if the prompt and plugins are correct and efficient.
\
- I tested different scenarios and keywords common to the niche. These keywords are commonly used by the chatbot users.
For this project, keywords like wallet address, portfolio, crypto news, market insights, and so on are the keywords I tested and ensure tasks are correctly delegated to the right nodes.
\
- I also check the time taken and the tokens consumed. These two factors could affect the efficiency of your chatbot, and ultimately drive users away.
\
Step 5: Publishing
After ensuring my chatbot works perfectly, it’s time to publish the chatbot. Click the ‘Publish’ button at the top right corner of the screen. You’ll be taken to the publish page.
\ There are several places to publish the chatbot. All you have to do is click the 'authorize' button and follow the instructions to configure any platform you want.
\ Moreover, you can also publish your chatbot as an API or Web SDK.
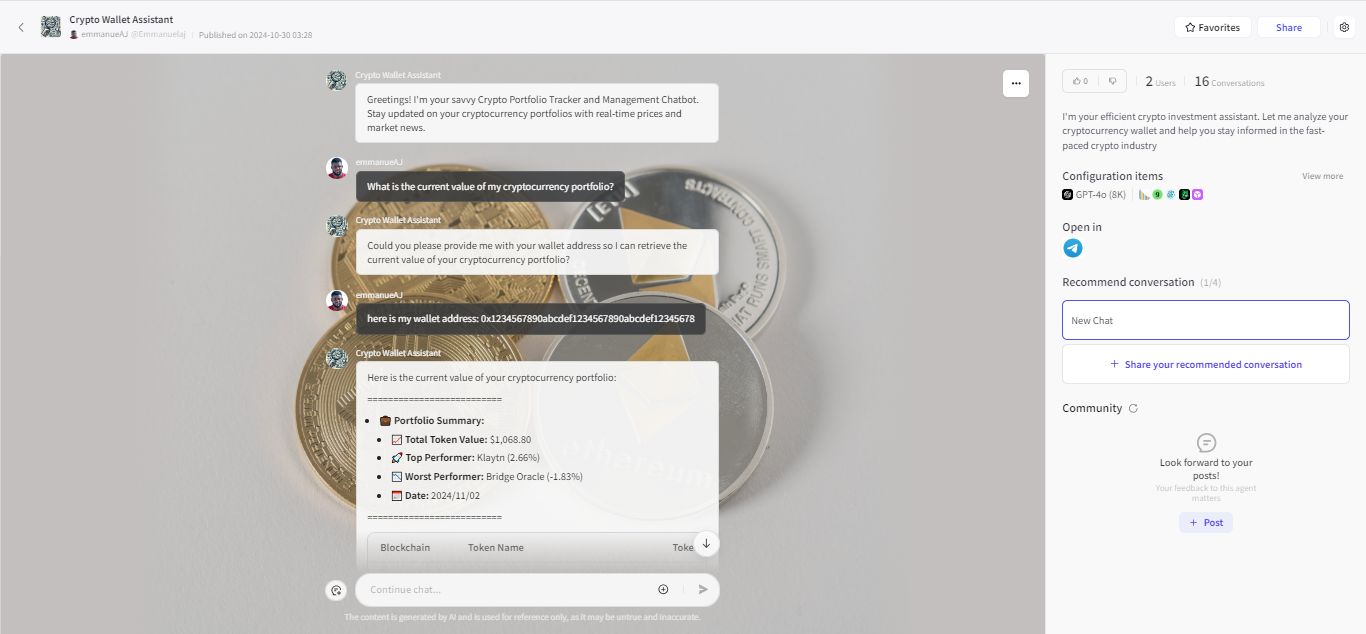
\ For this project, I’ll only publish this AI chatbot on the Coze Agent Store and Telegram.
\ Why Telegram?
Telegram is a simple-to-use platform compared to Discord. It’s also a popular communication platform among crypto and web3 natives.
\ Learn how to configure telegram for the AI Chatbot Agent.
\ Here is the link to the Crypto Investment Assistant’s Telegram bot: https://t.me/CryptoPortfolio_manager_bot
And Here is the link to the AI agent on Coze store: https://www.coze.com/s/ZmFgjK12T/
\
\
Conclusion
Building has never been as easy as it seems with the Coze platform. The ability to spin up an AI chatbot whenever you like, even without the technical ability is what the future needs to look like.
\ One thing I notice during my creation process is that there are some restrictions to what you can do with Coze. For example, if you’re the type that wants to get your hands dirty, Coze may not be for you. Apart from that, I’d recommend the platform.
\ So far, the crypto assistant chatbot has relieved me of a few repetitive tasks by automating them. Like Elon Musk said during the We’ Robot event some weeks ago.
\
The future should look like the future.
\
With the Coze platform, the ability to freely spin up whatever chatbot you need, whenever you need it is what the future should look like.
\ Resources for learning more about Coze AI
Complete Coze Tutorial: Building an AI Chatbot From Scratch
\
This content originally appeared on HackerNoon and was authored by Emmanuel Ajala
Emmanuel Ajala | Sciencx (2024-11-04T16:16:51+00:00) Crypto Investment Assistant: How I Built a Chatbot That Simplifies Portfolio Management With Coze. Retrieved from https://www.scien.cx/2024/11/04/crypto-investment-assistant-how-i-built-a-chatbot-that-simplifies-portfolio-management-with-coze/
Please log in to upload a file.
There are no updates yet.
Click the Upload button above to add an update.
