This content originally appeared on HackerNoon and was authored by Programmer in development
Use-case
Allowing users to log in using their Microsoft Entra credentials.
Why Auth.js?
It is a complete authentication solution. It,
- Abstracts away a lot of platform (social logins) / protocol (OAuth) details
- Supports cookie based and database based sessions
- Encrypts tokens
- Supports wide range of OAuth providers like Microsoft Entra ID, Google, GitHub, Facebook, etc.
- Is easy to integration with Next.js
Prerequisites
- Install Node.js (LTS version)
- Azure portal account
- Basic understanding of Next.js and Router
Azure portal configuration
Register an app
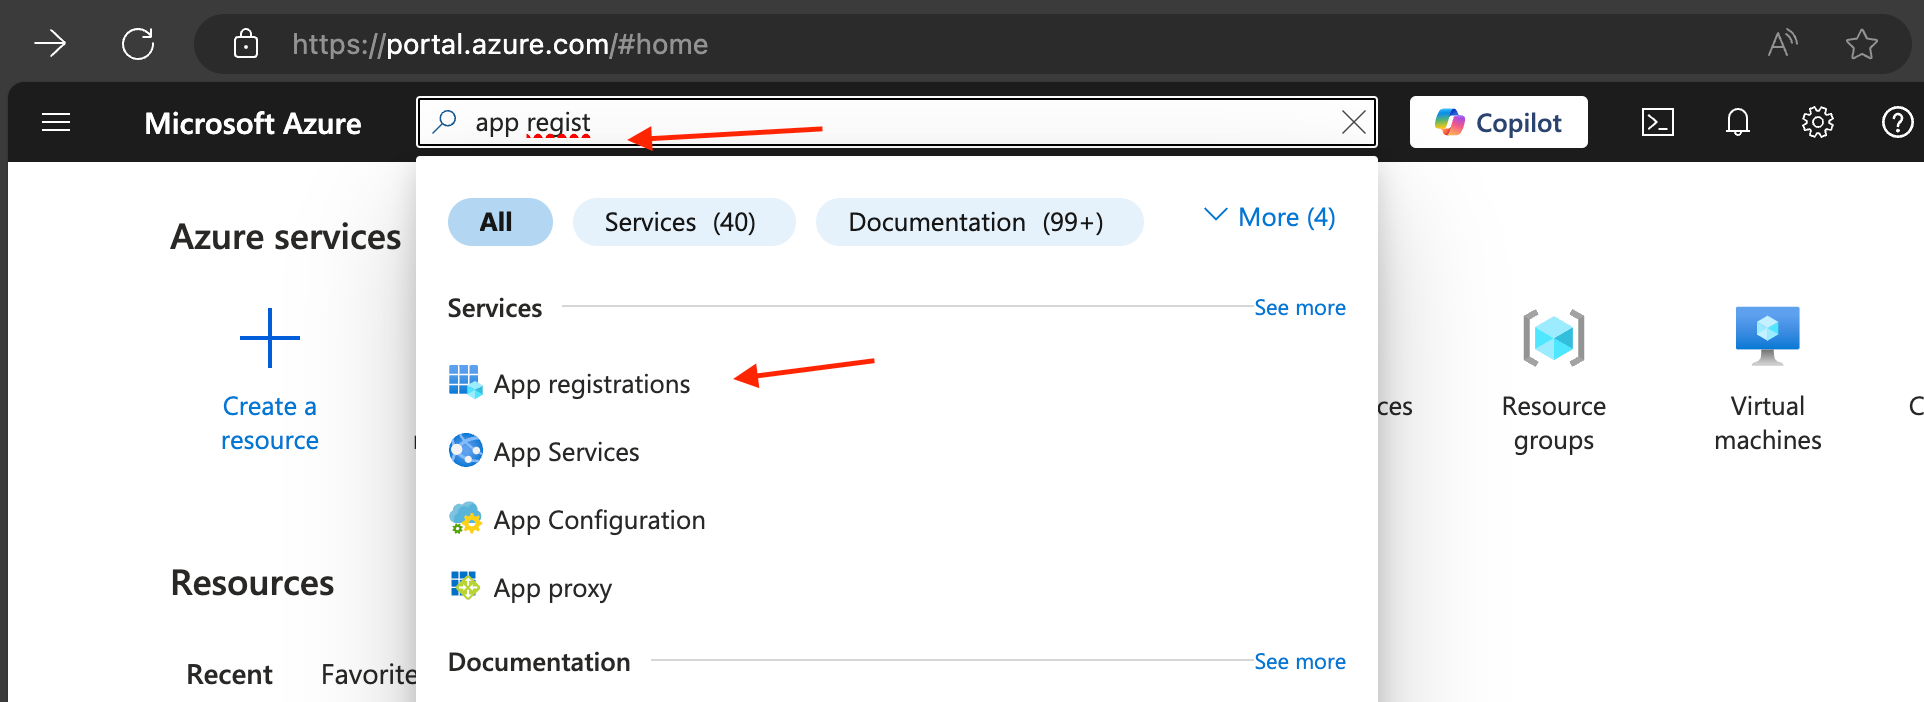
- Select 'App registrations' service by searching it in the search box and then clicking on the option
- Click on 'New registration'
- Give a name
- Under 'Supported account' types choose 'Accounts in this organizational directory only (Default Directory only - Single tenant)' for 'Who can use this application or access this API?'

- Under 'Redirect URI (optional)'
- Choose 'Web' as platform and specify
http://localhost:3000/api/auth/callback/microsoft-entra-idas value
- Choose 'Web' as platform and specify
- Click on 'Register' to finishing registration
Add credentials
- Select the app that you recently registered
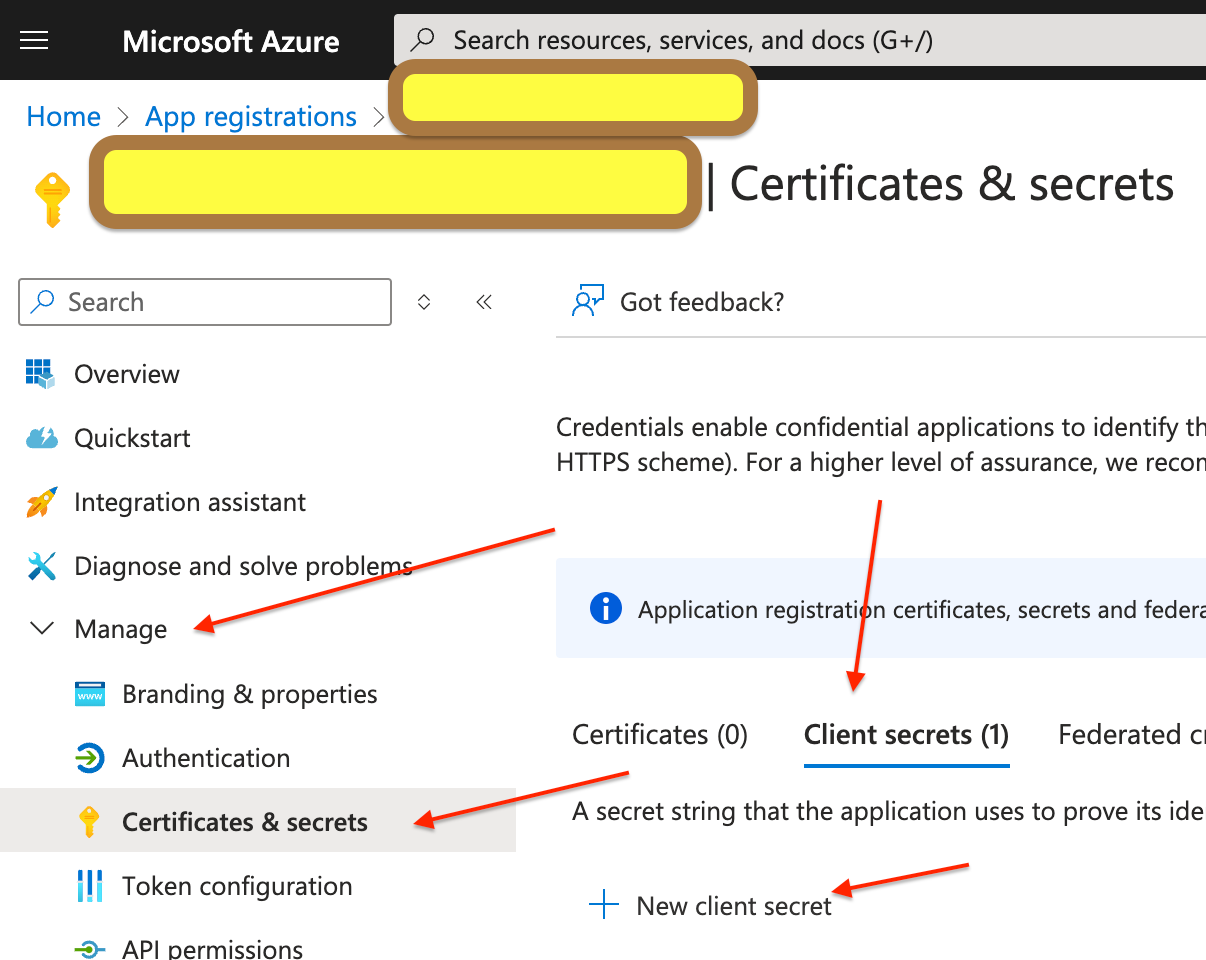
- Select 'Certificates & secrets' under 'Manage'
- Select 'Client secrets' and click on 'New client secret'
- Give a description and specify expiration period
- Copy the secret value

Allow permissions
- Select the app you recently registered
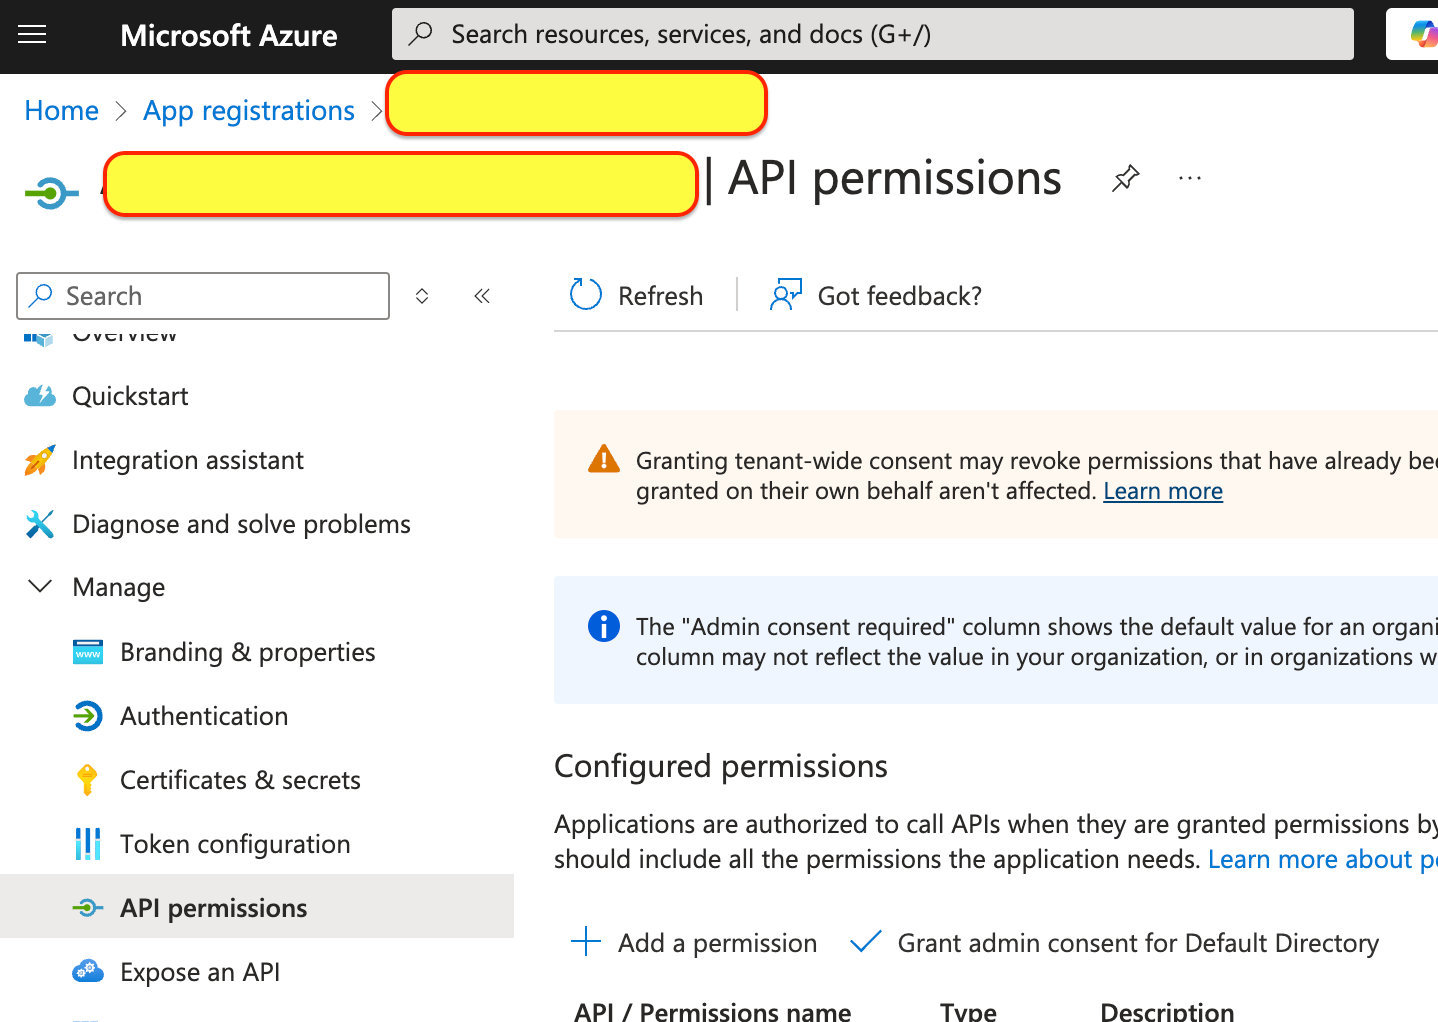
- Select 'API permissions' under 'Manage''
- Click 'Add a permission'
- Select 'Microsoft Graph' and then 'Delegated permissions'
- Add permissions 'email', 'openid', 'profile', 'User.Read'
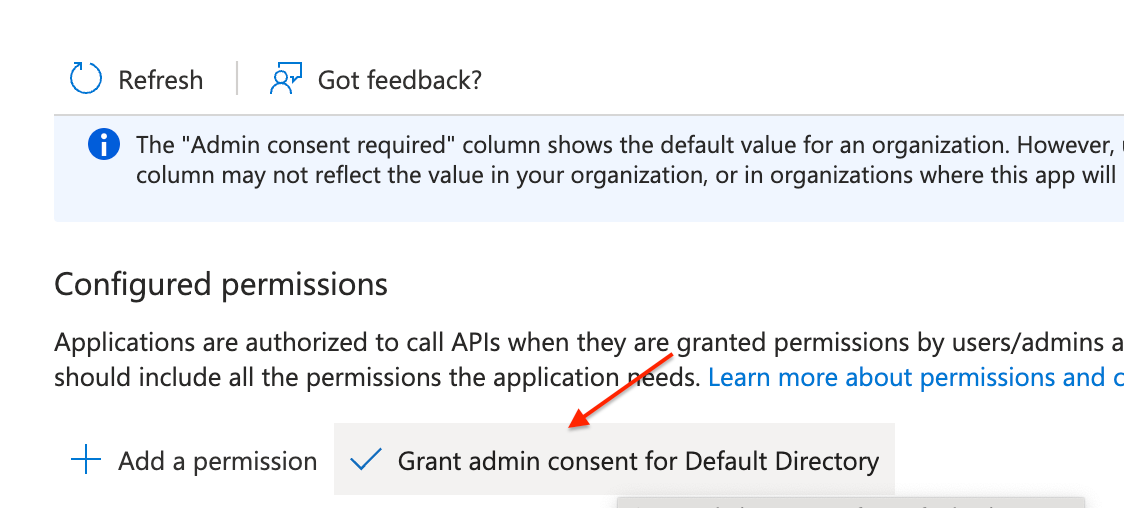
- Ensure to click 'Grant admin consent for Default Directory'
Read more on here
Create Next.js project
Create a Next.js project by using create-next-app CLI utility that is provided and recommended by Next.js (lets assume your appname is 'tutorial')
npx create-next-app tutorial
Choose the prompts, ensure you have App Router selected as yes. I choose default options.
✔ Would you like to use TypeScript? … No / Yes ==> Yes
✔ Would you like to use ESLint? … No / Yes ==> Yes
✔ Would you like to use Tailwind CSS? … No / Yes ==> No
✔ Would you like your code inside a `src/` directory? … No / Yes ==> No
✔ Would you like to use App Router? (recommended) … No / Yes ==> Yes
✔ Would you like to use Turbopack for `next dev`? … No / Yes ==> Yes
✔ Would you like to customize the import alias (`@/*` by default)? … No / Yes ==> No
- Change into newly create project
cd tutorial - With this your folder structure should be
├── tutorial
│   ├── README.md
│   ├── app
│   │   ├── favicon.ico
│   │   ├── globals.css
│   │   ├── layout.tsx
│   │   ├── page.module.css
│   │   └── page.tsx
│   ├── eslint.config.mjs
│   ├── next-env.d.ts
│   ├── next.config.ts
│   ├── package-lock.json
│   ├── package.json
│   ├── public
│   │   ├── file.svg
│   │   ├── globe.svg
│   │   ├── next.svg
│   │   ├── vercel.svg
│   │   └── window.svg
│   └── tsconfig.json
Configure Microsoft Entra ID integration using Authjs (Next-Auth)
Install Auth.js
npm install next-auth@beta
Setup environment variables
Auth.js encrypts (JWT) tokens, for that it uses cryptographically secure random string which is of at-least 32 characters. It expects that random string to be identified by 'AUTH_SECRET' environment variable. Auth.js provides CLI command to generate it which also adds it to environment file. It does so by,
npx auth secret
This creates secure random string, assigns it to environment variable AUTH_SECRET and adds it to .env.local file. The file will be placed in the directory where the command is executed, so ensure that you execute it in the root folder of your application.
To the .env.local file add other environment variables that are needed.
AUTH_MICROSOFT_ENTRA_ID_ID="<your-client-id>"
AUTH_MICROSOFT_ENTRA_ID_TENANT_ID="https://login.microsoftonline.com/<your-tenant-id>/v2.0"
AUTH_MICROSOFT_ENTRA_ID_SECRET="<your-client-secret>"
You will get the values from Azure portal.
- Goto the app that you registered
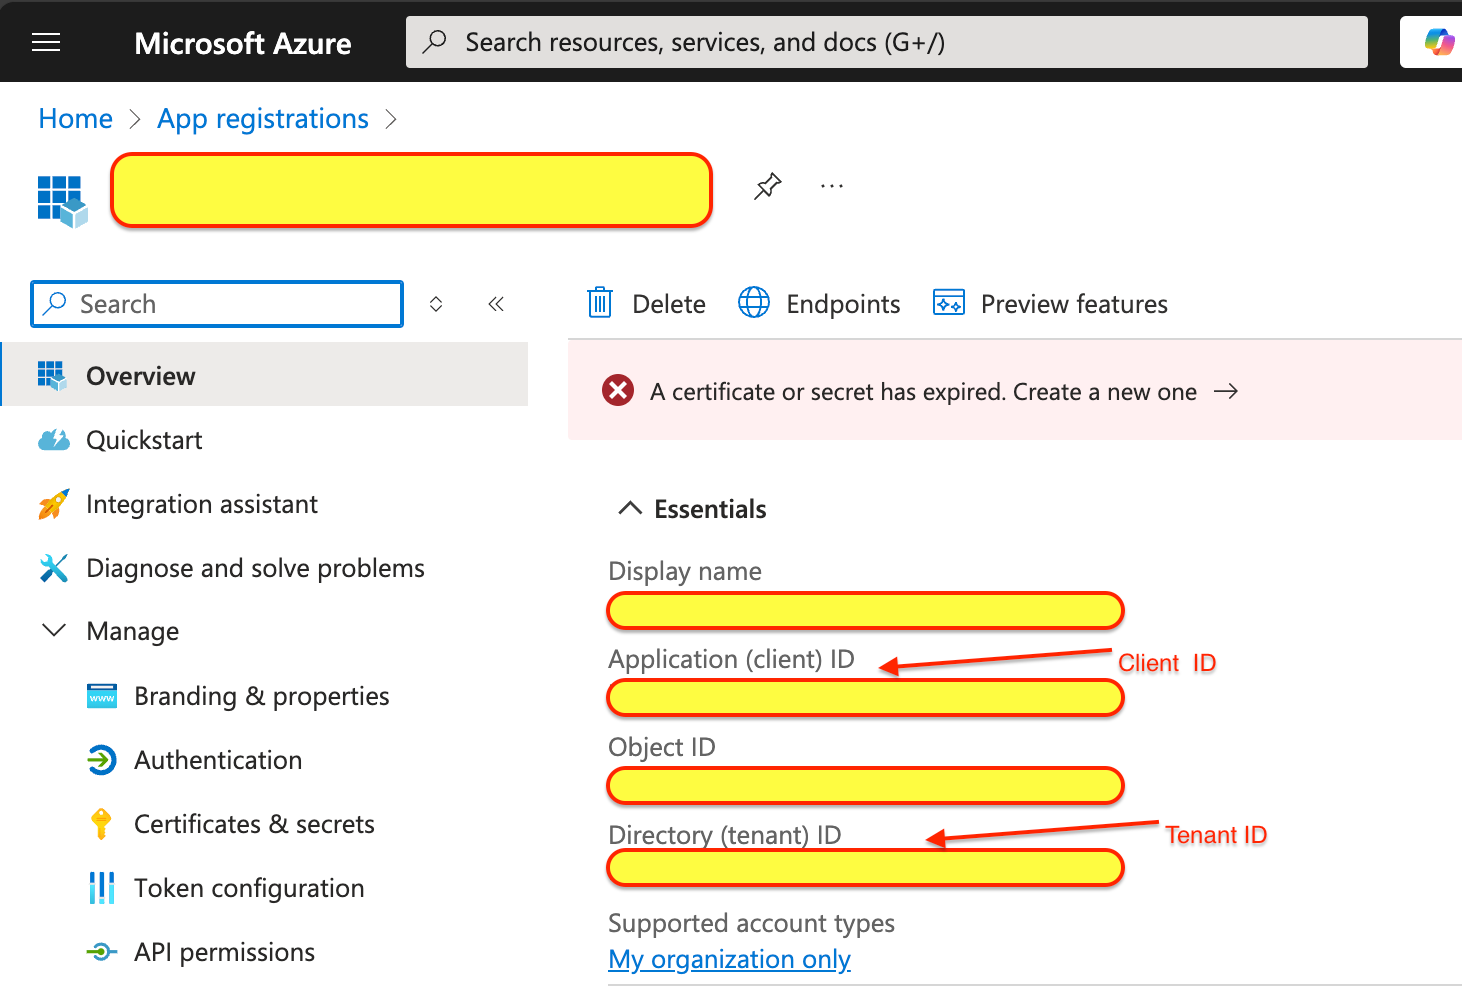

Complete .env.local file should look like
AUTH_SECRET="<random string generated after npx auth secret>"
AUTH_MICROSOFT_ENTRA_ID_ID="<your-client-id>"
AUTH_MICROSOFT_ENTRA_ID_TENANT_ID="https://login.microsoftonline.com/<your-tenant-id>/v2.0"
AUTH_MICROSOFT_ENTRA_ID_SECRET="<your-client-secret>"
Configure auth.ts
auth.ts file is the core of the authentication setup. It defines how Auth.js integrates with providers such as Microsoft Entra ID. It manages authentication, session and token handling.
Steps to Configure
- Create a new file in your project:
tutorial/auth.ts
- Integrate Microsoft Entra ID with Next-Auth. We use,
- clientId, clientSecret, and issuer (tenant) that we obtained from the Azure portal during app registration
- openid, profile, email, User.Read as scope params for authorization that we configures as API permissions
- AUTH_SECRET which is used to encrypt tokens, set in
.env.localfile
import NextAuth from "next-auth";
import MicrosoftEntraID from "@auth/core/providers/microsoft-entra-id";

export const { handlers } = NextAuth({
  providers: [
    MicrosoftEntraID({
      clientId: process.env.AUTH_MICROSOFT_ENTRA_ID_ID,
      issuer: process.env.AUTH_MICROSOFT_ENTRA_ID_TENANT_ID,
      clientSecret: process.env.AUTH_MICROSOFT_ENTRA_ID_SECRET,
      authorization: {
        params: {
          scope: "openid profile email User.Read",
        },
      },
    }),
  ],
  secret: process.env.AUTH_SECRET
});
Create Dynamic API Route
In Next.js, authentication requests (e.g., /api/auth/signin, /api/auth/session) need to be handled dynamically. The app/api/auth/[…nextauth]/route.ts file links the routing system to the handlers exported from auth.ts.
Purpose of […nextauth]
- Dynamic Routing:
- Matches all requests under /api/auth/, such as /api/auth/signin, /api/auth/signout, or /api/auth/callback/.
- Delegates to Auth.js:
- Passes requests to the appropriate handler (GET or POST) provided by auth.ts.
Steps to Configure
- Create a new file:
app/api/auth/[...nextauth]/route.ts
- Exports the handlers, mapping them to the HTTP methods for /api/auth/*
import { handlers } from "@/auth";

export const { GET, POST } = handlers;
Test
- Start the development server
npm run dev
Test Sign in
Visit
http://localhost:3000/api/auth/signin
You should see a sign-in page with Microsoft Entra ID listed as a provider. Login using your valid Microsoft Entra ID credentials.
Test logged in user details
Visit
http://localhost:3000/api/auth/session
You should see session data, including the user’s email, name, and token expiration time.
Test Sign out
Visit
http://localhost:3000/api/auth/signout
You should be logged out and the session should be cleared.
\ By following these steps, you’ve successfully configured Microsoft Entra ID as a login provider in your Next.js app using Auth.js!
This content originally appeared on HackerNoon and was authored by Programmer in development
Programmer in development | Sciencx (2025-01-06T14:34:22+00:00) How to Configure Microsoft Entra ID as a Login Provider in Your Next.js App. Retrieved from https://www.scien.cx/2025/01/06/how-to-configure-microsoft-entra-id-as-a-login-provider-in-your-next-js-app/
Please log in to upload a file.
There are no updates yet.
Click the Upload button above to add an update.
