This content originally appeared on Telerik Blogs and was authored by Christian Nwamba
With a simple book API, learn how to define middleware in Oak, handle request validation, create route handlers and perform basic DB operations with DenoKV.
This article will guide you through creating a REST API using Deno, the Oak framework and a DenoKV database. We will build a simple book API that shows the different ways to define middleware in Oak, handle request validation, create route handlers and perform basic database operations with DenoKV.
What Is Deno?
Deno fixes many problems developers face with Node. Its straightforward approach helps developers write more secure, efficient, modern JavaScript code. One of its major selling points is security. By default, Deno does not allow access to the file system, network or environment variables unless explicitly allowed by the developer.
Deno also gives developers native TypeScript support without needing additional configuration.
What Is Oak?
Oak is a middleware framework for Deno that helps developers build web apps and APIs. It provides tools for handling HTTP requests, managing routing and integrating middleware, similar to Express in Node.js. It comes with TypeScript right out of the box and benefits from Deno’s security and modern runtime environment.
What Is DenoKV?
DenoKV is a key-value database that manages structured data for Deno.
Each piece of data or “value” has a unique identifier or “key,” making it easy to fetch data by referencing its key. This approach allows developers to manage data without setting up a separate database server.
Project Setup
Run the following command to install deno for macOS using Shell:
curl -fsSL https://deno.land/install.sh | sh
For Windows using PowerShell:
irm https://deno.land/install.ps1 | iex
For Linux using Shell:
curl -fsSL https://deno.land/install.sh | sh
To test your installation, run the following command:
deno -version
Create New Project
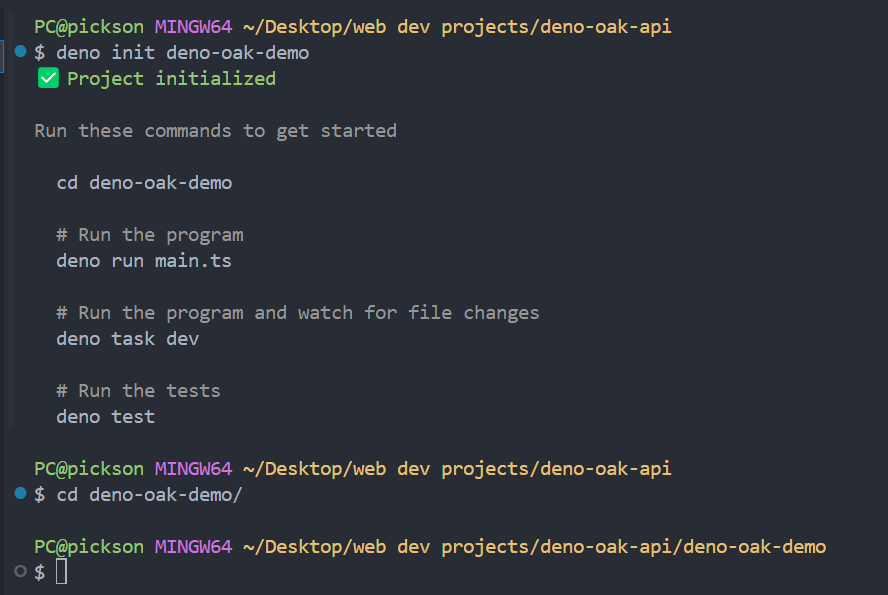
Next, we need to create a new project. Run the command deno init deno-oak-demo to create a new project called deno-oak-demo, then cd into it.

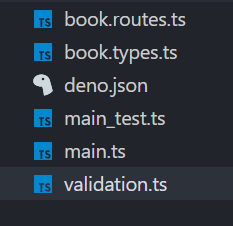
Next, we need to create three new files in the deno-oak-demo directory called book.routes.ts, book.types.ts and validation.ts.
Your deno-oak-demo directory should now look like this.

Install Deno VS Code Extension
We need to install Deno’s official VS Code extension. This extension adds support for Deno, such as offering import suggestions and automatically caching remote modules.

Install Oak
We’ll use JSR to install Oak. JSR, or JavaScript Repository, is a package registry designed by the creators of Deno. It allows developers to publish their TypeScript code directly without the need to transpile it first. Its key advantage is that it supports ES Modules only and is TypeScript-first.
We’ll use the command deno add jsr:**@oak**/oak to install the Oak framework as a dependency. If this is successful, a deno.lock file will be created.
The
deno.lockfile helps prevent unexpected changes in dependencies during the life of your application by locking specific dependency versions.
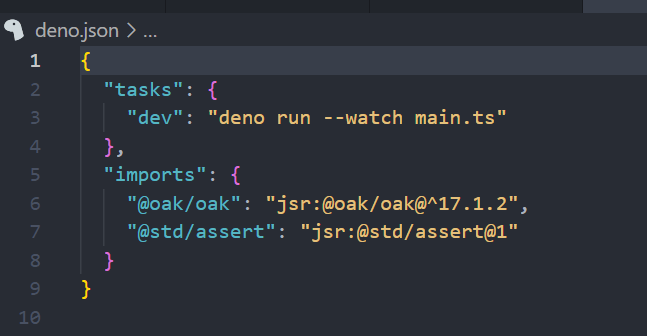
Your deno.json file should now look like this.

When we install a package in Deno, it is added to the deno.json file as an import. If we want to import this package into a file, we can use the alias defined in the deno.json or directly reference the package’s URL.
Registering Middleware in Oak
Middleware functions are processing layers that handle requests and responses in our application.
An Oak application is a chain of various middleware functions, such as route handlers, validation functions, custom error handlers and loggers. We can register a middleware on the application as a whole, a group of routes(a router) or a specific route.
This is how to register a middleware on the Application as a whole:
import { Application, Context, Next } from "@oak/oak";
const app = new Application();
const firstMiddleware = async (context: Context, next: Next) => {
  console.log("Running first Middleware");
  await next();
};
app.use(firstMiddleware);
app.use((context) => {
  console.log("Running second Middleware");
  context.response.body = "Hello world!";
});

await app.listen({ port: 3000 });
In the example above, we first define a middleware function and then register it to the application as a whole using the app.use method.
Notice that the middleware function has two parameters, context and next. context is an object used to access the request data and response methods, while next is a function used to call the next middleware in the chain.
In the example above, the first middleware will be called, thereby logging “Running first Middleware” to the console. This will be followed by the second middleware, which logs “Running second Middleware” to the console and returns “Hello world!” in the response body.
It’s important to note that the order in which middleware is registered is important.
Take a look at the code snippet below.
import { Application, Context, Next } from "@oak/oak";
const app = new Application();
app.use((context) => {
  console.log("Running second Middleware");
  context.response.body = "Hello world!";
});
const firstMiddleware = async (context: Context, next: Next) => {
  console.log("Running first Middleware");
  await next();
};
app.use(firstMiddleware);

await app.listen({ port: 3000 });
In this example, only “Running second Middleware” will be logged to the console, and “Hello world” will be sent as the response body. This is because after running the first middleware that appears in the chain, we didn’t add a next() function call.
This is how to register a middleware on a router:
import { Application, Context, Next, Router } from "@oak/oak";
const app = new Application();

const router = new Router();
router.prefix("/greeting");

const firstMiddleware = async (context: Context, next: Next) => {
  console.log("Running first Middleware");
  await next();
};
router.use(firstMiddleware);
router.get("/one", (context) => {
  context.response.body = "Hello, World!";
});
router.get("/two", (context) => {
  context.response.body = "What's Up, World!";
});

app.use(router.routes());
app.use(router.allowedMethods());

await app.listen({ port: 3000 });
In the above example, we define a new router, set the prefix for all its routes, register a middleware function and create two specific route handlers.
Since our middleware function is registered above the two route handlers, if either “/greeting/one” or “/greeting/two” is hit, our middleware function will run before the greeting is sent as the response body.
This is how to register a middleware on a specific route.
import { Application, Context, Next, Router } from "@oak/oak";
const app = new Application();

const router = new Router();
router.prefix("/greeting");

const firstMiddleware = async (context: Context, next: Next) => {
  console.log("Running first Middleware");
  await next();
};
router.get("/one", firstMiddleware, (context) => {
  context.response.body = "Hello, World!";
});
router.get("/two", (context) => {
  context.response.body = "What's Up, World!";
});

app.use(router.routes());
app.use(router.allowedMethods());

await app.listen({ port: 3000 });
In the above example, our middleware function will only run when “greeting/one” is hit.
Request Validation
Now that we know how middleware works in Oak, let’s build our REST API. First, we’ll create a middleware function to handle request validation. We’ll use this function later when adding route handlers to create and update books.
Deno supports importing npm packages using the npm: specifier. We’ll import a package called Joi from NPM.
Add the following code to your validation.ts file:
import { Context, Next } from "@oak/oak";
import Joi, { ObjectSchema } from "npm:joi";

export const createBookSchema = Joi.object({
  title: Joi.string().required(),
  author: Joi.string().required(),
  description: Joi.string().required(),
});

export const updateBookSchema = Joi.object({
  title: Joi.string().optional(),
  author: Joi.string().optional(),
  description: Joi.string().optional(),
}).or("title", "author", "description");

export const validate =
  (schema: ObjectSchema) => async (context: Context, next: Next) => {
    const body = await context.request.body.json();
    const { error } = schema.validate(body, { abortEarly: false });

    if (error) {
      context.response.status = 400;
      context.response.body = {
        errors: error.details.map((d) => d.message),
      };
    } else {
      await next();
    }
  };
Defining Types
Next, in the book.types.ts file, let’s define a Book type with an id, title, author and description.
export interface Book {
  id: string;
  title: string;
  author: string;
  description: string;
}
Configure Book Router
Next, let’s import the Oak Router, Book interface, createBookSchema and updateBookSchema into the book.routes.ts file:
import { Router } from "@oak/oak/router";
import type { Book } from "./book.types.ts";
import { createBookSchema, updateBookSchema, validate } from "./validation.ts";
Next, initialize the DenoKV database, create a bookRouter and set its prefix to “/books”:
const kv = await Deno.openKv();
const bookRouter = new Router();
bookRouter.prefix("/books");
Next, create a helper function to get a book by its ID:
async function getBookById(id: string) {
  const entry = await kv.get(["books", id]);
  return entry.value as Book | null;
}
In the snippet above, kv.get takes an array with two strings: one represents the namespace “books” and the other represents the key for the specific book to be retrieved.
Next, let’s define the route handler to get a book by ID:
bookRouter.get("/:id", async (context) => {
  try {
    const id = context.params.id;
    const book = await getBookById(id);

    if (book) {
      context.response.body = book;
    } else {
      context.response.status = 404;
      context.response.body = { message: "Book not found" };
    }
  } catch (error) {
    console.log(error);
    context.response.status = 500;
    context.response.body = { message: "Failed to retrieve book" };
  }
});
Next, let’s add a route handler to get all books:
bookRouter.get("/", async (context) => {
  try {
    const entries = kv.list({ prefix: ["books"] });
    const books: Book[] = [];

    for await (const entry of entries) {
      books.push(entry.value as Book);
    }

    context.response.body = books;
  } catch (error) {
    console.log(error);
    context.response.status = 500;
    context.response.body = { message: "Failed to fetch books" };
  }
});
In the snippet above, kv.list retrieves all key-value pairs that share a common prefix (namespace).
Next, add the route handler to create a new book:
bookRouter.post("/", validate(createBookSchema), async (context) => {
  try {
    const body = await context.request.body.json();

    const uuid = crypto.randomUUID();
    const newBook: Book = { id: uuid, ...body };

    await kv.set(["books", uuid], newBook);

    context.response.status = 201;
    context.response.body = { message: "Book added", book: newBook };
  } catch (error) {
    console.log(error);
    context.response.status = 500;
    context.response.body = { message: "Failed to add book" };
  }
});
In the snippet above, kv.set can be used to save a new key-value pair in the database. In this case, it takes two parameters: an array with two strings (the namespace “books” and the key uuid) and the value to be saved (newBook).
Next, let’s add the route handler to update a book by ID:
bookRouter.patch("/:id", validate(updateBookSchema), async (context) => {
  try {
    const id = context.params.id;
    const existingBook = await getBookById(id);

    if (!existingBook) {
      context.response.status = 404;
      context.response.body = { message: "Book not found" };
      return;
    }

    const body = await context.request.body.json();

    const updatedBook = { ...existingBook, ...body };

    await kv.set(["books", id], updatedBook);
    context.response.status = 200;
    context.response.body = { message: "Book updated", book: updatedBook };
  } catch (error) {
    console.log(error);
    context.response.status = 500;
    context.response.body = { message: "Failed to update book" };
  }
});
In the snippet above, kv.set can also be used to update the value of a key-value pair. In this case, it takes two arguments:
- An array with two strings: the namespace “books” and the key whose value will be the updated ID.
- The new value to be updated (
updatedBook).
Finally, let’s add the route handler to delete a book by ID and export bookRouter:
bookRouter.delete("/:id", async (context) => {
  try {
    const id = context.params.id;
    const book = await getBookById(id);

    if (!book) {
      context.response.status = 404;
      context.response.body = { message: "Book not found" };
      return;
    }

    await kv.delete(["books", id]);
    context.response.status = 200;
    context.response.body = { message: "Book deleted", book };
  } catch (error) {
    console.log(error);
    context.response.status = 500;
    context.response.body = { message: "Failed to delete book" };
  }
});

export { bookRouter };
In the snippet above, kv.delete is used to delete a given key-value pair.
Initialize Oak Application
Replace the code in your main.ts file with the following:
import { Application } from "@oak/oak/application";
import { bookRouter } from "./book.routes.ts";

const app = new Application();

app.use(bookRouter.routes());
app.use(bookRouter.allowedMethods());

app.listen({ port: 3000 });
Finally, we need to make a small change to our deno.json file to run our app. Add the --unstable-kv and --allow-net flags to dev task.
Aside from your version of Oak and the assert library, your deno.json should now look like this.
{
"tasks": {
"dev": "deno run --watch --unstable-kv --allow-net main.ts"
},
"imports": {
"@oak/oak": "jsr:@oak/oak@^17.1.3",
"@std/assert": "jsr:@std/assert@1"
}
}
We added the --stable-kv flag because DenoKV is still an unstable API. We also added the --allow-net flag to grant main.ts access to the internet.
With this in place, we can start our app by running the command deno run dev.
Conclusion
In this guide, we built a simple book API that shows how to define middleware in Oak, handle request validation, create route handlers and perform basic DB operations with DenoKV.
This content originally appeared on Telerik Blogs and was authored by Christian Nwamba
Christian Nwamba | Sciencx (2025-01-17T15:14:58+00:00) Building Restful APIs with Deno and Oak. Retrieved from https://www.scien.cx/2025/01/17/building-restful-apis-with-deno-and-oak/
Please log in to upload a file.
There are no updates yet.
Click the Upload button above to add an update.
