
This content originally appeared on Level Up Coding - Medium and was authored by Harish Siva Subramanian

Introduction: What is a CGAN?
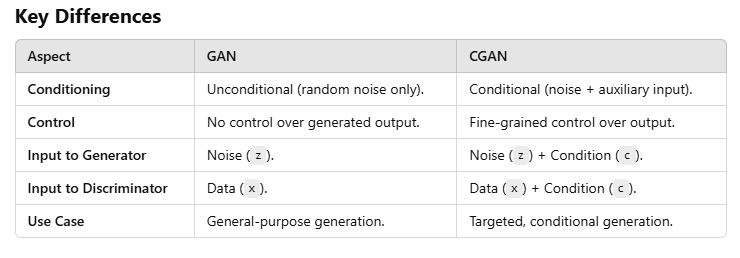
Conditional Generative Adversarial Networks (CGANs) are a powerful extension of Generative Adversarial Networks (GANs) that allow data generation conditioned on specific attributes or features. Unlike vanilla GANs, which generate data without constraints, CGANs incorporate additional information (e.g., class labels or feature vectors) as input to both the generator and discriminator.
Before diving into this article, it would be good to have a foundation of GAN. I have written an article on the full implementation of GAN here.
GAN (Generative Adversarial Network)
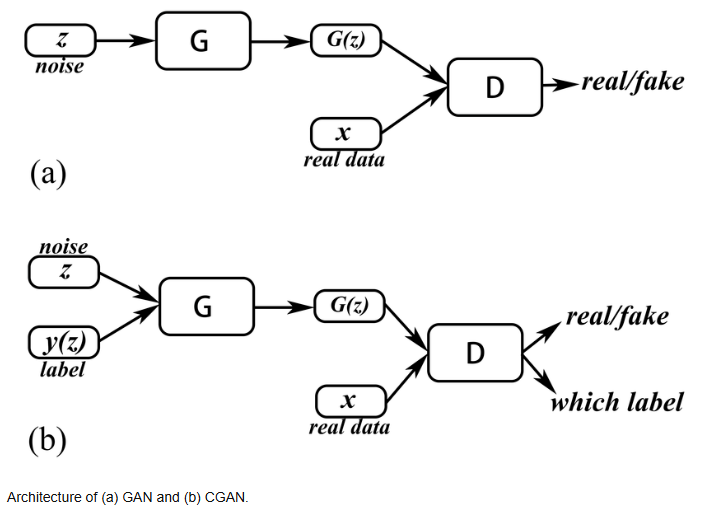
- Architecture:
- Generator: Generates data from a random latent space (noise).
- Discriminator: Distinguishes real data from fake (generated) data.
2. Input:
- Generator: Takes a random noise vector as input.
- Discriminator: Takes real or fake data as input.
3. Output:
- Generator: Produces synthetic data samples (e.g., images, text, etc.).
- Discriminator: Outputs a probability indicating whether the input data is real or fake.
4. Learning Objective:
- Generator: Maximizes the probability of the discriminator classifying generated data as real.
- Discriminator: Minimizes the error of distinguishing real from fake data.
5. Use Case:
General-purpose generation without constraints, such as:
- Generating realistic images.
- Creating synthetic datasets.
6. Limitation:
- No control over the characteristics of the generated data (e.g., generating a specific class of images).
CGAN (Conditional Generative Adversarial Network)
- Architecture:
- Similar to GAN, but both the Generator and Discriminator are conditioned on auxiliary information.
2. Input:
- Conditioned Input: An additional condition (e.g., class labels, attributes) is provided alongside:
- Generator: Takes both noise and the condition.
- Discriminator: Takes both data (real or fake) and the condition.
3. Output:
- Generator: Produces data that aligns with the provided condition (e.g., generating images of cats when conditioned on “cat”).
- Discriminator: Checks if the data matches the condition and determines real vs. fake.
4. Learning Objective:
- Same as GAN but with the condition used as an extra input to both models.
5. Use Case:
Controlled data generation, such as:
- Generating images of a specific class (e.g., dogs, cars).
- Data augmentation with specific attributes (e.g., generating samples of people with varying ages, genders).
- Creating synthetic tabular datasets conditioned on feature values.
Advantage: Enables control over the generation process, making it suitable for targeted applications.
Key Components of a CGAN
- Generator: Produces synthetic data by combining random noise and the conditional information.
- Discriminator: Distinguishes between real and synthetic data while also considering the conditional information.
- Loss Function:
- The generator aims to “fool” the discriminator by making synthetic data indistinguishable from real data.
- The discriminator learns to correctly classify real and synthetic samples.
Applications of CGANs
- Synthetic Tabular Data Generation: Useful for generating structured data for training machine learning models.
- Imbalanced Dataset Handling: Generate additional samples for minority classes.
- Data Privacy: Create synthetic datasets that mimic sensitive data while protecting privacy.
First things first, let’s implement a detailed walkthrough of CGAN with an example,
Step-by-Step Walkthrough
Dataset: The Adult Income Dataset
The Adult Income Dataset predicts whether a person’s income exceeds $50K/year based on attributes such as age, education, and hours worked per week. We’ll condition our CGAN on the education level to generate synthetic data specific to education categories.
First, let’s import the necessary libraries,
import pandas as pd
import torch
import torch.nn as nn
import torch.optim as optim
from sklearn.preprocessing import LabelEncoder, MinMaxScaler
from sklearn.model_selection import train_test_split
Next, we will import the dataset from the UCI website,
# Step 1: Load the dataset
url = "https://archive.ics.uci.edu/ml/machine-learning-databases/adult/adult.data"
columns = [
    "age", "workclass", "fnlwgt", "education", "education_num", "marital_status",
    "occupation", "relationship", "race", "sex", "capital_gain", "capital_loss",
    "hours_per_week", "native_country", "income"
]
data = pd.read_csv(url, names=columns, sep=",\s*", engine="python")
Next we will perform the data preprocessing,
1. Data Preprocessing
The dataset contains both numerical and categorical features. We:
- Select relevant columns: age, education, hours_per_week, and income.
- Encode categorical features (e.g., education and income) using LabelEncoder.
- Normalize numerical features (e.g., age and hours_per_week) to scale them between 0 and 1.
- Converting them as Tensors.
- Split the dataset into training and test sets.
# Select a subset of features
features = ["age", "education", "hours_per_week", "income"]
data = data[features]

# Encode categorical data
label_encoders = {}
for col in ["education", "income"]:
    le = LabelEncoder()
    data[col] = le.fit_transform(data[col])
    label_encoders[col] = le

# Normalize numerical features
scaler = MinMaxScaler()
data[["age", "hours_per_week"]] = scaler.fit_transform(data[["age", "hours_per_week"]])
conditions = data["education"].values
features = data.drop("education", axis=1).values

#Converting them as Tensors
conditions = torch.tensor(conditions, dtype=torch.float32).view(-1, 1)
features = torch.tensor(features, dtype=torch.float32)

train_features, test_features, train_conditions, test_conditions = train_test_split(
    features, conditions, test_size=0.2, random_state=42
)
2. CGAN Architecture
We will define the inputs to the CGAN model,
latent_dim = 5
condition_dim = 1
feature_dim = train_features.shape[1]
latent_dim:
- The dimensionality of the random noise vector, often referred to as the latent space.
- The generator takes this noise vector as input and transforms it into a sample resembling the real data distribution.
Example:
latent_dim = 5: The noise vector has 5 dimensions. This choice impacts the diversity and quality of the generated data.
condition_dim
- The dimensionality of the conditional information that is appended to the noise vector or real data.
- In CGANs, the generator and discriminator are conditioned on additional data (e.g., class labels, features).
Example:
In the code,condition_dim = 1: This is the dimension of the condition, which is a single value (e.g., the education level encoded as a numeric value)
Generator
The generator takes a combination of random noise and the conditional vector (education level) as input. It outputs synthetic tabular data matching the structure of the original data.
class Generator(nn.Module):
    def __init__(self, latent_dim, condition_dim, feature_dim):
        super(Generator, self).__init__()
        self.model = nn.Sequential(
            nn.Linear(latent_dim + condition_dim, 128),
            nn.ReLU(),
            nn.Linear(128, feature_dim),
        )

    def forward(self, noise, condition):
        x = torch.cat([noise, condition], dim=1)
        return self.model(x)
Discriminator
The discriminator receives both the data and the conditional vector (education level) to classify whether the data is real or synthetic.
class Discriminator(nn.Module):
    def __init__(self, feature_dim, condition_dim):
        super(Discriminator, self).__init__()
        self.model = nn.Sequential(
            nn.Linear(feature_dim + condition_dim, 128),
            nn.ReLU(),
            nn.Linear(128, 1),
            nn.Sigmoid(),
        )

    def forward(self, data, condition):
        x = torch.cat([data, condition], dim=1)
        return self.model(x)
3. Training the CGAN
The CGAN is trained using two loss functions:
- Discriminator Loss: Penalizes the model for incorrectly classifying real or fake data.
- Generator Loss: Penalizes the model if the discriminator can identify synthetic data as fake.
We train the generator and discriminator alternately for multiple epochs.
# Training loop
for epoch in range(epochs):
    for i in range(0, train_features.size(0), batch_size):
        # Prepare real and fake data
        real_data = train_features[i:i+batch_size]
        real_conditions = train_conditions[i:i+batch_size]
        batch_size_real = real_data.size(0)

        # Generate fake data
        noise = torch.randn(batch_size_real, latent_dim)
        fake_data = generator(noise, real_conditions)

        # Train Discriminator
        optimizer_D.zero_grad()
        real_labels = torch.ones(batch_size_real, 1)
        fake_labels = torch.zeros(batch_size_real, 1)
        loss_D_real = criterion(discriminator(real_data, real_conditions), real_labels)
        loss_D_fake = criterion(discriminator(fake_data.detach(), real_conditions), fake_labels)
        loss_D = loss_D_real + loss_D_fake
        loss_D.backward()
        optimizer_D.step()

        # Train Generator
        optimizer_G.zero_grad()
        loss_G = criterion(discriminator(fake_data, real_conditions), real_labels)
        loss_G.backward()
        optimizer_G.step()
4. Generating Synthetic Data
Once trained, the generator can produce synthetic data for specific conditions. For example, to generate data for individuals with a Bachelors education level:
# Generate synthetic data for a specific education level
education_level = 10 # Example: "Bachelors"
education_tensor = torch.tensor([[education_level]], dtype=torch.float32)
noise = torch.randn(10, latent_dim) # Generate 10 samples
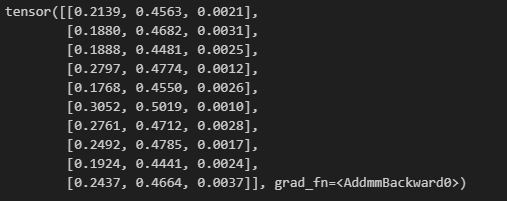
synthetic_data = generator(noise, education_tensor.repeat(10, 1))
print("Synthetic Data:", synthetic_data)
The generator will produce synthetic samples like the following:
Synthetic Data
- Use the synthetic data for downstream tasks such as training machine learning models.
- Evaluate how certain changes in conditions (e.g., education level) impact features like income or hours_per_week.
An important thing to note here is the synthetic data generated will correspond to the transformed data. We need to transform back to its original form to compare and analyze.
5. Retransformation of the data
# Decode the synthetic data back to its original format
synthetic_data_np = synthetic_data.detach().numpy()
# Create a NumPy array with dtype=object to hold string values for decoded data
synthetic_data_original = np.empty_like(synthetic_data_np, dtype=object)
# Inverse transform 'income' and assign it to the appropriate column
income_index = 2 # Index of 'income' in synthetic data
synthetic_income_values = synthetic_data_np[:, income_index].round().astype(int)
# Ensure the values are within the valid range of the LabelEncoder
synthetic_income_values = synthetic_income_values.clip(0, len(label_encoders["income"].classes_) - 1)
synthetic_data_original[:, income_index] = label_encoders["income"].inverse_transform(synthetic_income_values)
# Copy other columns without transformation
synthetic_data_original[:, :income_index] = synthetic_data_np[:, :income_index]
synthetic_data_original[:, income_index + 1:] = synthetic_data_np[:, income_index + 1:]
# Reverse the normalization of 'age' and 'hours_per_week'
synthetic_data_original[:, 0:2] = scaler.inverse_transform(synthetic_data_original[:, 0:2])
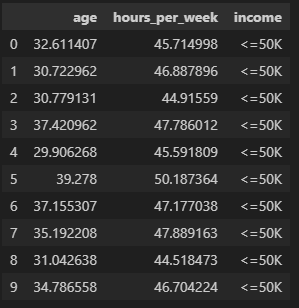
# Create a DataFrame for better readability and export to Excel
synthetic_df = pd.DataFrame(synthetic_data_original, columns=["age", "hours_per_week", "income"])
synthetic_df
Explanation:
- Reverse Normalization:
- The scaler.inverse_transform() function is applied to the first two columns (age and hours_per_week) to revert them back to their original scales.
2. Decode Categorical Values:
- The income column, which was label-encoded, is converted back to its original categories using the inverse_transform() method of the LabelEncoder. Since the synthetic values might be floating-point numbers, they are rounded and cast to integers before decoding.
Here is the full code of the entire python script,
import pandas as pd
import torch
import torch.nn as nn
import torch.optim as optim
from sklearn.preprocessing import LabelEncoder, MinMaxScaler
from sklearn.model_selection import train_test_split

# Step 1: Load the dataset
url = "https://archive.ics.uci.edu/ml/machine-learning-databases/adult/adult.data"
columns = [
    "age", "workclass", "fnlwgt", "education", "education_num", "marital_status",
    "occupation", "relationship", "race", "sex", "capital_gain", "capital_loss",
    "hours_per_week", "native_country", "income"
]
data = pd.read_csv(url, names=columns, sep=",\s*", engine="python")

# Step 2: Preprocessing
# Select a subset of features
features = ["age", "education", "hours_per_week", "income"]
data = data[features]

# Encode categorical data
label_encoders = {}
for col in ["education", "income"]:
    le = LabelEncoder()
    data[col] = le.fit_transform(data[col])
    label_encoders[col] = le

# Normalize numerical features
scaler = MinMaxScaler()
data[["age", "hours_per_week"]] = scaler.fit_transform(data[["age", "hours_per_week"]])

# Separate conditions and features
conditions = data["education"].values
features = data.drop("education", axis=1).values

# Convert to tensors
conditions = torch.tensor(conditions, dtype=torch.float32).view(-1, 1)
features = torch.tensor(features, dtype=torch.float32)

# Split into train/test
train_features, test_features, train_conditions, test_conditions = train_test_split(
    features, conditions, test_size=0.2, random_state=42
)

# Step 3: Define the CGAN architecture
latent_dim = 5
condition_dim = 1
feature_dim = train_features.shape[1]

class Generator(nn.Module):
    def __init__(self, latent_dim, condition_dim, feature_dim):
        super(Generator, self).__init__()
        self.model = nn.Sequential(
            nn.Linear(latent_dim + condition_dim, 128),
            nn.ReLU(),
            nn.Linear(128, feature_dim),
        )

    def forward(self, noise, condition):
        x = torch.cat([noise, condition], dim=1)
        return self.model(x)

class Discriminator(nn.Module):
    def __init__(self, feature_dim, condition_dim):
        super(Discriminator, self).__init__()
        self.model = nn.Sequential(
            nn.Linear(feature_dim + condition_dim, 128),
            nn.ReLU(),
            nn.Linear(128, 1),
            nn.Sigmoid(),
        )

    def forward(self, data, condition):
        x = torch.cat([data, condition], dim=1)
        return self.model(x)

# Initialize models
generator = Generator(latent_dim, condition_dim, feature_dim)
discriminator = Discriminator(feature_dim, condition_dim)

# Loss and optimizers
criterion = nn.BCELoss()
optimizer_G = optim.Adam(generator.parameters(), lr=0.0002)
optimizer_D = optim.Adam(discriminator.parameters(), lr=0.0002)

# Training
epochs = 100
batch_size = 64
for epoch in range(epochs):
    for i in range(0, train_features.size(0), batch_size):
        # Prepare batches
        real_data = train_features[i:i+batch_size]
        real_conditions = train_conditions[i:i+batch_size]
        batch_size_real = real_data.size(0)

        # Generate fake data
        noise = torch.randn(batch_size_real, latent_dim)
        fake_data = generator(noise, real_conditions)

        # Train Discriminator
        optimizer_D.zero_grad()
        real_labels = torch.ones(batch_size_real, 1)
        fake_labels = torch.zeros(batch_size_real, 1)

        output_real = discriminator(real_data, real_conditions)
        output_fake = discriminator(fake_data.detach(), real_conditions)

        loss_D_real = criterion(output_real, real_labels)
        loss_D_fake = criterion(output_fake, fake_labels)
        loss_D = loss_D_real + loss_D_fake
        loss_D.backward()
        optimizer_D.step()

        # Train Generator
        optimizer_G.zero_grad()
        output_fake = discriminator(fake_data, real_conditions)
        loss_G = criterion(output_fake, real_labels)
        loss_G.backward()
        optimizer_G.step()

    print(f"Epoch {epoch+1}/{epochs}, Loss D: {loss_D.item()}, Loss G: {loss_G.item()}")

# Step 4: Generate synthetic data
education_level = 10  # For example, "Bachelors" (based on the LabelEncoder mapping)
education_tensor = torch.tensor([[education_level]], dtype=torch.float32)
noise = torch.randn(10, latent_dim)  # Generate 10 samples
synthetic_data = generator(noise, education_tensor.repeat(10, 1))
print("Synthetic Data:", synthetic_data)
Conclusion
This hands-on guide demonstrates how CGANs can generate realistic tabular data conditioned on specific attributes, making them invaluable for scenarios like data augmentation and privacy-preserving synthetic data generation. By leveraging real-world datasets and a practical implementation in PyTorch, you can now explore new frontiers in synthetic data generation.
If you like the article and would like to support me, make sure to:
- 👏 Clap for the story (50 claps) to help this article be featured
- Follow me on Medium
- 📰 View more content on my medium profile
- 🔔 Follow Me: LinkedIn | GitHub
Unleashing the Power of Conditional GANs: A Hands-On Guide to Generating Realistic Tabular Data was originally published in Level Up Coding on Medium, where people are continuing the conversation by highlighting and responding to this story.
This content originally appeared on Level Up Coding - Medium and was authored by Harish Siva Subramanian
Harish Siva Subramanian | Sciencx (2025-01-24T01:57:44+00:00) Unleashing the Power of Conditional GANs: A Hands-On Guide to Generating Realistic Tabular Data. Retrieved from https://www.scien.cx/2025/01/24/unleashing-the-power-of-conditional-gans-a-hands-on-guide-to-generating-realistic-tabular-data/
Please log in to upload a file.
There are no updates yet.
Click the Upload button above to add an update.