
This content originally appeared on DEV Community and was authored by Vivek Yadav
What is Ollama
Ollama is a powerful, open-source tool that allows you to run large language models (LLMs) entirely on your local machine, without relying on cloud-based services. It provides an easy way to download, manage, and run AI models with optimized performance, leveraging GPU acceleration when available.
Key Features:
✅ Run LLMs Locally – No internet required after downloading models.
✅ Easy Model Management – Download, switch, and update models effortlessly.
✅ Optimized for Performance – Uses GPU acceleration for faster inference.
✅ Private & Secure – No data leaves your machine.
✅ Custom Model Support – Modify and fine-tune models for specific tasks.
✅ Simple API & CLI – Interact with models programmatically or via command line.
How It Works:
- Install Ollama – A simple install command sets it up.
- Pull a Model – Example: ollama pull mistral to download Mistral-7B.
- Run a Model – Example: ollama run mistral to start interacting.
- Integrate with Code – Use the API for automation and app development.
Create a API microservice to interact with Ollama models
We'll use FastAPI to create a microservice that interacts with Ollama models.
FastAPI Code:
from fastapi import FastAPI, HTTPException
from pydantic import BaseModel
import json
import httpx
import asyncio

app = FastAPI()

# Input Schema
class RequestModel(BaseModel):
    prompt: str
    model_name: str

# Response Schema
class ResponseModel(BaseModel):
    response: str
    request: str

async def get_response(prompt: str, model_name: str):
    url = "http://localhost:11434/api/generate"
    headers = {"Content-Type": "application/json"}
    data = {"model": model_name, "prompt": prompt}

    try:
        async with httpx.AsyncClient() as client:
            response = await client.post(url, headers=headers, json=data)

            if response.status_code != 200:
                raise HTTPException(status_code=response.status_code, detail=f"HTTP error! Status: {response.status_code}")

            combined_response = ""

            async for line in response.aiter_lines():
                line = line.strip()
                if not line:
                    continue
                try:
                    parsed_response = json.loads(line)
                    if "response" in parsed_response:
                        response_text = parsed_response["response"]
                        combined_response += response_text
                        if parsed_response.get("done", False):
                            break
                except json.JSONDecodeError:
                    print("Failed to parse line as JSON:", line)
                    continue
            return combined_response
    except Exception as e:
        print("Error fetching response:", e)
        raise HTTPException(status_code=500, detail="Error fetching response")

@app.post("/generate", response_model=ResponseModel)
async def generate_text(request: RequestModel):
    response_text = await get_response(request.prompt, request.model_name)
    return ResponseModel(response=response_text, request=request.prompt)

if __name__ == "__main__":
    import uvicorn
    uvicorn.run(app, host="0.0.0.0", port=8000)
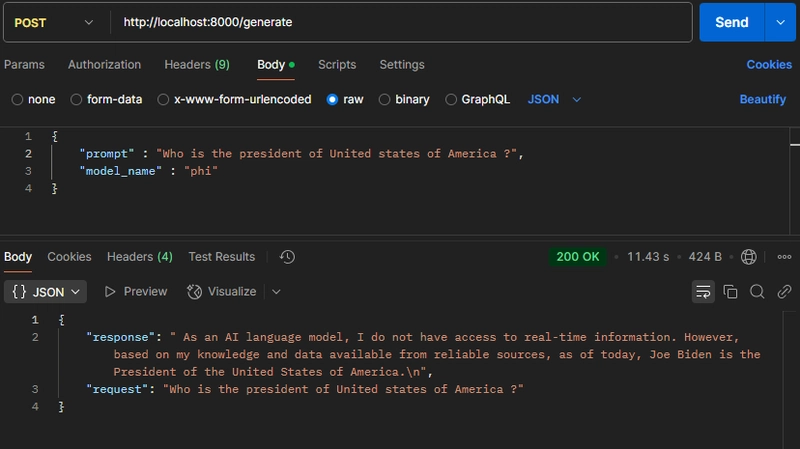
Start the API microservice
uvicorn dummy:app --host 0.0.0.0 --port 8000
Output in Postman:
Create a react native chat bot to call API microservice to process user query
Now, let's build a React Native chatbot that will communicate with the API microservice.
App.js (Main Chatbot UI)
import React, { useState, useEffect, useRef } from 'react';
import { StyleSheet, Text, View, TouchableOpacity, StatusBar, AppRegistry } from 'react-native';
import ChatbotUI from './components/ChatbotUI';
import { FontAwesomeIcon } from '@fortawesome/react-native-fontawesome';
import { faWindowMinimize, faCircleXmark } from '@fortawesome/free-solid-svg-icons';

const App = () => {

  const [isChatVisible, setIsChatVisible] = useState(false);

  const toggleChatWindow = () => {
    setIsChatVisible(!isChatVisible);
  };

  return (
    <View style={styles.container}>
      <Text style={{ fontWeight: 'bold', fontSize: 30 }}>Welcome to ChatBot using free models</Text>
      {isChatVisible && (
        <>
          <View style={styles.chatWindow}>
            <View style={styles.chatHeader}>
              <Text style={styles.chatTitle}>Chat with Us</Text>
              <View style={styles.chatHeaderActions}>
                <TouchableOpacity onPress={toggleChatWindow} style={styles.minimizeButton}>
                  <FontAwesomeIcon icon={faWindowMinimize} size={30} color="black" />
                </TouchableOpacity>
                <TouchableOpacity onPress={toggleChatWindow} style={styles.closeButton}>
                  <FontAwesomeIcon icon={faCircleXmark} size={30} color="black" />
                </TouchableOpacity>
              </View>
            </View>
            <ChatbotUI />
          </View>
        </>
      )}
      <TouchableOpacity
        style={styles.chatButton}
        onPress={toggleChatWindow}
      >
        <Text style={styles.chatIcon}>💬</Text>
      </TouchableOpacity>
    </View>
  );
};

const styles = StyleSheet.create({
  chatButton: {
    position: 'fixed',
    bottom: 20,
    right: 20,
    backgroundColor: '#0078d4',
    padding: 10,
    borderRadius: 50,
    justifyContent: 'center',
    alignItems: 'center',
  },
  chatIcon: {
    color: '#fff',
    fontSize: 24,
  },
  container: {
    flex: 1,
    justifyContent: 'center',
    alignItems: 'center',
    backgroundColor: '#1492c1', // Light background for the entire app
  },
  chatWindow: {
    position: 'fixed',
    bottom: 60,
    right: 60,
    height: 500,
    width: 350,
    backgroundColor: '#dae7ec', // Chat window color
    borderRadius: 15,
    padding: 10,
    shadowColor: '#000',
    shadowOffset: { width: 0, height: -2 },
    shadowOpacity: 0.2,
    shadowRadius: 5,
  },
  chatHeader: {
    flexDirection: 'row',
    alignItems: 'center',
    justifyContent: 'space-between', // Ensures space between title and actions
    padding: 5,
    backgroundColor: '#dae7ec', // Optional styling
  },
  chatTitle: {
    fontSize: 18,
    fontWeight: 'bold',
    flex: 1, // Ensures the title takes up remaining space
  },
  chatHeaderActions: {
    flexDirection: 'row',
    alignItems: 'center',
  },
  minimizeButton: {
    marginRight: 20, // Adds spacing between minimize and close buttons
    marginBottom: 20
  },
  closeButton: {
    // Additional button styling if needed
  }
});

export default App;
ChatbotUI.js (Chat Interface)/u>
import React, { useState, useEffect, useRef } from 'react';
import {
    StyleSheet,
    View,
    Text,
    TextInput,
    ScrollView,
    KeyboardAvoidingView,
    Platform,
    Keyboard,
    TouchableOpacity,
} from 'react-native';

const ChatbotUI = () => {
    const [messages, setMessages] = useState([]);
    const [inputMessage, setInputMessage] = useState('');
    const scrollViewRef = useRef();
    const inputRef = useRef(null);


    async function getModelResponse(prompt) {
        try {
            const response = await fetch("http://localhost:11434/api/generate", {
                method: "POST",
                headers: { "Content-Type": "application/json" },
                body: JSON.stringify({ model: "phi", prompt: prompt })
            });

            // Check if the response is ok (status code 200-299)
            if (!response.ok) {
                throw new Error(`HTTP error! Status: ${response.status}`);
            }

            let combinedResponse = "";  // Initialize an empty string to store the combined response

            const reader = response.body.getReader();
            const decoder = new TextDecoder();
            let done = false;

            while (!done) {
                const { value, done: readerDone } = await reader.read();
                done = readerDone;
                const decodedChunk = decoder.decode(value, { stream: true });

                try {
                    // Try to parse the decoded chunk as JSON
                    const parsedResponse = JSON.parse(decodedChunk);
                    if (parsedResponse && parsedResponse.response) {
                        // Check if the response contains a valid 'response' field
                        let cleanedResponse = parsedResponse.response;

                        // Remove 'User' wherever it appears in the response, ensuring spaces are preserved
                        cleanedResponse = cleanedResponse.replace(/\bUser\b/g, '');

                        // If valid, append the cleaned response incrementally
                        combinedResponse += cleanedResponse;

                        // Update the message UI progressively with each chunk
                        setMessages((prevMessages) => {
                            const botMessage = {
                                id: Date.now(),
                                text: combinedResponse.length > 0 ? combinedResponse : "Please try again",
                                sender: 'bot',
                            };
                            return [...prevMessages.slice(0, prevMessages.length - 1), botMessage]; // Update the last bot message
                        });
                    }
                } catch (error) {
                    // If parsing fails (for example, the chunk is not valid JSON), log it and continue
                    console.warn("Failed to parse chunk as JSON:", decodedChunk);
                }

            }
        } catch (error) {
            console.error("Error fetching Falcon response:", error);
        }
    }

    const handleSendMessage = async () => {
        if (inputMessage.trim() === '') return;

        const userQuery = {
            id: Date.now(),
            text: inputMessage,
            sender: 'user',
        };

        try {
            setMessages((prevMessages) => [...prevMessages, userQuery]);

            setInputMessage('');

            // Initialize a temporary bot message (empty text) for progressive rendering
            setMessages((prevMessages) => [
                ...prevMessages,
                { id: Date.now() + 1, text: '', sender: 'bot' }
            ]);

            // Start fetching the response, and update as chunks are received
            await getModelResponse(inputMessage);
        } catch (error) {
            console.error('Error sending message:', error);
        }

        Keyboard.dismiss();

        if (inputRef.current) {
            inputRef.current.focus();
        }
    };

    const renderMessage = (item) => {
        return (
            <View
                key={item.id}
                style={[
                    styles.messageContainer,
                    item.sender === 'user' ? styles.userMessage : styles.botMessage,
                ]}
            >
                <Text>{item.text}</Text>
            </View>
        );
    };

    const handleKeyPress = (e) => {
        if (e.nativeEvent.key === 'Enter') {
            handleSendMessage();
        }
    };

    return (
        <>
            <KeyboardAvoidingView
                behavior={Platform.OS === 'ios' ? 'padding' : 'height'}
                style={styles.chatContainer}
            >
                <ScrollView
                    ref={scrollViewRef}
                    onContentSizeChange={() =>
                        scrollViewRef.current.scrollToEnd({ animated: true })
                    }
                    style={styles.messagesContainer}
                >
                    {messages.map(renderMessage)}
                </ScrollView>

                <View style={styles.inputContainer}>
                    <TextInput
                        ref={inputRef}
                        style={styles.input}
                        value={inputMessage}
                        onChangeText={setInputMessage}
                        onKeyPress={handleKeyPress}
                        placeholder="Type your message..."
                        multiline={true}
                        numberOfLines={4}
                        textAlignVertical="auto"
                        placeholderTextColor="#aaa"
                    />
                    <TouchableOpacity onPress={handleSendMessage}>
                        <Text style={styles.sendButton}>Send</Text>
                    </TouchableOpacity>
                </View>
            </KeyboardAvoidingView>
        </>
    );
};

const styles = StyleSheet.create({
    chatContainer: {
        flex: 1,
    },
    messagesContainer: {
        flex: 1,
    },
    messageContainer: {
        maxWidth: '80%',
        padding: 10,
        marginBottom: 10,
        borderRadius: 10,
        borderWidth: 1,
        borderColor: 'black',
        backgroundColor: 'white',
        shadowColor: 'black',
        shadowOffset: { width: 0, height: 2 },
        shadowOpacity: 0.25,
        shadowRadius: 3.84,
        elevation: 5,
    },
    userMessage: {
        backgroundColor: '#30b5e7',
        alignSelf: 'flex-start',
    },
    botMessage: {
        backgroundColor: '#73c4e2',
        alignSelf: 'flex-end',
    },
    inputContainer: {
        flexDirection: 'row',
        alignItems: 'flex-end',
    },
    input: {
        flex: 1,
        padding: 10,
        borderRadius: 20,
        backgroundColor: '#fff',
        marginRight: 10,
    },
    sendButton: {
        backgroundColor: '#0078d4',
        color: '#fff',
        paddingHorizontal: 15,
        paddingVertical: 8,
        borderRadius: 10,
    },
});

export default ChatbotUI;
Start the react native application
# npm install
# npm run web
Output :
Output can be watched at Video
Conclusion
Building a chatbot using Ollama models provides a powerful and private AI experience by running large language models locally. By integrating Ollama with a FastAPI microservice and a React Native frontend, we created a seamless, interactive chatbot that processes user queries efficiently.
This approach offers:
✅ Full control over AI models without cloud dependencies.
✅ Optimized performance using GPU acceleration when available.
✅ Enhanced privacy, as no data is sent to external servers.
Whether you're developing an AI assistant, a customer support bot, or experimenting with LLMs, this setup provides a strong foundation for further improvements and customization. 🚀
This content originally appeared on DEV Community and was authored by Vivek Yadav
Vivek Yadav | Sciencx (2025-02-08T23:47:32+00:00) ChatBot application Using models available in Ollama. Retrieved from https://www.scien.cx/2025/02/08/chatbot-application-using-models-available-in-ollama/
Please log in to upload a file.
There are no updates yet.
Click the Upload button above to add an update.