
This content originally appeared on Level Up Coding - Medium and was authored by Shashank Mayya

…and how to set up a long-lived token server for Smartthings
The Problem
The change introduced by SmartThings for Personal Access Tokens (PATs) is that newly generated PATs are only valid for 24 hours from the creation date. Personal Access Tokens (PATs) provide a way to interact with the SmartThings API for non-SmartApp purposes. These tokens, created and managed on the personal access tokens page, must have explicitly defined permissions and expire within 24 hours unless created before December 30, 2024.
SmartThings recommends using an authorization_code OAuth flow instead of generating new PATs for continuous access.
However, at this time it does not support the client_credentials grant type which precludes usage in non-smartapp or external standalone machine scripts.
A Solution
Since the PAT capabilities are now limited, we will need to use Oauth2 here.
The high-level steps for this process are.
- Create a Smartthings app to obtain the Oauth client_id and client_secret (One-time setup)
- Use the Oauth2 authorization_code flow to get an “Authorization Code” (One-time setup)
- Use this Authorization Code to obtain an access_token and refresh_token (One-time setup)
- Create a simple script in Python to use this generated refresh_token to “seed” the auto-refresh process for the tokens in (potentially) perpetuity.
- The Python script will spin a server that can used in your applications and scripts as a direct replacement for the previous PA Token.
Below is a primer diagram on how the authorization_code Oauth grant_type flow works

STEP 1: Setting up a Smartapp using the SmartThings CLI
To install the SmartThings Command Line Interface (CLI), follow these steps based on your operating system:
macOS: Use Homebrew by running the command: brew install smartthingscommunity/smartthings/smartthings.
Windows: Download the smartthings.msi installer from the latest release
from the link → https://github.com/SmartThingsCommunity/smartthings-cli/releases and run it. If a “Windows protected your PC” warning appears, click “More info” and then “Run anyway” to proceed with the installation.
Linux and other systems: Download the appropriate zipped binary from the latest release, extract it, and install it on your system path. Ensure it is executable, though administrator privileges are not required.
Run smartthings apps:create from the terminal

You will be guided by the app setup instructions.
Note: You can leave the Target URL empty but ensure you enter https://httpbin.org/get for the Redirect URI
Once the app is created, it should look something like the one below.
Make a note of the OAuth Client ID and OAuth Client Secret values. You will need it later.
? Select Scopes. r:devices:*, w:devices:*, x:devices:*
? Add or edit Redirect URIs. Add Redirect URI.
? Redirect URI (? for help) https://httpbin.org/get
? Add or edit Redirect URIs. Finish editing Redirect URIs.
? Choose an action. Finish and create OAuth-In SmartApp.
Basic App Data:
────────────────────────────────────────────────────────────────
 Display Name     my_app
 App Id           941a0a50-7aca-47c8-b003-1c6b7731efad
 App Name         my_app-61981ee0-096d-35d0-a20a-e557949a03be
 Description      app for me
 Single Instance  true
 Classifications  CONNECTED_SERVICE
 App Type         API_ONLY
────────────────────────────────────────────────────────────────


OAuth Info (you will not be able to see the OAuth info again so please save it now!):
───────────────────────────────────────────────────────────
 OAuth Client Id      ee4ted7da-ab3a-4576-9f53-c4f772345868
 OAuth Client Secret  2att0f69-e260-24b2-93fc-993257fd52br
───────────────────────────────────────────────────────────
STEP 2: Generating the temporary AUTH CODE
Construct a URL like the below example using the client id and redirect uri that you used in Step 1.
Paste this URL into the browser to get a temporary Authorization Code
Example:-
https://api.smartthings.com/oauth/authorize?client_id=ee4ted7da-ab3a-4576-9f53-c4f772345868&response_type=code&redirect_uri=https://httpbin.org/get&scope=r:devices:*+w:devices:*+x:devices:*


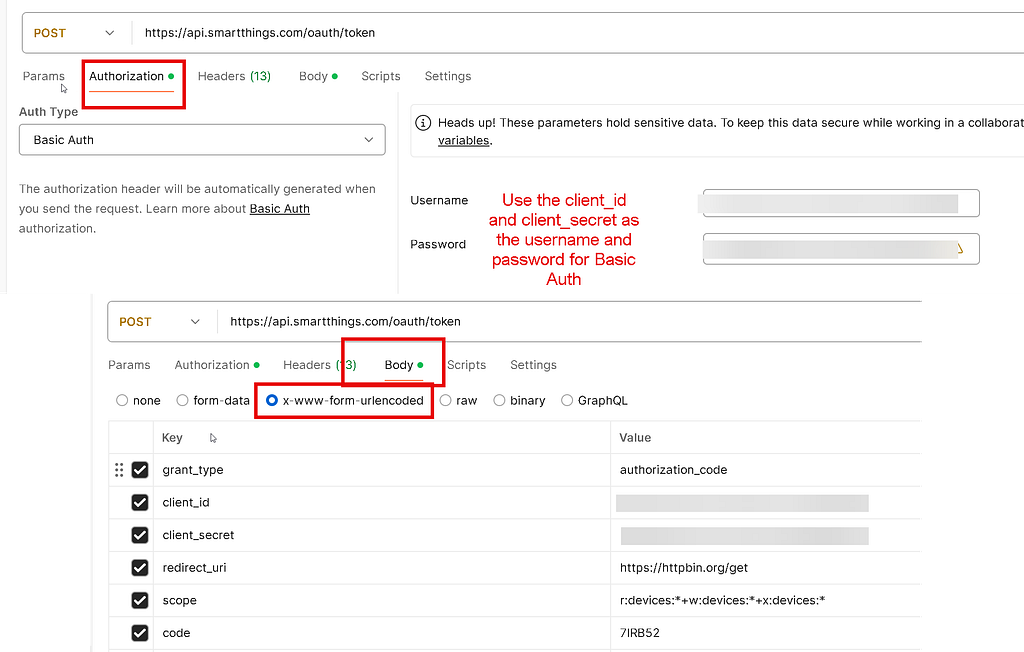
STEP 3: Generating the Seed Access and Refresh Tokens
Now that we have an Auth Code, we can use POSTMAN or any HTTP client like Curl to generate the Access and Refresh tokens which will be used as seed values in our Script.
A POST request to https://api.smartthings.com/oauth/token
# cURL version

curl --location 'https://api.smartthings.com/oauth/token' \
--header 'Content-Type: application/x-www-form-urlencoded' \
--header 'Authorization: Basic ••••••' \
--data-urlencode 'grant_type=authorization_code' \
--data-urlencode 'client_id=ee4ted7da-ab3a-4576-9f53-c4f772345868' \
--data-urlencode 'client_secret=2att0f69-e260-24b2-93fc-993257fd52br' \
--data-urlencode 'redirect_uri=https://httpbin.org/get' \
--data-urlencode 'scope=r:devices:*+w:devices:*+x:devices:*' \
--data-urlencode 'code=7IRB52'
The response should have the required access and refresh tokens
{
    "access_token": "07961fa6-73a5-408e-85db-6c93f7e9eaf1",
    "token_type": "bearer",
    "refresh_token": "25b90b60-1b57-4e14-92k3-7b8ey8er9d8f",
    "expires_in": 85025,
    "scope": "x:devices:* r:devices:* w:devices:*",
    "access_tier": 0,
    "installed_app_id": "341a0a50-7aca-47c8-b003-1c6b7731efad"
}
The access_token is valid for 24 hours
The refresh_token is valid for 30 Days
The refresh token can be renewed for another 30 Days using the Refresh Token grant type which is used in Step 4 below.
We will use the refresh_token above as the “seed” token in Step 4 below.
STEP 4: Python Script to Auto Refresh and Serve Tokens
Here is the quick POSTMAN and cURL checks for this refresh_token grant type.
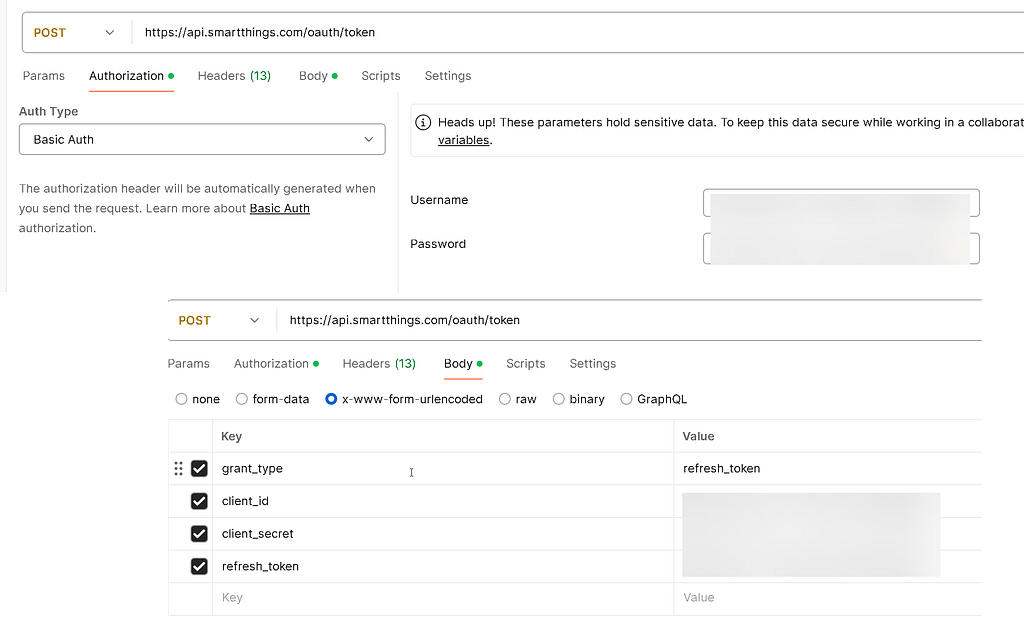
# curl version

curl --location 'https://api.smartthings.com/oauth/token' \
--header 'Content-Type: application/x-www-form-urlencoded' \
--header 'Authorization: Basic ••••••' \
--data-urlencode 'grant_type=refresh_token' \
--data-urlencode 'client_id=ee4ted7da-ab3a-4576-9f53-c4f772345868' \
--data-urlencode 'client_secret=2att0f69-e260-24b2-93fc-993257fd52br' \
--data-urlencode 'refresh_token=af8ce0b4-572c-2fbe-9d1f-b3e035efd568'
I wrote a simple Python script below to set up the Auto Refresh of the access and refresh and also spin up a simple HTTP server.
Any client can now connect to the HTTP endpoint and always get a valid token.
The script will serve the tokens at the below endpoint
http(s)://<server_host>:<server_port>/token_info.json
This script is self-contained and to have it constantly running 24x7, you could use multiple options. For example: The script can be used inside a Docker container or on Kubernetes.
Hint:- Use any official Python Docker image from the docker hub and override the start CMD like
python -u smartthings_token_server.py
You could also add features like Authentication to the standard Python server or use Ingresses to control Authentication if using Kubernetes.
STEP 5: Using this Token Server
Here is an example of a POSTMAN client call to fetch a fresh access_token from our running server/script.

CONCLUSION
With this approach, we can continue to get the same flexibility as PATs in standalone / non-smart app integrations using Oauth2.
SmartThings API: Taming the OAuth 2.0 Beast was originally published in Level Up Coding on Medium, where people are continuing the conversation by highlighting and responding to this story.
This content originally appeared on Level Up Coding - Medium and was authored by Shashank Mayya
Shashank Mayya | Sciencx (2025-03-07T01:03:20+00:00) SmartThings API: Taming the OAuth 2.0 Beast. Retrieved from https://www.scien.cx/2025/03/07/smartthings-api-taming-the-oauth-2-0-beast/
Please log in to upload a file.
There are no updates yet.
Click the Upload button above to add an update.