This content originally appeared on DEV Community and was authored by Opeyemi Stephen
My previous post was supposed to be a rant...a way of releasing my pent-up anger and frustration at the system and the very scarce resources it was swallowing, with little returns and immense presure all because I wanted to make a difference. The reception and similar experiences I read in the comments section is a source of motivation I will never take for granted.
I am working with a few people to build solutions which would help the average developer and while that would take some level of planning, implementation and even donations, I thought of other non-monetary(if there's a word like that) ways of helping newbies.
So...lots of research, a bout of serious typhoid fever, speaking with awesome developers including Jay, Trevor and Sebastian and my laptop getting spoilt by a power surge on the very day I wanted to POST this later, I was able to come up with this...now ask yourself...
HOW WOULD YOU LIKE TO BE ABLE TO USE FREECODECAMP AND ITS AMAZING LEARNING RESOURCES AND CERTIFICATIONS WITHOUT THE INTERNET?
Awesome yeah? Check out FreeCodeCamp here Link
You're probably thinking this is hard and it might take a long time to set up, well it isn't. You should be done in an hour or less.
Preliminary Requirements
First you need to have a working computer/laptop.(Thankfully I was able to get this post compiled before mine got spoilt).
You would also need initial internet connectivity.(This is so you can download the necessary FreeCodeCamp files from GitHub).
Lastly, you would need a resilience like no other. This is because it is one thing to download and set this up and it's a whole different thing to actually PUT THESE RESOURCES TO USE AND LEARN. Do not procastinate, start learning!
First Step: Setting Up Your Database On Your Local Machine
We will be making use of a document-oriented database called MongoDB. To learn more about MongoDB and why it is used, i have a helpful article here Link
Let's go on and install MongoDB. You can find the necessary documentation to install on all supported Operating Systems here
I will be using Windows 10 so kindly follow the steps below if you use windows 10 as well.
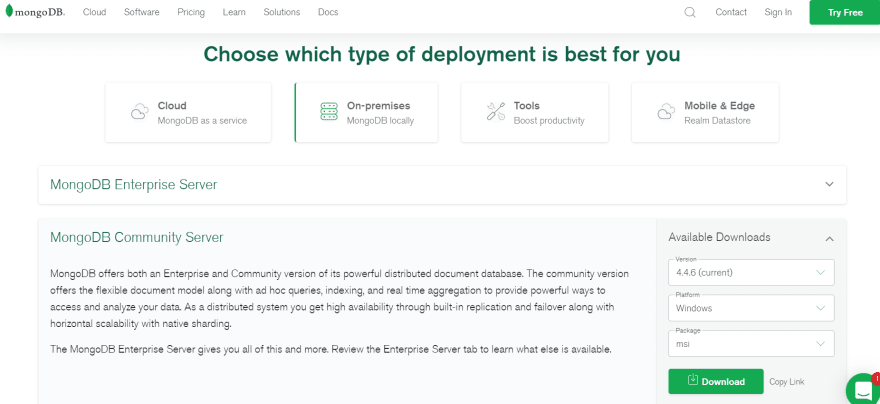
- Download the latest version(mine was 4.4.6) at Link (make sure to select "On-Premises MongooDB locally" and on the right-hand side select "msi" as Package. Learn more about "msi" here Link
After the Download is complete, navigate to your file location and install.
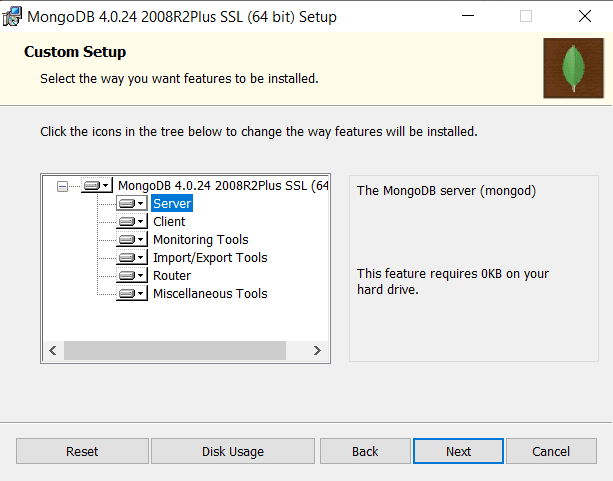
When you get to the prompt that says "Custom SetUp", make sure all features are selected and the "Server" is set to "install on the local hard drive, C:".
Click "Next"
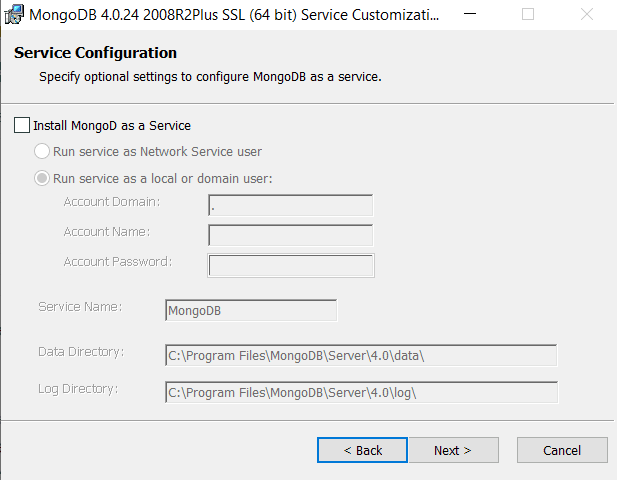
You should be in "Service Configuration" now. Unselect the checkbox which says "Install MongoDB as a service". We are doing this so MongoDB doesn't use up all your computer's memory and we will only run it before starting up FreeCodeCamp. You are not Google or Netflix my friend, winks. Click "Next".
- Keep Clicking "Next" to complete the rest of the installation.
Second Step: Setting Up Node.js and NPM
Node.js is an open-source, cross-platform, back-end JavaScript runtime environment that runs on the V8 engine and executes JavaScript code outside a web browser.
NPM stands for Node Package Manager and is always installed with Node.js
To learn more about NPM, you can check this resource Link
To learn more about node.js, you can check this resource Link
Download and install node.js by clicking Link
Make sure to download the recommended msi version (14.17.0 LTS).
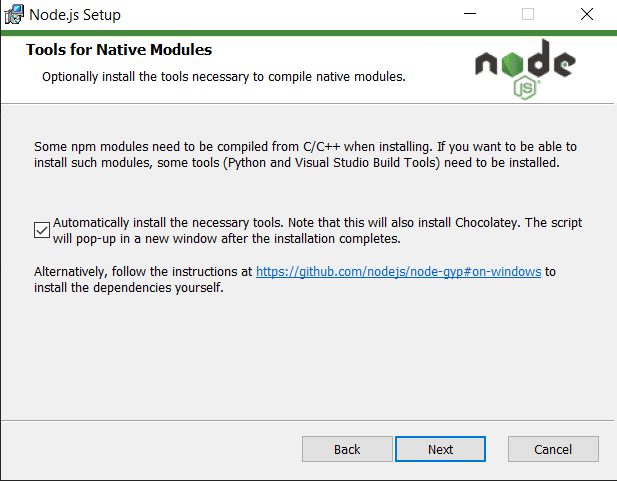
When this prompt below comes up, select the checkbox
This will enable your system to also install additional packages and dependencies when you need them and build stuff on FreeCodeCamp as well. Chocolately, Python and other packages will also be installed with this step
Third Step: Cloning FreeCodeCamp From GitHub
First thing to do is to install Git using your computer's package manager.
You can type "choco install git"
If you still do not know how, you can install normally here Link
- Open a new folder titled "FreeCodeCamp" on your computer.
Then Open your terminal or Windows Powershell and follow the following sub-steps;
Using
"cd"and"ls"commands, navigate to the FreeCodeCamp folder(directory) which you opened in 1.Clone FreeCodeCamp and its necessary accompanying files using git by typing the following command in your Powershell or Terminal
git clone --depth=1 https://github.com/freeCodeCamp/freeCodeCamp
Fourth Step: SetUp and Install FreeCodeCamp On Your Local Machine
Use "cd" to navigate into the FreeCodeCamp directory you just cloned and then type the command below to begin installation(might take a while but you've already come this far so be patient my friend)
"npm ci"
DO NOT CLOSE THIS POWERSHELL/TERMINAL WINDOW YET
Fifth Step: Starting Up The MongoDB Database
You will need to always start the service in 2 below before you can run FreeCodeCamp everytime so you can do well to note it down somewhere.
Open up a new window in your terminal or Powershell while waiting for the installation in the Fourth Step above.
You can start up the MongoDB database by following the steps below:
Windows Users: Navigate as seen below and then type in the command
"C:\Program Files\MongoDB\Server\3.6\bin\mongod.exe" --dbpath=/path/to/freeCodeCamp
Linux Users: Navigate as seen below and then type in the command
mongod --dbpath=/path/to/freeCodeCamp
DO NOT CLOSE THIS POWERSHELL/TERMINAL WINDOW YET
Sixth Step: Seeding the MongoDB Database
Remember the installation in Step 4? It should be completed by now.
Go back to that Powershell or Terminal window and then type in the command below just once;
"npm run seed"
Note: In subsequent times, you do not have to run the above command again because your would have already been initialized.
7th Step: Start FreeCodeCamp
Go back to the Powershell terminal in the Sixth Step.
Run this command to start FreeCodeCamp
"npm run develop"
It might take an awful lot of time but as long as you have a stable internet connection, trust the process and let the building sun its full course. it took about 8 minutes on my end.
How do i know it's done? You should see this line
success Building development bundle - 497.330s
Step 8:
Open up your preferred browser and type in [Link}(http://localhost:8000)
Click "Get Started Now, It's Free!"
You should see " Welcome back, development user".
Congratulations, you can access all the courses now without the internet. Your progress will be saved in the MongoDB commands run in Step 5.
Question: What I want to start FreeCodeCamp later, do i need to go through all the steps again?
Answer: Of course not, next time you can do so without the internet by following the instructions on Step 5 and 8 in two different terminals/powershells.
May The Stars Align For You Fellow Dev....Major shoutouts to every resource I previously read and a few blogs that already did something like this. I hope this helps us all.
This content originally appeared on DEV Community and was authored by Opeyemi Stephen
Opeyemi Stephen | Sciencx (2021-06-03T18:19:37+00:00) Learn to code using FreeCodeCamp Especially If You Do Not Have 24/7 Internet Access. Retrieved from https://www.scien.cx/2021/06/03/learn-to-code-using-freecodecamp-especially-if-you-do-not-have-24-7-internet-access/
Please log in to upload a file.
There are no updates yet.
Click the Upload button above to add an update.


