This content originally appeared on DEV Community and was authored by DEV Community
Creating a Fully-Functional Next.js SaaS Application in five minutes
Creating a fully-functional SaaS web application is challenge and the cost of maintaining and upholding one can range from a few hundred to thousands of dollars per month.
Keep on reading - you can do all this in almost no work at all and free with saasbox.
What is SaaSBox?
SaaSBox is a turnkey package of hosted software that handles authentication, subscription and dashboards. This means everything is already built-in for you and there is a graceful free plan where every single feature can be tested out.
If you would like to learn more, be sure to give saasbox a check-out.
Getting started
The official tutorial is at the saasbox documentation, but alternatively I'll walk you through the tutorial here.
This guide shows how to make a standalone full-stack application residing in your app.yourdomain.com address a fully functional, complete SaaS.
Check out the video demo below for all the essential steps and the final result!
Functionality you get:
- User login, sign up, password reset
- Marketing pages
- Pricing page and subscriptions
- User dashboard based on React/NextJS living in app.yourdomain.com (Running on Vercel)
- Optional database (based on Google Cloud Firestore (Firebase))
While your React / NextJS application will deliver the core logic of your service that you can independently develop, SaaSBox will handle the authentication of your NextJS app (login, sign up, password reset, user profile React component), as well as subscriptions (creating editing plans with nocode, users subscribing to plans)
Setup Requirements
Pre-requisites:
Get a SaaSBox account by signing up at https://saasbox.net and make sure to set up for a free plan at https://saasbox.net/pricing.
Make sure you have npm, git, and nodejs installed globally on your device.
Getting Started
Clone this repo that has a sample dashboard application that has been pre-integrated with SaaSBox authentication package (npm install sbox-auth-next)
Clone the NextJS application starter template with
git clone https://github.com/getsaasbox/saasbox-sample-nextjs-react-app.git
Install the NextJS dependencies:
cd saasbox-sample-nextjs-react-app
npm install
Set up SaaSBox Environment Variables:
NextJS typically uses a file .env.local for environment variables. Edit it as follows using the information from below:
// .env.local
// Add values WITHOUT "" quotes.
SAASBOX_APP_ID=<application id>
SAASBOX_API_KEY=<api key>
SAASBOX_JWT_SECRET=<JWT secret>
NEXTJS_PUBLIC_SAASBOX_DOMAIN=<your saasbox url> # e.g. https://nextjs-react-saas.saasbox.net
SAASBOX_DOMAIN=<your saasbox url> # e.g. https://nextjs-react-saas.saasbox.net
You may obtain the above information as below.
Your JWT

Your JWT secret is found on the Outbound JWT Secret screen. Generate one if it doesn't exist.
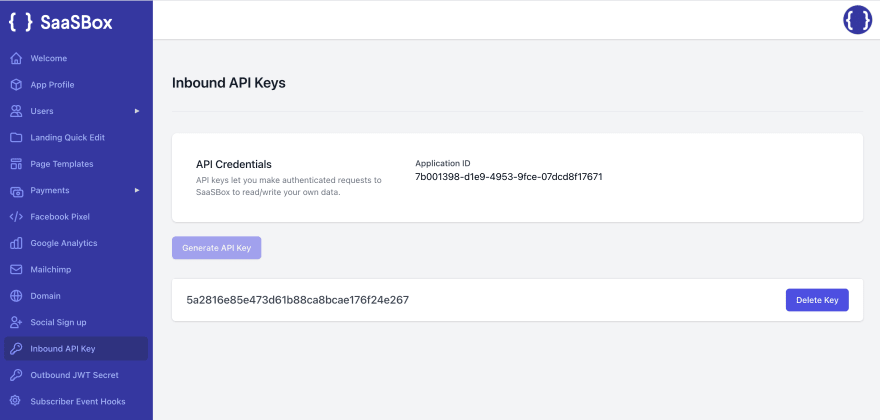
Your Application ID and API key

Your application ID is listed above and API key is listed in the bottom part of the page
Saasbox domain
This is the domain that you have set up from the "Domain" > "Subdomain" tab for your application. On the free plan you may use any available subdomain, e.g. your-application.saasbox.net. On Paid plans you may set up your own domain with https support.
Run your Next.js Application
Enter your local workspace directory and run the command npm run dev. You should see your application compile and show a similar screen on your terminal as follows:

Don't expect too much style from a mac terminal 🤣
At this point we are done setting up our standalone SaaS dashboard application based on React/NextJS.
*Note - * If you don't wish to use NGrok with a local instance, you can deploy the application to Vercel, and directly use the public Vercel URL for the deployed application. Vercel setup/deployment of a NextJS project can be found at https://vercel.com
Set up an Ngrok Tunnel
NGrok will enable your application running on your developer machine (localhost) to be accessible from the Internet. This includes sending and receiving requests to and from your SaaSBox application living in https://your-app.saasbox.net
- Sign up to ngrok at https://ngrok.com
- Go through Setup & Installation at dashboard.ngrok.com
To install the ngrok cli, you can use sudo npm install -g ngrok or you can follow the steps below:
Download ngrok-version.zip on your local computer.
Open up a terminal and unzip ngrok-version.zip. You will now see the ngrok executable in the current directory.
Set up your auth token issuing the command:
ngrok authtoken <your token>Run Ngrok:
ngrok http 3000Take a note of the tunnel address that has been created and shown on your terminal, e.g.:
https://c00b-47-224-207-237.ngrok.io->http://localhost:3000
Why do we do this again?
Your NextJS application running on http://localhost:3000 will be accessible on the internet at the tunnel endpoint created at https://c00b-47-224-207-237.ngrok.io
Setup SaaSBox to redirect logged in users to your application
This step will create the connection from https://your-application.saasbox.net to your standalone application running at https://localhost:3000, using the NGrok tunnel we created, e.g. in this example at the temporary address https://c00b-47-224-207-237.ngrok.io
Your users will log in, sign up and subscribe to plans at https://your-application.saasbox.net and then be redirected to your standalone dashboard.
*Important Note - * Make sure you keep the ngrok tunnel active. Once you terminate the ngrok tunnel, your app location will change and you'll have to set it again. Ngrok is not recommended for production - deploy your dashboard to a hosting provider like vercel or netlify.
Let's set this up
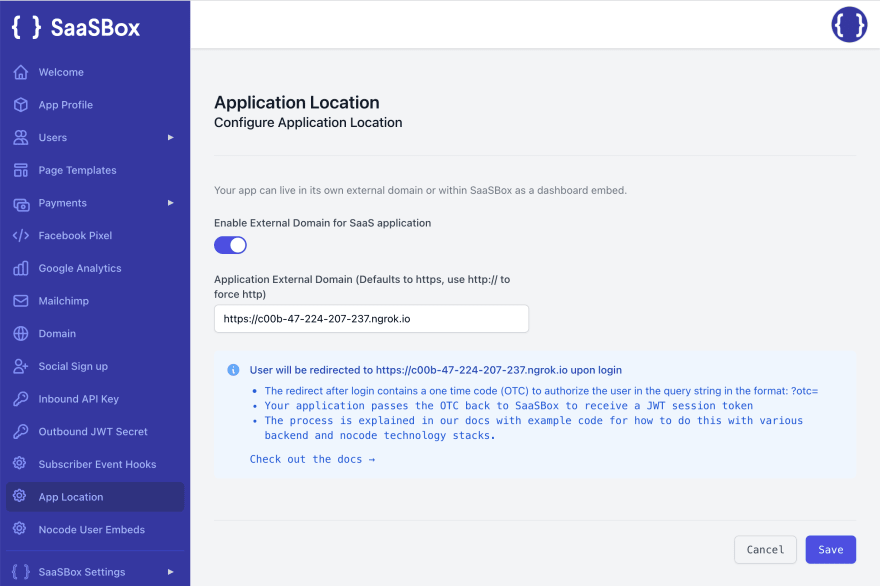
- Turn on "Enable External Domain for SaaS Application" setting in the App Location screen.
- Paste your NGrok URL in the input box for Application External Domain
- Save.
This setting will make sure that any logged in user will be sent to your application, instead of the user dashboard area inside SaaSBox. This way, you can manage them in a more customized way.
Visiting your SaaS with logged in user and plan information
You can now visit your standalone application hosted at localhost:3000 as a logged in user from your SaaSBox application residing in https://your-application.saasbox-net. Let's take a look at an example for how it works.
Step 1: Visit your application and log in.
Step 2: Press the Go To App button in the lower left side of your dashboard.
Step 3: Thats it! You should now be in your standalone SaaS application, with the logged in user information shown in the lower left bottom profile area, and the subscription plan information is also available to your application in the user object.
Demo
Check out how everything above works with a demo application we have created at https://nextjs-react-saas.saasbox.net
username: testuser2000@saasbox.net
password: testuser2000
This standalone NextJS application is deployed at https://saasbox-sample-nextjs-react-app.vercel.app and it takes the user and subscription information from the application deployed at saasbox.net.
Conclusion
You can build a SaaS application using SaaSBox + Vercel almost for free, leveraging standalone app hosting from Vercel, and hosting everything else (marketing, login, payments) on SaaSBox.
This content originally appeared on DEV Community and was authored by DEV Community
DEV Community | Sciencx (2022-03-02T20:59:29+00:00) Creating a Fully-Functional Next.js SaaS Application in five minutes. Retrieved from https://www.scien.cx/2022/03/02/creating-a-fully-functional-next-js-saas-application-in-five-minutes/
Please log in to upload a file.
There are no updates yet.
Click the Upload button above to add an update.


