This content originally appeared on Level Up Coding - Medium and was authored by Chris Bao
Understand HTTP/1.1 Persistent Connection: A Hands-on Approach
Based on a Golang application
Background
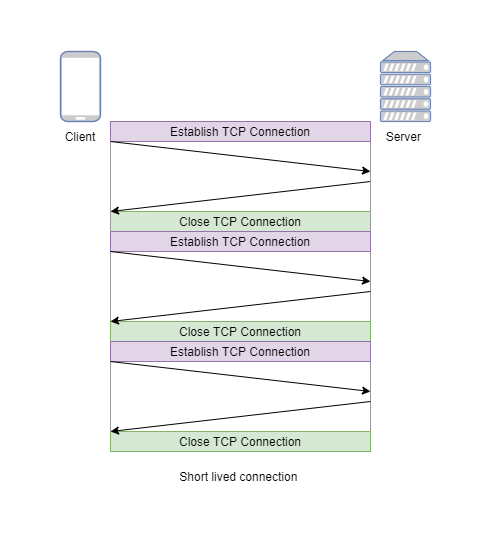
Initially, HTTP was a single request-and-response model. An HTTP client opens the TCP connection, requests a resource, gets the response, and the connection is closed. And establishing and terminating each TCP connection is a resource-consuming operation (in detail, you can refer to my previous article). As the web application becomes more and more complex, displaying a single page may require several HTTP requests, too many TCP connection operations will have a bad impact on the performance.

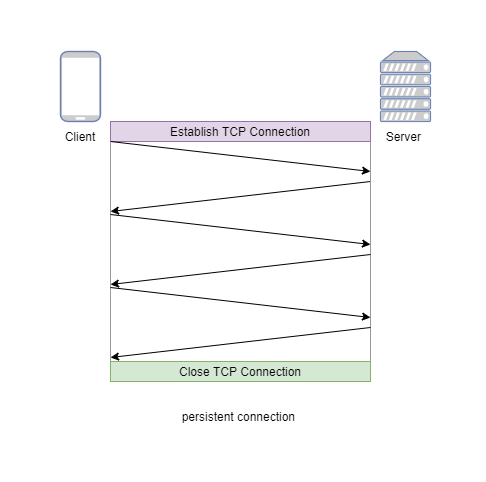
So persistent-connection (which is also called keep-alive) model is created in HTTP/1.1 protocol. In this model, TCP connections keep open between several successive requests, and in this way, the time needed to open new connections will be reduced.

In this article, I will show you how persistent connection works based on a Golang application. We will do some experiments based on the demo app, and verify the TCP connection behavior with some popular network packet analysis tools. In short, After reading this article, you will learn:
- Golang http.Client usage (and a little bit source code analysis)
- network analysis with netstat and tcpdump
You can find the demo Golang application in this Github repo.
Sequential requests
Let’s start from the simple case where the client keeps sending sequential requests to the server. The code goes as follows:
We start an HTTP server in a Goroutine, and keep sending ten sequential requests to it. Right? Let’s run the application and check the numbers and status of TCP connections.
After running the above code, you can see the following output:

When the application stops running, we can run the following netstat command:
netstat -n | grep 8080
The TCP connections are listed as follows:

Obviously, the 10 HTTP requests are not persistent since 10 TCP connections are opened.
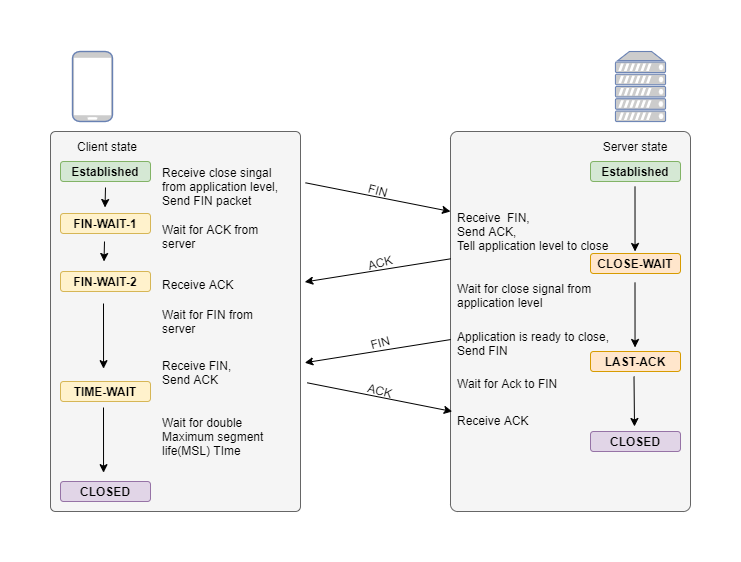
Note: the last column of netstat shows the state of TCP connection. The state of TCP connection termination process can be explained with the following image:

I will not cover the details in this article. But we need to understand the meaning of TIME-WAIT.
In the four-way handshake process, the client will send the ACK packet to terminate the connection, but the state of TCP can’t immediately go to CLOSED. The client has to wait for some time and the state in this waiting process is called TIME-WAIT. The TCP connection needs this TIME-WAIT state for two main reasons.
- The first is to provide enough time that the ACK is received by the other peer.
- The second is to provide a buffer period between the end of current connection and any subsequent ones. If not for this period, it’s possible that packets from different connections could be mixed. In detail, you can refer to this book.
In our demo application case, if you wait for a while after the program stops, and run the netstat command again then no TCP connection will be listed in the output since they’re all closed.
Another tool to verify the TCP connections is tcpdump, which can capture every network packet send to your machine. In our case, you can run the following tcpdump command:
sudo tcpdump -i any -n host localhost
It will capture all the network packets send from or to the localhost (we’re running the server in localhost, right?). tcpdump is a great tool to help you understand the network, you can refer to its document for more help.
Note: in our demo code above, we send 10 HTTP requests in sequence, which will make the capture result from tcpdump too long. So I modified the for loop to only send 2 sequential requests, which is enough to verify the behavior of persistent connection. The result goes as follows:

In tcpdump output, the Flag [S] represents SYN flag, which is used to establish the TCP connection. The above snapshot contains two Flag [S] packets. The first Flag [S] is triggered by the first HTTP call, and the following packets are HTTP request and response. Then you can see the second Flag [S] packet to open a new TCP connection, which means the second HTTP request is not persistent connection as we hope.
Next step, let’s see how to make HTTP work as a persistent connection in Golang.
In fact,this is a well known issue in Golang ecosystem, you can find the information in the official document:
- If the returned error is nil, the Response will contain a non-nil Body which the user is expected to close. If the Body is not both read to EOF and closed, the Client’s underlying RoundTripper (typically Transport) may not be able to re-use a persistent TCP connection to the server for a subsequent “keep-alive” request.
The fix will be straightforward by just adding two more lines of code as follows:
let’s verify by running netstat command, the result goes as follows:

This time 10 sequential HTTP requests establish only one TCP connection. This behavior is just what we hope: persistent connection.
We can double verify it by doing the same experiment as above: run two HTTP requests in sequence and capture packets with tcpdump:

This time, only one Flag [S] packet is there! The two sequential HTTP request re-use the same underlying TCP connection.
In next section, I will modify the demo app and make it send concurrent requests. In this way, we can have more understanding about HTTP/1.1’s persistent connection.
Concurrent requests
The demo code goes as follows:
Note: In HTTP/1.1 protocol, concurrent requests will establish multiple TCP connections. That’s the restriction of HTTP/1.1, the way to enhance it is using HTTP/2 which can multiplex one TCP connection for multiple parallel HTTP connections. HTTP/2 is not in the scope of this post. I will talk about it in another article.
Note that in the above demo, we have fully read the response body and closed it, and based on the discussion in last article, the HTTP requests should work in the persistent connection model.
Before we use the network tool to analyze the behavior, let’s imagine how many TCP connections will be established. As there are 10 concurrent goroutines, 10 TCP connections should be established, and all the HTTP requests should re-use these 10 TCP connections, right? That’s our expectation.
Next, let’s verify our expectation with netstat as follows:

It shows that the number of TCP connections is much more than 10. The persistent connection does not work as we expect.
After reading the source code of net/http package, I find the following hints:
The Client is defined inside client.go which is the type for HTTP client, and Transport is one of the properties:
Transport is defined in transport.go like this:
Note that there are two parameters of Transport:
- MaxIdleConns: controls the maximum number of idle (keep-alive) connections across all hosts.
- MaxIdleConnsPerHost: controls the maximum idle (keep-alive) connections to keep per-host. If zero, DefaultMaxIdleConnsPerHost is used.
By default, MaxIdleConns is 100 and MaxIdleConnsPerHost is 2.
In our demo case, ten goroutines send requests to the same host (which is localhost:8080). Although MaxIdleConns is 100, but only 2 idle connections can be cached for this host because MaxIdleConnsPerHost is 2. That’s why you saw much more TCP connections are established.
Based on this analysis, let’s refactor the code as follows:
This time we don’t use the default httpClient, instead we create a customized client which sets MaxIdleConnsPerHost to be 10. This means the size of the connection pool is changed to 10, which can cache 10 idle TCP connections for each host.
Verify the behavior with netstat again:

Now the result is what we expect.
Summary
In this article, we discussed how to make HTTP/1.1 persistent connection work in both sequential and concurrent cases by tuning the parameters for the connection pool. In the next article, let’s review the source code to study how to implement HTTP client.
Understand HTTP/1.1 persistent connection: A Hands-on Approach was originally published in Level Up Coding on Medium, where people are continuing the conversation by highlighting and responding to this story.
This content originally appeared on Level Up Coding - Medium and was authored by Chris Bao
Chris Bao | Sciencx (2022-05-10T12:07:30+00:00) Understand HTTP/1.1 persistent connection: A Hands-on Approach. Retrieved from https://www.scien.cx/2022/05/10/understand-http-1-1-persistent-connection-a-hands-on-approach/
Please log in to upload a file.
There are no updates yet.
Click the Upload button above to add an update.
