This content originally appeared on Level Up Coding - Medium and was authored by Lorenzo Zarantonello
NgRx is a state management library that uses the Redux pattern. Learn why and when to use it.
If you’ve heard of NgRx, you’ve probably thought that it’s complex and that you shouldn’t use it unless your app has complicated state to maintain.
That is typically accurate. And that’s why you should get familiar with it when you don’t need it. Then when you do need it, you have a good starting point.
This is an introduction to NgRx basic concepts.
I will start by answering to
- What is NgRx?
- Why Do We Need State Management?
before jumping into building a simple app that uses NgRx.
What is NgRx?
NgRx is a state management library that uses the Redux pattern.
What is a state?
In simple terms, you can think of the state as a JavaScript object that contains data used in different parts of an application.
The idea is to have one data store where different parts of the application, services, and components can still interact with one another while receiving their state from the store.
That store is the single source of truth for the whole application state.
This concept comes from Redux.
What is Redux?
Redux is a state management pattern and a library to implement that pattern into any application.
The main idea behind Redux is that the state of the whole application is stored in a single central place: the store.
Think of the store as a JavaScript object.

Why Do We Need State Management?
So far, we said that NgRx is used to manage the state of an app.
But for that, we could use services! For small and simple applications, services are enough to handle the app state.
More specifically, by using RxJS and Subjects we can go pretty far without using NgRx.
However, there are some good reasons to use state management, and in particular, NgRx if you are using Angular.
Reasons to use NgRx
According to ngrx.io, “you might use NgRx
- when you build an application with a lot of user interactions and multiple data sources, or
- when managing state in services are no longer sufficient”.
So, if your app is growing bigger and your state management is getting messier, it might be because of a lack of proper state management.
They even propose a handy guideline that answers the question: Do I need NgRx Store?
- Shared: state that is accessed by many components and services.
- Hydrated: state that is persisted and rehydrated from external storage.
- Available: state that needs to be available when re-entering routes.
- Retrieved: state that must be retrieved with a side-effect.
- Impacted: state that is impacted by actions from other sources.
Why aren’t services enough?
First of all, using services to handle big and complex applications might get confusing and you might lose the single source of truth.
Moreover:
- Angular might not detect value changes in properties nested in objects when using RxJS and Subjects. In JavaScript, changing the property of an object doesn't change the overall object.
- You need a clear and structured pattern to update data in your app
Having said that, keep in mind that “NgRx Store comes with some tradeoffs […]. It is not meant to be the shortest or quickest way to write code. It also encourages the usage of many files”, ngrx.io.
Why NgRx instead of Redux?
Briefly, NgRx integrates better with Angular. Furthermore, it uses injectable services, RxJs and TypeScript.
NgRx is opinionated on side effects, while Redux has different approaches.
Build a simple app using NgRx: Overview & Theory
We will create a simple counter app to explore the basics of NgRx.
This app loosely follows the tutorial available on ngrx.io. However, I added some explanations that might benefit developers approaching NgRx and the Redux pattern for the first time.
We start by creating a counter feature in AppComponent. CSS is mainly omitted but you can find the whole code on GitHub.
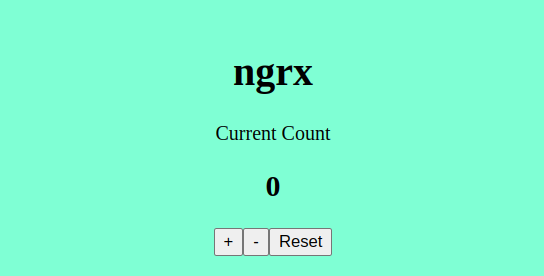
The code in app.component.html is
<p>Current Count</p>
<h2>{{ count }}</h2>
<button (click)="increment()">+</button>
<button (click)="decrement()">-</button>
<button (click)="reset()">Reset</button>
The code in app.component.ts is
...
export class AppComponent {
  title = 'ngrx';
  count: number = 0;
increment() { this.count++; } decrement() { this.count--; } reset() { this.count = 0; }
}Local state lifecycle
At the moment, AppComponent has a local state. It is the variable called counterand it stores the value of the counter.
Let’s have a quick look at the state lifecycle in AppComponent
Starting from the template:
- clicking on a button triggers a click event
- the click event executes a method
- the method updates the value of counter in the class
- finally, the template reflects the updated value thanks to string interpolation
The overall general flow of the application state in NgRx is pretty complex, but some elements are similar to what I just described above.
Global state lifecycle
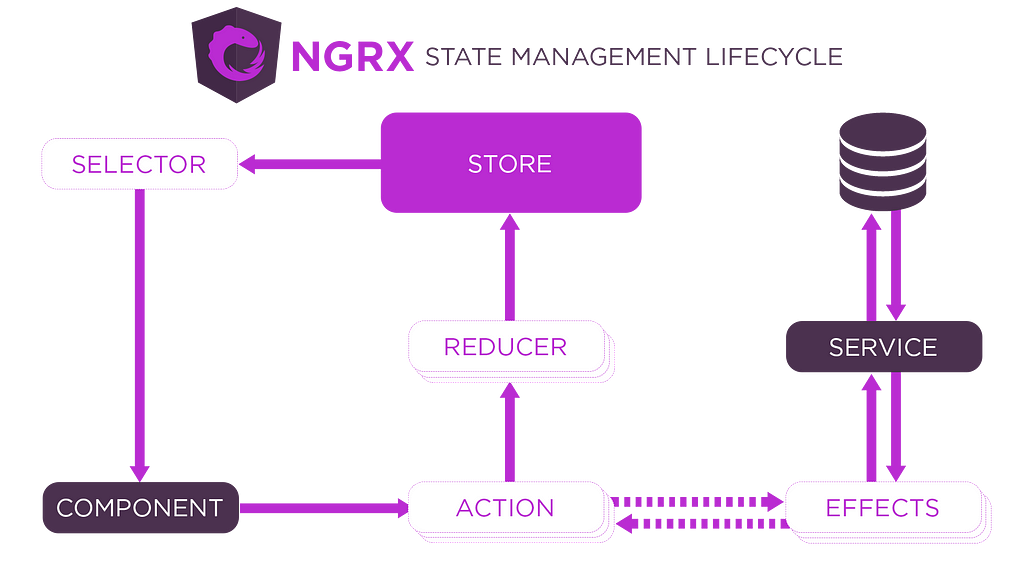
In NgRx, the component doesn’t store the state nor does it manage the changes when something happens.
The state is now stored in the store and not in the component.
Let’s see how the state lifecycle changes, starting from the template:
- clicking on a button triggers a click event
- the click event executes a method
- the method dispatches an action to the reducer
- the reducer executes the logic to update the value of counter in the store
- finally, the template reflects the updated value thanks to string interpolation
We can break down this logic even further.
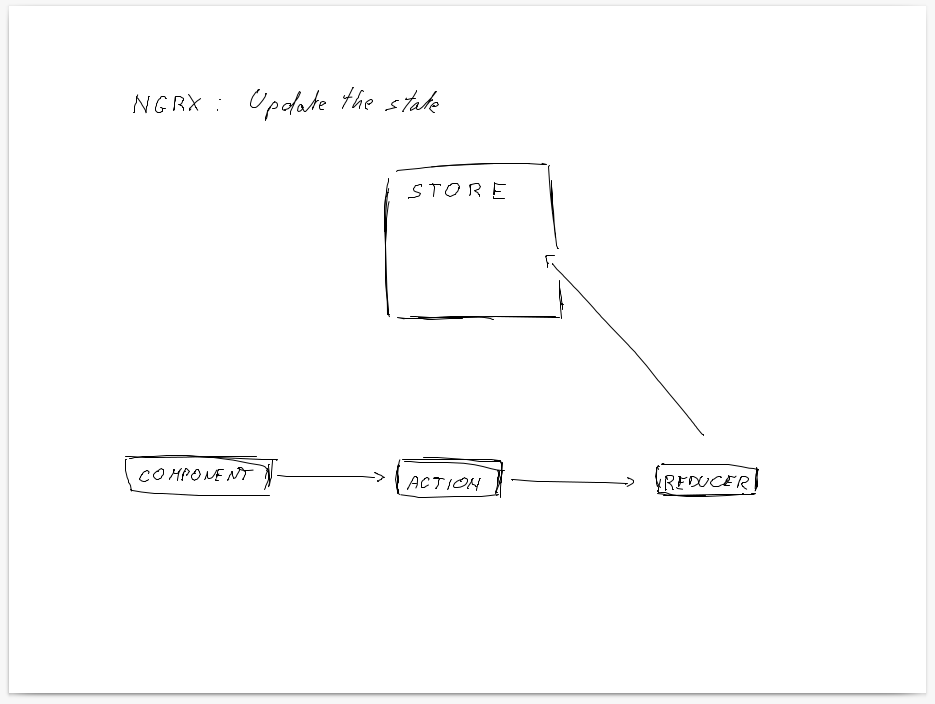
- Update the state. The first four steps update the value of the state in the store.
- Pull the state. The last step pulls the value of the state from the store.
Next, we start to build the application following these two parts.
Build a simple app using NgRx: Code
First of all, install NgRx
npm install @ngrx/store --save
Then, let’s work on part 1 to update the value of the state in the store.
Part 1: Update the state
I will start by creating the code to update the state in the store, thus only focusing on the first four steps.
The first two steps are the same but the third step introduces two new concepts: actions, and reducers.
- actions: Actions represent unique events happening in the application. For instance, incrementing the counter.
- reducers: Reducers detect actions, modify the current state, and store the new state in the store. We usually have one reducer for every feature in the app. One reducer can handle multiple actions, like incrementing, decrementing, and resetting a counter.
Let’s dispatch an action to the reducer.
Create an action
I created a state folder where I will include everything related to state management. Inside the state folder, I created a file called counter.actions.ts. There are other ways to structure NgRx, but this is a simple way to start.
I create an action to increment the counter:
// counter.actions.ts
import { createAction } from '@ngrx/store';export const increment = createAction('[App Component] Increment');To create an action, we simply pass the name of the action to the createAction method. The name of the action is a string that usually represents the source of the action, between square brackets, followed by what the action is.
This is our first action. Now we need to create a reducer that receives the action and handles it.
Create a reducer
In the state folder, I created a file called counter.reducer.ts.
// counter.reducer.ts
import { createReducer, on } from '@ngrx/store';
import { increment } from './counter.actions';export const initialState = 0;
export const counterReducer = createReducer(
initialState,
on(increment, (state) => state + 1),
);
Note that initialState will be the initial state of the app before any action is dispatched. In this simple app, initialStateis a number and it will be the value of counter in AppComponent.
To create a reducer, we use the createReducer method.
The first parameter takes the value that will be initially assigned to counter. This value could be an object and it stores the initial state of the application or the feature.
The second parameter takes the on method to handle specific actions. So, in our case, when the increment action is dispatched we take the current state and return a new state.
Import NgRx in AppModule
Since we didn’t use the Angular CLI to add NgRx, we need to add it manually.
In AppModule, we import:
// app.module.ts
import { StoreModule } from '@ngrx/store';
import { counterReducer } from './state/counter.reducer';@NgModule({
declarations: [AppComponent],
imports: [BrowserModule, StoreModule.forRoot({ count: counterReducer })],
providers: [],
bootstrap: [AppComponent],
})
export class AppModule {}
Note how the “StoreModule.forRoot() method registers the global providers needed to access the Store throughout your application”, ngrx.io.
The StoreModule.forRoot function takes an object that contains count and the counterReducer method that we use to manage the state of the counter.
Dispatch an action to the reducer
Now we have an action (increment) and a reducer (counterReducer). Let’s finally dispatch our first action.
As we said above, the method dispatches an action to the reducer, thus let’s update the code in app.component.ts to dispatch actions.
import { Component } from '@angular/core';
import { Store } from '@ngrx/store';
import { increment } from './state/counter.actions';...
export class AppComponent {
title = 'ngrx';
count: number = 0;
constructor(private store: Store) {} increment() {
this.store.dispatch(increment());
} decrement() { this.count--; }
  reset() { this.count = 0; }
}Note that we need to import Store and increment. We then inject the store in the constructor and finally, we update the increment method:
increment() {
this.store.dispatch(increment());
}Now, if you click on the + button in the application, you will see that nothing happens.
However, the logic is correct. We dispatch an action to the reducer and the reducer updates the state.
You can check this using Angular DevTools. See a screenshot below.
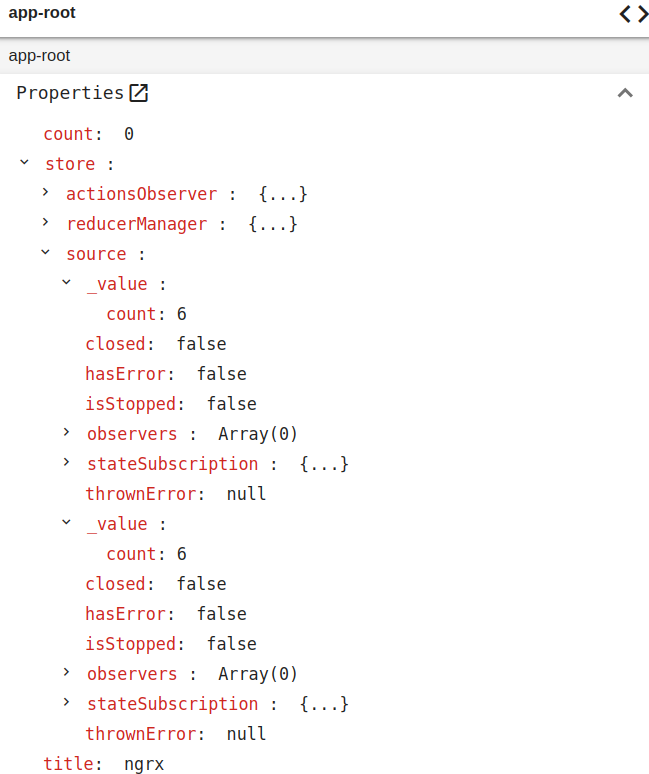
From the Angular DevTools we see three properties: count, store, and title.
- count. The value of count is 0. That makes sense because we initialized countto 0 in AppComponent. Since we changed the incrementmethod to use a dispatcher, nothing is changing the value of countanymore.
- store. When we look at the value of store/source/_value/count we see that it is 6. That’s the value of count in the state in the store! I clicked six times the + button and here is the outcome!
- title. Is simply the string ‘ngrx’
So, the state gets updated and this concludes Part 1: Update the state.
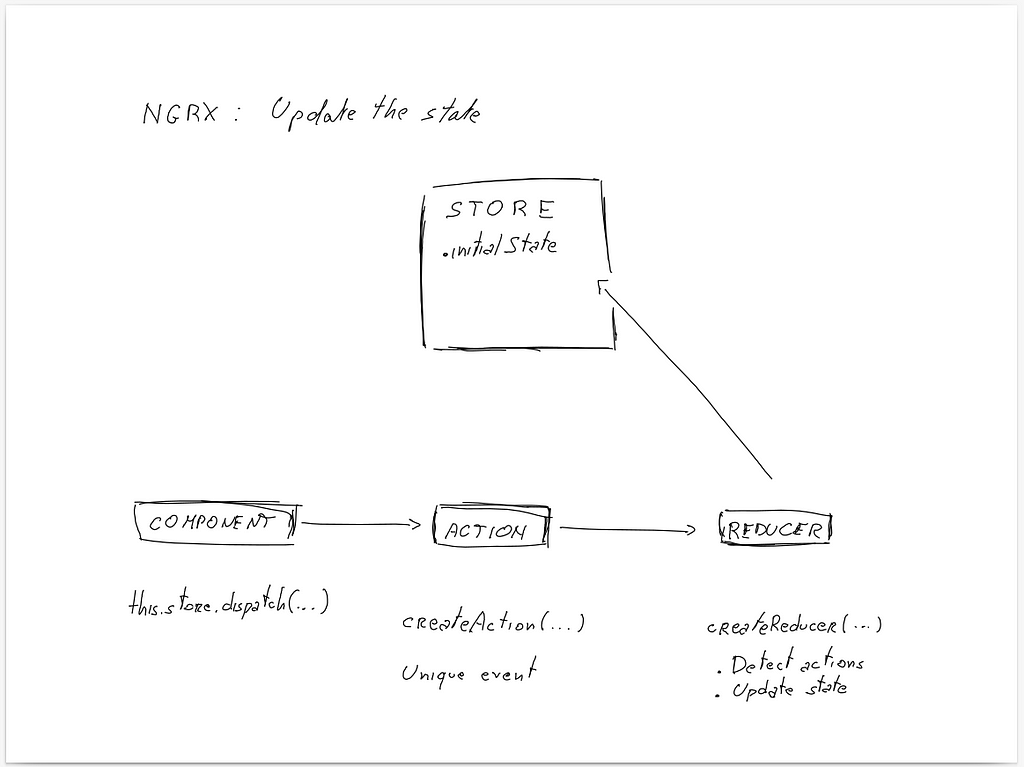
Why don’t we see it in the UI? Because the template gets its value from count in app.component.ts and not from the store! So that’s Part 2: Pull the state.
As a side note, there is a Redux extension that gives you quite some visibility on NgRx state management.
Part 2: Pull the state
As we said above, the fifth step pulls the value of the state from the store into the class. Then, we can use the new value to update the UI.
To get data from the store we use a selector, the select method, which returns a stream of the current state.
- selectors: Selectors pull the state from the store into the components or services that require it. It is important to remember that “Selectors are pure functions used for obtaining slices of store state”, ngrx.io
The code in app.component.ts evolves to:
...
import { Observable } from 'rxjs';
...
export class AppComponent {
  title = 'ngrx';
count: number = 0; // remove once all methods dispatch actions
count$: Observable<number>;
  constructor(private store: Store<{ count: number }>) {
    this.count$ = this.store.select('count');
  }
...
}
Note that count$ refers to an Observable stream. We initialize the value of count$ in the constructor.
Finally, we can use the async pipe to subscribe to changes and render them as soon as they occur.
Therefore, app.component.html becomes:
...
<h2>{{ count$ | async }}</h2>...
Now the UI should update every time you click on +.
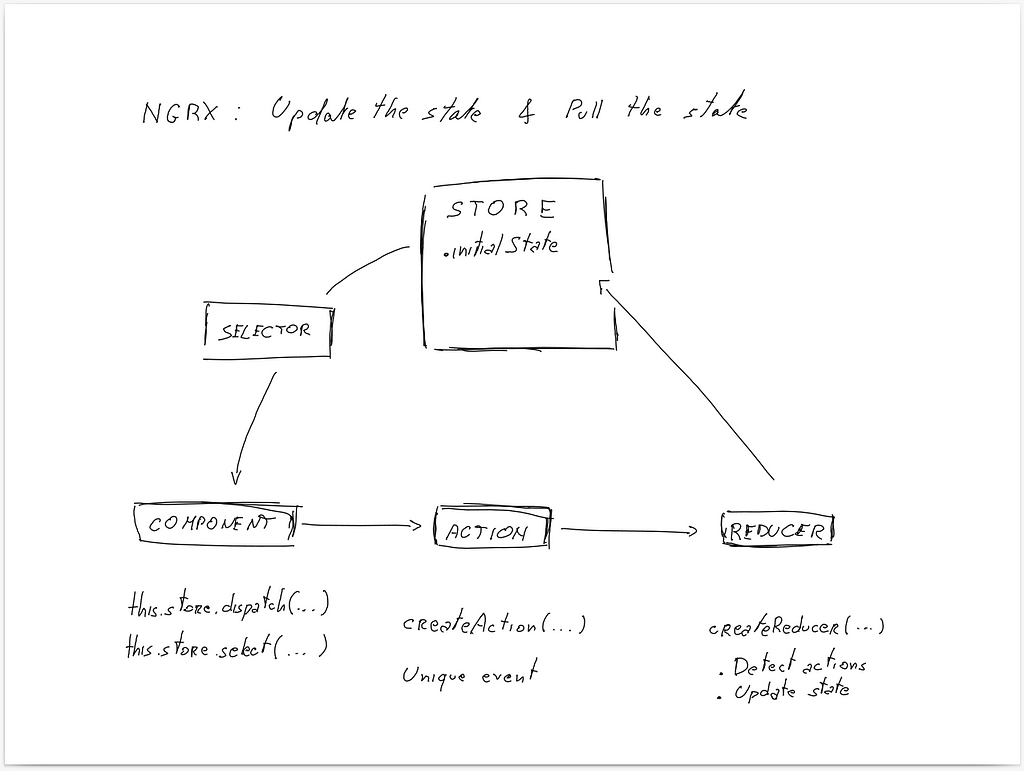
The other buttons won’t produce any effect. It is necessary to
- create an action,
- update the reducer,
- dispatch the action to the reducer
for each button.
Feel free to try it on your own or find the code on GitHub.
Final Considerations
This is just an introduction to NgRx and it doesn’t explore effects.
If you need to use NgRx with asynchronous operations, you should take a look at effects otherwise you might get undesired behavior.
Despite these limitations, I hope this post helped you strengthen your understanding of NgRx.
Key Concepts
- NgRx is a state management library that uses the Redux pattern
- A state is a JavaScript object that contains data used in your app
- Redux is a state management pattern that advocates for storing the state of the app in a single central place: the store
- To update the state, you need to create an action, update the reducer, and dispatch the action to the reducer.
- To pull data from the state, you need to use the select method.
Level Up Coding
Thanks for being a part of our community! Before you go:
- 👏 Clap for the story and follow the author 👉
- 📰 View more content in Level Up Coding
- 🔔 Follow us: Twitter | LinkedIn | Newsletter
- 🚀👉 Top jobs for software engineers
An Introduction To NgRx was originally published in Level Up Coding on Medium, where people are continuing the conversation by highlighting and responding to this story.
This content originally appeared on Level Up Coding - Medium and was authored by Lorenzo Zarantonello
Lorenzo Zarantonello | Sciencx (2022-07-19T14:58:02+00:00) An Introduction To NgRx. Retrieved from https://www.scien.cx/2022/07/19/an-introduction-to-ngrx/
Please log in to upload a file.
There are no updates yet.
Click the Upload button above to add an update.
