This content originally appeared on Zell Liew and was authored by Zell Liew
I bought the Moonlander (an ergonomic keyboard) and I’ve been playing with it for a month. I want to share what I think of this keyboard in case you were thinking of getting an ergonomic keyboard as well.

The Summary
The Moonlander is an excellent keyboard if you have a permanent work station. I wouldn’t recommend taking it out every day even though it comes with a travel case for you to move it around. Why? Because it takes some time to get the optimal tilt/tent position for your hands. (I’ll talk about how in a bit).
It has a nice columnar layout, which means keys are arranged vertically in a column as opposed to the diagonal-ish layout that most keyboards have. This columnar layout can be hard to get used to at first. I’m still trying to get used to it and I’m still hitting the wrong keys occasionally.
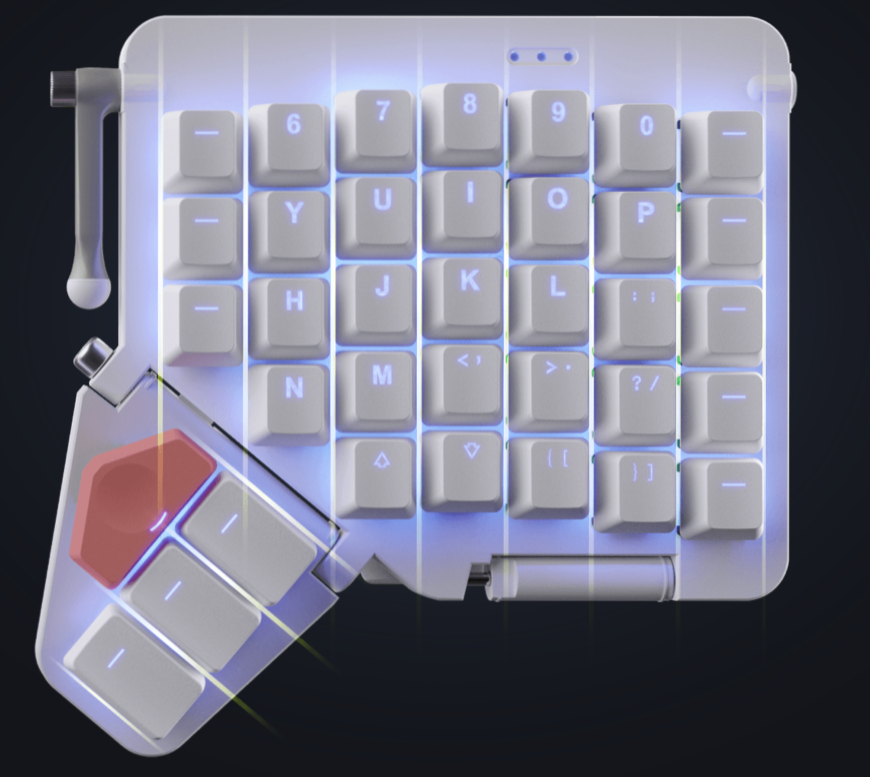
The split keyboard is really nice. I can feel my arms and shoulders relaxing as I use the keyboard so that’s a good thing.
Another good thing is the Moonlander is very customisable. You can create ultra-flexible keyboard shortcuts, control the mouse, and even control the operating system (to a limited extend). It can make life much easier for you if you spend long hours on the keyboard.
The only downside is the keyboard doesn’t have space for the arrow keys. So I had to relegate the arrow keys to another layer. This takes some effort to get used to.
Overall, the Moonlander is a good buy. It just takes some time to get used to.
Setting up the Moonlander
Ideally, you’d want to place the moonlander shoulder-width apart so your shoulders can remain as relaxed as possible.
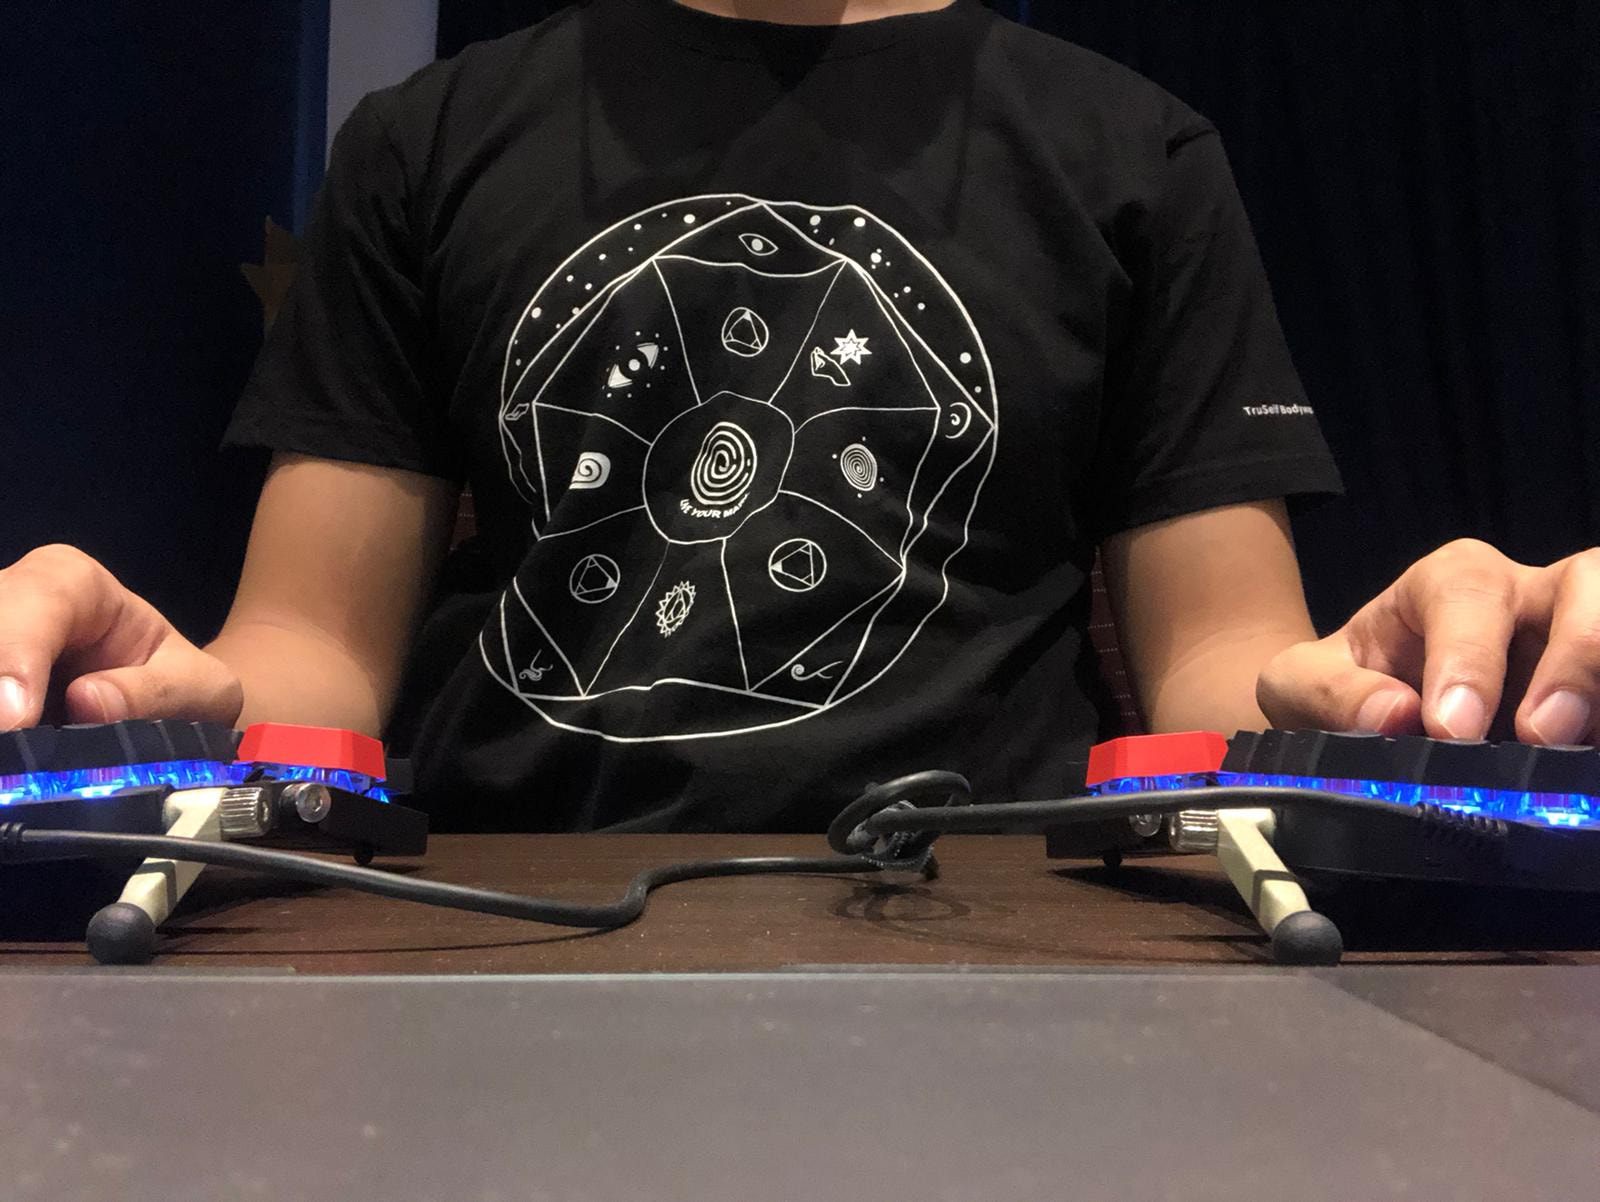
You can also choose to put the Moonlander further apart to expand your shoulders initially to create a stretch. But I highly recommend shoulder-width apart for long term usage.
Setting up the Tilt/Tent
Our hands tilt at an angle naturally. You can find this angle by relaxing your hands on the table, then raise your hands slightly off it. This angle will be the correct tilt you want to emulate on the Moonlander.
This is an important step since an incorrect tilt harms your wrists even more. Using an incorrect tilt defeats the purpose of getting an ergonomic keyboard in the first place.

As you can see from the pictures above, I don’t tilt my hands much, so I set up my Moonlander with a tiny tilt.
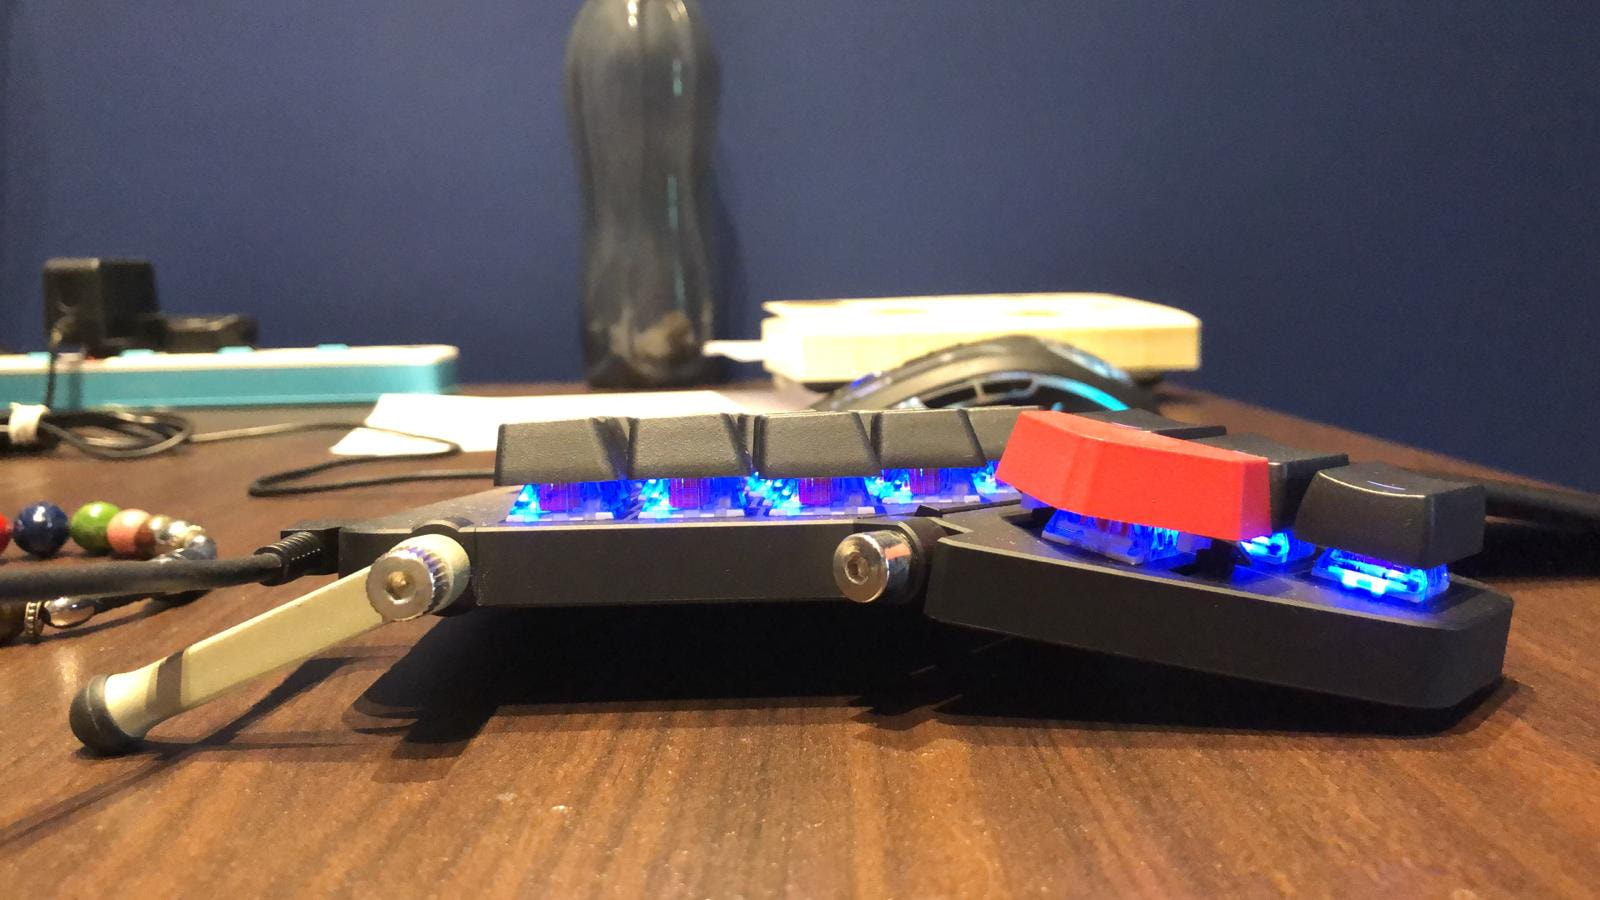
Ben Vallack has created a video on adjusting this tilt if you need help with it.
Positioning the Thumb Cluster
The thumb cluster refers to this big red button and three long buttons on the keyboard.
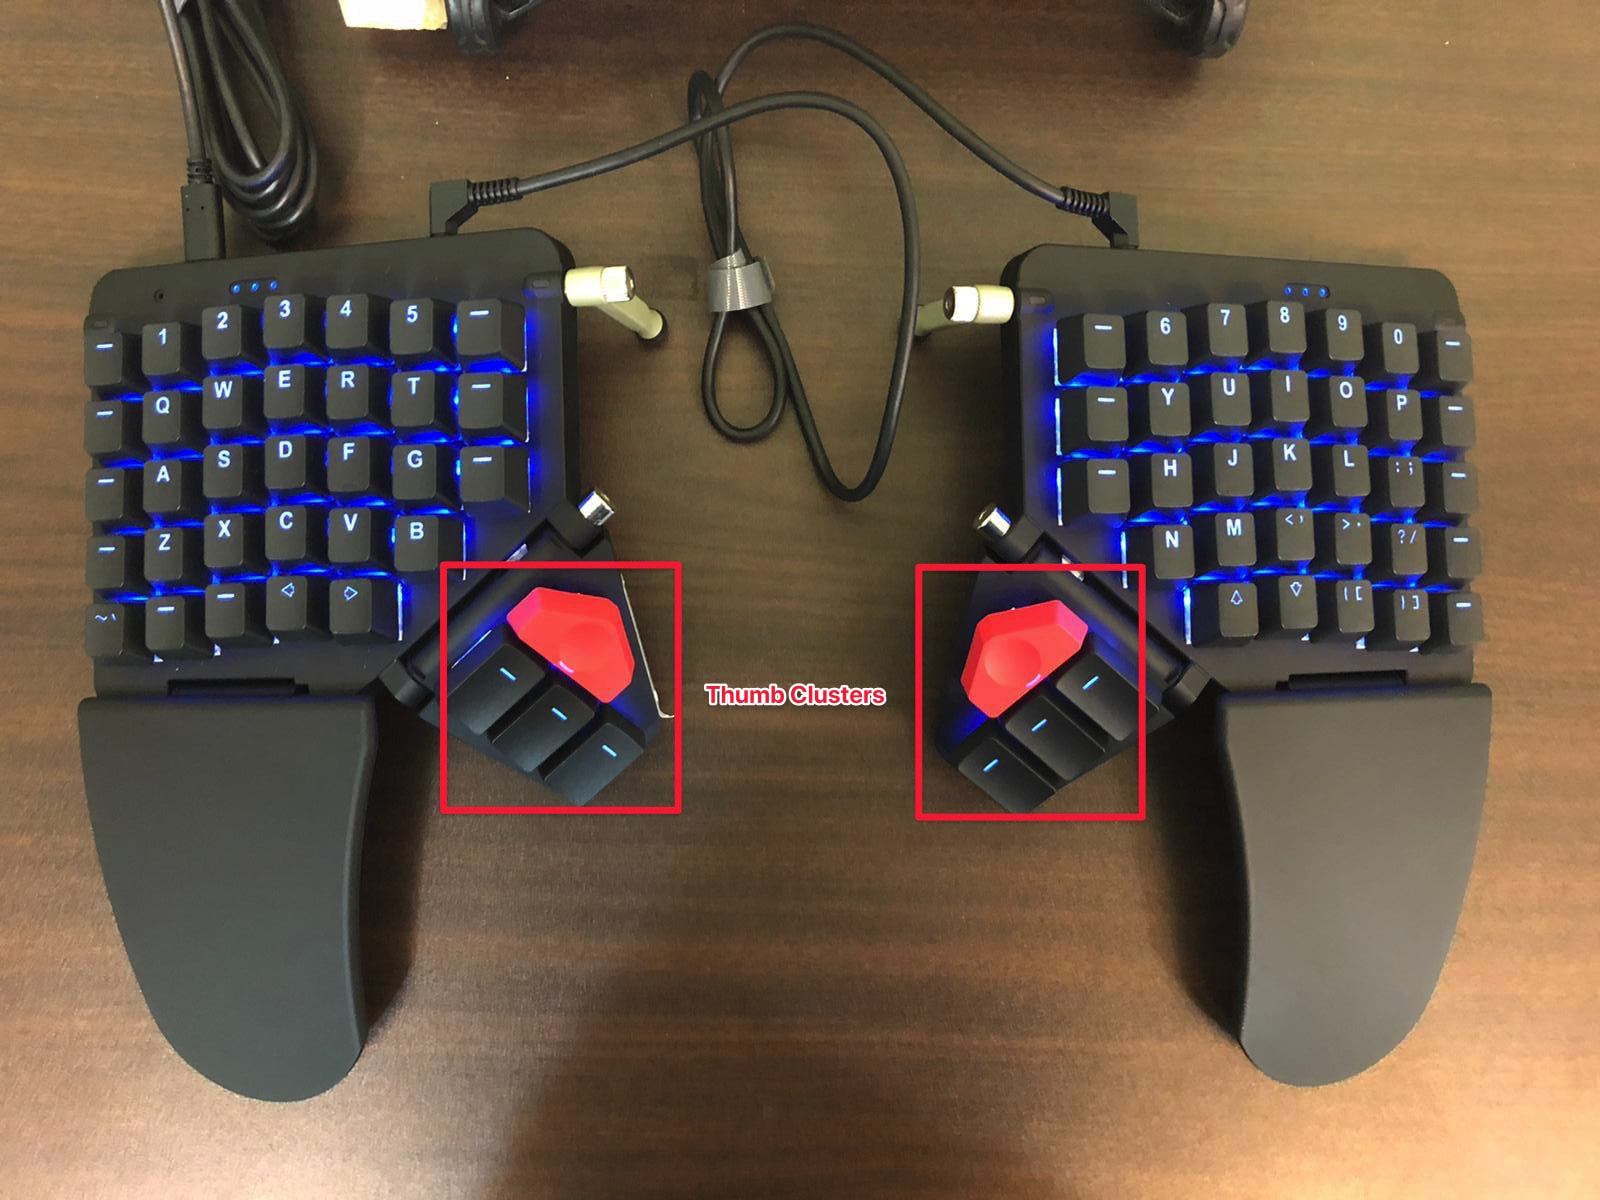
ZSA recommends people with small hands to tilt the thumb cluster up. But I disagree with this recommendation because it destabilizes the keyboard.
Instead, I recommend setting the tilt according to your hands (like what I showed you above). Once you do that, let the thumb cluster rest naturally and lock its angle there.
If you end up not using the thumb cluster much for normal typing, then so be it. (I don’t use it much for normal typing either).
Configuring the keyboard
ZSA allows you to configure the Moonlander through a software called Oryx. You can find the configuration link here.
The Moonlander contains up to 4 layers, affectionately called layers 0, 1, 2, and 3. You can name each layer to your preference. Here are my layers.
- 0: Base (the main typing keyboard)
- 1: Nav (for arrows and navigation)
- 2: Num (for using the numpad)
- 3: Play (for playing with the backlit lights ?).


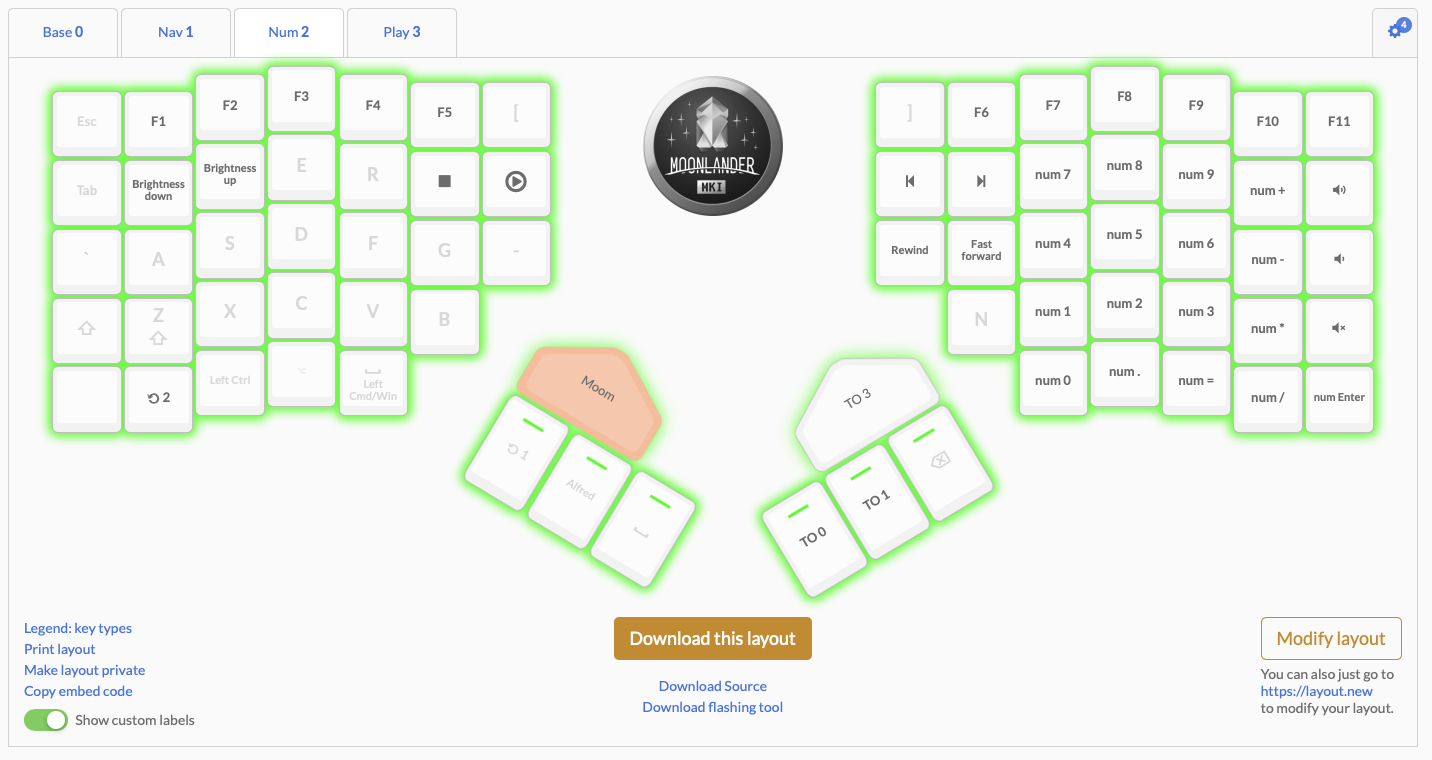

There are lots of customizations here. I want to share why I configured the keyboard like this so it helps you plan how to configure your keyboard when you get one.
Layer 0: The Base Keyboard

It goes without saying that your base keyboard needs to contain keys for typing. If you are like most people, sticking with the default QWERTY keyboard is good enough.
If you use the DVORAK-QWERTY keyboard like me, then I recommend you stick to the QWERTY keyboard layout as well.
What’s tricky about the base keyboard are the following keys:
- Space
- Enter
- Backspace
- Arrows
- Symbols
- Keys to change keyboards
The Space key
We hit the space key often when we type. So the location of space should be below the thumb. This allows us to use the key without moving the hands as much. In my case, my hands rest on the command location naturally.
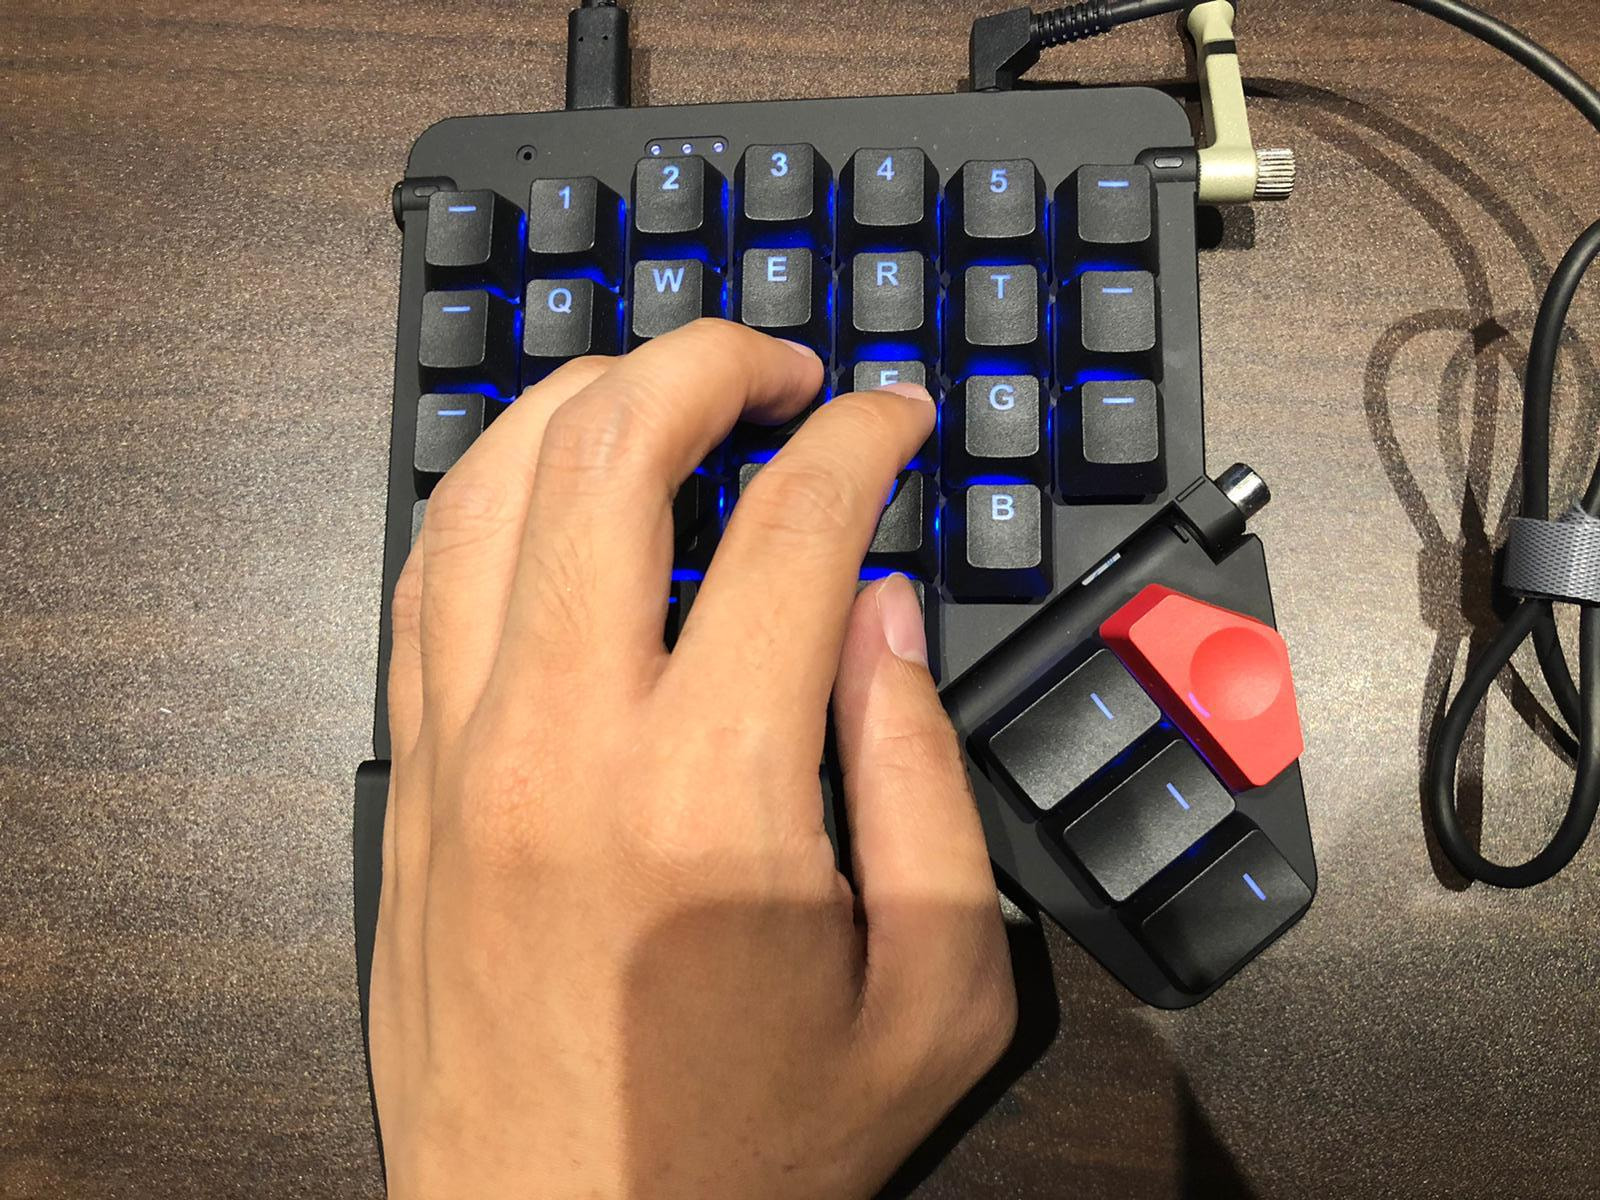
So I set the space key on the same location as the command key with a dual-function key. This essentially means I’d activate space when I tap the key and I’d activate command if I hold the key down.
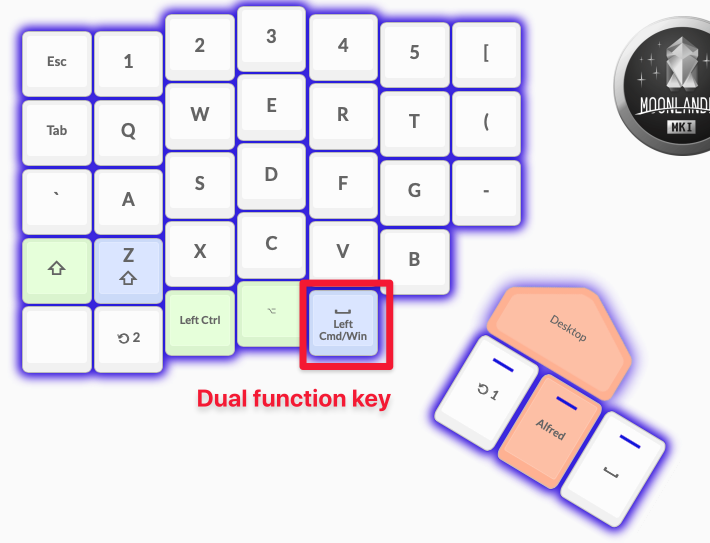
I placed Space on the left side because I predominantly press space only with my left hand. I only use space occasionally with the right hand.
You may also have noticed I added another space key as the third key in the left thumb cluster. I do this because lots of my keyboard shortcuts use Command and Space at the same time.
The Enter key
Normal keyboards have a dedicated Enter key that’s located two keys away from the L key. The Moonlander only has two keys after L. So it’s impossible to let Enter be on the same location on the right side.
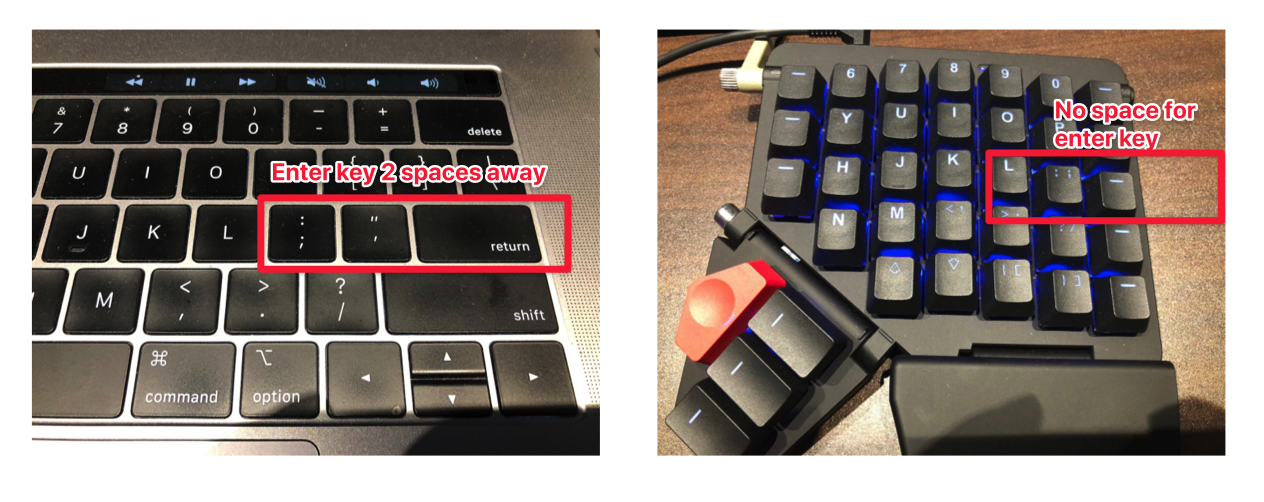
I chose to put the Enter key on the right command key (with a dual-function key) since I need to access Enter often. The additional benefit here is I don’t have to move my hands at all to reach the enter key. This means my hands are always in the optimal position for touch-typing.
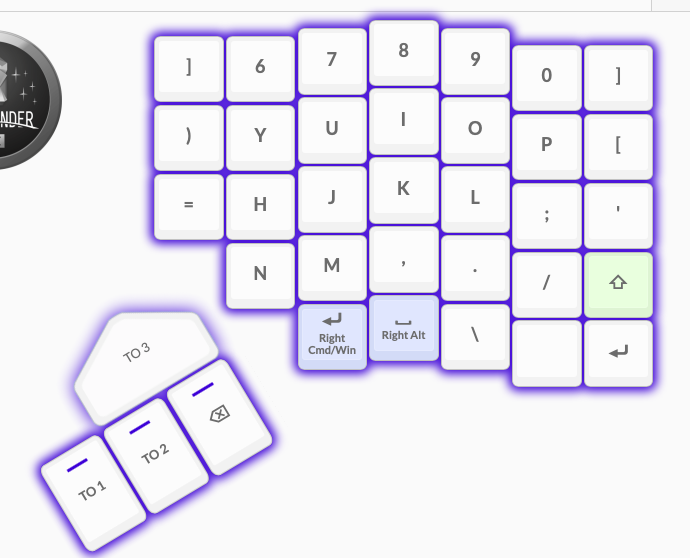
You may also notice I added another Enter key at the bottom right corner as well. This is a redundant key that I don’t use often. There’s also an extra space key at the right-alt position just in case I want to use the space with my right hand.
The Backspace key
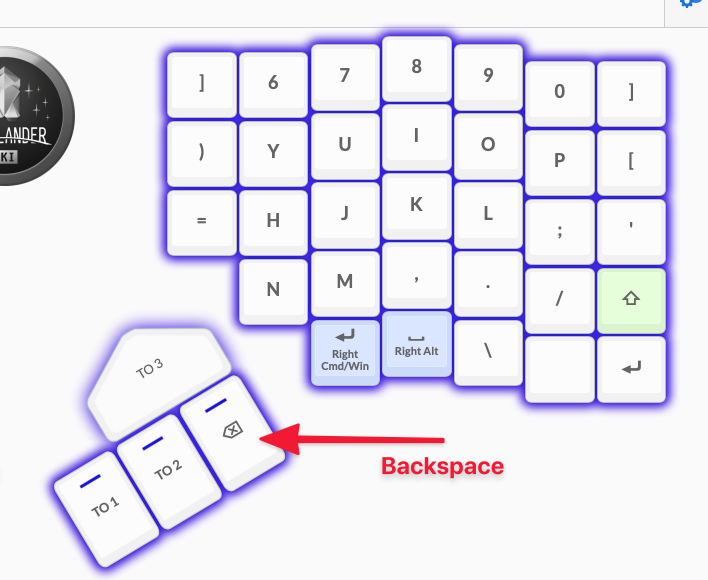
The backspace key is located two keys away from zero on a normal keyboard. In this case, we only have one after zero, which is a serious problem. This means both symbols and backspace need to be located elsewhere.
Originally, added backspace to the right command key (as a dual-function key) since I use the backspace more often than Enter. But I needed backspace to repeat frequently, which cannot be done on a Dual-function key. So backspace needs to have a dedicated key by itself.
The closest and most comfortable place for me is the top piano key in the right thumb cluster. So I added backspace there.
Arrow keys
Arrow keys are the hardest keys to map to the Moonlander in my opinion. We’re used to arrow keys being easily available – we can move our right hand to reach it easily.
Unfortunately, this movement is impossible because the Moonlander requires most of the space for normal keyboard operation. If you’re using QWERTY, you may opt to sacrifice the / key for arrow movements.
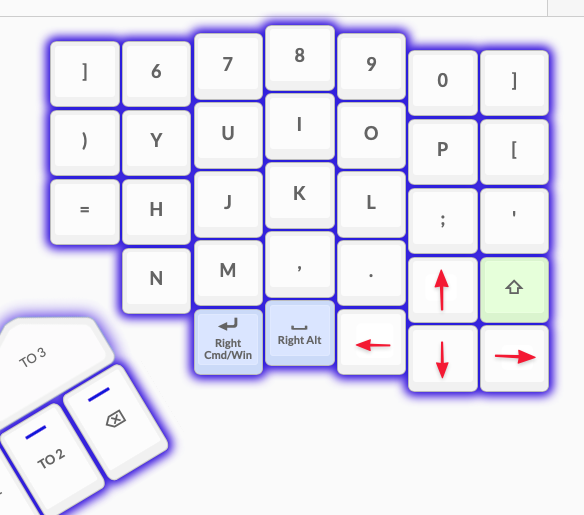
Unfortunately, I can’t do this because has a Z key in the / location. After much deliberation, I chose to put the arrow keys on a second layer. I then access this layer by changing the keyboards.

Symbol Keys
The Moonlander provides three real-estate spaces for symbol keys. I highlighted them in this picture below.

I’m going to refrain from talking about symbol keys much because Dvorak and Qwerty symbol keys are very different. I’d have a hard time explaining why I use [ and ] on the right to someone who doesn’t use Dvorak.
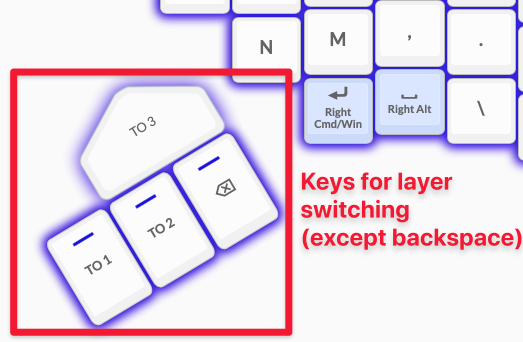
Layer Change Keys
Initially I added layer change keys to the bottom row, near the two corners. I thought it was a good idea because the bottom row are rarely accessed with norma because the bottom row
I discovered later that it was easy to trigger these keys accidentally when I tried to pressed keys on the first or second row. It changed my entire keyboard and messes up the typing.
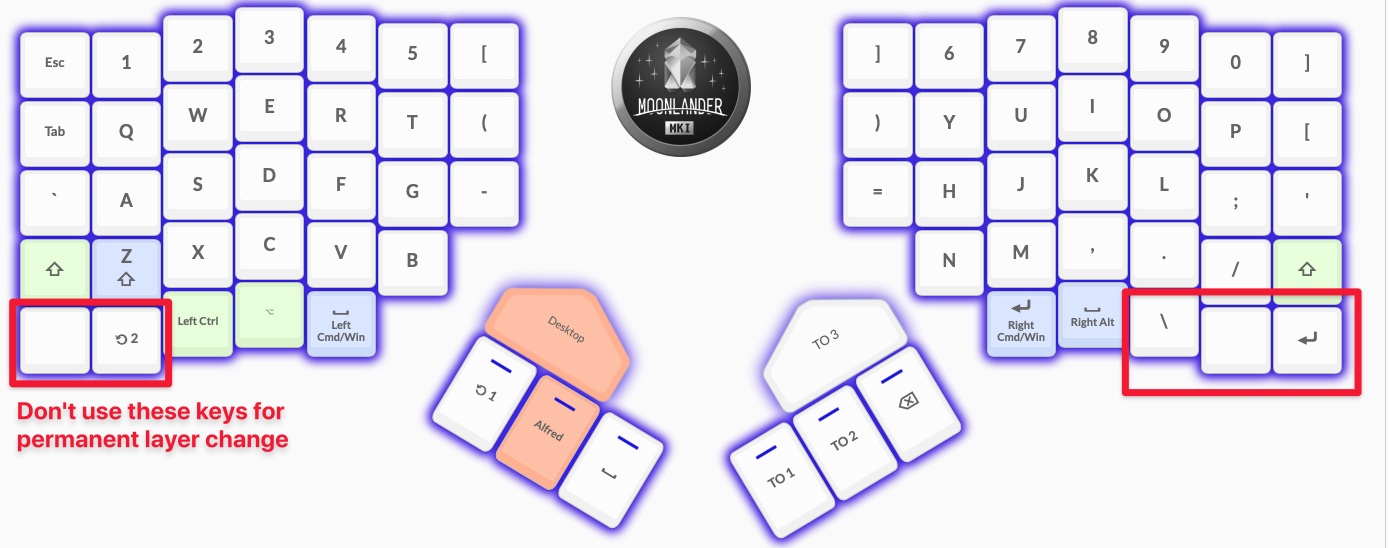
If you use these keys for layer change, make sure it doesn’t switch the keyboard permanently. Use something that switches back to the base keyboard when you lift off your finger.
For me, I moved the layer change keys into the thumb cluster which I don’t use much. It’s convenient because I can dedicate these three keys to layer-switching across all my keyboards.
Layer 1: The Nav Keyboard
My Navigation keyboard contains three major parts:
- Arrow navigation
- Mouse navigation
- Desktop navigation

Arrow Navigation
Since I normally access arrow keys with my right hand, I chose to put these keys in a place where don’t have to shift my right hand to access them.
All I need to do is press down on a layer-change key on my left thumb cluster.

This is difficult to get used to initially. It takes practice to get used to.
Selecting text with arrows
This is probably the most complex part of all. I realize I use both my hands to press down on shift, command, and option (depending on what I’m trying to do) to select text when I type. For example:
- Option + Right: Move to next word
- Shift + Option + Right: Select word
- Command + Right: Move the end of the line
- Command + Shift + Right: Select the entire line
To combat these erratic movements, I added Command, Option, and Shift keys to various parts of the keyboard.

The left side is self-explanatory. The right side looks weird – I had to put the Command and Option keys on different lines to minimize unnecessary stretching of my hands.
Mouse Navigation
The great thing about Moonlander is it lets you control the mouse with your keyboard. This means I rarely have to use my mouse for anything at all.
I chose to put the Mouse keys on my left hand so I have access to them easily. If I need the mouse on the right… I can use my actual mouse.
The best part here for me is the mouse wheel keys. None of the mouse wheels work properly on a Mac and I have to rely on the trackpad for vertical scrolling previously. Now I simply pressed the Layer switch keys plus the mouse wheel keys.

Layer 2: The Numpad Keyboard
There are three things in this layer:
- The Numpad
- Function keys
- Software keys

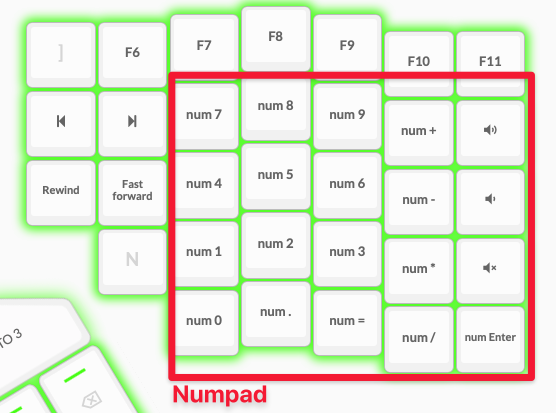
The Numpad
The Numpad is not necessary for daily operations since I don’t write numbers as much. But it is still important once in a while. I think it’s important because the number keys feel really far out of reach for me on this keyboard. (I think I have small hands?).
I don’t want to move my hands as much as possible (I’m lazy). So I create a Numpad I can use to make calculations or write numbers with.
Function Keys
Function keys are not needed most of the time, so I placed them in this layer instead of the Nav layer. This allows me to continue using the number keys even if I accidentally held down the layer switch button on my left thumb cluster. (Which happened frequently when I was getting used to the keyboard).
Software keys
By software keys, I’m talking about keys that change volume and brightness. The volume change button is quite important for adjusting music volume ?.

Special Shortcut Keys
ZSA lets you create two types of special shortcut keys
- Keys with modifiers
- Macros
Keys with modifiers
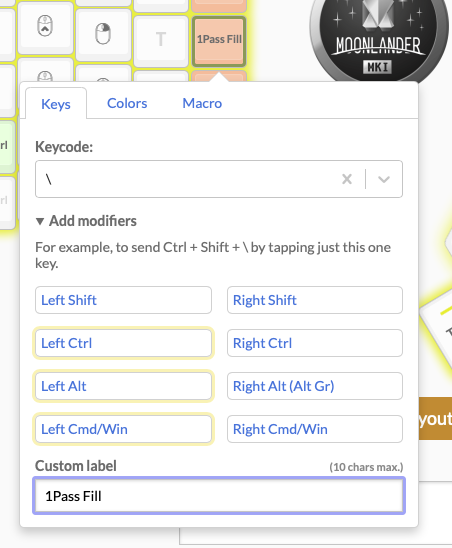
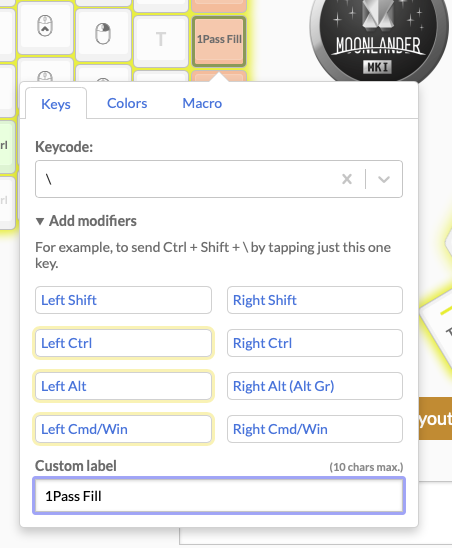
When you set a key, you can include any number of modifiers for the key. This lets you create a dedicated key for keyboard shortcut.
For example, I created a dedicated key to fill up passwords by pressing Ctrl + Opt + Command + / at the same time.
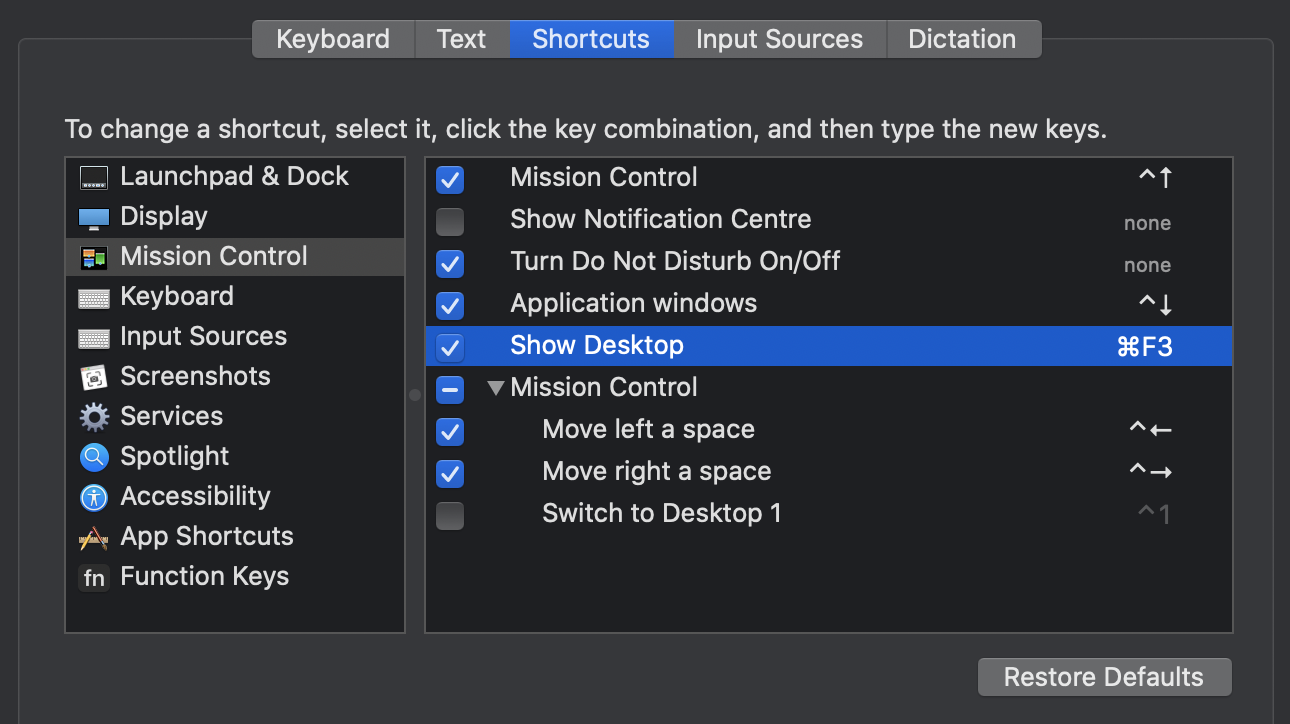
Another example: I added a shortcut to show my desktop with Command + F3.

Note: You can only do this after setting a keyboard shortcut in the Keyboard panel.
Macros
Macros are keys that are pressed in quick succession. We are allowed to press up to 4 keys (regardless of modifier count per key).
My best example is a shortcut I use for switching Window positions with Moom. Here, I press the following keys:
- Command + Shift + Space to activate Moom.
- Space again to maximize the window
This 4-key combination can be executed via a single key with Moonlander’s macros.
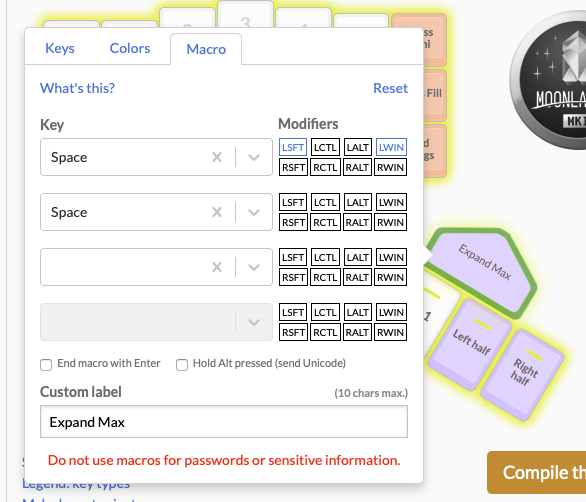
I love it since it makes window-positioning effortless!
Note: If you have a Setapp subscription, you can use Mosiac to do the same thing.
Final Words
There really isn’t a right or wrong answer to keyboard customisation. What matters is it works for you. So go ahead and experiment with different key combinations until you find one that you’re comfortable with.
I’m still working on my keyboard layouts. You can find the latest version here.
By the way, we can also apply this experience to programming and to life as well.
To programming: There are no right/wrong answers to choose languagues or framework or even coding styles. You are free to experiment with different styles to find one you love.
To life: Again, there are no right/wrong answers to life. So why not go out and experiment with different things until you find a combination that you love?
I hope this article helps you configure your keyboard layout! I’m always curious about how others configure their layouts, so let me know how you configured yours! ?.
This content originally appeared on Zell Liew and was authored by Zell Liew
Zell Liew | Sciencx (2020-12-23T00:00:00+00:00) How I set up my Moonlander. Retrieved from https://www.scien.cx/2020/12/23/how-i-set-up-my-moonlander/
Please log in to upload a file.
There are no updates yet.
Click the Upload button above to add an update.
