This content originally appeared on Bits and Pieces - Medium and was authored by Diego Abdo
Implementing form validation in React from scratch can get very messy, especially when you need to check different types of inputs, handle errors, and disable buttons at the same time.
This is why there are libraries out there that already handle all this for us. In this tutorial, I will teach you how to use the react-hook-form and zod libraries to implement form validation.
We will be using TypeScript for this tutorial.
Setup
Let’s start by initializing a new React app using Vite. I will use Tailwind CSS for styling.
Create a new project with Vite.
npm create vite@latest
Select React and Typescript.
Need to install the following packages:
  create-vite@latest
Ok to proceed? (y) y
√ Project name: ... react_form_validation
√ Select a framework: » React
√ Select a variant: » TypeScript
Move to the project directory and install the dependencies.
cd react_form_validation
npm install
npm run dev
Install and initialize Tailwind.
npm install -D tailwindcss postcss autoprefixer
npx tailwindcss init -p
Set up the Tailwind config file.
module.exports = {
  content: [
    "./src/**/*.{js,jsx,ts,tsx}",
  ],
  theme: {
    extend: {},
  },
  plugins: [],
}
Add this to the index.css file
@tailwind base;
@tailwind components;
@tailwind utilities;
Start the server and go tohttp://127.0.0.1:5173/ , you should see this page.

Now, let’s install the packages needed for the project.
npm install react-hook-form @hookform/resolvers zod
Clear the App.tsx file and add the following Tailwind code for a registration form.
function App() {
  return (
    <section className="bg-gray-50 dark:bg-gray-900">
      <div className="flex flex-col items-center justify-center px-6 py-8 mx-auto md:h-screen lg:py-0">
        <div className="w-full bg-white rounded-lg shadow dark:border md:mt-0 sm:max-w-md xl:p-0 dark:bg-gray-800 dark:border-gray-700">
          <div className="p-6 space-y-4 md:space-y-6 sm:p-8">
            <h1 className="text-xl font-bold leading-tight tracking-tight text-gray-900 md:text-2xl dark:text-white">
              Create and account
            </h1>
            <form className="space-y-4 md:space-y-6">
              <div>
                <label
                  htmlFor="username"
                  className="block mb-2 text-sm font-medium text-gray-900 dark:text-white"
                >
                  Your username
                </label>
                <input
                  type="text"
                  id="username"
                  className="bg-gray-50 border border-gray-300 text-gray-900 sm:text-sm rounded-lg block w-full p-2.5"
                  placeholder="Your name"
                />
              </div>
              <div>
                <label
                  htmlFor="email"
                  className="block mb-2 text-sm font-medium text-gray-900 dark:text-white"
                >
                  Your email
                </label>
                <input
                  type="email"
                  id="email"
                  className="bg-gray-50 border border-gray-300 text-gray-900 sm:text-sm rounded-lg block w-full p-2.5"
                  placeholder="name@company.com"
                />
              </div>
              <div>
                <label
                  htmlFor="password"
                  className="block mb-2 text-sm font-medium text-gray-900 dark:text-white"
                >
                  Password
                </label>
                <input
                  type="password"
                  id="password"
                  placeholder="••••••••"
                  className="bg-gray-50 border border-gray-300 text-gray-900 sm:text-sm rounded-lg block w-full p-2.5"
                />
              </div>
              <div>
                <label
                  htmlFor="confirm-password"
                  className="block mb-2 text-sm font-medium text-gray-900 dark:text-white"
                >
                  Confirm password
                </label>
                <input
                  type="password"
                  id="confirmPassword"
                  placeholder="••••••••"
                  className="bg-gray-50 border border-gray-300 text-gray-900 sm:text-sm rounded-lg block w-full p-2.5"
                />
              </div>
              <div className="flex items-start">
                <div className="flex items-center h-5">
                  <input
                    id="terms"
                    aria-describedby="terms"
                    type="checkbox"
                    className="w-4 h-4 border border-gray-300 rounded bg-gray-50 focus:ring-3 focus:ring-primary-300 dark:bg-gray-700 dark:border-gray-600 dark:focus:ring-primary-600 dark:ring-offset-gray-800"
                  />
                </div>
                <div className="ml-3 text-sm">
                  <label
                    htmlFor="terms"
                    className="font-light text-gray-500 dark:text-gray-300"
                  >
                    I accept the{" "}
                    <a
                      className="font-medium text-primary-600 hover:underline dark:text-primary-500"
                      href="#"
                    >
                      Terms and Conditions
                    </a>
                  </label>
                </div>
              </div>

              <button
                type="submit"
                className="w-full text-white bg-primary-600 hover:bg-primary-700 focus:ring-4 focus:outline-none focus:ring-primary-300 font-medium rounded-lg text-sm px-5 py-2.5 text-center dark:bg-primary-600 dark:hover:bg-primary-700 dark:focus:ring-primary-800"
              >
                Create an account
              </button>
            </form>
          </div>
        </div>
      </div>
    </section>
  );
}

export default App;
Add the following to the Tailwind config file for the colors.
module.exports = {
  content: [
    "./src/**/*.{js,jsx,ts,tsx}",
  ],
  theme: {
    extend: {
      colors: {
        primary: { "50": "#eff6ff", "100": "#dbeafe", "200": "#bfdbfe", "300": "#93c5fd", "400": "#60a5fa", "500": "#3b82f6", "600": "#2563eb", "700": "#1d4ed8", "800": "#1e40af", "900": "#1e3a8a" }
      }
    },
  },
  plugins: [],
}
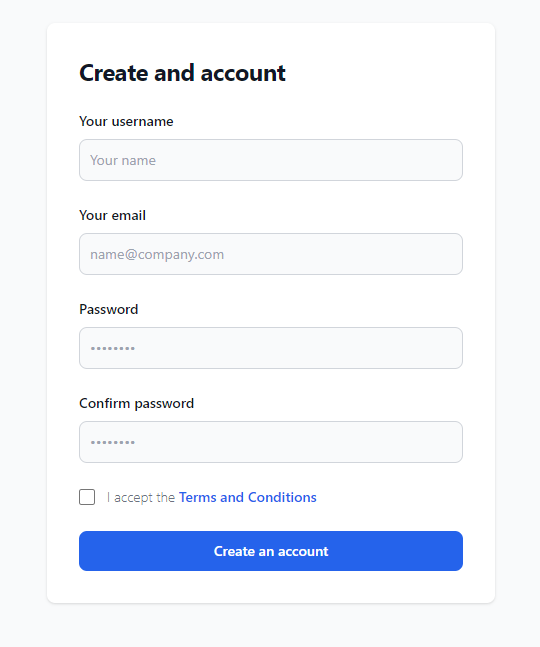
You should see this form in the browser.
Building the Validation Schema with Zod
First, let’s import all the necessary packages.
import { z } from "zod";
import { SubmitHandler, useForm } from "react-hook-form";
import { zodResolver } from "@hookform/resolvers/zod";
I am going to briefly explain how Zod works. Zod is a Typescript-first library for making validation schemas. This means that you can define how you want your data to look while using Typescript types. Zod can automatically create types from a schema, and it also comes with zero dependencies.
Let’s start by building a schema for our form.
const formSchema = z
  .object({
    username: z.string().min(1, "Username is required").max(100),
    email: z.string().email("Invalid email").min(1, "Email is required"),
    password: z
      .string()
      .min(1, "Password is required")
      .min(8, "Password must have more than 8 characters"),
    confirmPassword: z.string().min(1, "Password confirmation is required"),
    terms: z.literal(true, {
      errorMap: () => ({ message: "You must accept the terms and conditions" }),
    }),
  })
  .refine((data) => data.password === data.confirmPassword, {
    path: ["confirmPassword"],
    message: "Passwords do not match",
});
First, we declared a new schema using z.object(). Here, we start by defining the types of our field, in this case, all of them are strings so we use z.string(). Next, we use the z.min() function to specify that we don’t want an empty string, also we can add an error message as a second argument. For the email, we can use the z.email() function that comes with Zod.
We add another z.min() for the password to specify we want at least 8 characters in it, and we set the terms field to be a z.literal(), which means that this field must be exactly the set value.
Finally, we use the refine method to implement custom validation for checking if the passwords match. With this method, you can also implement custom error messages and more complex checks.
Now we can create a type for our schema using the Zod infer method. We will use this type to tell react-hook-form what our data should look like.
type FormSchemaType = z.infer<typeof formSchema>;
Implementing React Hook Form
This library comes with a custom hook named useForm , this will let us register our inputs, handle the form submission, and handle errors.
const {
    register,
    handleSubmit,
    formState: { errors, isSubmitting },
  } = useForm<FormSchemaType>({
    resolver: zodResolver(formSchema),
});
Here we destructured 4 properties from the hook. We will use register it to tell react-hook-form what inputs to check, handleSubmit to handle the form submission, errors is an object that will contain all of the form errors, and isSubmitting contains a boolean that we can use to check if the form is currently being submitted.
We also pass the resolver to the hook, in this case, we are using our Zod schema to validate the form.
Now let’s create a function for handling the form submission.
const onSubmit: SubmitHandler<FormSchemaType> =  (data) => {
     console.log(data);
};
This function will be called when the onSubmit method of our form is triggered. For now, we will just log the data to the console.
Registering Fields
We can use the register method to tell react-hook-form which fields to check.
<input
  type="text"
  id="username"
  className="bg-gray-50 border border-gray-300 text-gray-900 sm:text-sm rounded-lg block w-full p-2.5"
  placeholder="Your name"
  {...register("username")}
/>
Make sure that the fields have the same as the ones in the Zod schema. Your form should look like this.
<form className="space-y-4 md:space-y-6">
  <div>
    <label
      htmlFor="username"
      className="block mb-2 text-sm font-medium text-gray-900 dark:text-white"
    >
      Your username
    </label>
    <input
      type="text"
      id="username"
      className="bg-gray-50 border border-gray-300 text-gray-900 sm:text-sm rounded-lg block w-full p-2.5"
      placeholder="Your name"
      {...register("username")}
    />
  </div>
  <div>
    <label
      htmlFor="email"
      className="block mb-2 text-sm font-medium text-gray-900 dark:text-white"
    >
      Your email
    </label>
    <input
      type="email"
      id="email"
      className="bg-gray-50 border border-gray-300 text-gray-900 sm:text-sm rounded-lg block w-full p-2.5"
      placeholder="name@company.com"
      {...register("email")}
    />
  </div>
  <div>
    <label
      htmlFor="password"
      className="block mb-2 text-sm font-medium text-gray-900 dark:text-white"
    >
      Password
    </label>
    <input
      type="password"
      id="password"
      placeholder="••••••••"
      className="bg-gray-50 border border-gray-300 text-gray-900 sm:text-sm rounded-lg block w-full p-2.5"
      {...register("password")}
    />
  </div>
  <div>
    <label
      htmlFor="confirmPassword"
      className="block mb-2 text-sm font-medium text-gray-900 dark:text-white"
    >
      Confirm password
    </label>
    <input
      type="password"
      id="confirmPassword"
      placeholder="••••••••"
      className="bg-gray-50 border border-gray-300 text-gray-900 sm:text-sm rounded-lg block w-full p-2.5"
      {...register("confirmPassword")}
    />
  </div>
  <div className="flex items-start">
    <div className="flex items-center h-5">
      <input
        id="terms"
        aria-describedby="terms"
        type="checkbox"
        className="w-4 h-4 border border-gray-300 rounded bg-gray-50 focus:ring-3 focus:ring-primary-300 dark:bg-gray-700 dark:border-gray-600 dark:focus:ring-primary-600 dark:ring-offset-gray-800"
        {...register("terms")}
      />
    </div>
    <div className="ml-3 text-sm">
      <label
        htmlFor="terms"
        className="font-light text-gray-500 dark:text-gray-300"
      >
        I accept the{" "}
        <a
          className="font-medium text-primary-600 hover:underline dark:text-primary-500"
          href="#"
        >
          Terms and Conditions
        </a>
      </label>
    </div>
  </div>

  <button
    type="submit"
    className="w-full text-white bg-primary-600 hover:bg-primary-700 focus:ring-4 focus:outline-none focus:ring-primary-300 font-medium rounded-lg text-sm px-5 py-2.5 text-center dark:bg-primary-600 dark:hover:bg-primary-700 dark:focus:ring-primary-800"
  >
    Create an account
  </button>
</form>
Submit Handler
With the handleSubmit method, we can call our onSubmit handler by passing it to the form.
<form
  className="space-y-4 md:space-y-6"
  onSubmit={handleSubmit(onSubmit)}
>
Now when you fill out the form and click the submit button you should be able to see the form data in the console.
One thing to note is that the form can get submitted multiple times if you click the submit button many times in a row. Let’s fix that by disabling the submit button while our form is processing.
<button
  type="submit"
  className="w-full text-white bg-primary-600 hover:bg-primary-700 focus:ring-4 focus:outline-none focus:ring-primary-300 font-medium rounded-lg text-sm px-5 py-2.5 text-center dark:bg-primary-600 dark:hover:bg-primary-700 dark:focus:ring-primary-800"
  disabled={isSubmitting}
>
  Create an account
</button>
You can also add styling to the button by using the disabled property that Tailwind has.
Error Handling
The last thing is to handle the errors, we can use the errors object for that.
<div>
  <label
    htmlFor="email"
    className="block mb-2 text-sm font-medium text-gray-900 dark:text-white"
  >
    Your email
  </label>
  <input
    type="email"
    id="email"
    className="bg-gray-50 border border-gray-300 text-gray-900 sm:text-sm rounded-lg block w-full p-2.5"
    placeholder="name@company.com"
    {...register("email")}
  />
  {errors.email && (
    <span className="text-red-800 block mt-2">
      {errors.email?.message}
    </span>
  )}
</div>
Here we are checking if the email field is in the errors object. If it is there then we display a message under the field.
Your form should look like this.
<form
  className="space-y-4 md:space-y-6"
  onSubmit={handleSubmit(onSubmit)}
>
  <div>
    <label
      htmlFor="username"
      className="block mb-2 text-sm font-medium text-gray-900 dark:text-white"
    >
      Your username
    </label>
    <input
      type="text"
      id="username"
      className="bg-gray-50 border border-gray-300 text-gray-900 sm:text-sm rounded-lg block w-full p-2.5"
      placeholder="Your name"
      {...register("username")}
    />
    {errors.username && (
      <span className="text-red-800 block mt-2">
        {errors.username?.message}
      </span>
    )}
  </div>
  <div>
    <label
      htmlFor="email"
      className="block mb-2 text-sm font-medium text-gray-900 dark:text-white"
    >
      Your email
    </label>
    <input
      type="email"
      id="email"
      className="bg-gray-50 border border-gray-300 text-gray-900 sm:text-sm rounded-lg block w-full p-2.5"
      placeholder="name@company.com"
      {...register("email")}
    />
    {errors.email && (
      <span className="text-red-800 block mt-2">
        {errors.email?.message}
      </span>
    )}
  </div>
  <div>
    <label
      htmlFor="password"
      className="block mb-2 text-sm font-medium text-gray-900 dark:text-white"
    >
      Password
    </label>
    <input
      type="password"
      id="password"
      placeholder="••••••••"
      className="bg-gray-50 border border-gray-300 text-gray-900 sm:text-sm rounded-lg block w-full p-2.5"
      {...register("password")}
    />
    {errors.password && (
      <span className="text-red-800 block mt-2">
        {errors.password?.message}
      </span>
    )}
  </div>
  <div>
    <label
      htmlFor="confirmPassword"
      className="block mb-2 text-sm font-medium text-gray-900 dark:text-white"
    >
      Confirm password
    </label>
    <input
      type="password"
      id="confirmPassword"
      placeholder="••••••••"
      className="bg-gray-50 border border-gray-300 text-gray-900 sm:text-sm rounded-lg block w-full p-2.5"
      {...register("confirmPassword")}
    />
    {errors.confirmPassword && (
      <span className="text-red-800 block mt-2">
        {errors.confirmPassword?.message}
      </span>
    )}
  </div>
  <div className="flex items-start">
    <div className="flex items-center h-5">
      <input
        id="terms"
        aria-describedby="terms"
        type="checkbox"
        className="w-4 h-4 border border-gray-300 rounded bg-gray-50 focus:ring-3 focus:ring-primary-300 dark:bg-gray-700 dark:border-gray-600 dark:focus:ring-primary-600 dark:ring-offset-gray-800"
        {...register("terms")}
      />
    </div>
    <div className="ml-3 text-sm">
      <label
        htmlFor="terms"
        className="font-light text-gray-500 dark:text-gray-300"
      >
        I accept the{" "}
        <a
          className="font-medium text-primary-600 hover:underline dark:text-primary-500"
          href="#"
        >
          Terms and Conditions
        </a>
      </label>
    </div>
  </div>
  {errors.terms && (
    <span className="text-red-800 block mt-2">
      {errors.terms?.message}
    </span>
  )}
  <button
    type="submit"
    className="w-full text-white bg-primary-600 hover:bg-primary-700 focus:ring-4 focus:outline-none focus:ring-primary-300 font-medium rounded-lg text-sm px-5 py-2.5 text-center dark:bg-primary-600 dark:hover:bg-primary-700 dark:focus:ring-primary-800"
    disabled={isSubmitting}
  >
    Create an account
  </button>
</form>
Testing the Form
Now we can test our form.
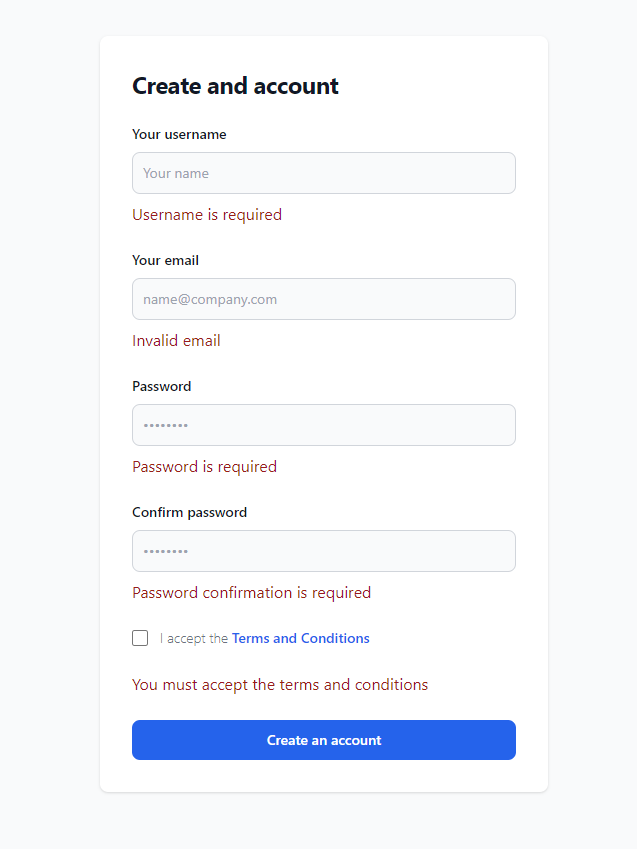
If we try to submit the form without filling it out we see that the required error messages show up.
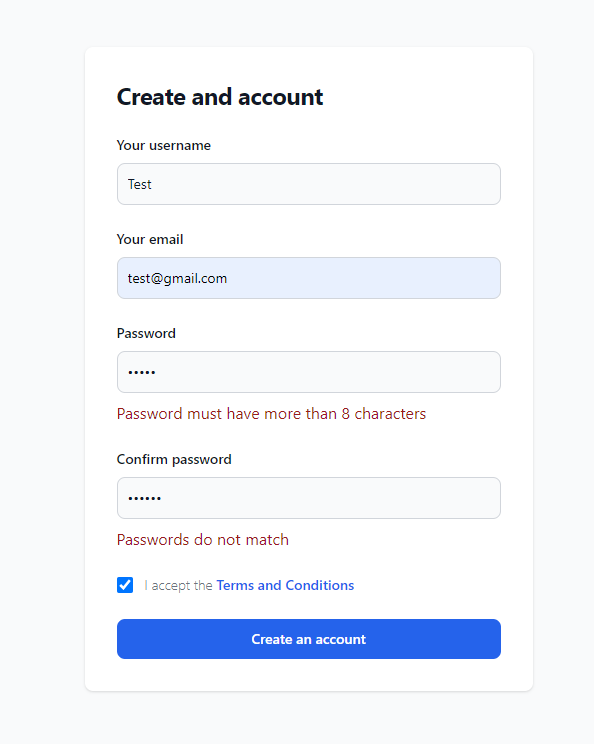
The password validation is also working.

And our data is logged to the console as expected.
Conclusion
Now you know how to implement form validation in React using the react-hook-form and zod libraries. I hope you can now see the value in using form validation libraries, and how they help us save time and improve our code. Now, if you need to re-use your form validation logic, you can push it to Bit so you can use it later, or share it with teammates.
I leave here a link to the GitHub repository if you want to check the completed code.
Thank you for reading!
Build Apps with reusable logic
Bit’s open-source tool help 250,000+ devs to build apps with components.
Turn any UI, feature, or page into a reusable component — and share it across your applications. It’s easier to collaborate and build faster.
Split apps into components to make app development easier, and enjoy the best experience for the workflows you want:
→ Micro-Frontends
→ Design System
→ Code-Sharing and reuse
→ Monorepo
Learn more
- How We Build Micro Frontends
- How we Build a Component Design System
- How to reuse React components across your projects
- 5 Ways to Build a React Monorepo
- How to Create a Composable React App with Bit
Best Way to Handle Form Validation: React Hook Form and Zod was originally published in Bits and Pieces on Medium, where people are continuing the conversation by highlighting and responding to this story.
This content originally appeared on Bits and Pieces - Medium and was authored by Diego Abdo
Diego Abdo | Sciencx (2023-02-03T12:03:53+00:00) Best Way to Handle Form Validation: React Hook Form and Zod. Retrieved from https://www.scien.cx/2023/02/03/best-way-to-handle-form-validation-react-hook-form-and-zod/
Please log in to upload a file.
There are no updates yet.
Click the Upload button above to add an update.
