
This content originally appeared on Level Up Coding - Medium and was authored by Siddhardha

State management is undoubtedly one of the most critical aspects of building a top-notch Flutter app, and as a seasoned Flutter developer, you understand the significance of efficiently managing the state. Effectively managing state enables your app to be dynamic, interactive, and responsive, thereby enhancing the user experience. In this article, we shall delve into everything you need to know about state management in Flutter, including the fundamentals of state, various state management alternatives, and sophisticated state management techniques.
Throughout this piece, I will be providing you with comprehensive information to cover the topic of state management in Flutter. To give you a glimpse of what to expect, we will be focusing on three major topics that will form the backbone of our discussion. These topics include:
- Fundamental Concepts: We will start by exploring the fundamental concepts that form the basis of state management in Flutter. By understanding these concepts, you will have a solid foundation for grasping the more complex aspects of state management.
- Practical Applications: In this section, we will take a closer look at the practical applications of state management in Flutter. I will provide you with real-world examples to help you understand how state management is used in practice.
- Advanced Techniques: Finally, we will conclude our discussion by exploring some of the advanced techniques used in state management in Flutter. By the end of this section, you will have a more in-depth understanding of the intricate details of state management in Flutter.
Overall, our aim is to equip you with comprehensive knowledge and insights that will enable you to master state management in Flutter. I am confident that by the end of this article, you will have gained the necessary skills and expertise to apply state management concepts in practical situations while developing your Flutter applications.
Get ready to unlock the secrets of State Management! for revealing tips and tricks that will take your knowledge to the next level. Let’s jump in for the first major topic in our today’s article which is “The Basics of State in Flutter”.
The Basics of State in Flutter (Fundamental Concepts)
Understanding state management is critical when developing Flutter applications. It’s essential to know the distinction between state and properties in this context before diving into the available state management options. State, in Flutter, refers to any data that can change during the lifetime of a widget. Unlike properties, the state is not passed down from parent widgets to child widgets. Instead, the state is managed either by the widget itself or its parent widget.
Managing the state separately from properties is a vital concept in Flutter’s state management. By managing the state separately, you can achieve more efficient updates and improved app performance. Instead of rebuilding the entire app, Flutter only rebuilds the affected widgets when changes are made to the state. This feature is particularly useful for complex apps where rebuilding the entire widget tree can be time-consuming and may lead to poor performance. Thus, it’s essential to make sure your app manages its state effectively to ensure it performs optimally and provides a seamless user experience.
A Simple Example of State Management in a Flutter App
One inspiring real-life example that comes to mind is a shopping app that I developed where the user can filter products based on price, category, and availability. With each filter applied, the list of products displayed on the screen changes. It’s worth noting that without proper state management, the app’s performance would have suffered, leading to a poor user experience. However, with the implementation of efficient state management techniques, I was able to transform the app into a fast and responsive platform, providing a seamless shopping experience for users.
Let’s examine an example of state management in a Flutter shopping app, specifically focusing on the implementation of a filter button. When the button is pressed, the items present will change accordingly. Here’s how you might implement this using the setState method:
import 'package:flutter/material.dart';

class ShoppingApp extends StatefulWidget {
  const ShoppingApp({Key? key}) : super(key: key);
  @override
  _ShoppingAppState createState() => _ShoppingAppState();
}
class _ShoppingAppState extends State<ShoppingApp> {
  // Define the default values for each filter
  bool filterByPrice = false;
  bool filterByCategory = false;
  bool filterByAvailability = false;
  // Define a function to toggle the state of the price filter
  void togglePriceFilter() {
    setState(() {
      filterByPrice = !filterByPrice;
    });
  }
  // Define a function to toggle the state of the category filter
  void toggleCategoryFilter() {
    setState(() {
      filterByCategory = !filterByCategory;
    });
  }
  // Define a function to toggle the state of the availability filter
  void toggleAvailabilityFilter() {
    setState(() {
      filterByAvailability = !filterByAvailability;
    });
  }
  @override
  Widget build(BuildContext context) {
    return Scaffold(
      appBar: AppBar(
        title: Text('Shopping App'),
      ),
      body: Column(
        children: [
          // Add buttons for each filter and assign the appropriate function to be called when pressed
          Row(
            mainAxisAlignment: MainAxisAlignment.spaceEvenly,
            children: [
              TextButton(
                onPressed: togglePriceFilter,
                child: Text(
                  'Filter by Price',
                  style: TextStyle(
                    color: filterByPrice ? Colors.blue : Colors.black,
                  ),
                ),
              ),
              TextButton(
                onPressed: toggleCategoryFilter,
                child: Text(
                  'Filter by Category',
                  style: TextStyle(
                    color: filterByCategory ? Colors.blue : Colors.black,
                  ),
                ),
              ),
              TextButton(
                onPressed: toggleAvailabilityFilter,
                child: Text(
                  'Filter by Availability',
                  style: TextStyle(
                    color: filterByAvailability ? Colors.blue : Colors.black,
                  ),
                ),
              ),
            ],
          ),
          // Add a list of products that updates based on the filters
          Expanded(
            child: ListView(
              children: [
                // List of products displayed based on applied filters
                // ...
              ],
            ),
          ),
        ],
      ),
    );
  }
}
A simpler example can be demonstrated using the default Flutter project template, which includes a counter button that uses the setState method, a fundamental aspect of state management in Flutter.
💡 setState is a built-in Flutter method that allows developers to update the state of a widget. This is a simple and effective option for managing state in small and simple apps.
class CounterApp extends StatefulWidget {
  @override
  _CounterAppState createState() => _CounterAppState();
}

class _CounterAppState extends State<CounterApp> {
  int _counter = 0;
  void _incrementCounter() {
    setState(() {
      _counter++;
    });
  }
  @override
  Widget build(BuildContext context) {
    return Scaffold(
      appBar: AppBar(
        title: Text('Counter App'),
      ),
      body: Center(
        child: Column(
          mainAxisAlignment: MainAxisAlignment.center,
          children: <Widget>[
            Text(
              '$_counter',
              style: TextStyle(fontSize: 36.0),
            ),
            RaisedButton(
              onPressed: _incrementCounter,
              child: Text('Increment'),
            ),
          ],
        ),
      ),
    );
  }
}
In this example, we’re using the setState method to manage the state of the _counter variable. When the button is pressed, _incrementCounter is called, which updates the value of _counter and triggers a rebuild of the affected widgets.
Common State Management Options in Flutter(Practical Applications)
While setState is a valid option for simple state management needs, it can become unwieldy and hard to maintain in larger apps. Luckily, there are several other state management options available in Flutter:
- InheritedWidget
- Provider
- Bloc
- MobX
- Redux
- Riverpod
- GetX
- Cube
Each option has its own pros and cons and is better suited for certain use cases. Let’s take a closer look at each option.
InheritedWidget
InheritedWidget is a widget that can pass down data to its child widgets without needing to explicitly pass that data through each level of the widget tree. This makes it a great option for managing an app-wide state.
Pros:
- It simplifies passing data down the widget tree, as it eliminates the need to manually pass it down as constructor arguments to every child widget.
- It allows for efficient updates, as only the widgets that depend on the changed data will be rebuilt.
- It can be used to share data and states between widgets that are not necessarily close in the widget tree.
Cons:
- It can become complex to manage as the app grows, especially if multiple data sources are used.
- Debugging can become more difficult, as the data is not explicitly passed to each widget, so it can be challenging to trace the source of issues.
- It can be less performant than other state management techniques for large, complex applications.
When to use InheritedWidget:
- When you have a data model that needs to be shared by multiple widgets in the widget tree.
- When you have a data model that needs to be updated in real time and the changes need to be propagated to all child widgets.
- When you want to avoid passing down the same data to multiple widgets in the widget tree.
When not to use InheritedWidget:
- When the data model is large and complex, it may lead to performance issues when it is passed down to many child widgets.
- When you have only one or two child widgets that need to access the data, it may be more efficient to pass down the data directly to those widgets.
- When the data model is not likely to change during the lifetime of the widget tree, it may be more efficient to pass down the data as a constructor parameter.
In general, InheritedWidget can be a good option for managing shared states in Flutter, but it’s important to consider the specific needs of your app and weigh the trade-offs between different state management options.
Provider
The provider is a state management option that builds on InheritedWidget but simplifies the process. It’s easy to use and has become a popular option for state management in Flutter. Provider allows you to provide data to any widget in your app, making it a flexible and powerful tool. The provider also has good performance and is optimized for rebuilding only the widgets that need to be updated.
Pros of Provider:
- The provider is a lightweight and flexible state management option in Flutter.
- It allows for a more granular and localized approach to state management compared to other options.
- Provider allows for dependency injection, making it easy to share instances of objects across your app.
- It integrates well with other Flutter features such as streams, ChangeNotifier, and ValueNotifier.
Cons of Provider:
- The provider can sometimes be difficult to set up and understand for beginners.
- It may not be the best option for managing more complex and dynamic states that need to be shared across many widgets.
- The provider does not have built-in support for time-travel debugging, which can make it harder to debug certain issues.
When to use Provider:
- A provider is a good option for small and medium-sized apps with simpler state management needs.
- If your app has a hierarchical structure with many nested widgets that need access to the same state, Provider can be a good choice.
- If you need to share objects across many parts of your app, Provider can provide a simple way to do so.
When not to use Provider:
- The provider may not be the best option for larger apps with complex state management needs.
- If you need to share state across many parts of your app and you have a lot of dependencies, you may want to consider using another option like Redux or Bloc.
- If you have very simple state management needs, you may not need to use a state management library at all.
The provider can be a great choice for small to medium-sized apps, but larger apps may require more powerful state management solutions.
Bloc
Bloc is a pattern that uses streams to manage states in a Flutter app. This pattern is great for apps that require a lot of data fetching or complex data manipulation. Bloc allows for easy separation of business logic from UI, which improves the readability and maintainability of your code. However, Bloc can be a bit complicated to set up and can be overkill for simple apps.
Pros:
- Provides a clear separation of concerns between the UI and the business logic.
- Helps to keep code organized and maintainable, especially in larger apps.
- Enables easy testing of the app’s business logic.
- Can handle complex state transitions and asynchronous operations effectively.
- Supports reactive programming, allowing for real-time updates to the UI.
Cons:
- Requires a bit of a learning curve, especially for developers new to reactive programming and the concept of streams.
- The boilerplate code required to set up a Bloc can make simple apps feel overly complex.
- Overuse of Blocs can lead to an over-engineered architecture that is difficult to maintain.
- The number of files required to set up a Bloc can be overwhelming for some developers.
When to use Bloc:
- When the app has complex business logic that requires handling multiple states and asynchronous operations.
- When testing business logic is a priority.
- When working on a larger app that needs to be a clear separation of concerns.
When not to use Bloc:
- For small apps that don’t require complex state management.
- When the app has simple business logic that can be handled easily by other state management options like setState or Provider.
The BLoC pattern in Flutter provides a clear separation of concerns but can be complex for small projects. It is most useful for larger and more complex apps where the architecture can help manage complexity.
MobX
MobX is a state management library that uses observable objects to track changes to the state. This makes it easy to keep your app in sync with changes to data. MobX also has good performance and is easy to use. However, MobX can be difficult to debug and requires some setup.
Pros:
- It is very simple to use and has a relatively small learning curve.
- MobX is highly performant, making it suitable for larger, more complex apps.
- It supports both mutable and immutable states, making it flexible for a variety of use cases.
- MobX makes it easy to manage the global state without the need for a third-party package.
Cons:
- It can be difficult to debug since it relies on observables and reactions.
- While MobX is simple to use, it can become more complex as the app grows in size and complexity.
- MobX requires the use of annotations which can be unfamiliar to some developers.
When to use:
- When you need a performant state management solution for larger, more complex apps.
- When you want to manage a global state without relying on a third-party package.
- When you are comfortable with using annotations in your code.
When not to use:
- When you have a very small app with simple state management needs.
- When you prefer not to use annotations in your code.
- When you need a more straightforward, easy-to-debug state management solution.
Overall, MobX is a great option for state management in Flutter, especially for larger applications with more complex state requirements. Its key advantages include its ease of use, its ability to efficiently handle large state trees, and its support for both mutable and immutable objects. However, it may not be the best fit for smaller projects with simpler state requirements, as the added complexity of MobX could outweigh the benefits in those cases.
Redux
Redux is a state management library that follows a unidirectional data flow. It’s a great option for large, complex apps with a lot of data flowing between components. Redux provides a single source of truth for your app’s data and has good performance. However, Redux can be complex to set up and requires a lot of boilerplate code.
Pros:
- Encourages separation of concerns and predictable data flow.
- Can help manage complex states and prevent bugs.
- Allows for easy testing and debugging.
Cons:
- Requires setup and learning a new library.
- Adds complexity to small apps.
- Can lead to boilerplate code.
When to use Redux:
- Large apps with complex state management needs.
- Multiple screens and components need access to the same data.
- Team collaboration on a project.
When not to use Redux:
- Small apps with simple state management needs.
- Solo projects without the need for a shared state.
- If you’re already using a state management library that meets your needs.
In conclusion, Redux can be a powerful tool for managing state in large and complex Flutter apps. While it may require some setup and boilerplate code, it can lead to more maintainable and predictable code in the long run. However, for smaller apps or solo projects with simpler state management needs, other options like setState or Provider may be more appropriate.
Riverpod
Riverpod is a Flutter state management solution that has evolved from Provider, and it is a relatively new library.
Pros:
- Allows you to declare and access the state in a more flexible and declarative way.
- Easy-to-understand syntax and simple to use.
- Fast and efficient, with good performance.
Cons:
- Still, a relatively new and evolving library, with fewer resources and documentation compared to other options.
- Requires a learning curve to use effectively.
When to use Riverpod:
- When you need a more flexible and powerful state management solution than what’s available with Provider.
- When you want a more organized and modular approach to state management that is easy to understand.
When not to use Riverpod:
- When you have a small, simple application with very few state management needs.
- When you prefer a more widely used and established state management library.
Riverpod is a good choice for state management in Flutter when you want to simplify the code with better modularity, reduce boilerplate code, and have a lot of flexibility to manage the state. It’s ideal for mid to large-sized projects where you need a robust and scalable architecture.
GetX
GetX is a simple yet powerful Flutter state management solution that emphasizes performance and code reduction.
Pros:
- Easy to use, with simple syntax and minimal boilerplate.
- Fast and efficient, with excellent performance.
- Comes with a built-in dependency injection system.
Cons:
- Not as widely adopted as other options, with less documentation and community support.
- May require some learning and adjustment if you are used to other state management solutions.
When to use GetX:
- When you prioritize performance and want to keep your codebase minimal.
- When you need to manage state across multiple widgets, screens, or even multiple apps.
- When you want to take advantage of built-in dependency injection.
GetX is a good choice for those who want a lightweight and easy-to-use state management solution. It provides a lot of useful features out of the box, such as reactive programming and dependency injection. However, it may not be the best option for larger apps with more complex state management needs.
Cube
Cube is a simple and powerful Flutter state management solution that emphasizes modularity and flexibility.
Pros:
- Easy to use, with simple syntax and minimal boilerplate.
- Provides a modular architecture that can help you organize your state management and codebase more effectively.
- Comes with several built-in features like caching, persistence, and dependency injection.
Cons:
- A newer and less established solution, with fewer resources and documentation, compared to other options.
- May require some learning and adjustment if you are used to other state management solutions.
When to use Cube:
- When you want a flexible and modular architecture that makes state management easy to understand and maintain.
- When you want to take advantage of built-in features like caching and persistence to improve app performance.
- When you need a lightweight solution that won’t slow down your app.
Cube provides a scalable and testable approach to state management. Its benefits include easy-to-use dependency injection, reactive state management, and separation of concerns between UI and business logic. However, it may have a steep learning curve for those new to Flutter or state management. It is suitable for larger apps with complex state management needs, but may not be necessary for smaller projects.
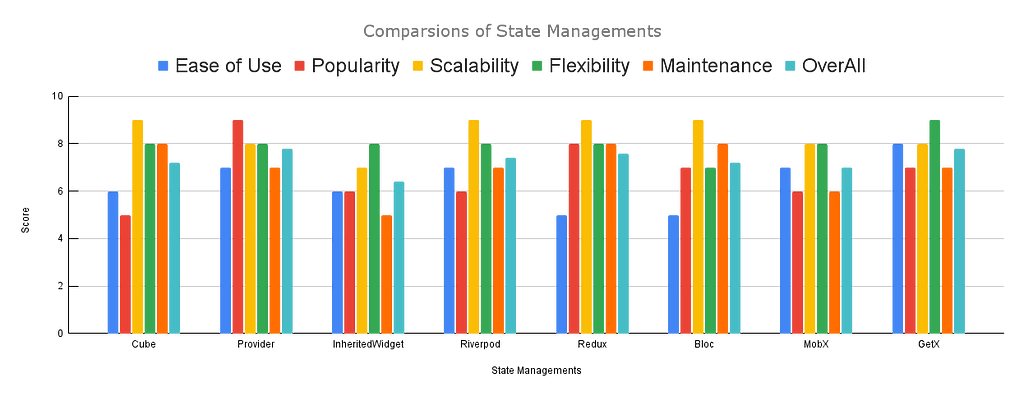
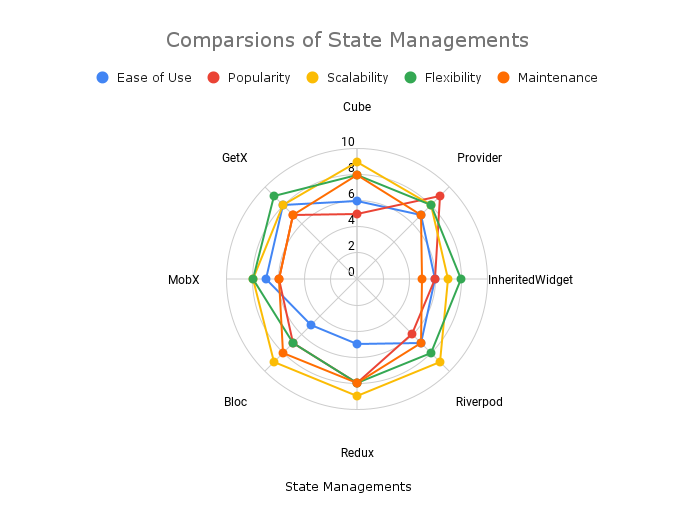
State Management Rankings
In the preceding discussion, we have examined various state management options available in Flutter. However, selecting a suitable state management strategy for a particular project is a critical decision. Several factors, such as scalability, popularity, ease of use, and project requirements, should be taken into account before making a choice. Let’s see the various factors to consider suitable state management for your project.
- Scalability: The ability of a state management solution to handle the increasing complexity and size of an app. A highly scalable state management solution can efficiently manage a large amount of state and maintain a high level of performance. All state management options can be scalable, but some require more effort than others to scale properly. For example, Redux is highly scalable but may require more boilerplate code than other options. GetX and Riverpod are also highly scalable options.
- Popularity: The degree to which a state management solution is widely used and accepted in the Flutter community. Popularity can indicate community support, quality of documentation and examples, and availability of third-party packages and tools. Some highly popular state management solutions in the Flutter community are Provider, Riverpod, GetX, and Bloc.
- Ease of use: The degree to which a state management solution is easy to learn, understand, and use. A highly user-friendly state management solution can save development time and reduce the risk of errors. InheritedWidget can be considered one of the simplest options, but may not be suitable for complex applications. GetX is known for being easy to use and requires minimal boilerplate code.
- Integration with other libraries: The degree to which a state management solution can be easily integrated with other third-party libraries and packages. All state management solutions can be integrated with other libraries, but some may require more effort than others. For example, GetX and Riverpod have built-in support for dependency injection, making it easier to integrate with other packages.
- Learning curve: The degree of time and effort required to learn and master a state management solution. A low learning curve can speed up the development process and reduce the risk of errors. Provider and InheritedWidget are considered to have a low learning curve, while Bloc and Redux may require more effort to master.
Overall, the best state management solution for a particular project depends on the specific requirements, constraints, and team expertise.
Assigning a score of 1 to 10 for each state management, let us evaluate their suitability for a project based on various factors.
Using Provider for State Management in Flutter
Now that we have explored various state management options in Flutter, let us delve deeper into using Provider. This state management solution is an excellent choice for efficiently managing state, both simple and complex, in your Flutter application.
When using Provider, the provider package must first be added to the pubspec.yaml file. Subsequently, a class that extends the ChangeNotifier must be created to hold the application state and to alert any listening widgets when the state is modified. The following example demonstrates this process:
class MyApp extends StatelessWidget {
  @override
  Widget build(BuildContext context) {
    return ChangeNotifierProvider(
      create: (context) => CounterModel(),
      child: MaterialApp(
        home: CounterApp(),
      ),
    );
  }
}
In this example, we’re creating a new ChangeNotifierProvider widget and passing in an instance of CounterModel. We're then wrapping our app's MaterialApp widget with the ChangeNotifierProvider. This allows any child widget MaterialApp to access the CounterModel.
Now that we have our state management set up with Provider, we can use the Consumer widget to listen for changes to the CounterModel. Here's an example:
class CounterApp extends StatelessWidget {
  @override
  Widget build(BuildContext context) {
    return Scaffold(
      appBar: AppBar(
        title: Text('Counter App'),
      ),
      body: Center(
        child: Column(
          mainAxisAlignment: MainAxisAlignment.center,
          children: <Widget>[
            Consumer<CounterModel>(
              builder: (context, counter, child) {
                return Text(
                  '${counter.counter}',
                  style: TextStyle(fontSize: 36.0),
                );
              },
            ),
            RaisedButton(
              onPressed: () {
                Provider.of<CounterModel>(context, listen: false).incrementCounter();
              },
              child: Text('Increment'),
            ),
          ],
        ),
      ),
    );
  }
}
In this example, we’re using the Consumer widget to listen for changes to the CounterModel. We're also using the Provider.of method to access the CounterModel and its methods. When the incrementCounter method is called, it updates the value of _counter and notifies any listening widgets that the state has changed.
Overall, Provider is a great option for managing the state in your Flutter app. It’s easy to use, has good performance, and is flexible enough to handle both simple and complex states. By using Provider, you can keep your app’s state in sync with changes to data and ensure that your app is running smoothly.
Conclusion
State management is a crucial part of building any Flutter app. It’s important to choose the right state management library for your app, based on its complexity and your own experience level. A provider is a great option for managing state in your Flutter app, as it’s easy to use and flexible enough to handle both simple and complex states. By using Provider, you can ensure that your app is running smoothly and that your users are having a great experience.
In conclusion, I hope this article has been helpful in explaining the different state management options available in Flutter and how to use Provider to manage your app’s state. With the right state management library and techniques, you can build fast, efficient, and easy-to-maintain Flutter apps. Happy coding!
Thank you for taking the time to read this blog. I hope you found the information provided to be helpful and informative. If you have any further questions or comments, please don’t hesitate to reach out. Thank you again for reading!
If you liked this article, don’t forget to leave a clap and follow!
Level Up Coding
Thanks for being a part of our community! Before you go:
- 👏 Clap for the story and follow the author 👉
- 📰 View more content in the Level Up Coding publication
- 💰 Free coding interview course ⇒ View Course
- 🔔 Follow us: Twitter | LinkedIn | Newsletter
🚀👉 Join the Level Up talent collective and find an amazing job
Everything You Need to Know About Flutter State Management from my Experience was originally published in Level Up Coding on Medium, where people are continuing the conversation by highlighting and responding to this story.
This content originally appeared on Level Up Coding - Medium and was authored by Siddhardha
Siddhardha | Sciencx (2023-02-20T03:34:02+00:00) Everything You Need to Know About Flutter State Management from my Experience. Retrieved from https://www.scien.cx/2023/02/20/everything-you-need-to-know-about-flutter-state-management-from-my-experience/
Please log in to upload a file.
There are no updates yet.
Click the Upload button above to add an update.