Making a Portfolio Website with R: A Walkthrough of the Blogdown Package

R is one of the most popular languages utilized by the statistics and data science community to analyze and model data, but thanks to its robust repository of packages and integrated development environment, it enables doing many more things outside of just analysis — including building a website. In this post, I demistify using the blogdown package to create your own personal page in R for the web.

The Difference Between a Static and Dynamic Website

Before creating a page, it’s helpful to have some idea of the difference between static websites vs. dynamic ones. Most websites people use are dynamic — like Google, Twitter, etc. which use scripting language in the backend to process inputs provided by a user on the front end. Static websites, like the ones blogdown creates, don’t have those behind the scenes processes: the site is a product of fixed content on pages. They provide a minimalist approach for blogs or personal websites, which are meant for showcasing work rather than having users interact with the page.

A Typical Workflow

The static website workflow is basically as follows:

  1. Creating a project directory initialized with a git repository
  2. Organizing the content of your site in a series of static files written in markdown (with a .md or .Rmd extension)
  3. Using a static website generator (like Jekyll or Hugo — the latter which blogdown uses) to render these pages into a website
  4. Creating a repository on GitHub where you will push the local files of your site page to remote
  5. Linking your Github repository to a platform (like Netlify) that will deploy the website.

The benefit of using RStudio to create a static website is that you can create a git initialized project, write markdown files, preview the site and push to the remote repository all within the IDE: once you write and edit your site files, you can preview your page within the viewer and push your changes to Github with the version control add-in, which then links with Netlify to deploy the website. Outside of blogdown, a typical workflow would involve installing requirements from the static generators, separately using markdown editor to create the files and using command line to preview and push changes, which makes for a less integrated workflow.

First Steps

In this walkthrough, I use the example of creating my own personal page with the blogdown package. You can refer to the official blogdown book for additional clarification throughout this demonstration.

The first steps involve:

  1. Making sure you already have Git installed and a GitHub account. If you are new to version control in R, you can read this primer or refer to Happy Git with R, which covers version control with R in its entirety.
  2. Creating a new R project (in RStudio, navigate to File in the top toolbar → select “New Project”). You can either create a new R directory → new R Project → and make sure “initialize with a git repository” is checked off (this creates your local repository — the directory that exists on your computer), then simulatenously create a repository on GitHub for your website (a remote repository — the one that exists online) and link both by typing :
git remote add origin https://github.com/your_username/your_repository.git

in a terminal window in RStudio. You can find the address of your GitHub repository by navigating to the repository → selecting the green “code” button → and copying the HTTPS address.

Or you can create your GitHub repository first, then select File → New Project → Version Control → Clone in RStudio and put the address of your GitHub repository.

3. Installing the blogdown package by typing the following in your RStudio console

# Install and call in the packages
install.packages("blogdown")
library(blogdown)

4. Picking a theme for your page from the Hugo themes gallery

When you figure out a theme you’d like, navigate to the page of that theme. There are a few buttons: download, demo or homepage on the bottom of the theme page. Click on the button that directs you to the Github repository of the theme — it can be either the “download” or the “homepage button”.

A screenshot from the Hugo themes page of the Hugo Imperfect Slim Theme. The “homepage” button is circled with text that reads “the homepage will take you to the github repository”

From the GitHub repository, you need the information for both the author and the name of the repository where the theme files are saved to use that as an argument in the new_site function from the blogdown package that will create the template for your page. For example, I used the Hugo Future Imperfect Slim theme.

A screenshot of the Github repository for the hugo-future-imperfect-slim theme. The mouse is pointing to the address of the Github repository — the author’s name, the slash (“/”) symbol and the name of the repository (hugo-future-imperfect-slim)

So in the console of my R project, I typed the following:

# Use the new_site() function to start a new site with theme = to the theme repository 

blogdown::new_site(theme = 'pacollins/hugo-future-imperfect-slim')

After running new_site(), your project directory will have some version of the following files forming the basic layout of your site page.

A screenshot of my RStudio session that shows the directory structure after I run the blogdown::new_site() function

Every theme may have variable directories, so it’s best to refer to the theme’s documentation to understand the setup. Below, I provide an overview of the most common files within a Hugo theme directory.

Files and Directories

Most themes will have either a config file in either a .yaml, .toml or .json extension, otherwise known as front matter. An example of some lines from the config file from my website:

baseurl                 = "/"
DefaultContentLanguage = "en"
title = "samia.rbind.io"
theme = "hugo-future-imperfect-slim"
preserveTaxonomyNames = true
paginate = 3
disqusShortname = ""
googleAnalytics = ""
pluralizeListTitles = false
disableLanguages = [""]

[params]
mainSections = ["blog", "post"]
# Loads CSS and JavaScript files. The variable is an array so that you can load
# multiple/additional files if necessary. The standard theme files can be loaded
# by adding the value, "default". Default includes the add-on.css and and-on.js.
# Example: ["default", "/path/to/file"]
cssFiles = ["default"]
jsFiles = ["default"]
# Sets options for highlight.js
highlightjs = true
highlightjsVersion = "9.16.2"
highlightjsCDN = "//cdnjs.cloudflare.com/ajax/libs"
highlightjsTheme = "dracula"
highlightjsLang = ["html", "css", "js", "toml", "r"]
# Sets where "View More Posts" links to
viewMorePostsLink = "/blog/"
# Activate Estimated Reading Times, which appear in the post headers
readingTime = true
# Sets which Social Share links appear in posts.
# Options are twitter, facebook, reddit, linkedin, pinterest, email
socialShare = ["twitter", "linkedin", "email"]

#Code truncated

The “front matter” can be thought of setting the default settings for your page: the title, the header and footer, the menu and your socials so that the page renders the information based on the settings you provide it. On the left are variable names and on the right are the values you provide that are assigned to that variable. If you explore the HTML files of your theme, you may see a reference to those variables written in Go, which is where the value of the variable will show up.

The themes folder contains the directory of your theme and the dependent HTML, CSS and JavaScript files that form the template of the page that should be left unchanged. This is why front matter file exists — it allows dynamic changes by assigning your input as values embedded in the theme files without changing the structure of the actual theme. Direct changes to your theme will cause issues when Netlify is trying to read the contents of your folder to deploy the site.

A screenshot of a themes directory that shows the contents of the directory

However, you can still add your own personal touches to the HTML, CSS and JavaScript of the website by copying folders or files in the theme directory and bringing them to your site’s main directory and make those changes within that directory.

The content folder contains directories that contain the written content of your website markdown (.md or .Rmd files in R) that correspond to each page of your website. The static folder contains folders for add-on css and javascript files as well as an images folder where you can save images used throughout the site or on your blog posts. You can reference your image in your markdown pages using either Markdown syntax or HTML as such:

# Markdown syntax for images. Make sure to add the / before the name of the image subdirectory in the static folder 
![My picture](/img/post/a_picture.png)
# HTML img tag. The minimum you need is the src which is the filepath of the image. You can add alt = a description and width and height adjustments
<img src="/img/post/a_picture.png" alt="My picture" height="50%" width="50%">

Lastly, the public folder is a directory automatically created after you build the site through either the blogdown::build_site() or blogdown::serve_site() functions (I use serve_site() the most because I am constantly previewing my changes). The public folder pieces together all the site contents necessary for deployment.

Site Layout

Since the theme takes care of the site look and feel, understanding the layout is not necessary but something I found helpful to customize the template. If you have a specific purpose for your site and would like to deploy your blog quickly, you don’t need to know these details, and probably wouldn’t want to experiment too much in that regard.

However, if you’re curious what parts of the site directory manage the aspects of the appearance, the layouts or templates folder house the HTML scripts that determine the components and their respective location on the site. These scripts also store the variables set in the config file, allowing the templates to remain largely unchanged while the config manages most changes needed to be made to the site. When creating a new site, there was no layouts folder already in my main directory, so I had to make a copy from my theme’s directory. It’s really important to make a copy and not make changes directly through the themes folder because the site won’t be able to deploy if it can’t recognize the original theme.

The remaining aspects of the site layout are managed by CSS and JavaScript, stored in respective subdirectories under the static folder as .css and .js files. CSS is the look and feel complement to HTML that sets the colors and styles of the layout components. JavaScript allows adding optional dynamic features to enhance the usability of the site (the light/dark mode switch on my page, for example, is created by JavaScript, which is explained later in this walkthrough).

Creating a Blog Post

A screenshot of my RStudio session that shows the window that pops-up after selecting the blogdown post option from the “Addins” menu in RStudio

The blogdown package has a convenient add-in feature similar to what would be available in a blogging website that enables defining most of the post’s metadata upfront. A blank .md or .Rmd document is then generated with the front matter populated based on what was entered in the add-in.

---
title: 'Making A Website With RStudio: The Blogdown Package'
author: ''
date: '2019-11-23'
# the date-automatically generated from the add-in
slug: making-a-static-website-using-blogdown
# the slug is the name added to the hyperlink of your page for this specific post. Also automatically generated from the add-in
categories:
- r
- web development
# categories generated from the add-in
tags:
- blogdown
- javascript
- html
- css
- jekyll
# tags generated from the add-in
description: ''
linktitle: ''
type: post
draft: true
# put this to prevent it from deploying if still in draft mode
---

To save the post as a draft, adding draft: true at the end keeps it from deploying when serving the website to make any other changes. You can remove that line once you’re ready to deploy.

Writing a blog post is essentially just like typing up any markdown document. You can use both markdown syntax or HTML tags to format text and add pictures. To add code blocks, you can insert code in between three backquotes or insert text between single backquotes for inline code.

If you want to preview your website, all you have to do is save changes to your files and run blogdown::serve_site() that will run the site on a local server. The preview appears in the Viewer tab in the IDE, but can be extended into a web browser after clicking the “show in new window” button. Alternatively, you can run blogdown::build_site() if you don’t want to preview (the differences between the two are better explained here).

A screenshot of my RStudio session that circles a button opening the website I created into an external browser

One thing to keep in mind is that after running the serve_site() command, it re-runs automatically everytime you save new changes to your site files. If you like to continuously preview your site and have it open in multiple tabs on a browser window, the save button eventually freezes at some point, in which case, you should close out of those tabs as you preview.

A screenshot of website browswer tabs that causes previewing in RStudio to freeze if too many tabs are open

As you work with your site and make changes, it’s good practice to commit your changes using git. You can refer to the resource I mentioned earlier in this post — Happy Git With R, or the the git reference manual to understand the commands to stage files, commit changes and pull/push changes from local to remote and vice versa.

In R, there are two ways to commit changes: either you can use the git add-in, which is a button on the menu on the top toolbar in RStudio, or a terminal to write the commands.

R Studio menu that shows the git-add in button on the left
In the RStudio menu, the git add-in feature— a button with grey, red and green lettering, allows you to use version control with R without typing up commands in terminal

The general workflow for your blog will be as follows:

Add your changes to staging (pre-commit)

Navigate to the git add-in button in RStudio:

  • Select “Commit”
  • Check off the files you want to stage — the files you want to commit changes to (if you want to stage all the files, select one and hit CTRL+A to select all)
  • Click the “stage” button on the top which has a blue checkmark icon

Alternatively, in the terminal:

git add path/example.md # If you want to add a specific example.md file git add -A # If you want to add all changes

Commit your changes (with a message so you can keep track of what you’re doing)

Once you have added your changes to staging, you want to commit your changes. You should add a short message that specifies what changes you made. In the commit window under the git add-in, you can add a message or check “amend previous commit” that will automatically populate with the same if you’ve already committed changes previously.

Alternatively, in the terminal:

git commit -m "add your message here" # If you're making a new commit git commit --amend # If you're amending a previous commit

Git pull makes sure that your local repository matches the remote repository before you make the changes to your local repository and send it back to the remote. If you don’t have anything on your remote repository or have not pushed anything from local to remote previously, likely you will have nothing to pull, but this is the general sequence before pushing the changes you made on your local to the remote repository.

In the git add-in, you can pull using the blue arrow facing down.

Alternatively, in the terminal:

git pull

Once you have ensured your local repository matches the remote repository, you’re ready to push your changes to the remote repository.

In the git add-in, you can push using the green arrow facing up. Alternatively, in the terminal:

git push origin master

Creating a Netlify account to deploy page

If you haven’t already created a Netlify account, you should do so once your remote repository contains all your blog’s static files and is ready for deployment. Once you create an account, Netlify reads in your repository, specifically looking for the public folder created after serving your blogdown site. As mentioned previously, you want to make sure that you haven’t made any changes to the original themes folder of your site which would cause the deployment to fail. If everything is good to go, you should have a running website!

You can choose your own domain name however you’d like if you decide you want an alternative to the .netlify.com domain, which is the default when using netlify. I decided to use the .rbind.io domain name as I mainly made a blogdown for R and related statistics and programming posts.

Optional Add-Ons For Your Page

Dark/Light Mode Switch

I noticed some themes already have a dark/light mode switch built into the template that enables changing the contrast of the theme, so I wanted to add one to my own page. This easy to follow tutorial goes over all the Javascript, HTML and CSS elements to add one to your own page.

Favicon

A favicon is a little icon that identifies your page, which is probably most noticeable when you have many tabs open on your browser at once. The theme I used includes a true/false option in the config file that either enables or disables the favicon HTML code already included in the template, so after setting it to true I generated the icon using https://realfavicongenerator.net and put the accompanying files in the static folder for it to show up on my page’s tabs.

Highlight.js

Highlight.js is a syntax highlighter that automatically detects the language of code written in HTML code blocks and highlights the elements of the language accordingly with hundreds of themes to choose from. The option to enable or disable highlight.js and specify the theme was available through the config file.

A screenshot from my website of a code block that has highlight.js enabled with syntax of different elements of a programming language highlighted

Adding Copy Buttons to Code Blocks

When browsing blog sites while learning programming, I noticed it was always helpful to have a copy button readily available on code chunks. This tutorial here does a great job of walking through the steps to include one on your own page.

A screenshot of a code block from my website with a copy button on the top right
The copy button is on the top right of the code block

Level Up Coding

Thanks for being a part of our community! Before you go:

🚀👉 Join the Level Up talent collective and find an amazing job


Making a Portfolio Website with R: A Walkthrough of the Blogdown Package was originally published in Level Up Coding on Medium, where people are continuing the conversation by highlighting and responding to this story.


This content originally appeared on Level Up Coding - Medium and was authored by Samia
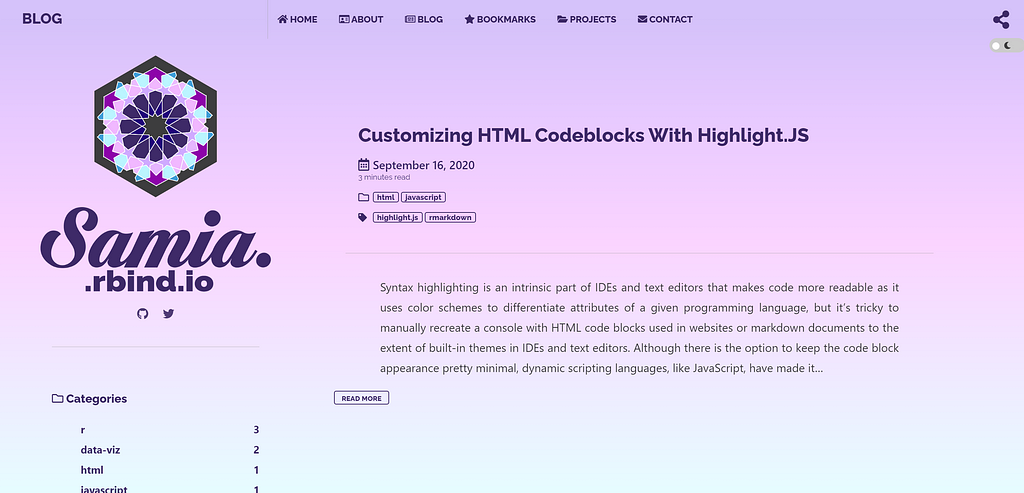
R is one of the most popular languages utilized by the statistics and data science community to analyze and model data, but thanks to its robust repository of packages and integrated development environment, it enables doing many more things outside of just analysis — including building a website. In this post, I demistify using the blogdown package to create your own personal page in R for the web.

The Difference Between a Static and Dynamic Website

Before creating a page, it’s helpful to have some idea of the difference between static websites vs. dynamic ones. Most websites people use are dynamic — like Google, Twitter, etc. which use scripting language in the backend to process inputs provided by a user on the front end. Static websites, like the ones blogdown creates, don't have those behind the scenes processes: the site is a product of fixed content on pages. They provide a minimalist approach for blogs or personal websites, which are meant for showcasing work rather than having users interact with the page.

A Typical Workflow

The static website workflow is basically as follows:

  1. Creating a project directory initialized with a git repository
  2. Organizing the content of your site in a series of static files written in markdown (with a .md or .Rmd extension)
  3. Using a static website generator (like Jekyll or Hugo — the latter which blogdown uses) to render these pages into a website
  4. Creating a repository on GitHub where you will push the local files of your site page to remote
  5. Linking your Github repository to a platform (like Netlify) that will deploy the website.

The benefit of using RStudio to create a static website is that you can create a git initialized project, write markdown files, preview the site and push to the remote repository all within the IDE: once you write and edit your site files, you can preview your page within the viewer and push your changes to Github with the version control add-in, which then links with Netlify to deploy the website. Outside of blogdown, a typical workflow would involve installing requirements from the static generators, separately using markdown editor to create the files and using command line to preview and push changes, which makes for a less integrated workflow.

First Steps

In this walkthrough, I use the example of creating my own personal page with the blogdown package. You can refer to the official blogdown book for additional clarification throughout this demonstration.

The first steps involve:

  1. Making sure you already have Git installed and a GitHub account. If you are new to version control in R, you can read this primer or refer to Happy Git with R, which covers version control with R in its entirety.
  2. Creating a new R project (in RStudio, navigate to File in the top toolbar → select “New Project”). You can either create a new R directory → new R Project → and make sure “initialize with a git repository” is checked off (this creates your local repository — the directory that exists on your computer), then simulatenously create a repository on GitHub for your website (a remote repository — the one that exists online) and link both by typing :
git remote add origin https://github.com/your_username/your_repository.git

in a terminal window in RStudio. You can find the address of your GitHub repository by navigating to the repository → selecting the green “code” button → and copying the HTTPS address.

Or you can create your GitHub repository first, then select File → New Project → Version Control → Clone in RStudio and put the address of your GitHub repository.

3. Installing the blogdown package by typing the following in your RStudio console

# Install and call in the packages
install.packages("blogdown")
library(blogdown)

4. Picking a theme for your page from the Hugo themes gallery

When you figure out a theme you’d like, navigate to the page of that theme. There are a few buttons: download, demo or homepage on the bottom of the theme page. Click on the button that directs you to the Github repository of the theme — it can be either the “download” or the “homepage button”.
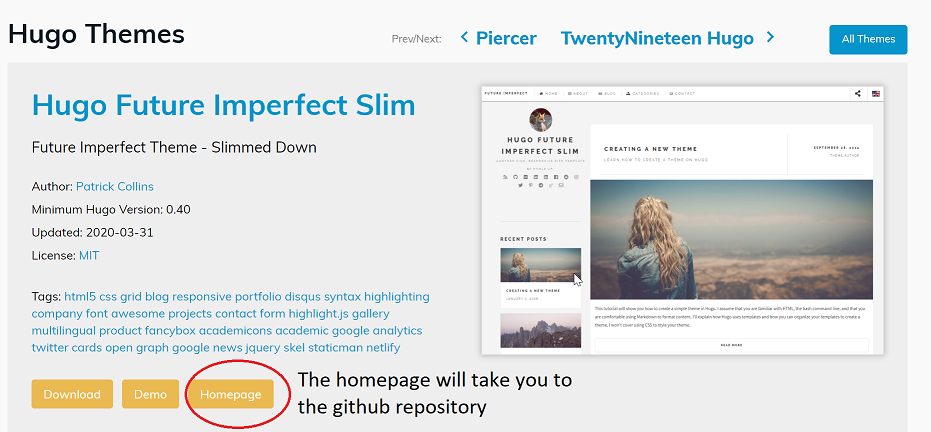
A screenshot from the Hugo themes page of the Hugo Imperfect Slim Theme. The “homepage” button is circled with text that reads “the homepage will take you to the github repository”

From the GitHub repository, you need the information for both the author and the name of the repository where the theme files are saved to use that as an argument in the new_site function from the blogdown package that will create the template for your page. For example, I used the Hugo Future Imperfect Slim theme.
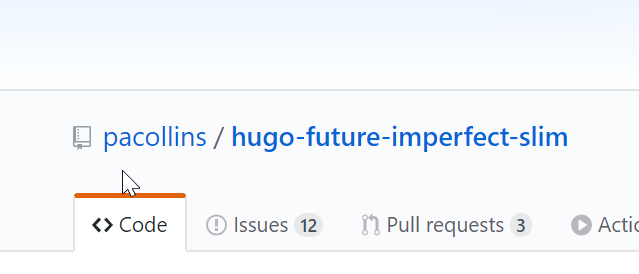
A screenshot of the Github repository for the hugo-future-imperfect-slim theme. The mouse is pointing to the address of the Github repository — the author’s name, the slash (“/”) symbol and the name of the repository (hugo-future-imperfect-slim)

So in the console of my R project, I typed the following:

# Use the new_site() function to start a new site with theme = to the theme repository 

blogdown::new_site(theme = 'pacollins/hugo-future-imperfect-slim')

After running new_site(), your project directory will have some version of the following files forming the basic layout of your site page.
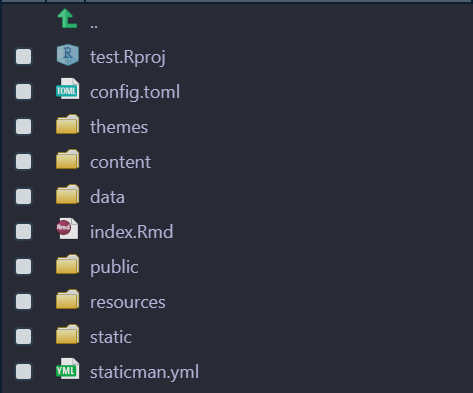
A screenshot of my RStudio session that shows the directory structure after I run the blogdown::new_site() function

Every theme may have variable directories, so it’s best to refer to the theme’s documentation to understand the setup. Below, I provide an overview of the most common files within a Hugo theme directory.

Files and Directories

Most themes will have either a config file in either a .yaml, .toml or .json extension, otherwise known as front matter. An example of some lines from the config file from my website:

baseurl                 = "/"
DefaultContentLanguage = "en"
title = "samia.rbind.io"
theme = "hugo-future-imperfect-slim"
preserveTaxonomyNames = true
paginate = 3
disqusShortname = ""
googleAnalytics = ""
pluralizeListTitles = false
disableLanguages = [""]

[params]
mainSections = ["blog", "post"]
# Loads CSS and JavaScript files. The variable is an array so that you can load
# multiple/additional files if necessary. The standard theme files can be loaded
# by adding the value, "default". Default includes the add-on.css and and-on.js.
# Example: ["default", "/path/to/file"]
cssFiles = ["default"]
jsFiles = ["default"]
# Sets options for highlight.js
highlightjs = true
highlightjsVersion = "9.16.2"
highlightjsCDN = "//cdnjs.cloudflare.com/ajax/libs"
highlightjsTheme = "dracula"
highlightjsLang = ["html", "css", "js", "toml", "r"]
# Sets where "View More Posts" links to
viewMorePostsLink = "/blog/"
# Activate Estimated Reading Times, which appear in the post headers
readingTime = true
# Sets which Social Share links appear in posts.
# Options are twitter, facebook, reddit, linkedin, pinterest, email
socialShare = ["twitter", "linkedin", "email"]

#Code truncated

The “front matter” can be thought of setting the default settings for your page: the title, the header and footer, the menu and your socials so that the page renders the information based on the settings you provide it. On the left are variable names and on the right are the values you provide that are assigned to that variable. If you explore the HTML files of your theme, you may see a reference to those variables written in Go, which is where the value of the variable will show up.

The themes folder contains the directory of your theme and the dependent HTML, CSS and JavaScript files that form the template of the page that should be left unchanged. This is why front matter file exists — it allows dynamic changes by assigning your input as values embedded in the theme files without changing the structure of the actual theme. Direct changes to your theme will cause issues when Netlify is trying to read the contents of your folder to deploy the site.
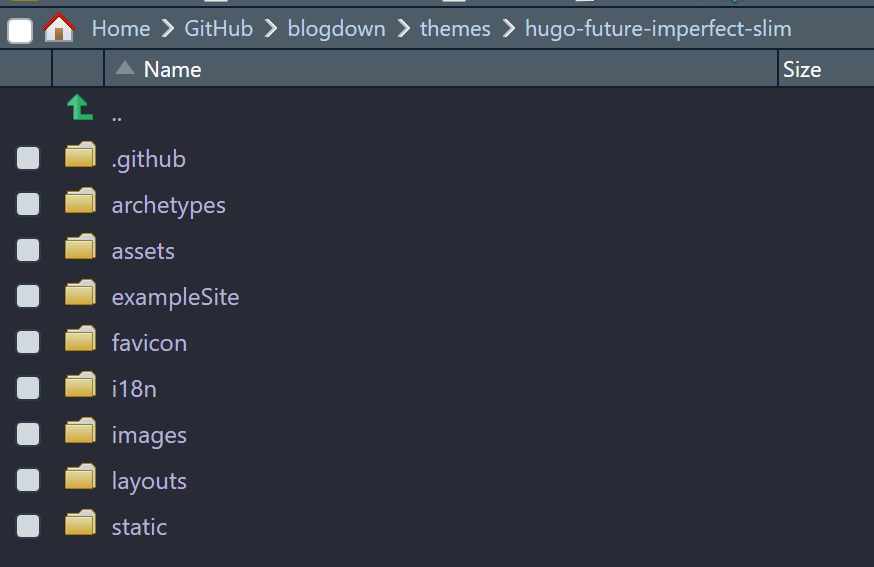
A screenshot of a themes directory that shows the contents of the directory

However, you can still add your own personal touches to the HTML, CSS and JavaScript of the website by copying folders or files in the theme directory and bringing them to your site’s main directory and make those changes within that directory.

The content folder contains directories that contain the written content of your website markdown (.md or .Rmd files in R) that correspond to each page of your website. The static folder contains folders for add-on css and javascript files as well as an images folder where you can save images used throughout the site or on your blog posts. You can reference your image in your markdown pages using either Markdown syntax or HTML as such:

# Markdown syntax for images. Make sure to add the / before the name of the image subdirectory in the static folder 
![My picture](/img/post/a_picture.png)
# HTML img tag. The minimum you need is the src which is the filepath of the image. You can add alt = a description and width and height adjustments
<img src="/img/post/a_picture.png" alt="My picture" height="50%" width="50%">

Lastly, the public folder is a directory automatically created after you build the site through either the blogdown::build_site() or blogdown::serve_site() functions (I use serve_site() the most because I am constantly previewing my changes). The public folder pieces together all the site contents necessary for deployment.

Site Layout

Since the theme takes care of the site look and feel, understanding the layout is not necessary but something I found helpful to customize the template. If you have a specific purpose for your site and would like to deploy your blog quickly, you don’t need to know these details, and probably wouldn’t want to experiment too much in that regard.

However, if you’re curious what parts of the site directory manage the aspects of the appearance, the layouts or templates folder house the HTML scripts that determine the components and their respective location on the site. These scripts also store the variables set in the config file, allowing the templates to remain largely unchanged while the config manages most changes needed to be made to the site. When creating a new site, there was no layouts folder already in my main directory, so I had to make a copy from my theme’s directory. It’s really important to make a copy and not make changes directly through the themes folder because the site won’t be able to deploy if it can’t recognize the original theme.

The remaining aspects of the site layout are managed by CSS and JavaScript, stored in respective subdirectories under the static folder as .css and .js files. CSS is the look and feel complement to HTML that sets the colors and styles of the layout components. JavaScript allows adding optional dynamic features to enhance the usability of the site (the light/dark mode switch on my page, for example, is created by JavaScript, which is explained later in this walkthrough).

Creating a Blog Post
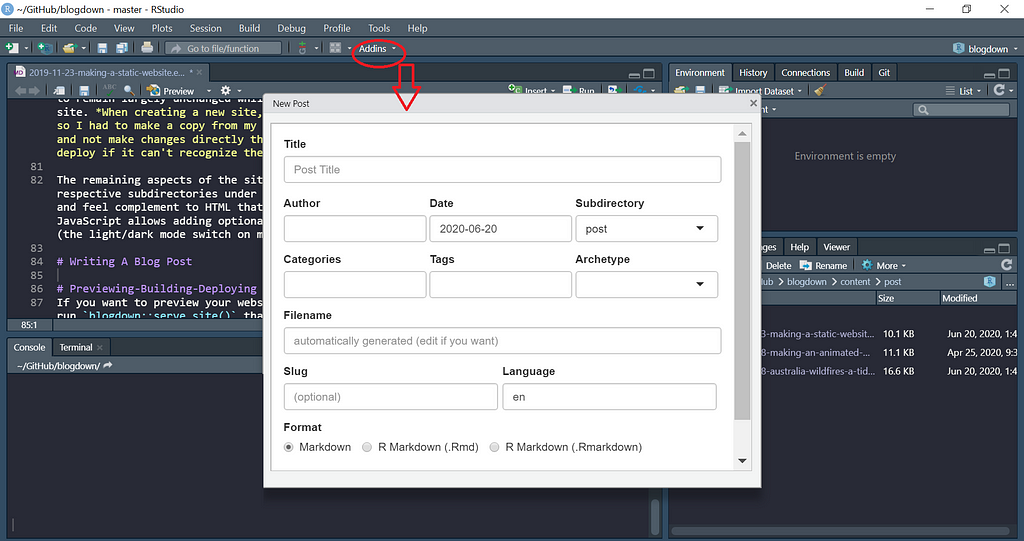
A screenshot of my RStudio session that shows the window that pops-up after selecting the blogdown post option from the “Addins” menu in RStudio

The blogdown package has a convenient add-in feature similar to what would be available in a blogging website that enables defining most of the post's metadata upfront. A blank .md or .Rmd document is then generated with the front matter populated based on what was entered in the add-in.

---
title: 'Making A Website With RStudio: The Blogdown Package'
author: ''
date: '2019-11-23'
# the date-automatically generated from the add-in
slug: making-a-static-website-using-blogdown
# the slug is the name added to the hyperlink of your page for this specific post. Also automatically generated from the add-in
categories:
- r
- web development
# categories generated from the add-in
tags:
- blogdown
- javascript
- html
- css
- jekyll
# tags generated from the add-in
description: ''
linktitle: ''
type: post
draft: true
# put this to prevent it from deploying if still in draft mode
---

To save the post as a draft, adding draft: true at the end keeps it from deploying when serving the website to make any other changes. You can remove that line once you're ready to deploy.

Writing a blog post is essentially just like typing up any markdown document. You can use both markdown syntax or HTML tags to format text and add pictures. To add code blocks, you can insert code in between three backquotes or insert text between single backquotes for inline code.

If you want to preview your website, all you have to do is save changes to your files and run blogdown::serve_site() that will run the site on a local server. The preview appears in the Viewer tab in the IDE, but can be extended into a web browser after clicking the "show in new window" button. Alternatively, you can run blogdown::build_site() if you don't want to preview (the differences between the two are better explained here).
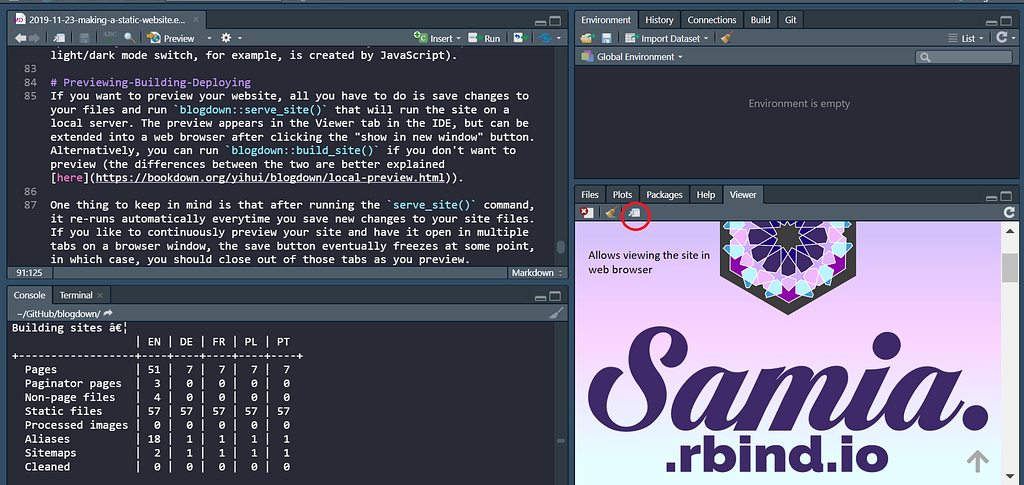
A screenshot of my RStudio session that circles a button opening the website I created into an external browser

One thing to keep in mind is that after running the serve_site() command, it re-runs automatically everytime you save new changes to your site files. If you like to continuously preview your site and have it open in multiple tabs on a browser window, the save button eventually freezes at some point, in which case, you should close out of those tabs as you preview.

A screenshot of website browswer tabs that causes previewing in RStudio to freeze if too many tabs are open

As you work with your site and make changes, it’s good practice to commit your changes using git. You can refer to the resource I mentioned earlier in this post — Happy Git With R, or the the git reference manual to understand the commands to stage files, commit changes and pull/push changes from local to remote and vice versa.

In R, there are two ways to commit changes: either you can use the git add-in, which is a button on the menu on the top toolbar in RStudio, or a terminal to write the commands.

R Studio menu that shows the git-add in button on the left
In the RStudio menu, the git add-in feature— a button with grey, red and green lettering, allows you to use version control with R without typing up commands in terminal

The general workflow for your blog will be as follows:

Add your changes to staging (pre-commit)

Navigate to the git add-in button in RStudio:

  • Select “Commit”
  • Check off the files you want to stage — the files you want to commit changes to (if you want to stage all the files, select one and hit CTRL+A to select all)
  • Click the “stage” button on the top which has a blue checkmark icon

Alternatively, in the terminal:

git add path/example.md # If you want to add a specific example.md file git add -A # If you want to add all changes

Commit your changes (with a message so you can keep track of what you’re doing)

Once you have added your changes to staging, you want to commit your changes. You should add a short message that specifies what changes you made. In the commit window under the git add-in, you can add a message or check “amend previous commit” that will automatically populate with the same if you’ve already committed changes previously.

Alternatively, in the terminal:

git commit -m "add your message here" # If you're making a new commit git commit --amend # If you're amending a previous commit

Git pull makes sure that your local repository matches the remote repository before you make the changes to your local repository and send it back to the remote. If you don’t have anything on your remote repository or have not pushed anything from local to remote previously, likely you will have nothing to pull, but this is the general sequence before pushing the changes you made on your local to the remote repository.

In the git add-in, you can pull using the blue arrow facing down.

Alternatively, in the terminal:

git pull

Once you have ensured your local repository matches the remote repository, you’re ready to push your changes to the remote repository.

In the git add-in, you can push using the green arrow facing up. Alternatively, in the terminal:

git push origin master

Creating a Netlify account to deploy page

If you haven’t already created a Netlify account, you should do so once your remote repository contains all your blog’s static files and is ready for deployment. Once you create an account, Netlify reads in your repository, specifically looking for the public folder created after serving your blogdown site. As mentioned previously, you want to make sure that you haven’t made any changes to the original themes folder of your site which would cause the deployment to fail. If everything is good to go, you should have a running website!

You can choose your own domain name however you’d like if you decide you want an alternative to the .netlify.com domain, which is the default when using netlify. I decided to use the .rbind.io domain name as I mainly made a blogdown for R and related statistics and programming posts.

Optional Add-Ons For Your Page

Dark/Light Mode Switch

I noticed some themes already have a dark/light mode switch built into the template that enables changing the contrast of the theme, so I wanted to add one to my own page. This easy to follow tutorial goes over all the Javascript, HTML and CSS elements to add one to your own page.

Favicon

A favicon is a little icon that identifies your page, which is probably most noticeable when you have many tabs open on your browser at once. The theme I used includes a true/false option in the config file that either enables or disables the favicon HTML code already included in the template, so after setting it to true I generated the icon using https://realfavicongenerator.net and put the accompanying files in the static folder for it to show up on my page’s tabs.

Highlight.js

Highlight.js is a syntax highlighter that automatically detects the language of code written in HTML code blocks and highlights the elements of the language accordingly with hundreds of themes to choose from. The option to enable or disable highlight.js and specify the theme was available through the config file.
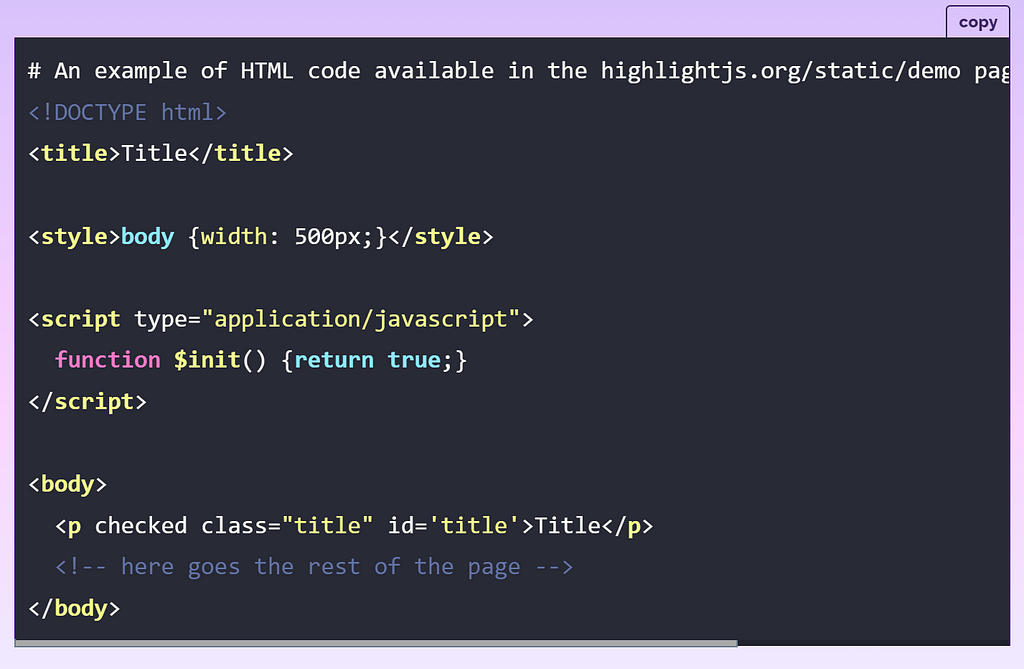
A screenshot from my website of a code block that has highlight.js enabled with syntax of different elements of a programming language highlighted

Adding Copy Buttons to Code Blocks

When browsing blog sites while learning programming, I noticed it was always helpful to have a copy button readily available on code chunks. This tutorial here does a great job of walking through the steps to include one on your own page.
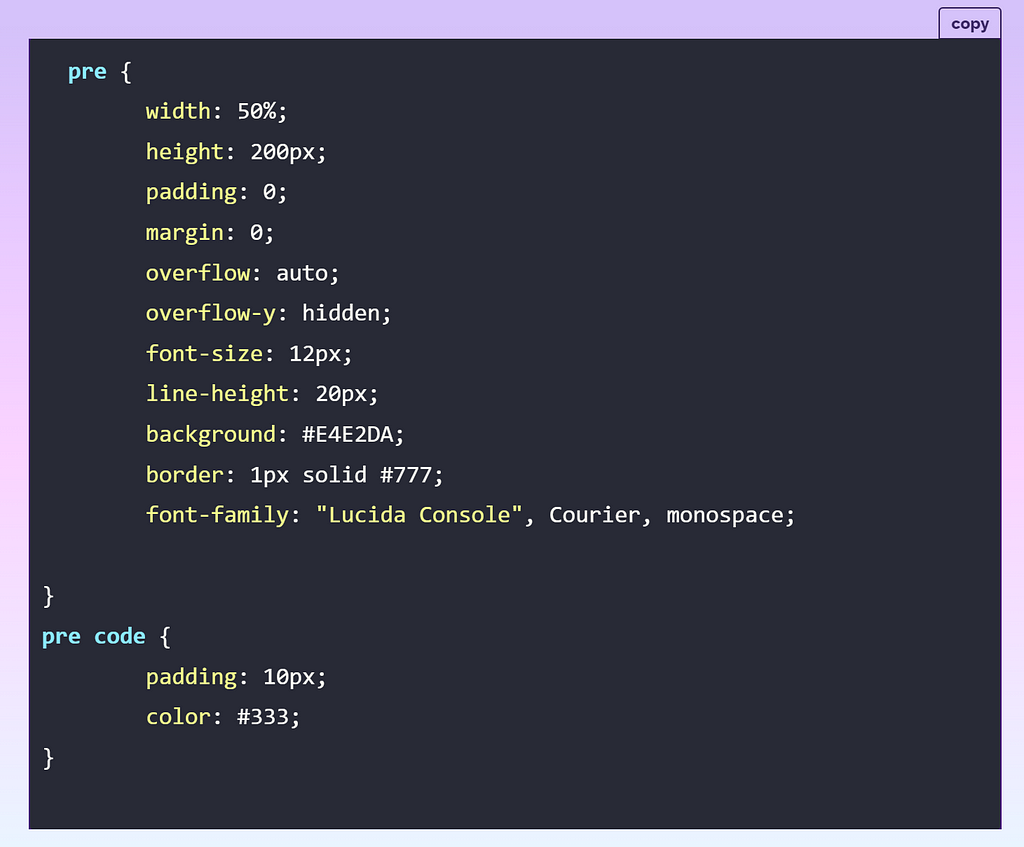
A screenshot of a code block from my website with a copy button on the top right
The copy button is on the top right of the code block

Level Up Coding

Thanks for being a part of our community! Before you go:

🚀👉 Join the Level Up talent collective and find an amazing job


Making a Portfolio Website with R: A Walkthrough of the Blogdown Package was originally published in Level Up Coding on Medium, where people are continuing the conversation by highlighting and responding to this story.


This content originally appeared on Level Up Coding - Medium and was authored by Samia


Print Share Comment Cite Upload Translate Updates
APA

Samia | Sciencx (2023-03-22T02:20:57+00:00) Making a Portfolio Website with R: A Walkthrough of the Blogdown Package. Retrieved from https://www.scien.cx/2023/03/22/making-a-portfolio-website-with-r-a-walkthrough-of-the-blogdown-package/

MLA
" » Making a Portfolio Website with R: A Walkthrough of the Blogdown Package." Samia | Sciencx - Wednesday March 22, 2023, https://www.scien.cx/2023/03/22/making-a-portfolio-website-with-r-a-walkthrough-of-the-blogdown-package/
HARVARD
Samia | Sciencx Wednesday March 22, 2023 » Making a Portfolio Website with R: A Walkthrough of the Blogdown Package., viewed ,<https://www.scien.cx/2023/03/22/making-a-portfolio-website-with-r-a-walkthrough-of-the-blogdown-package/>
VANCOUVER
Samia | Sciencx - » Making a Portfolio Website with R: A Walkthrough of the Blogdown Package. [Internet]. [Accessed ]. Available from: https://www.scien.cx/2023/03/22/making-a-portfolio-website-with-r-a-walkthrough-of-the-blogdown-package/
CHICAGO
" » Making a Portfolio Website with R: A Walkthrough of the Blogdown Package." Samia | Sciencx - Accessed . https://www.scien.cx/2023/03/22/making-a-portfolio-website-with-r-a-walkthrough-of-the-blogdown-package/
IEEE
" » Making a Portfolio Website with R: A Walkthrough of the Blogdown Package." Samia | Sciencx [Online]. Available: https://www.scien.cx/2023/03/22/making-a-portfolio-website-with-r-a-walkthrough-of-the-blogdown-package/. [Accessed: ]
rf:citation
» Making a Portfolio Website with R: A Walkthrough of the Blogdown Package | Samia | Sciencx | https://www.scien.cx/2023/03/22/making-a-portfolio-website-with-r-a-walkthrough-of-the-blogdown-package/ |

Please log in to upload a file.


There are no updates yet.
Click the Upload button above to add an update.

You must be logged in to translate posts. Please log in or register.