Create a GitHub Public Repository Listing App

How to use React to create a simple web app that lists users’ public repositories.

In this article, I’m going to write about how to use React to create a simple web app that lists users’ public GitHub repositories.

Without further ado, let’s begin.

Step 1

Using npx create-react-app my-app, construct a basic React app.

Step 2
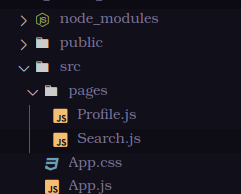
file setup
Search.js
Profile.js

Create the files Profile.js and Search.js as shown above.

Step 3

Now, use npm add react-router-dom to install react-router-dom.

code of App.js

import './App.css';
import { Profile } from './pages/Profile';
import { Search } from './pages/Search';
import React from 'react';
import {BrowserRouter as Router, Routes,Route } from 'react-router-dom';
import {useState, createContext } from "react";
export const AppContext = createContext();
function App() {
const [userInput,setUserInput] = useState("");
return <div>
<AppContext.Provider value={{userInput,setUserInput}}>
<Router>
<Routes>
<Route path="/" element={<Search />} />
<Route path="/profile" element={<Profile />} />
</Routes>
</Router>
</AppContext.Provider>
</div>
}
export default App;

The useContext hook is used here to pass the userInput and setUserInput through the pages.

Step 4

Now we’ll focus on Search.js. In this section, we enter the user name.

Code of Search.js

import { useContext } from "react"
import { AppContext } from "../App"
import "../App.css";
import { useNavigate } from 'react-router-dom';
export const Search = ()=>{
const navigate = useNavigate();
const {userInput,setUserInput} = useContext(AppContext);
async function LogUser (){
navigate('/profile');
};

return (
<div className="App w-100 min-vh-50 justify-content-center align-items-center d-flex flex-column">
<form onSubmit={LogUser}><br></br>
<input
value={userInput}
onChange={(e) => setUserInput(e.target.value)}
type="text"
placeholder="User Name"/>
<br></br>
<input type="submit" value="Search"/>
</form>
</div>
);
}

When we click the search button, we are taken to the profile page, thus we utilize useNavigate.

💡 Tip: You can now use an open-source toolchain such as Bit to extract this search logic into a package and reuse it across multiple projects with a simple npm i @bit/your-username/search-component.

Learn more here:

How to reuse React components across your projects

Step 5

We’ll be using Bootstrap here, so install it with npm install react-bootstrap.

Code of Profile.js

import { useEffect, useState } from "react";
import "../App.css";
import Card from "react-bootstrap/Card";
import Button from "react-bootstrap/Button";
import React from 'react';
import { useContext } from "react";
import { AppContext } from "../App";


export const Profile = ()=>{
const [avatarURL, setAvatarURL] = useState();
const [githubUsername, setGitHubUsername] = useState();
const [repoData, setRepoData] = useState();
const {userInput}=useContext(AppContext);


async function repoDataURL() {
//Get repo data about github user
await fetch(`https://api.github.com/users/${userInput}/repos`)
.then((res) => res.json())
.then(
(result) => {
console.log(36, result);
const list = result.map((item) => (
<div className="text-center">
<a target="_blank" href={item.svn_url}>
{item.name}
</a>
</div>
));
setRepoData(list);
},
(error) => {
console.log(error);
}
);
}

useEffect(() => {
fetch(`https://api.github.com/users/${userInput}`)
.then((res) => res.json())
.then(
(result) => {
console.log(result);
setAvatarURL(result.avatar_url);
setGitHubUsername(result.login);
},
(error) => {
console.log(error);
}
);
}, []);
return (
<div className="App w-100 min-vh-100 justify-content-center align-items-center d-flex flex-column">
<Card style={{ width: "18rem" }}>
<Card.Img variant="top" src={avatarURL} />
<Card.Body>
<Card.Title>{githubUsername}</Card.Title>

<Button variant="primary" onClick={repoDataURL}>
List my public repos!
</Button>
</Card.Body>
</Card>
{repoData}
</div>
);

}

We use fetch and useEffect() here.


useEffect(() => {
fetch(`https://api.github.com/users/${userInput}`)
.then((res) => res.json())
.then(
(result) => {
console.log(result);
setAvatarURL(result.avatar_url);
setGitHubUsername(result.login);
},
(error) => {
console.log(error);
}
);
}, []);

We get the data via the Git API here. The variable userInput is used to retrieve data from GitHub by userName. This is the fundamental concept of retrieving data from GitHub.

View of the app

That concludes this post. I hope you took away something from this. Thank you

Source code:- https://github.com/matheshyogeswaran/git_public_repo.git

Build React Apps with reusable components, just like Lego

Bit’s open-source tool help 250,000+ devs to build apps with components.

Turn any UI, feature, or page into a reusable component — and share it across your applications. It’s easier to collaborate and build faster.

Learn more

Split apps into components to make app development easier, and enjoy the best experience for the workflows you want:

Micro-Frontends

Design System

Code-Sharing and reuse

Monorepo

Learn more:


Create a GitHub Public Repository Listing App was originally published in Bits and Pieces on Medium, where people are continuing the conversation by highlighting and responding to this story.


This content originally appeared on Bits and Pieces - Medium and was authored by Matheshyogeswaran

How to use React to create a simple web app that lists users’ public repositories.

In this article, I’m going to write about how to use React to create a simple web app that lists users’ public GitHub repositories.

Without further ado, let’s begin.

Step 1

Using npx create-react-app my-app, construct a basic React app.

Step 2

file setup
Search.js
Profile.js

Create the files Profile.js and Search.js as shown above.

Step 3

Now, use npm add react-router-dom to install react-router-dom.

code of App.js

import './App.css';
import { Profile } from './pages/Profile';
import { Search } from './pages/Search';
import React from 'react';
import {BrowserRouter as Router, Routes,Route } from 'react-router-dom';
import {useState, createContext } from "react";
export const AppContext = createContext();
function App() {
const [userInput,setUserInput] = useState("");
return <div>
<AppContext.Provider value={{userInput,setUserInput}}>
<Router>
<Routes>
<Route path="/" element={<Search />} />
<Route path="/profile" element={<Profile />} />
</Routes>
</Router>
</AppContext.Provider>
</div>
}
export default App;

The useContext hook is used here to pass the userInput and setUserInput through the pages.

Step 4

Now we’ll focus on Search.js. In this section, we enter the user name.

Code of Search.js

import { useContext } from "react"
import { AppContext } from "../App"
import "../App.css";
import { useNavigate } from 'react-router-dom';
export const Search = ()=>{
const navigate = useNavigate();
const {userInput,setUserInput} = useContext(AppContext);
async function LogUser (){
navigate('/profile');
};

return (
<div className="App w-100 min-vh-50 justify-content-center align-items-center d-flex flex-column">
<form onSubmit={LogUser}><br></br>
<input
value={userInput}
onChange={(e) => setUserInput(e.target.value)}
type="text"
placeholder="User Name"/>
<br></br>
<input type="submit" value="Search"/>
</form>
</div>
);
}

When we click the search button, we are taken to the profile page, thus we utilize useNavigate.

💡 Tip: You can now use an open-source toolchain such as Bit to extract this search logic into a package and reuse it across multiple projects with a simple npm i @bit/your-username/search-component.

Learn more here:

How to reuse React components across your projects

Step 5

We’ll be using Bootstrap here, so install it with npm install react-bootstrap.

Code of Profile.js

import { useEffect, useState } from "react";
import "../App.css";
import Card from "react-bootstrap/Card";
import Button from "react-bootstrap/Button";
import React from 'react';
import { useContext } from "react";
import { AppContext } from "../App";


export const Profile = ()=>{
const [avatarURL, setAvatarURL] = useState();
const [githubUsername, setGitHubUsername] = useState();
const [repoData, setRepoData] = useState();
const {userInput}=useContext(AppContext);


async function repoDataURL() {
//Get repo data about github user
await fetch(`https://api.github.com/users/${userInput}/repos`)
.then((res) => res.json())
.then(
(result) => {
console.log(36, result);
const list = result.map((item) => (
<div className="text-center">
<a target="_blank" href={item.svn_url}>
{item.name}
</a>
</div>
));
setRepoData(list);
},
(error) => {
console.log(error);
}
);
}

useEffect(() => {
fetch(`https://api.github.com/users/${userInput}`)
.then((res) => res.json())
.then(
(result) => {
console.log(result);
setAvatarURL(result.avatar_url);
setGitHubUsername(result.login);
},
(error) => {
console.log(error);
}
);
}, []);
return (
<div className="App w-100 min-vh-100 justify-content-center align-items-center d-flex flex-column">
<Card style={{ width: "18rem" }}>
<Card.Img variant="top" src={avatarURL} />
<Card.Body>
<Card.Title>{githubUsername}</Card.Title>

<Button variant="primary" onClick={repoDataURL}>
List my public repos!
</Button>
</Card.Body>
</Card>
{repoData}
</div>
);

}

We use fetch and useEffect() here.


useEffect(() => {
fetch(`https://api.github.com/users/${userInput}`)
.then((res) => res.json())
.then(
(result) => {
console.log(result);
setAvatarURL(result.avatar_url);
setGitHubUsername(result.login);
},
(error) => {
console.log(error);
}
);
}, []);

We get the data via the Git API here. The variable userInput is used to retrieve data from GitHub by userName. This is the fundamental concept of retrieving data from GitHub.
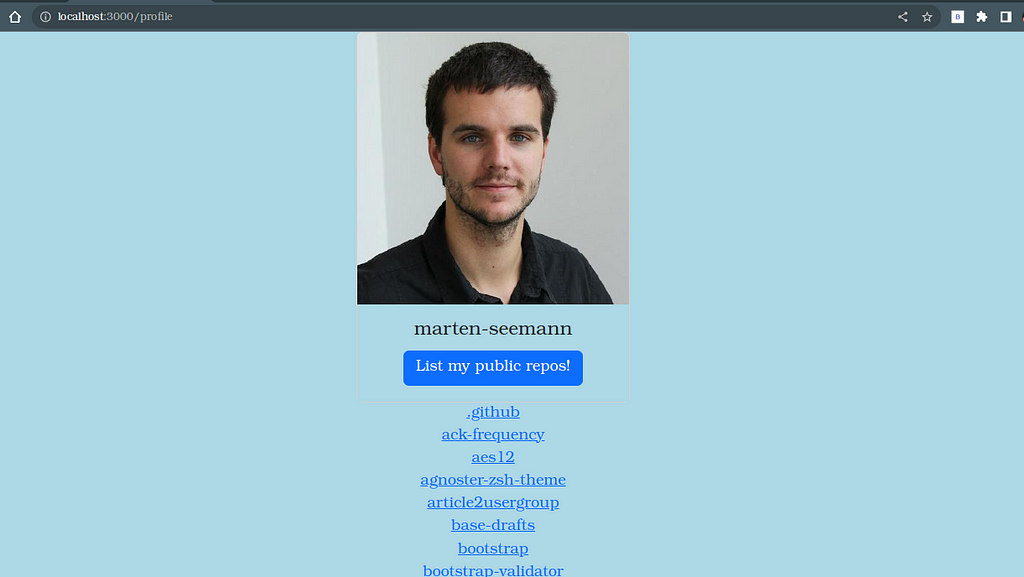
View of the app

That concludes this post. I hope you took away something from this. Thank you

Source code:- https://github.com/matheshyogeswaran/git_public_repo.git

Build React Apps with reusable components, just like Lego
Bit’s open-source tool help 250,000+ devs to build apps with components.

Turn any UI, feature, or page into a reusable component — and share it across your applications. It’s easier to collaborate and build faster.

Learn more

Split apps into components to make app development easier, and enjoy the best experience for the workflows you want:

Micro-Frontends

Design System

Code-Sharing and reuse

Monorepo

Learn more:


Create a GitHub Public Repository Listing App was originally published in Bits and Pieces on Medium, where people are continuing the conversation by highlighting and responding to this story.


This content originally appeared on Bits and Pieces - Medium and was authored by Matheshyogeswaran


Print Share Comment Cite Upload Translate Updates
APA

Matheshyogeswaran | Sciencx (2023-05-03T06:10:31+00:00) Create a GitHub Public Repository Listing App. Retrieved from https://www.scien.cx/2023/05/03/create-a-github-public-repository-listing-app/

MLA
" » Create a GitHub Public Repository Listing App." Matheshyogeswaran | Sciencx - Wednesday May 3, 2023, https://www.scien.cx/2023/05/03/create-a-github-public-repository-listing-app/
HARVARD
Matheshyogeswaran | Sciencx Wednesday May 3, 2023 » Create a GitHub Public Repository Listing App., viewed ,<https://www.scien.cx/2023/05/03/create-a-github-public-repository-listing-app/>
VANCOUVER
Matheshyogeswaran | Sciencx - » Create a GitHub Public Repository Listing App. [Internet]. [Accessed ]. Available from: https://www.scien.cx/2023/05/03/create-a-github-public-repository-listing-app/
CHICAGO
" » Create a GitHub Public Repository Listing App." Matheshyogeswaran | Sciencx - Accessed . https://www.scien.cx/2023/05/03/create-a-github-public-repository-listing-app/
IEEE
" » Create a GitHub Public Repository Listing App." Matheshyogeswaran | Sciencx [Online]. Available: https://www.scien.cx/2023/05/03/create-a-github-public-repository-listing-app/. [Accessed: ]
rf:citation
» Create a GitHub Public Repository Listing App | Matheshyogeswaran | Sciencx | https://www.scien.cx/2023/05/03/create-a-github-public-repository-listing-app/ |

Please log in to upload a file.


There are no updates yet.
Click the Upload button above to add an update.

You must be logged in to translate posts. Please log in or register.