Using GPU to Improve JavaScript Performance

Make your applications 10 times faster with GPU.js

As developers, we always seek opportunities to improve application performance. When it comes to web applications, we mainly make these improvements in code.

But have you ever thought of combining the power of GPU into your web applications to boost performance?

This article will introduce you to a JavaScript acceleration library called GPU.js and show you how to improve complex computations.

What is GPU.js & why should we use it?

Source: https://gpu.rocks/#/

In short, GPU.js is a JavaScript acceleration library that can be used for general-purpose computations on GPUs using JavaScript. It supports browsers, Node.js and TypeScript.

In addition to the performance boost, there are several reasons why I recommend using GPU.js:

  • GPU.js uses JavaScript as the base, allowing you to use JavaScript syntax.
  • It takes the responsibility of automatically transpiling JavaScript into shader language and compiles them.
  • It can fall back into the regular JavaScript engine if there is no GPU in the device. So, there won’t be any disadvantage in using GPU.js.
  • GPU.js can be used for parallel computations as well. Besides, you can perform multiple calculations asynchronously in both CPU & GPU at the same time.

With all these things together, I don’t see a reason not to use GPU.js. So let’s see how we can get started with it.

How to Setup GPU.js?

Installing GPU.js for your projects is similar to any other JavaScript library.

For Node projects

npm install gpu.js --save
or
yarn add gpu.js
import { GPU } from ('gpu.js')
--- or ---
const { GPU } = require('gpu.js')
--- or ---
import { GPU } from 'gpu.js'; // Use this for TypeScript
const gpu = new GPU();

For Bowsers

Download GPU.js locally or use their CDN.

<script src="dist/gpu-browser.min.js"></script>
--- or ---
<script 
src="https://unpkg.com/gpu.js@latest/dist/gpu- browser.min.js">
</script>
<script
rc="https://cdn.jsdelivr.net/npm/gpu.js@latest/dist/gpu-browser.min.js">
</script>
<script>
const gpu = new GPU();
...
</script>

Note: If you are using Linux, you need to ensure that you have correct files installed by running: sudo apt install mesa-common-dev libxi-dev

That’s what you need to know about installing and importing GPU.js. Now, you can start using GPU programming in your application.

Besides, I highly recommend understanding the essential functions and concepts of GPU.js. So, let’s start with few basics of GPU.js.

Tip: Build & share independent components with Bit

Bit is an ultra-extensible tool that lets you create truly modular applications with independently authored, versioned, and maintained components.

Use it to build modular apps & design systems, author and deliver micro frontends, or simply share components between applications.

Material UI components shared individually on Bit.dev

Creating Functions

You can define functions in GPU.js to run in GPU, using general JavaScript syntax.

const exampleKernel = gpu.createKernel(function() {
...
}, settings);

The above code sample shows the basic structure of a GPU.js function. I have named the function as exampleKernel. As you can see, there I’ve used the createKernel function that does computations leveraging the GPU.

Also, it is mandatory to define the size of the output. In the above example, I have used a parameter called settings to assign output size.

const settings = {
output: [100]
};

The output of a kernel function can be 1D, 2D, or 3D, which means it can have up to 3 threads. You can access those threads within the kernel using this.thread command.

  • 1D : [length] — value[this.thread.x]
  • 2D : [width, height] — value[this.thread.y][this.thread.x]
  • 3D: [width, height, depth] — value[this.thread.z][this.thread.y][this.thread.x]

Finally, the created function can be invoked like any other JavaScript function using function name: exampleKernel()

Supported Variables for Kernels

Number

You can use any integer or float within a GPU.js function.

const exampleKernel = gpu.createKernel(function() {
const number1 = 10;
const number2 = 0.10;
return number1 + number2;
}, settings);

Boolean

Boolean values are also supported in GPU.js similar to JavaScript.

const kernel = gpu.createKernel(function() {
const bool = true;
if (bool) {
return 1;
}else{
return 0;
}
},settings);

Arrays

You can define number arrays of any size within the kernel functions and return them.

const exampleKernel = gpu.createKernel(function() {
const array1 = [0.01, 1, 0.1, 10];
return array1;
}, settings);

Functions

Using private functions within the kernel function is also allowed in GPU.js

const exampleKernel = gpu.createKernel(function() {
function privateFunction() {
return [0.01, 1, 0.1, 10];
}
return privateFunction();
}, settings);

Supported Input Types

In addition to the above variable types, you can pass several input types to kernel functions.

Numbers

Similar to the variable declaration, you can pass integers or float numbers to kernel functions as below.

const exampleKernel = gpu.createKernel(function(x) {
return x;
}, settings);
exampleKernel(25);

1D,2D, or 3D Array of Numbers

You can pass array types of Array, Float32Array, Int16Array, Int8Array, Uint16Array, uInt8Array into GPU.js kernels.

const exampleKernel = gpu.createKernel(function(x) {
return x;
}, settings);
exampleKernel([1, 2, 3]);

Pre flattened 2D and 3D arrays are also accepted by kernel functions. This approach makes uploads much faster and you have to use the input option from GPU.js for that.

const { input } = require('gpu.js');
const value = input(flattenedArray, [width, height, depth]);

HTML Images

Passing images into functions is a new thing we can see in GPU.js compared to traditional JavaScript. With GPU.js, you can pass one or many HTML images as an array to the kernel function.

//Single Image
const kernel = gpu.createKernel(function(image) {
...
})
.setGraphical(true)
.setOutput([100, 100]);

const image = document.createElement('img');
image.src = 'image1.png';
image.onload = () => {
kernel(image);
document.getElementsByTagName('body')[0].appendChild(kernel.canvas);
};
//Multiple Images
const kernel = gpu.createKernel(function(image) {
const pixel = image[this.thread.z][this.thread.y][this.thread.x];
this.color(pixel[0], pixel[1], pixel[2], pixel[3]);
})
.setGraphical(true)
.setOutput([100, 100]);

const image1 = document.createElement('img');
image1.src = 'image1.png';
image1.onload = onload;
....
//add another 2 images
....
const totalImages = 3;
let loadedImages = 0;
function onload() {
loadedImages++;
if (loadedImages === totalImages) {
kernel([image1, image2, image3]);
document.getElementsByTagName('body')[0].appendChild(kernel.canvas);
}
};

Apart from the above configurations, there are many exciting things to experiment with GPU.js. You can find them in their documentation. Since now you understand several configurations, let’s write a function with GPU.js and compare its performance.

First Function using GPU.js

By combining all the things we discussed earlier, I wrote a small angular application to compare GPU and CPU computations’ performance by multiplying two arrays with 1000 elements.

Step 1 — Function to generate number arrays with 1000 elements

I will generate a 2D array with 1000 numbers for each element and use them for computations in the next steps.

generateMatrices() {
this.matrices = [[], []];
for (let y = 0; y < this.matrixSize; y++) {
this.matrices[0].push([])
this.matrices[1].push([])
for (let x = 0; x < this.matrixSize; x++) {
const value1 = parseInt((Math.random() * 10).toString())
const value2 = parseInt((Math.random() * 10).toString())
this.matrices[0][y].push(value1)
this.matrices[1][y].push(value2)
}
}
}

Step 2 — Kernel function

This is the most crucial function in this application since all the GPU computations happen inside this. Here the multiplyMatrix function will receive two number arrays and the size of the matrix as input. Then it will multiply two arrays and return the total sum while measuring the time using performance API.

gpuMultiplyMatrix() {
const gpu = new GPU();
const multiplyMatrix = gpu.createKernel(function (a: number[][], b: number[][], matrixSize: number) {
let sum = 0;

for (let i = 0; i < matrixSize; i++) {
sum += a[this.thread.y][i] * b[i][this.thread.x];
}
return sum;
}).setOutput([this.matrixSize, this.matrixSize])
  const startTime = performance.now();
const resultMatrix = multiplyMatrix(this.matrices[0], this.matrices[1], this.matrixSize);

const endTime = performance.now();
this.gpuTime = (endTime - startTime) + " ms";

console.log("GPU TIME : "+ this.gpuTime);
this.gpuProduct = resultMatrix as number[][];
}

Step 3— CPU multiplication function.

This is a traditional TypeScript function used to measure computational time for the same arrays.

cpuMutiplyMatrix() {
const startTime = performance.now();
const a = this.matrices[0];
const b = this.matrices[1];
  let productRow = Array.apply(null, new Array(this.matrixSize)).map(Number.prototype.valueOf, 0);
let product = new Array(this.matrixSize);

for (let p = 0; p < this.matrixSize; p++) {
product[p] = productRow.slice();
}

for (let i = 0; i < this.matrixSize; i++) {
for (let j = 0; j < this.matrixSize; j++) {
for (let k = 0; k < this.matrixSize; k++) {
product[i][j] += a[i][k] * b[k][j];
}
}
}
  const endTime = performance.now();
this.cpuTime = (endTime — startTime) + “ ms”;
console.log(“CPU TIME : “+ this.cpuTime);
this.cpuProduct = product;
}

You can find the full demo project in my GitHub account.

CPU vs GPU — Performance Comparison

Now it’s time to see whether all this buzz around GPU.js and GPU computation is true or not. Since I have created an Angular application in the previous section, I used it to measure the performance.

CPU vs GPU — Execution Time

As you can clearly see, GPU programming only took 799ms for the calculations while the CPU took 7511ms, which is almost 10 times longer.

Without stopping from there, I ran the same tests for a couple of cycles by changing array size.

CPU vs GPU

First, I tried with smaller array sizes, and I noticed that the CPU had taken less time than GPU. For example, when I reduced array size to 10 elements, the CPU only took 0.14ms while GPU took 108 ms.

But as the array size increases, there was a clear gap between the time taken by GPU and CPU. As you can see in the above graph, GPU was the winner.

Conclusion

Based on my experiment using GPU.js, it can boost the performance of JavaScript applications.

But, we must be mindful of using GPU only for complex tasks. Otherwise, we will be wasting resources, and ultimately it will reduce the application performance, as shown in the above graph.

However, if you haven’t tried GPU.js yet, I invite you all to use it and share your experience in the comments section.

Thank you for reading !!!.

Learn More


Using GPU to Improve JavaScript Performance was originally published in Bits and Pieces on Medium, where people are continuing the conversation by highlighting and responding to this story.


This content originally appeared on Bits and Pieces - Medium and was authored by Chameera Dulanga

Make your applications 10 times faster with GPU.js

As developers, we always seek opportunities to improve application performance. When it comes to web applications, we mainly make these improvements in code.

But have you ever thought of combining the power of GPU into your web applications to boost performance?

This article will introduce you to a JavaScript acceleration library called GPU.js and show you how to improve complex computations.

What is GPU.js & why should we use it?

Source: https://gpu.rocks/#/
In short, GPU.js is a JavaScript acceleration library that can be used for general-purpose computations on GPUs using JavaScript. It supports browsers, Node.js and TypeScript.

In addition to the performance boost, there are several reasons why I recommend using GPU.js:

  • GPU.js uses JavaScript as the base, allowing you to use JavaScript syntax.
  • It takes the responsibility of automatically transpiling JavaScript into shader language and compiles them.
  • It can fall back into the regular JavaScript engine if there is no GPU in the device. So, there won’t be any disadvantage in using GPU.js.
  • GPU.js can be used for parallel computations as well. Besides, you can perform multiple calculations asynchronously in both CPU & GPU at the same time.

With all these things together, I don’t see a reason not to use GPU.js. So let’s see how we can get started with it.

How to Setup GPU.js?

Installing GPU.js for your projects is similar to any other JavaScript library.

For Node projects

npm install gpu.js --save
or
yarn add gpu.js
import { GPU } from ('gpu.js')
--- or ---
const { GPU } = require('gpu.js')
--- or ---
import { GPU } from 'gpu.js'; // Use this for TypeScript
const gpu = new GPU();

For Bowsers

Download GPU.js locally or use their CDN.

<script src="dist/gpu-browser.min.js"></script>
--- or ---
<script 
src="https://unpkg.com/gpu.js@latest/dist/gpu- browser.min.js">
</script>
<script
rc="https://cdn.jsdelivr.net/npm/gpu.js@latest/dist/gpu-browser.min.js">
</script>
<script>
const gpu = new GPU();
...
</script>
Note: If you are using Linux, you need to ensure that you have correct files installed by running: sudo apt install mesa-common-dev libxi-dev

That’s what you need to know about installing and importing GPU.js. Now, you can start using GPU programming in your application.

Besides, I highly recommend understanding the essential functions and concepts of GPU.js. So, let’s start with few basics of GPU.js.

Tip: Build & share independent components with Bit

Bit is an ultra-extensible tool that lets you create truly modular applications with independently authored, versioned, and maintained components.

Use it to build modular apps & design systems, author and deliver micro frontends, or simply share components between applications.

Material UI components shared individually on Bit.dev

Creating Functions

You can define functions in GPU.js to run in GPU, using general JavaScript syntax.

const exampleKernel = gpu.createKernel(function() {
...
}, settings);

The above code sample shows the basic structure of a GPU.js function. I have named the function as exampleKernel. As you can see, there I’ve used the createKernel function that does computations leveraging the GPU.

Also, it is mandatory to define the size of the output. In the above example, I have used a parameter called settings to assign output size.

const settings = {
output: [100]
};

The output of a kernel function can be 1D, 2D, or 3D, which means it can have up to 3 threads. You can access those threads within the kernel using this.thread command.

  • 1D : [length] — value[this.thread.x]
  • 2D : [width, height] — value[this.thread.y][this.thread.x]
  • 3D: [width, height, depth] — value[this.thread.z][this.thread.y][this.thread.x]

Finally, the created function can be invoked like any other JavaScript function using function name: exampleKernel()

Supported Variables for Kernels

Number

You can use any integer or float within a GPU.js function.

const exampleKernel = gpu.createKernel(function() {
const number1 = 10;
const number2 = 0.10;
return number1 + number2;
}, settings);

Boolean

Boolean values are also supported in GPU.js similar to JavaScript.

const kernel = gpu.createKernel(function() {
const bool = true;
if (bool) {
return 1;
}else{
return 0;
}
},settings);

Arrays

You can define number arrays of any size within the kernel functions and return them.

const exampleKernel = gpu.createKernel(function() {
const array1 = [0.01, 1, 0.1, 10];
return array1;
}, settings);

Functions

Using private functions within the kernel function is also allowed in GPU.js

const exampleKernel = gpu.createKernel(function() {
function privateFunction() {
return [0.01, 1, 0.1, 10];
}
return privateFunction();
}, settings);

Supported Input Types

In addition to the above variable types, you can pass several input types to kernel functions.

Numbers

Similar to the variable declaration, you can pass integers or float numbers to kernel functions as below.

const exampleKernel = gpu.createKernel(function(x) {
return x;
}, settings);
exampleKernel(25);

1D,2D, or 3D Array of Numbers

You can pass array types of Array, Float32Array, Int16Array, Int8Array, Uint16Array, uInt8Array into GPU.js kernels.

const exampleKernel = gpu.createKernel(function(x) {
return x;
}, settings);
exampleKernel([1, 2, 3]);

Pre flattened 2D and 3D arrays are also accepted by kernel functions. This approach makes uploads much faster and you have to use the input option from GPU.js for that.

const { input } = require('gpu.js');
const value = input(flattenedArray, [width, height, depth]);

HTML Images

Passing images into functions is a new thing we can see in GPU.js compared to traditional JavaScript. With GPU.js, you can pass one or many HTML images as an array to the kernel function.

//Single Image
const kernel = gpu.createKernel(function(image) {
...
})
.setGraphical(true)
.setOutput([100, 100]);

const image = document.createElement('img');
image.src = 'image1.png';
image.onload = () => {
kernel(image);
document.getElementsByTagName('body')[0].appendChild(kernel.canvas);
};
//Multiple Images
const kernel = gpu.createKernel(function(image) {
const pixel = image[this.thread.z][this.thread.y][this.thread.x];
this.color(pixel[0], pixel[1], pixel[2], pixel[3]);
})
.setGraphical(true)
.setOutput([100, 100]);

const image1 = document.createElement('img');
image1.src = 'image1.png';
image1.onload = onload;
....
//add another 2 images
....
const totalImages = 3;
let loadedImages = 0;
function onload() {
loadedImages++;
if (loadedImages === totalImages) {
kernel([image1, image2, image3]);
document.getElementsByTagName('body')[0].appendChild(kernel.canvas);
}
};

Apart from the above configurations, there are many exciting things to experiment with GPU.js. You can find them in their documentation. Since now you understand several configurations, let’s write a function with GPU.js and compare its performance.

First Function using GPU.js

By combining all the things we discussed earlier, I wrote a small angular application to compare GPU and CPU computations’ performance by multiplying two arrays with 1000 elements.

Step 1 — Function to generate number arrays with 1000 elements

I will generate a 2D array with 1000 numbers for each element and use them for computations in the next steps.

generateMatrices() {
this.matrices = [[], []];
for (let y = 0; y < this.matrixSize; y++) {
this.matrices[0].push([])
this.matrices[1].push([])
for (let x = 0; x < this.matrixSize; x++) {
const value1 = parseInt((Math.random() * 10).toString())
const value2 = parseInt((Math.random() * 10).toString())
this.matrices[0][y].push(value1)
this.matrices[1][y].push(value2)
}
}
}

Step 2 — Kernel function

This is the most crucial function in this application since all the GPU computations happen inside this. Here the multiplyMatrix function will receive two number arrays and the size of the matrix as input. Then it will multiply two arrays and return the total sum while measuring the time using performance API.

gpuMultiplyMatrix() {
const gpu = new GPU();
const multiplyMatrix = gpu.createKernel(function (a: number[][], b: number[][], matrixSize: number) {
let sum = 0;

for (let i = 0; i < matrixSize; i++) {
sum += a[this.thread.y][i] * b[i][this.thread.x];
}
return sum;
}).setOutput([this.matrixSize, this.matrixSize])
  const startTime = performance.now();
const resultMatrix = multiplyMatrix(this.matrices[0], this.matrices[1], this.matrixSize);

const endTime = performance.now();
this.gpuTime = (endTime - startTime) + " ms";

console.log("GPU TIME : "+ this.gpuTime);
this.gpuProduct = resultMatrix as number[][];
}

Step 3— CPU multiplication function.

This is a traditional TypeScript function used to measure computational time for the same arrays.

cpuMutiplyMatrix() {
const startTime = performance.now();
const a = this.matrices[0];
const b = this.matrices[1];
  let productRow = Array.apply(null, new Array(this.matrixSize)).map(Number.prototype.valueOf, 0);
let product = new Array(this.matrixSize);

for (let p = 0; p < this.matrixSize; p++) {
product[p] = productRow.slice();
}

for (let i = 0; i < this.matrixSize; i++) {
for (let j = 0; j < this.matrixSize; j++) {
for (let k = 0; k < this.matrixSize; k++) {
product[i][j] += a[i][k] * b[k][j];
}
}
}
  const endTime = performance.now();
this.cpuTime = (endTime — startTime) + “ ms”;
console.log(“CPU TIME : “+ this.cpuTime);
this.cpuProduct = product;
}

You can find the full demo project in my GitHub account.

CPU vs GPU — Performance Comparison

Now it’s time to see whether all this buzz around GPU.js and GPU computation is true or not. Since I have created an Angular application in the previous section, I used it to measure the performance.

CPU vs GPU — Execution Time
As you can clearly see, GPU programming only took 799ms for the calculations while the CPU took 7511ms, which is almost 10 times longer.

Without stopping from there, I ran the same tests for a couple of cycles by changing array size.
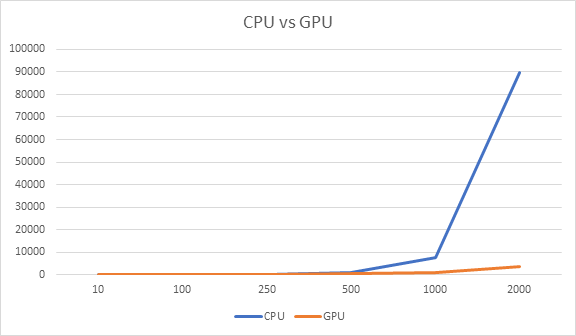
CPU vs GPU
First, I tried with smaller array sizes, and I noticed that the CPU had taken less time than GPU. For example, when I reduced array size to 10 elements, the CPU only took 0.14ms while GPU took 108 ms.

But as the array size increases, there was a clear gap between the time taken by GPU and CPU. As you can see in the above graph, GPU was the winner.

Conclusion

Based on my experiment using GPU.js, it can boost the performance of JavaScript applications.

But, we must be mindful of using GPU only for complex tasks. Otherwise, we will be wasting resources, and ultimately it will reduce the application performance, as shown in the above graph.

However, if you haven’t tried GPU.js yet, I invite you all to use it and share your experience in the comments section.

Thank you for reading !!!.

Learn More


Using GPU to Improve JavaScript Performance was originally published in Bits and Pieces on Medium, where people are continuing the conversation by highlighting and responding to this story.


This content originally appeared on Bits and Pieces - Medium and was authored by Chameera Dulanga


Print Share Comment Cite Upload Translate Updates
APA

Chameera Dulanga | Sciencx (2021-03-30T21:44:42+00:00) Using GPU to Improve JavaScript Performance. Retrieved from https://www.scien.cx/2021/03/30/using-gpu-to-improve-javascript-performance/

MLA
" » Using GPU to Improve JavaScript Performance." Chameera Dulanga | Sciencx - Tuesday March 30, 2021, https://www.scien.cx/2021/03/30/using-gpu-to-improve-javascript-performance/
HARVARD
Chameera Dulanga | Sciencx Tuesday March 30, 2021 » Using GPU to Improve JavaScript Performance., viewed ,<https://www.scien.cx/2021/03/30/using-gpu-to-improve-javascript-performance/>
VANCOUVER
Chameera Dulanga | Sciencx - » Using GPU to Improve JavaScript Performance. [Internet]. [Accessed ]. Available from: https://www.scien.cx/2021/03/30/using-gpu-to-improve-javascript-performance/
CHICAGO
" » Using GPU to Improve JavaScript Performance." Chameera Dulanga | Sciencx - Accessed . https://www.scien.cx/2021/03/30/using-gpu-to-improve-javascript-performance/
IEEE
" » Using GPU to Improve JavaScript Performance." Chameera Dulanga | Sciencx [Online]. Available: https://www.scien.cx/2021/03/30/using-gpu-to-improve-javascript-performance/. [Accessed: ]
rf:citation
» Using GPU to Improve JavaScript Performance | Chameera Dulanga | Sciencx | https://www.scien.cx/2021/03/30/using-gpu-to-improve-javascript-performance/ |

Please log in to upload a file.


There are no updates yet.
Click the Upload button above to add an update.

You must be logged in to translate posts. Please log in or register.