Create Your App With Flutter In 5 Days

Dribbble by Michael Filipiuk By Fireart Studio

Flutter, Flutter, Flutter! From Twitter recommendations to app development recommended videos, Flutter has become a buzzword all over the internet. Undoubtedly, long listed features of Flutter have already taken the world by storm, but how to get started with the Flutter app in 5 days is the central question.

Gone are those days when you need to sit back, close your eyes, and think for long hours about the programming language that would allow developing any type of application for multiple operating platforms.

With the launch of Google’s Flutter, now you don’t need to spend sleepless nights studying new languages and frameworks. The app development process has never been easy, but Flutter has made it far easier and simpler for developers by providing an advanced level of software development kit complied with all the widgets and plugins.

Developing an application with Flutter is nothing more than a story of fantasy. In reality, no matter how proficient you are in app development, you have to deal with plenty of technologies and its flaws. In fact, in the world of mobile app development, there’s an endless race between two giants iOS and Android.

So here, being a startup you have two concerns:

  • Firstly, if you choose to develop a Native iOS and Android app, then you need a high budget.
  • Secondly, how to capture the wider segment of the market?

While each sphere requires specific skills, therefore, the most common answer that you will get from a software development company is to choose Swift for iOS and Kotlin for Android.

But my simple answer for both of your questions is — FLUTTER!

Flutter: A Story of Fantasy

Flutter is a recently launched SDK by Google, allowing developers to create applications for iOS and Android by using a single code-base. Unlike other popular solutions, rather than calling Flutter a framework, it is a complete SDK that comes with everything that you will need to build cross-platform applications. Right from rendering engine, ready-made widgets to testing and integration APIs, Flutter has everything.

From here before getting straight into the development process, let me hit some quick highlights of Flutter which makes it quite demanding:

  • Despite being launched in 2017, it has been used by 39% of developers from all across the world and has quickly secured its position as a second topmost demanding framework for cross-platform app development.
  • Dart is the Flutters Object oriented language that uses advanced techniques and compiles into native code that adds up a noticeable speed.
  • Flutter uses the OS as a canvas to build an interface on and moves services such as gestures, rendering and animations into the framework itself that allows developers to have complete control over the system.
  • Flutter boasts ready-made and custom widgets for fast UI coding that enables you to do any level of customization.
  • Compared to others, Flutter has the mildest learning curve and a growing community that allows developers with limited programming knowledge to prototyping and building app can also get started with Flutter.
  • Hot Reload feature can tenfold the development speed and elevates programmer’s productivity that ultimately allows you to experiment with new things without bothering such long delays.
  • Flutter apps are known for their high performance as it uses CPU usage, number of requests per second, average response time, number of frames per second and more.
  • It offers excellent app portability and allows you to migrate from any platform to Flutter.

In a Nutshell: All these features and functionalities of Flutter, definitely encourages you to dig deeper into its core mechanisms and get started with the first Flutter app. Now you must be wondering how a Flutter app can be built in 5 days while a mobile app development company would take at least 4 weeks to 6 weeks of development. So let’s get straight into the Flutter app development process

Creating an Application With Flutter in 5 Days

Flutter is such an easy-to-go technology for app development. So at the time of writing, we have kept the focus on both novice and experts and try to keep this tutorial simple, sorted and straightforward.

So whether you are working as a freelancer or an app development company, this piece of knowledge will definitely help you become a Flutter developer.

With this tutorial, you will take a closer look at Flutter Development for Android Platform, but in mind that you’ll need Android Studio for Android and XCode for iOS. So before you get started with the app development process, it is worth to set up an environment.

First of all, make sure you have Android Studio version 3.0+. If you are not having this, then follow below simple steps:

Let’s get started with the main steps:

Step 1: Install Android Studio

Android Studio offers a complete, integrated IDE experience for Flutter. Moreover, you can use the Flutter SDK for any text editor development experience. But, IDEs provide you with features like Syntax highlighting, code completion, and debugger which are really helpful during the development process.

In case, if you are using Android Studio and IntelliJ, keep in mind that you restart the IDE to activate the recently launched plugins. Also, this will help you start working with the stable versions of IDEs, as Flutter plugins may not function properly on Beta, Canary or EAP builds.

Step 2: Install the Flutter and Dart Plugins

Install these to start a new project on your own or with the help of software development company:

  • Start Android Studio
  • Open plugin preferences (on macOS go to Preferences> Plugins; on Windows & Linux go to File>Settings>Plugins).
  • Open plugin preferences (Configure>Plugins as of v3.6.3.0 or later).
  • Browse repositories of the Flutter plugin and click install
  • Click yes when prompted to install the Dart plugin.
  • Click restart when prompted.

With this, now you can create a new project for Flutter: File>New>New Flutter Project.

Step 3: Create a Flutter Project

To create a new flutter project, you need to select the Flutter Application> Start a New Flutter Project> Android Studio.

Image Source: Author

Once you click the Flutter Application, on a next screen you will need to provide the Flutter SDK path and basic project details.

Let’s take an example of creating a Songs App, you accordingly you need to add the details in the below columns:

Song_App, /home/user/flutter , /home/user/AndroidStudioProjects , Songs Gallery

Image Source: Author

Finally, now set a domain name for the package. It’s important that you use a unique name for the package (for signing and publishing purposes). If you don’t have any domain, then you can use com.github.<your login>. And leave the other options set to default values and confirm by clicking finish.

Hurray! Our project is successfully created!

Step 4: Run the Build: Flutter Doctor

To ensure that your app set up the environment is correctly working, it is worth to open the terminal (Alt+F12 in Android Studio) and involve the Flutter Doctor command.

To make it function properly, you need at least usable Flutter with one working IDE and a connected device (physical or emulator)

  • Testing Build on Android

In case of using the device itself, make sure it must be connected via a USB cable and have USB debugging enabled.

In the case of Android Emulator, you need to create a virtual device. And for that, you can either hire a mobile app developer or just open an AVD manager by using the on the toolbar or pressing Ctrl Alt+F12 and typing the action name.

Image Source: Author

Leave the default setting as it is on the screen. Now it’s time to run your app. Just choose the desired device or emulator and press “Shift+F10’’ or simply use the run button. When you click on the run button, the below icon will automatically get changed.

Image Source: Author
  • Testing an App on iOS

While testing an app on iOS Simulator, then you need to first use the dropdown device menu. Keep in mind that Xcode installer will prompt you to install the missing components from the app.

But, things can be a bit complicated to test in case of a physical iOS device. While the device is connected Via a USB cable and unlocked, you need to first open the iOS module in Xcode.

Image Source: Author

Once you open the Xcode, then next go to the signing and capabilities settings of the app. Sign in to your Apple ID and after closing the Accounts window, provisioning profile will be generated.

In case, you locate any error that states that the app identifier cannot be registered, then it means someone else is already using the identifier. Here you need to change the Bundle Identifier value to something else. Once the signing is configured, you can try to run the app from the Android studio. Since the provisioning profile is not trusted on the device, therefore, the first attempt will fail.

While testing your app on iOS devices, keep in mind that it is impossible to run Flutter apps provisioned using Personal Team provisioning profiles on devices running on iOS 13.3.1. This limitation was set by Apple itself. Once the profile is trusted, you can launch the app from the home screen. Since testing on iOS devices is quite complicated, therefore it makes sense to hire Flutter app developer with all the expertise and knowledge.

Image Source

Step 5: Start Coding the Flutter App

Since you have already created the project with the name of Song_App. Once you start coding the app, most of the app developers edit lib/main.dart, where the Dart code lives. You can replace the contents of the lib/main.dart or delete all of the code from lib/main.dart. Replace all the code with the following code which displays “Songs Gallery’’ in the centre of the screen.

Image Source: Author

Pro Tip: While pasting these codes into your app, you can fix this with the tools that we have mentioned with step 1.

Secondly, run the app by following the step 4 guide and use the suggested Android and iOS IDEs, depending on your devices.

Step 6: Use An External Package

To keep your task sorted and simple, you are advised to start using an open-source package name english_words. Try to use common English words that have some functionality as well. Usually, Flutter app development companies find the english_words package and other open-source packages on Pub.dev. https://pub.dev/

In lib/main.dart, import the new package:

import ‘package:flutter/material.dart’;

import ‘package:english_words/english_words.dart’;

Once you start typing, Android studio will start giving you suggestions for libraries to import. It then renders the import string in grey by reminding you that the imported library is unsaved yet.

Further, use English words package to generate the text instead of using the string “Songs_Gallery”.

Image Gallery

Next, if the app is running, you can use the hot reload feature to update the running app with the changes you required in the app. You can see the below image with the pair of words randomly chosen to run in the app. In case, your app is not running correctly, look for typos or can try out Flutter’s debugging tools. The software development company would prefer to use “pubspec.yaml” or “lib/main.dart” for debugging the app.

Step 7: Add a Stateful Widgets to your App

In Flutter app development, everything is a widget which is an application itself. Stateless and stateful widgets are the widgets which come with changeable and unchangeable conditions. The scaffold widget is a framework that includes the standard screen components. Hierarchy can be quite a difficult process and have an app bar, body, menu and others.

Flutter’s widget saves you a lot of time and efforts on app development, but it involves a method to build a Widget. The Widget should contain other widgets.

Stateless widgets are immutable which means that their properties can’t be changed and all the value will remain final. On the other hand, Stateful widgets maintain state that might be changed during the lifetime of the widget. So when you implement a stateful widget, it requires at least two classes:

1) a StatefulWidget class that creates an instance of

2) A state class

The StatefulWidget class is, itself, immutable and can be thrown away and regenerated. But the State class persists over the lifetime of the widget.

So basically, you will need to add State class by adding a RandomWordsState. So to add _RandomWordsState, as a child inside the existing MyApp Stateless Widget, you need to follow these two things:

Create the boilerplate code for a stateful widget by positioning all of the code in lib/main.dart and enter Return a couple of times to start on a fresh line.

Enter RandomWords as the name of your widget.

Now both classes will look as follows:

Image Source: Author

Remove the word generation code from the app by making the changes reflecting in the below codes.

Image Source: Author

At last restart the app to make it behave as before and display a word pairing each time you hot reload or save the app.

Step 8: Create an Infinite Scrolling List View

Here create a list of the most common words and add a possibility to mark the words and add a possibility to mark the words that we liked the most and drag them on the new screen to add some functionality. Basically, the complete logic lays in the condition class. So here are the simple coding that you need to follow as a single class with comments:

Image Source: Author

The final output of the app will like below image:

Congratulations! You have learned to write an interactive Flutter app that runs on both iOS and Android.

Setting up Your First App With Flutter- Closing Statement

With this quick tutorial, you must have understood how Flutter has made the app development process easier, quicker and simpler for the developer. Developing an app with Flutter can tenfold productivity of the developers and allow enterprises to market their app quickly to the market.

With this app development tutorial, you have learned:

  • Creating a Flutter app development grounds.
  • Writing Dart Codes.
  • Using an External or third-party library.
  • Using hot reload feature for the faster development cycle
  • Implementing a stateful widget
  • Created an infinite scrolling list.

The app development steps are quite long but with careful understanding, you can quickly implement these steps into action. However, if you still have a doubt, then it is best to look for the mobile app development company that can help you get started with the Flutter app in 5 days without any delay.


Create Your App With Flutter In 5 Days was originally published in Level Up Coding on Medium, where people are continuing the conversation by highlighting and responding to this story.


This content originally appeared on Level Up Coding - Medium and was authored by Sara Khan
Dribbble by Michael Filipiuk By Fireart Studio

Flutter, Flutter, Flutter! From Twitter recommendations to app development recommended videos, Flutter has become a buzzword all over the internet. Undoubtedly, long listed features of Flutter have already taken the world by storm, but how to get started with the Flutter app in 5 days is the central question.

Gone are those days when you need to sit back, close your eyes, and think for long hours about the programming language that would allow developing any type of application for multiple operating platforms.

With the launch of Google’s Flutter, now you don’t need to spend sleepless nights studying new languages and frameworks. The app development process has never been easy, but Flutter has made it far easier and simpler for developers by providing an advanced level of software development kit complied with all the widgets and plugins.

Developing an application with Flutter is nothing more than a story of fantasy. In reality, no matter how proficient you are in app development, you have to deal with plenty of technologies and its flaws. In fact, in the world of mobile app development, there’s an endless race between two giants iOS and Android.

So here, being a startup you have two concerns:

  • Firstly, if you choose to develop a Native iOS and Android app, then you need a high budget.
  • Secondly, how to capture the wider segment of the market?

While each sphere requires specific skills, therefore, the most common answer that you will get from a software development company is to choose Swift for iOS and Kotlin for Android.

But my simple answer for both of your questions is — FLUTTER!

Flutter: A Story of Fantasy

Flutter is a recently launched SDK by Google, allowing developers to create applications for iOS and Android by using a single code-base. Unlike other popular solutions, rather than calling Flutter a framework, it is a complete SDK that comes with everything that you will need to build cross-platform applications. Right from rendering engine, ready-made widgets to testing and integration APIs, Flutter has everything.

From here before getting straight into the development process, let me hit some quick highlights of Flutter which makes it quite demanding:
  • Despite being launched in 2017, it has been used by 39% of developers from all across the world and has quickly secured its position as a second topmost demanding framework for cross-platform app development.
  • Dart is the Flutters Object oriented language that uses advanced techniques and compiles into native code that adds up a noticeable speed.
  • Flutter uses the OS as a canvas to build an interface on and moves services such as gestures, rendering and animations into the framework itself that allows developers to have complete control over the system.
  • Flutter boasts ready-made and custom widgets for fast UI coding that enables you to do any level of customization.
  • Compared to others, Flutter has the mildest learning curve and a growing community that allows developers with limited programming knowledge to prototyping and building app can also get started with Flutter.
  • Hot Reload feature can tenfold the development speed and elevates programmer’s productivity that ultimately allows you to experiment with new things without bothering such long delays.
  • Flutter apps are known for their high performance as it uses CPU usage, number of requests per second, average response time, number of frames per second and more.
  • It offers excellent app portability and allows you to migrate from any platform to Flutter.

In a Nutshell: All these features and functionalities of Flutter, definitely encourages you to dig deeper into its core mechanisms and get started with the first Flutter app. Now you must be wondering how a Flutter app can be built in 5 days while a mobile app development company would take at least 4 weeks to 6 weeks of development. So let’s get straight into the Flutter app development process

Creating an Application With Flutter in 5 Days

Flutter is such an easy-to-go technology for app development. So at the time of writing, we have kept the focus on both novice and experts and try to keep this tutorial simple, sorted and straightforward.

So whether you are working as a freelancer or an app development company, this piece of knowledge will definitely help you become a Flutter developer.

With this tutorial, you will take a closer look at Flutter Development for Android Platform, but in mind that you’ll need Android Studio for Android and XCode for iOS. So before you get started with the app development process, it is worth to set up an environment.

First of all, make sure you have Android Studio version 3.0+. If you are not having this, then follow below simple steps:

Let’s get started with the main steps:

Step 1: Install Android Studio

Android Studio offers a complete, integrated IDE experience for Flutter. Moreover, you can use the Flutter SDK for any text editor development experience. But, IDEs provide you with features like Syntax highlighting, code completion, and debugger which are really helpful during the development process.

In case, if you are using Android Studio and IntelliJ, keep in mind that you restart the IDE to activate the recently launched plugins. Also, this will help you start working with the stable versions of IDEs, as Flutter plugins may not function properly on Beta, Canary or EAP builds.

Step 2: Install the Flutter and Dart Plugins

Install these to start a new project on your own or with the help of software development company:

  • Start Android Studio
  • Open plugin preferences (on macOS go to Preferences> Plugins; on Windows & Linux go to File>Settings>Plugins).
  • Open plugin preferences (Configure>Plugins as of v3.6.3.0 or later).
  • Browse repositories of the Flutter plugin and click install
  • Click yes when prompted to install the Dart plugin.
  • Click restart when prompted.

With this, now you can create a new project for Flutter: File>New>New Flutter Project.

Step 3: Create a Flutter Project

To create a new flutter project, you need to select the Flutter Application> Start a New Flutter Project> Android Studio.
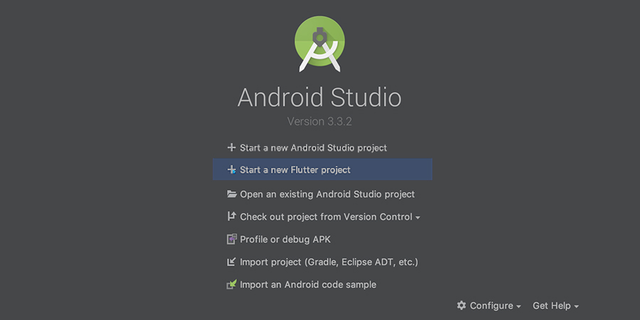
Image Source: Author

Once you click the Flutter Application, on a next screen you will need to provide the Flutter SDK path and basic project details.

Let’s take an example of creating a Songs App, you accordingly you need to add the details in the below columns:

Song_App, /home/user/flutter , /home/user/AndroidStudioProjects , Songs Gallery
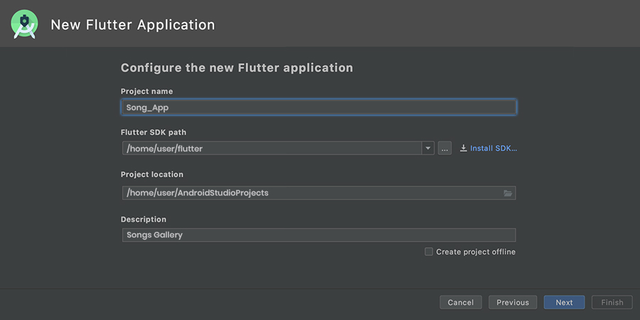
Image Source: Author

Finally, now set a domain name for the package. It’s important that you use a unique name for the package (for signing and publishing purposes). If you don’t have any domain, then you can use com.github.<your login>. And leave the other options set to default values and confirm by clicking finish.

Hurray! Our project is successfully created!

Step 4: Run the Build: Flutter Doctor

To ensure that your app set up the environment is correctly working, it is worth to open the terminal (Alt+F12 in Android Studio) and involve the Flutter Doctor command.

To make it function properly, you need at least usable Flutter with one working IDE and a connected device (physical or emulator)

  • Testing Build on Android

In case of using the device itself, make sure it must be connected via a USB cable and have USB debugging enabled.

In the case of Android Emulator, you need to create a virtual device. And for that, you can either hire a mobile app developer or just open an AVD manager by using the on the toolbar or pressing Ctrl Alt+F12 and typing the action name.

Image Source: Author

Leave the default setting as it is on the screen. Now it’s time to run your app. Just choose the desired device or emulator and press “Shift+F10'’ or simply use the run button. When you click on the run button, the below icon will automatically get changed.

Image Source: Author
  • Testing an App on iOS

While testing an app on iOS Simulator, then you need to first use the dropdown device menu. Keep in mind that Xcode installer will prompt you to install the missing components from the app.

But, things can be a bit complicated to test in case of a physical iOS device. While the device is connected Via a USB cable and unlocked, you need to first open the iOS module in Xcode.
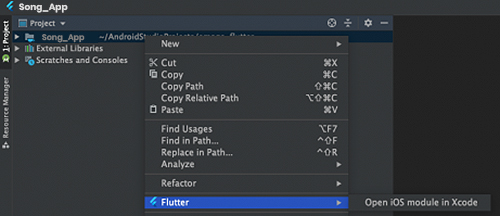
Image Source: Author

Once you open the Xcode, then next go to the signing and capabilities settings of the app. Sign in to your Apple ID and after closing the Accounts window, provisioning profile will be generated.

In case, you locate any error that states that the app identifier cannot be registered, then it means someone else is already using the identifier. Here you need to change the Bundle Identifier value to something else. Once the signing is configured, you can try to run the app from the Android studio. Since the provisioning profile is not trusted on the device, therefore, the first attempt will fail.

While testing your app on iOS devices, keep in mind that it is impossible to run Flutter apps provisioned using Personal Team provisioning profiles on devices running on iOS 13.3.1. This limitation was set by Apple itself. Once the profile is trusted, you can launch the app from the home screen. Since testing on iOS devices is quite complicated, therefore it makes sense to hire Flutter app developer with all the expertise and knowledge.

Image Source

Step 5: Start Coding the Flutter App

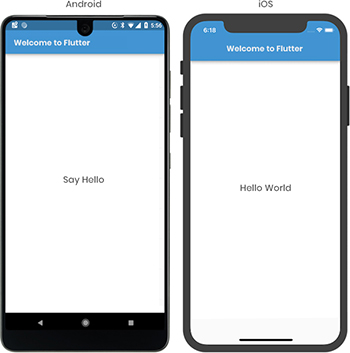
Since you have already created the project with the name of Song_App. Once you start coding the app, most of the app developers edit lib/main.dart, where the Dart code lives. You can replace the contents of the lib/main.dart or delete all of the code from lib/main.dart. Replace all the code with the following code which displays “Songs Gallery’’ in the centre of the screen.
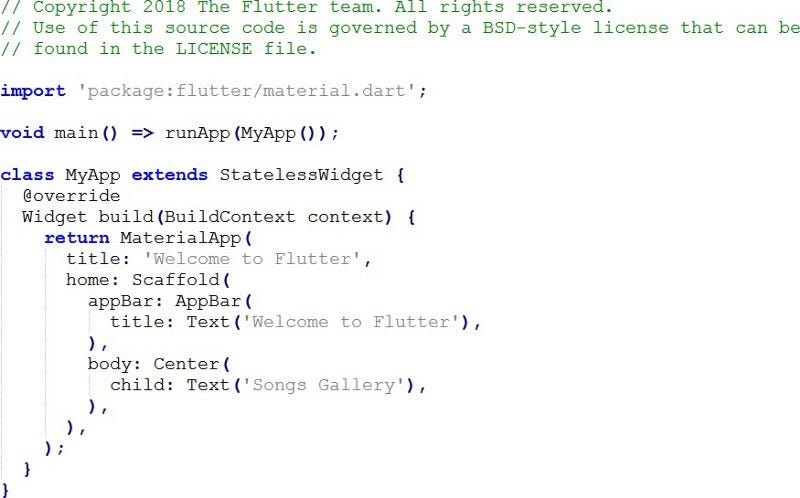
Image Source: Author
Pro Tip: While pasting these codes into your app, you can fix this with the tools that we have mentioned with step 1.

Secondly, run the app by following the step 4 guide and use the suggested Android and iOS IDEs, depending on your devices.

Step 6: Use An External Package

To keep your task sorted and simple, you are advised to start using an open-source package name english_words. Try to use common English words that have some functionality as well. Usually, Flutter app development companies find the english_words package and other open-source packages on Pub.dev. https://pub.dev/

In lib/main.dart, import the new package:

import ‘package:flutter/material.dart’;

import ‘package:english_words/english_words.dart’;

Once you start typing, Android studio will start giving you suggestions for libraries to import. It then renders the import string in grey by reminding you that the imported library is unsaved yet.

Further, use English words package to generate the text instead of using the string “Songs_Gallery”.
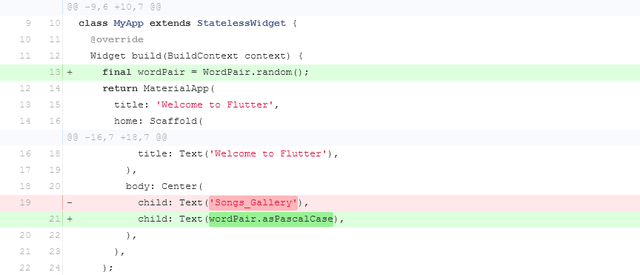
Image Gallery

Next, if the app is running, you can use the hot reload feature to update the running app with the changes you required in the app. You can see the below image with the pair of words randomly chosen to run in the app. In case, your app is not running correctly, look for typos or can try out Flutter’s debugging tools. The software development company would prefer to use “pubspec.yaml” or “lib/main.dart” for debugging the app.

Step 7: Add a Stateful Widgets to your App

In Flutter app development, everything is a widget which is an application itself. Stateless and stateful widgets are the widgets which come with changeable and unchangeable conditions. The scaffold widget is a framework that includes the standard screen components. Hierarchy can be quite a difficult process and have an app bar, body, menu and others.

Flutter’s widget saves you a lot of time and efforts on app development, but it involves a method to build a Widget. The Widget should contain other widgets.

Stateless widgets are immutable which means that their properties can’t be changed and all the value will remain final. On the other hand, Stateful widgets maintain state that might be changed during the lifetime of the widget. So when you implement a stateful widget, it requires at least two classes:

1) a StatefulWidget class that creates an instance of

2) A state class

The StatefulWidget class is, itself, immutable and can be thrown away and regenerated. But the State class persists over the lifetime of the widget.

So basically, you will need to add State class by adding a RandomWordsState. So to add _RandomWordsState, as a child inside the existing MyApp Stateless Widget, you need to follow these two things:

Create the boilerplate code for a stateful widget by positioning all of the code in lib/main.dart and enter Return a couple of times to start on a fresh line.

Enter RandomWords as the name of your widget.

Now both classes will look as follows:
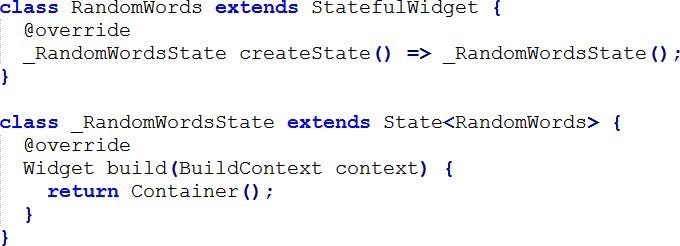
Image Source: Author
Remove the word generation code from the app by making the changes reflecting in the below codes.
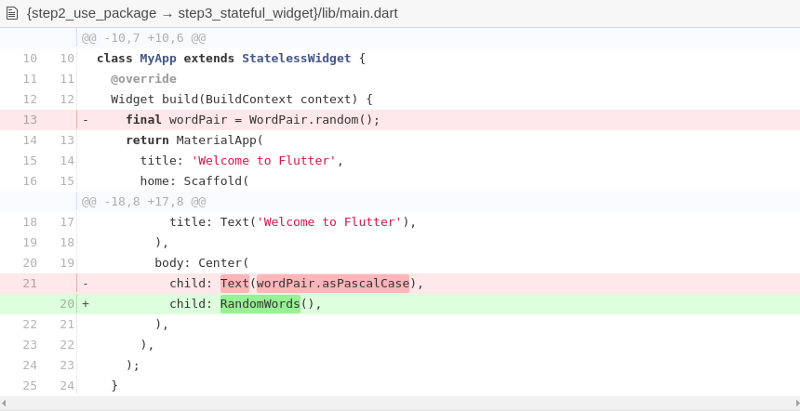
Image Source: Author

At last restart the app to make it behave as before and display a word pairing each time you hot reload or save the app.
Step 8: Create an Infinite Scrolling List View

Here create a list of the most common words and add a possibility to mark the words and add a possibility to mark the words that we liked the most and drag them on the new screen to add some functionality. Basically, the complete logic lays in the condition class. So here are the simple coding that you need to follow as a single class with comments:
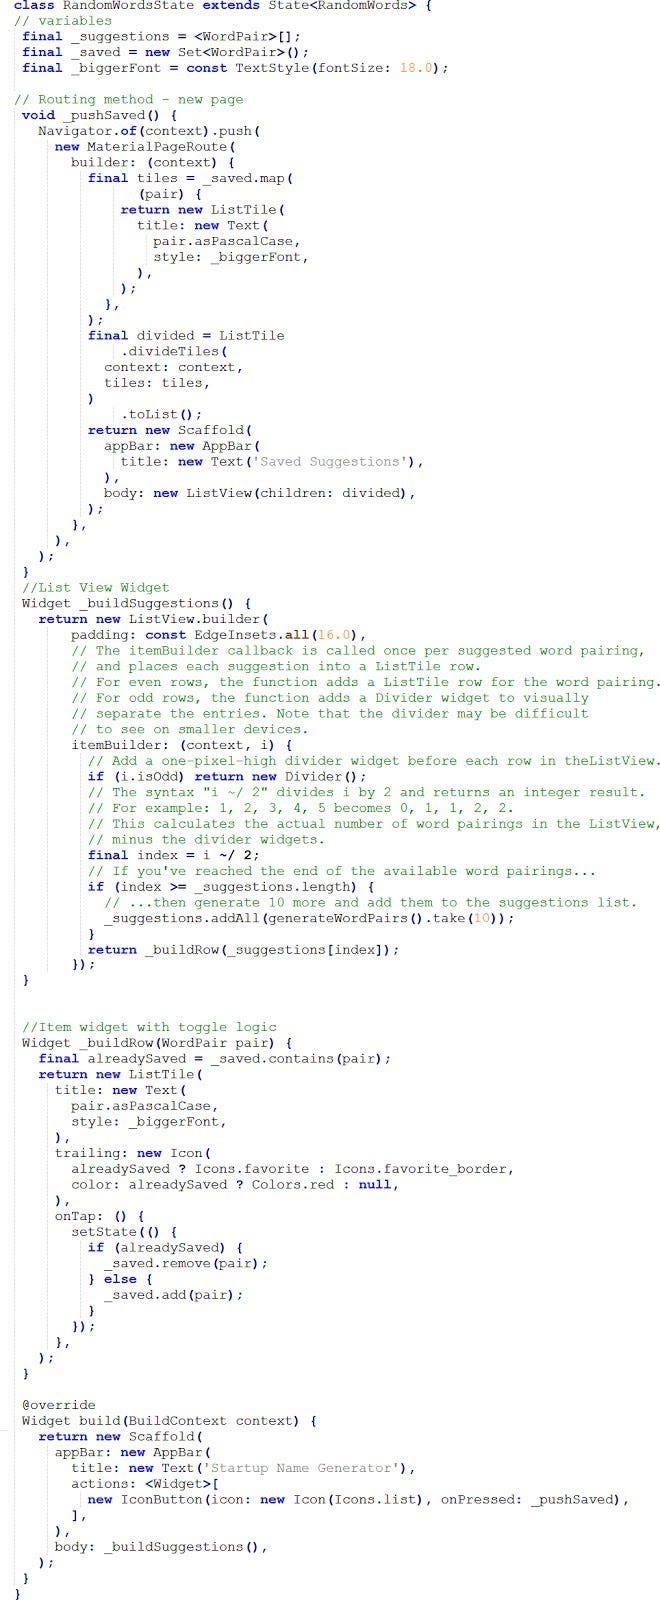
Image Source: Author
The final output of the app will like below image:
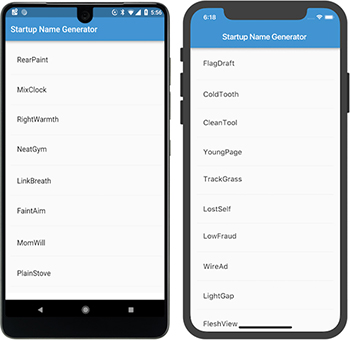
Congratulations! You have learned to write an interactive Flutter app that runs on both iOS and Android.

Setting up Your First App With Flutter- Closing Statement

With this quick tutorial, you must have understood how Flutter has made the app development process easier, quicker and simpler for the developer. Developing an app with Flutter can tenfold productivity of the developers and allow enterprises to market their app quickly to the market.

With this app development tutorial, you have learned:
  • Creating a Flutter app development grounds.
  • Writing Dart Codes.
  • Using an External or third-party library.
  • Using hot reload feature for the faster development cycle
  • Implementing a stateful widget
  • Created an infinite scrolling list.

The app development steps are quite long but with careful understanding, you can quickly implement these steps into action. However, if you still have a doubt, then it is best to look for the mobile app development company that can help you get started with the Flutter app in 5 days without any delay.


Create Your App With Flutter In 5 Days was originally published in Level Up Coding on Medium, where people are continuing the conversation by highlighting and responding to this story.


This content originally appeared on Level Up Coding - Medium and was authored by Sara Khan


Print Share Comment Cite Upload Translate Updates
APA

Sara Khan | Sciencx (2021-03-31T03:29:49+00:00) Create Your App With Flutter In 5 Days. Retrieved from https://www.scien.cx/2021/03/31/create-your-app-with-flutter-in-5-days/

MLA
" » Create Your App With Flutter In 5 Days." Sara Khan | Sciencx - Wednesday March 31, 2021, https://www.scien.cx/2021/03/31/create-your-app-with-flutter-in-5-days/
HARVARD
Sara Khan | Sciencx Wednesday March 31, 2021 » Create Your App With Flutter In 5 Days., viewed ,<https://www.scien.cx/2021/03/31/create-your-app-with-flutter-in-5-days/>
VANCOUVER
Sara Khan | Sciencx - » Create Your App With Flutter In 5 Days. [Internet]. [Accessed ]. Available from: https://www.scien.cx/2021/03/31/create-your-app-with-flutter-in-5-days/
CHICAGO
" » Create Your App With Flutter In 5 Days." Sara Khan | Sciencx - Accessed . https://www.scien.cx/2021/03/31/create-your-app-with-flutter-in-5-days/
IEEE
" » Create Your App With Flutter In 5 Days." Sara Khan | Sciencx [Online]. Available: https://www.scien.cx/2021/03/31/create-your-app-with-flutter-in-5-days/. [Accessed: ]
rf:citation
» Create Your App With Flutter In 5 Days | Sara Khan | Sciencx | https://www.scien.cx/2021/03/31/create-your-app-with-flutter-in-5-days/ |

Please log in to upload a file.


There are no updates yet.
Click the Upload button above to add an update.

You must be logged in to translate posts. Please log in or register.