This content originally appeared on Level Up Coding - Medium and was authored by Yannick KIKI

Introduction
An ORM (Object Relational Mapper) is a tool that allows you to interact with your database using the object-oriented paradigm. Therefore, ORMs are generally implemented as libraries in languages that support object-oriented programming.
Here is a basic example with Django ORM:
There are several open-source ORMs in different programming languages such as Django ORM (Python), Laravel Eloquent (PHP), Sequelize (JavaScript), etc.
These ORMs implement very advanced features and their source code can be a little intimidating when you are a beginner so in this article, we will implement a simple ORM with Python from scratch to demystify the process and give a general idea of how it works.

Usage Definition
Since we are building our ORM from scratch, before starting to code, we should define how it will be used. It will allow us to have a good overview of what we are trying to design.
For example, let’s consider this query:
SELECT * FROM employees WHERE salary = 10000;
With Django ORM, to execute this query, we can write this:
employees = Employee.objects.filter(salary=10000)
But that’s because Django decided to implement his ORM to behave like that. Here are some examples of how it could be done differently:
(1) Employee.get_objects(where={'salary': 10000})
(2) Employee.objects.select('*', condition=Condition(salary=10000))
So it’s up to the system developer to decide how his system will behave.
In our case, we will try to design an ORM that will allow us to perform basic create, read, update and delete operations with the usage defined below:
After understanding how this can be achieved, you should be able to add more features and use cases.

Implementation
Structure
The first step of our ORM implementation would be to implement the structure that will allow us to have the usage expected. We can achieve this with the following code:
Now that we have our general structure, we can go ahead and implement our features (SELECT, INSERT, UPDATE and DELETE) as described above. But before that, let’s set up a database to be able to test our ORM.
Database setup
Most of the popular ORMs support many database management systems but here, to keep it simple, let’s just implement support for PostgreSQL.
Therefore, to be able to test our ORM, we would need a Postgres database. This is what our database settings will look like.
DB_SETTINGS = {
    'host': '127.0.0.1',
    'port': '5432',
    'database': 'ormify',
    'user': 'yank',
    'password': 'yank'
}
You can follow this nice article to create a Postgres database, user, and grant access to the database to the user.
To follow the ORM usage defined above, after creating a database, we would need to create a table employees with the fields first_name , last_name , salary , and grade .
You can use the script below to create that table and populate it with some data (after updating DB_SETTINGS with your own credentials).
This script requires the psycopg2 package. You can install it by executing the command:
- pip install psycopg2-binary
If you already have an existing database with some tables in it, you can also create your own models (as our Employee model) and test with it.
Alright, if everything is set up now, we can start with the first feature: SELECT
Select feature
As a reminder, here is what we want to have for the SELECT feature:
# SQL: SELECT salary, grade FROM employees;
employees = Employee.objects.select('salary', 'grade')
with employees a list of Employee objects. We can achieve this by updating the ORM implementation code as follows:
You can use your favorite code editor diff tool or Diffchecker to inspect the changes in the different steps of the implementation easily.
Let’s test this code to see what happens.
If everything went well, you should see an output like this:

If so, congratulations ?, you have implemented an ORM with Python that can make basic SELECT queries on your database ?. Let’s now add the INSERT, UPDATE, and DELETE features.
Insert, Update, Delete features
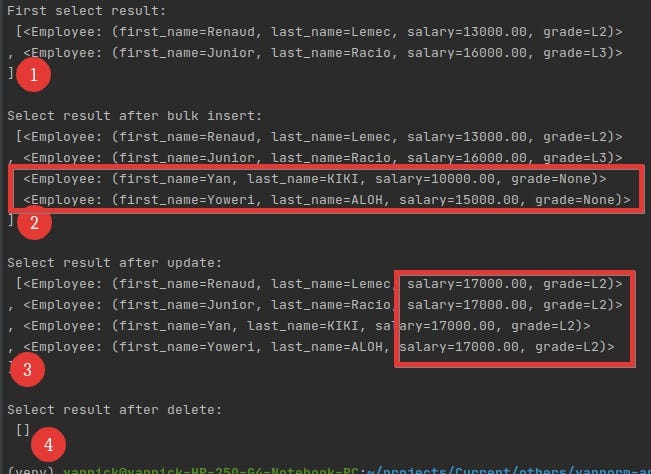
To implement these features, we can update the code as follows:
After running this script, you should have an output like this:

Yaaaay!! We can be proud ? ?, we now have a functional ORM that supports all the basics queries. Congratulations ?.
Conclusion
We have been able to implement a simple ORM with Python that supports basic SQL queries. We can now interact with our database from Python code and we also had an overview on how to proceed to design our own software systems.
There are a lot of features that we can add to this ORM to make it more powerful such as:
- records filtering with WHERE clauses
- jointures
- aggregations, etc.
You can find the current state of the ORM implementation on Github:
Feel free to contribute to the project with code reviews, issues report features implementations, features requests, etc.
If you have any questions/feedback about this article, let me know in the comments section. Thanks.
How I built a simple ORM from scratch in Python was originally published in Level Up Coding on Medium, where people are continuing the conversation by highlighting and responding to this story.
This content originally appeared on Level Up Coding - Medium and was authored by Yannick KIKI
Yannick KIKI | Sciencx (2021-04-12T15:19:22+00:00) How I built a simple ORM from scratch in Python. Retrieved from https://www.scien.cx/2021/04/12/how-i-built-a-simple-orm-from-scratch-in-python/
Please log in to upload a file.
There are no updates yet.
Click the Upload button above to add an update.
