This content originally appeared on Telerik Blogs and was authored by Claudio Bernasconi
Learn how to integrate Blazor components into an existing WinForms .NET 6+ application using WebView2.
Blazor is an excellent .NET web development technology. However, it does not stop there.
One of the reasons why Blazor is becoming more and more widely used in .NET development is its convenient migration path. Blazor is not only attractive for greenfield development but also for modernizing existing (desktop) .NET applications.
In this article, I will explain how to integrate Blazor components into an existing WinForms application using Blazor Hybrid.
Prerequisites
The integration of Blazor components into a WinForms application works using WebView2. The NuGet package providing WebView2 support for WinForms applications requires your WinForms application to run on .NET 6 or later. If you cannot migrate your WinForms application to .NET 6 or later, you might reconsider your desire to use Blazor components inside your legacy WinForms application.
If you plan to continue developing your WinForms application, the first step is migrating from .NET Framework to a future-proof, modern .NET version before considering integrating Blazor components.
Also, make sure the ASP.NET Core and web development workload is installed in your Visual Studio instance.
The Demo Application
In this article, we want to use a simple but realistic example application. I use a .NET 8–based WinForms application with a WinForms ListBox on the left and a Blazor component on the right.
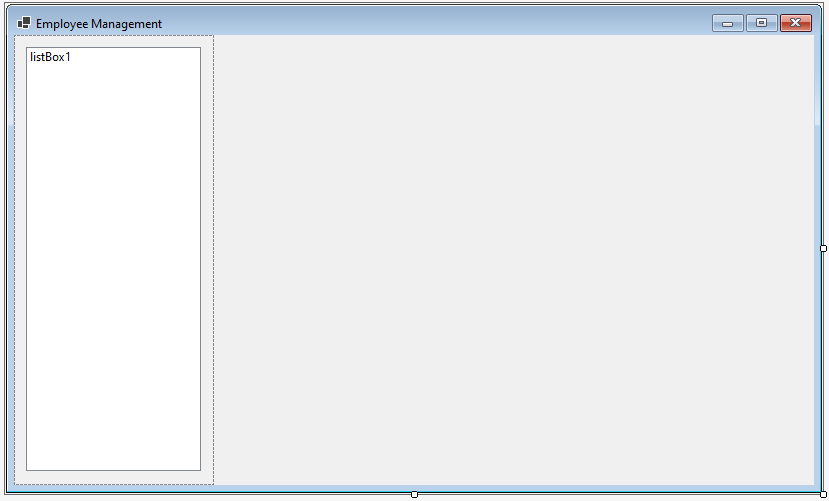
The application imitates a window of employee management software. The ListBox on the left contains the names of all employees. When the user selects one of the employees, we see their detailed information on the right rendered in a Blazor component.
We start with the WinForms-only application, including the ListBox implementation and an empty screen on the right.
You can find the before and after applications in the GitHub repository.
Adding Blazor Support to an Existing WinForms Application
A few steps are involved in adding Blazor support to an existing WinForms application.
Again, make sure your application is based on .NET 6 or later—refer to the Prerequisites chapter.
The required steps are:
- Changing the project’s SDK type
- Installing the NuGet package containing WebView2 support for WinForms
- Creating an _Imports.razor file
- Creating an index.html file
- Creating an app.css file
- Creating a Blazor component (.razor) file
- Adding a BlazorWebView component in the WinForms designer
- Initializing the BlazorWebView component in the code-behind file
Hint: To make this chapter as simple as possible, we will use the default Counter component from the standard Blazor web application project template. Later, we will replace it with a more realistic Blazor component, implement parameter passing and use dependency injection.
1. Changing the Project’s SDK Type
A regular WinForms project file starts with a Project tag and its Sdk property set to Microsoft.NET.Sdk.
To make a project compile .razor files, we need to change the Sdk type from Microsoft.NET.Sdk to Microsoft.NET.Sdk.Razor.
<Project Sdk="Microsoft.NET.Sdk.Razor">
For the demo application, we change the definition in the BlazorInWinForms.csproj file.
2. Installing the NuGet Package Containing WebView2 Support for WinForms
There is a NuGet package, which contains the WebView2 component for WinForms, which allows us to render a Blazor component inside a WinForms application.
We install the following package using the NuGet package manager or the Package Manager Console:
Microsoft.AspNetCore.Components.WebView.WindowsForms
Make sure to install the correct version matching your intended .NET version. For example, use 6.x for a .NET 6 application and 8.x for a .NET 8 WinForms application.
3. Creating an _Imports.razor File
We create a new _Imports.razor file inside the project’s root folder.
As the file content, we add the following line:
@using Microsoft.AspNetCore.Components.Web
It makes the Microsoft.AspNetCore.Components.Web namespace available in all .razor files in the project.
You might want to add additional namespaces in the future, similar to a regular Blazor web application.
Hint: If you cannot find the
.razorfile template in the New File Dialog in Visual Studio, you might want to close and reopen Visual Studio. I have had a few instances where changing the SDK type was not recognized without restarting Visual Studio.
4. Creating an index.html File
Next, we want to create a new wwwroot folder and add a new index.html file inside this folder.
Hint: In Visual Studio, the icon of the folder should automatically turn into a globe.
We use the following code in the index.html file:
<!DOCTYPE html>
<html lang="en">
<head>
    <meta charset="utf-8" />
    <meta name="viewport" content="width=device-width, initial-scale=1.0" />
    <title>BlazorInWinForms</title>
    <base href="/" />
    <link href="css/app.css" rel="stylesheet" />
    <link href="BlazorInWinForms.styles.css" rel="stylesheet" />
</head>
<body>
    <div id="app">Loading...</div>

    <div id="blazor-error-ui" data-nosnippet>
        An unhandled error has occurred.
        <a href="" class="reload">Reload</a>
        <a class="dismiss"></a>
    </div>

    <script src="_framework/blazor.webview.js"></script>
</body>
</html>
The important bits are the viewport definition, the CSS stylesheet imports, and the script import for the blazor.webview.js file.
5. Creating an app.css File
Next, we want to create a new css folder in the wwwroot folder and create the app.css file, which is referenced in the index.html file we created in the previous step.
We mostly use the default code generated by the Blazor web application project template for this demo application:
html, body {
    font-family: 'Helvetica Neue', Helvetica, Arial, sans-serif;
}

h1:focus {
    outline: none;
}

a, .btn-link {
    color: #0071c1;
}

.btn-primary {
    color: #fff;
    background-color: #1b6ec2;
    border-color: #1861ac;
}

.valid.modified:not([type=checkbox]) {
    outline: 1px solid #26b050;
}

.invalid {
    outline: 1px solid red;
}

.validation-message {
    color: red;
}

#blazor-error-ui {
    background: lightyellow;
    bottom: 0;
    box-shadow: 0 -1px 2px rgba(0, 0, 0, 0.2);
    display: none;
    left: 0;
    padding: 0.6rem 1.25rem 0.7rem 1.25rem;
    position: fixed;
    width: 100%;
    z-index: 1000;
}

    #blazor-error-ui .dismiss {
        cursor: pointer;
        position: absolute;
        right: 0.75rem;
        top: 0.5rem;
    }
6. Creating a Blazor Component (.razor) File
Next, we create the root Blazor component, which we want to render inside the WinForms application.
As a first step, we will use the default Counter component generated by the Blazor web application template.
@page "/counter"

<PageTitle>Counter</PageTitle>

<h1>Counter</h1>
<p>Current count: @currentCount</p>
<button @onclick="IncrementCount">Click me</button>

@code {
    private int currentCount = 0;

    private void IncrementCount()
    {
        currentCount++;
    }
}
We will expand on this example and introduce a more realistic and more complex Blazor component in future chapters.
7. Adding a BlazorWebView Component in the WinForms Designer
Next, we open the Form1.cs file in the WinForms designer.
It currently contains a ListBox on the left and a lot of remaining space on its right.

We open the Toolbox and add an instance of the BlazorWebView component to the WinForms form where we want to render the Counter component.
Important: Make sure to use the BlazorWebView component from the previously installed NuGet package and not the WebView2 component.
Make sure to position and resize the component in the forms designer to use the remaining space on the right of the existing ListBox.
8. Initializing the BlazorWebView Component in the Code-behind File
Now that we have an instance of the BlazorWebView component, we need to initialize it inside the constructor of the Form1 form.
At the end of the constructor in the code-behind file, after the initialization of the ListBox, we add the following code:
var services = new ServiceCollection();
services.AddWindowsFormsBlazorWebView();
blazorWebView1.HostPage = "wwwroot\\index.html";
blazorWebView1.Services = services.BuildServiceProvider();
blazorWebView1.RootComponents.Add<Counter>("#app");
We create an instance of the ServiceCollection type, which allows us to register services with the dependency injection system. We use the AddWindowsFormsBlazorWebView extension method to register the required services.
Next, we set the HostPage property of the BlazorWebView to the index.html file defined in the wwwroot folder.
We then build the service provider on the service collection by calling the BuildServiceProvider method and assign its result to the Services property.
The last line uses the Add method on the RootComponents property to add the Counter component. We use the Counter type as the generic type argument and provide the HTML selector as the method argument.
The method argument defines where in the HTML code (index.html) the Blazor component should be rendered. The value #app defines that the Counter component should be rendered on an HTML tag with the id "app".
Running the WinForms Application Using a Blazor Component
We are now ready to build and run the WinForms application. The application should now render the Counter component beside the ListBox component.
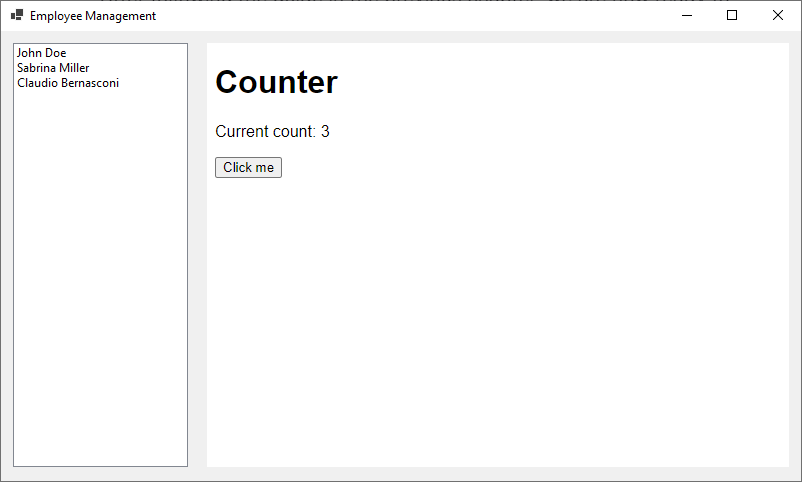
Every click on the Click me button should increase the count by 1.
Congratulations! You successfully rendered your first Blazor component inside an existing WinForms application.
Providing Parameters to a Blazor Component
The previous chapter demonstrated adding a Blazor component to an existing WinForms application.
The Counter component is straightforward. It doesn’t consume services, and it doesn’t receive any data from the WinForms application. It is a dynamic Blazor component, but it is completely isolated from the WinForms application.
In this chapter, we will implement a more realistic component, which will receive data from the WinForms application and demonstrate how WinForms and Blazor can work hand-in-hand.
Let’s start by creating a new Blazor component. We call the file PersonDetail.razor.
<div>
    <b>@PersonId</b>
</div>

@code {
    [Parameter]
    public int PersonId { get; set; }
}
The component code is simple. We have an HTML template that references a PersonId property.
In the code section, we have a definition of a PersonId property of type int. Notice the Parameter attribute. It tells Blazor that this component accepts a parameter from its parent component.
Now, let’s change the code in the Form1.cs code-behind file to render the PersonDetail component instead of the Counter component.
We change the line from:
blazorWebView1.RootComponents.Add<Counter>("#app");
to:
blazorWebView1.RootComponents.Add<PersonDetail>("#app");
Next, we remove the Counter.razor file form the project.
Remember the PersonId parameter we just defined in the PersonDetail component? We now want to pass data from the WinForms application to the PersonId parameter of the PersonDetail component.
We use the second parameter of the Add method on the RootComponents property:
var parameters = new Dictionary<string, object> { { "PersonId", 16 } };
blazorWebView1.RootComponents.Add<PersonDetail>("#app", parameters);
First, we create a Dictionary of type string and object. We then add an entry with PersonId as the key and 16 as its value.
Now, let’s build and run the application again.
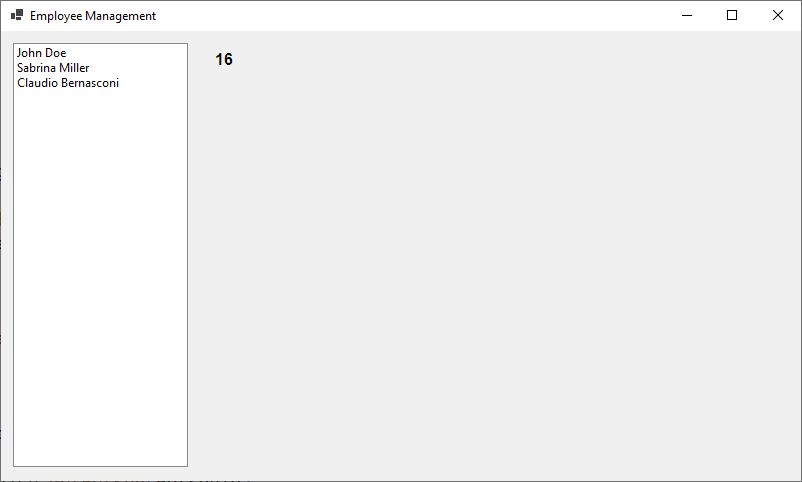
We now see the number 16 rendered on the screen. It is rendered by the PersonDetail component and passed from the WinForms application to the Blazor component.
Consuming Services from a Blazor Component
We now want to use a service inside the PersonDetail component to load information about the person.
It’s a common pattern to implement business logic in framework-independent C# code and inject those services into Blazor components.
We create a new Services folder and add an IPersonService file, which contains the following code:
namespace BlazorInWinForms.Services;

internal interface IPersonService
{
    Person GetPerson(int personId);
}

public record Person(
    int PersonId,
    string FirstName,
    string LastName,
    string Role
);
We define an interface IPersonService with a single GetPerson method. As the return type, we use the Person type, which we define as a record type a few lines after the interface definition.
A Person contains a PersonId, a FirstName, a LastName and a Role.
Next, we add another file to the Service folder and name it PersonService.
It contains the following code implementing the IPersonService interface:
namespace BlazorInWinForms.Services;

internal class PersonService : IPersonService
{
    private readonly IList<Person> _persons = new List<Person>
    {
        new Person(1, "John", "Doe", "Business Analyst"),
        new Person(3, "Sabrina", "Miller", "Product Manager"),
        new Person(16, "Claudio", "Bernasconi", "Software Engineer")
    };

    public Person GetPerson(int personId)
    {
        return _persons.Single(p => p.PersonId == personId);
    }
}
We define a PersonService class, which implements the IPersonService interface. We create a private _persons variable, which holds the information about the persons.
In the GetPerson method implementation, we access the _persons variable and return the correct Person object that matches the provided PersonId.
Before we can inject the PersonService into a Blazor component, we need to register it with the dependency injection system.
We open the Form1.cs code-behind file and add the following service registration before calling the BuildServiceProvider method on the ServiceCollection.
services.AddScoped<IPersonService, PersonService>();
In the PersonDetail component, we can now inject the PersonService using the following lines at the beginning of the component definition:
@using BlazorInWinForms.Services
@inject IPersonService PersonService
We also want to use the GetPerson method on the injected PersonService instance when the component is rendered and display the retrieved information on the screen.
The completed PersonDetail component code looks like this:
@using BlazorInWinForms.Services
@inject IPersonService PersonService

<div style="display: flex; align-items: center;">
    <div style="margin-right: 10px;">
        <img style="width: 80px" src="@PersonAvatar" />
    </div>
    <div>
        <b>@Person?.FirstName @Person?.LastName</b><br />
        @Person?.Role
    </div>
</div>

@code {
    [Parameter]
    public int PersonId { get; set; }

    public Person? Person { get; set; }
    public string PersonAvatar
    {
        get
        {
            return $"images/avatar_{Person?.PersonId}.png";
        }
    }

    protected override void OnAfterRender(bool firstRender)
    {
        Person = PersonService.GetPerson(PersonId);
        StateHasChanged();
    }
}
Let’s focus on the overriden OnAfterRender method. Whenever the component is rendered, we use the PersonId provided as the component’s parameter to load the correct Person object from the PersonService by calling the GetPerson method. We also call the StateHasChanged method, which tells Blazor to rerender the component.
Besides the information on the Person object, we also render an avatar image. I added a few images to a new images folder inside the wwwroot folder. Reference the GitHub repository to download the images, or create them yourself.
Let’s build and run the application again.
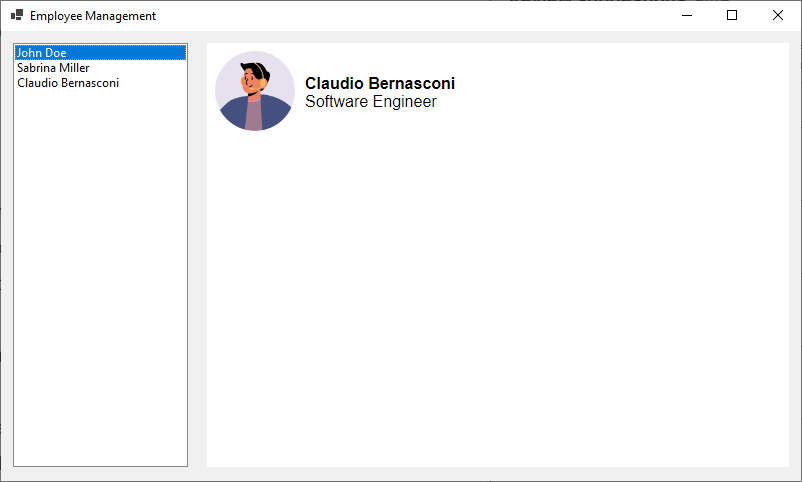
We now see the first and last name, the role, and an avatar of the person with the id 16, which we provide when initializing the BlazorWebView in the Form1.cs file.
Now, let’s connect the ListBox on the left with the Blazor component on the right.
We open the Form1.cs file in the WinForms designer and add a new event handler for the SelectedIndexChanged event of the ListBox object.
When double-clicking the event in the event inspector, Visual Studio creates an event handler in the code-behind file.
We add the following implementation:
private void listBox1_SelectedIndexChanged(object sender, EventArgs e)
{
    var selectedPerson = listBox1.SelectedItem as PersonListItem;

    blazorWebView1.RootComponents.Remove("#app");

    var parameters = new Dictionary<string, object> {
        { "PersonId", selectedPerson.PersonId }
    };
    blazorWebView1.RootComponents.Add<PersonDetail>("#app", parameters);
}
First, we use the SelectedItem property on the ListBox instance and cast its object to the PersonListItem type, which is part of the legacy WinForms application.
Hint: The type is already used in the initialization code to add three persons to the
ListBox.
Next, we remove the existing Blazor component from the BlazorWebView using its Remove method.
We then create a new dictionary containing the parameters and call the Add method on the RootComponents property to add the PersonDetail component with the personId from the selected item.
Let’s build and run the application again.
Whenever we click on any of the persons in the ListView on the left, we see the person’s information on the right.
Blending Blazor Components into a WinForms Application
Of course, modern Blazor components will most likely look different from the typical battleship gray WinForms application.
However, there are simple things we can do to tune the look of a Blazor component to the style of a legacy WinForms application.
For example, we can adjust the background color to match the WinForms application. On the web, a white background is the default color. In a WinForms application, a light gray color is the default.
If we adjust the background of the Blazor component to the color of the WinForms application, it will already make a noticeable difference.
We can add the following CSS definition to the HTML selector in the app.css file:
html, body {
    font-family: 'Helvetica Neue', Helvetica, Arial, sans-serif;
    background-color: #F0F0F0;
}
Take a look at the following image, which shows the same PersonDetail component with the same background for the Blazor and the WinForms components.
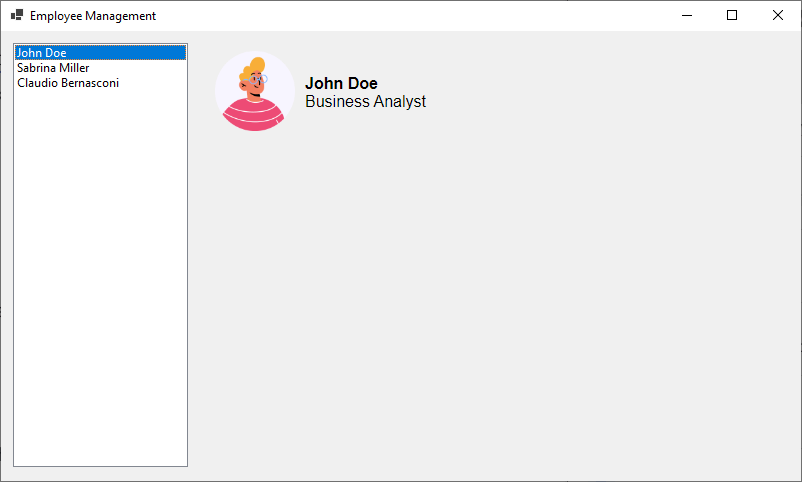
Compare it with the previous screenshot, where the Blazor component has its default white background.
Another option would be using a font similar to MS Sans Serif, the default font used in WinForms.
Sometimes, you want to clearly communicate which parts of the application are new and use Blazor and which are legacy WinForms views. In that case, I suggest you do not blend the Blazor components too much into your WinForms application.
Conclusion
Modernizing legacy applications can be challenging. There have been two decades between Blazor and WinForms, and they use a completely different technology stack.
Rendering Blazor components, passing parameters and consuming services are all possible when integrating the BlazorWebView component within a WinForms application.
We can add the BlazorWebView to all .NET 6+ based WinForms applications using the Microsoft.AspNetCore.Components.WebView.WindowsForms NuGet package.
Using the approach shown in this article, you can implement new components using Blazor, a modern browser-based technology, and integrate those new components into an existing legacy WinForms application.
This approach allows for a gradual improvement and a step-by-step migration from WinForms to Blazor without requiring a big-bang migration shifting from one app to another.
With this approach to integrating Blazor components into a WinForms application, you can even use .NET Hot Reload, which allows you to see changes in your source code that are very quickly applied to your application.
For example, you can change the background color of your Blazor component, and you will immediately see the change reflected on the screen.
You can access the code used in this example on GitHub.
If you want to learn more about Blazor development, you can watch my free Blazor Crash Course on YouTube. And stay tuned to the Telerik blog for more Blazor Basics.
Don’t forget: Progress Telerik can assist in both WinForms and Blazor. Your free Telerik DevCraft trial is waiting!
And learn more about Blazor Hybrid.
This content originally appeared on Telerik Blogs and was authored by Claudio Bernasconi
Claudio Bernasconi | Sciencx (2024-10-02T16:16:02+00:00) Blazor Basics: Using Blazor Components in WinForms with Blazor Hybrid. Retrieved from https://www.scien.cx/2024/10/02/blazor-basics-using-blazor-components-in-winforms-with-blazor-hybrid/
Please log in to upload a file.
There are no updates yet.
Click the Upload button above to add an update.
