This content originally appeared on Level Up Coding - Medium and was authored by AJinkya Ranade (Aj)

Hello Friends, today I am going to examining how to deploy a spring boot microservice on minikube. There are several good articles is already exist but they are scattered in many articles. I am trying to put all those knowledge in a single bucket to understand quickly and easily.
? Prerequisites
- window 10 pro-1909 or windows 10 home pro-1903
- Chocolatey version: v0.10.15
- Docker version : v 10.0.9
- minikube version: v1.15.1
- git version : 2.29.2.windows.1
- Github account
- Docker hub account
Try your hand setup in a minikube environment :
?Chocolatey: Chocolatey is an excellent tool to help us install/uninstall windows packages and feels like an ubuntu user, but it’s not mandatory here. You can also download packages from the original site but I would recommend using choco to installing packages quickly.
? Install Chocolatey with cmd or PowerShell
Run the below command on cmd/shell and wait few seconds to complete the installation.
- Installing with cmd.exe (run as administrator)
@”%SystemRoot%\System32\WindowsPowerShell\v1.0\powershell.exe” -NoProfile -InputFormat None -ExecutionPolicy Bypass -Command “[System.Net.ServicePointManager]::SecurityProtocol = 3072; iex ((New-Object System.Net.WebClient).DownloadString(‘https://chocolatey.org/install.ps1'))" && SET “PATH=%PATH%;%ALLUSERSPROFILE%\chocolatey\bin”
- Installing with PowerShell (run as administrator)
Set-ExecutionPolicy Bypass -Scope Process -Force; iex ((New-Object System.Net.WebClient).DownloadString(‘https://chocolatey.org/install.ps1'))
you are ready to use Chocolatey! Type choco or choco --version
? Docker (Container Management software)
Before going to kick off with Docker installation, we revisit some important docker terminologies at a very high-level which will help us grasp the deployment process easily.
What is Docker?
From a technical point of view, Docker helps us with containerized applications, building container-ready images, pushing docker images on the central repository without worrying about the environment setup.
Whats is the docker image? ? ➕️? ➡️ ?
Docker image is made of different types of layers. Each layer represents specific functionality it’s maybe an os, dependency, or any type of software, and each image layer is called an AUFS (union file system).
Docker image blueprint of your container.
- Image layers and their contents are collected in the diff directory
- image layers are stacked in the layers directory
- containers are mounted inside mnt the directory
Let’s try to relate the layer with the .docker file which has to use while building an image.
** build stage **
FROM maven:3.6.0-**-slim AS build <-- layer 1 (mvn setup)
RUN mvn -f /pom.xml clean package <-- layer 2 top of 1 layer to use mvn command
Whats is Container? ? put into ? and ⏩️
Docker Container: Docker image becomes a container when they run on the docker engine. The container build special packages called containers and inside that, you can build whatever you can.
?Install Docker Desktop
1️⃣ If the Chocolatey Package Manager is installed, use the following command or you can also download the desktop docker installer from here.
choco install docker-desktop
2️⃣ You are ready to use Docker! Type docker — version to check if the setup has been completed successfully or not.
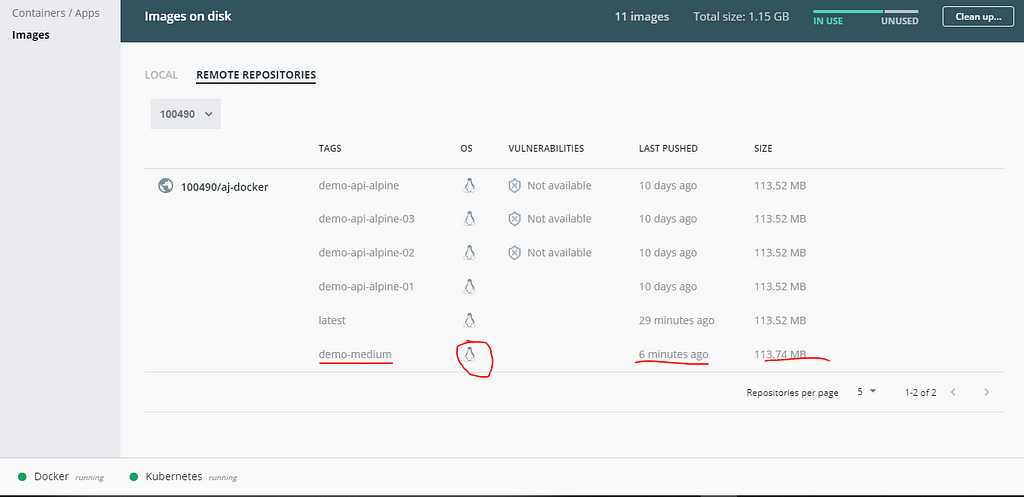
Using docker desktop we can also access our remote docker repository and as well as manage local images. the biggest advantage we can eassly find and update the docker setting. If you do not have a docker id yet no worries you can create from here and it's free up to certain levels.
Try to run the docker login the command from the power shell so we will build, tag, and push images to the Docker repository.
3️⃣ create a Repository on docker hub
Login with Docker hub → Click on create repository → give repository name → click on create repository
In My Case
100490/aj-docker 100490 --> dockerId and aj-docker --> repository
?The Important point note here, our main motto is, dynamically pulling the images from a repository and build a container. for keeping things simple and moving ahead with basic knowledge I am explaining pull, build, commit, and push concepts here. you can ignore those if you already know about those concepts and continue with the next step (Install Minikube ).
- create a spring boot project using spring.io or you can also clone a sample microservice from my GitHub repo to build a docker image. here
- you can simply ignore if you have already clone API from my GitHub repository. otherwise, you need to update your .dockerFile which will contain the following commands as well as change the VOLUME attribute value according to your directory structure.
- try to execute docker pull openjdk:8-jdk-alpine to install the lightweight version of JDK 8 . you can also pull different images from the docker hub repo dashboard.
- build docker image using below command (make sure you are in working directory)
docker build -t 100090/aj-docker:demo-medium -f ./dockerFile .
docker build -t your_docker-id/your repo:{tag_name} -f path_of_docker_file .
- used docker images command to find the image id . in my case c619178c180d* is my image id.
- Tag your image before the push into the docker repo.
docker tag c619178c180d 100490/aj-docker:demo-medium
docker tag your_image_id/your_repo:{give_tag_name_in_build_cmd}
- pushing an image to the Docker repository.
docker push 100490/aj-docker
docker push docker_id/repo
Run Docker image on your local machine using below cmd
docker run -p 8080:8080 100490/aj-docker:demo-medium
docker run -p 8080:8080 your_docker_id/your_repo:your_tag_name

?Install Minikube ( Kubernetes )
- you can download minikube using the below command or you can also download the minikube installer from here
choco install minikube
- let’s start the Kubernetes cluster using the minikube start — vm=true command. if minikube fails to start please visit the driver package for help setting up a compatible container.
what is Kubernetes Cluster?
Cluster is the soul of Kubernetes. It is a set of nodes for running our container application. Kubernetes runs your application, by placing containers into Pods to run on Nodes. A node may be a virtual or physical machine, depending on the cluster. Each node contains the services necessary to run pods.
what is Kubernetes Dashboard ?
it is a user interface to get an overview of your application running on your Kubernetes cluster. you can start the minikube dashboard using the following command.
minikube dashboard --url or minikube dashboard
Configure Docker hub repo with GitHub project
config repository with Github, whenever we will push our code to codebase it’s by available for the docker hub repository to create a new docker image with our new changes.
1️⃣ Navigate to Repositories → Select Your Repository → builds → Authenticate with your Github credential → select Project.
2️⃣ In the build rule session we need to specify our docker file name(name are exactly the same as we mention in the project) to build images.

?Install kubectl
Kubectl is a command-line tool to run commands against the Kubernetes clusters get pod details, applying config, service log.
choco install kubernetes-cli
Create a secret
The secret can holds the user credentials required by the pods to access resources. In our case, we are going to create a secret for our private repository to pull docker images. There are serval ways to maintain the secret you can also use Helm Secrets or keep secrets in a git repo but for now, we keep this simple here.
Steps to create secret
docker login
The login process updates the config.json file with the authentication token.
cat ~/.docker/config.json
Create a secret using existing docker hub credentials. Kubernetes cluster used that secret to authenticate and pull images from the private repo.
kubectl create secret docker-registry regcred --docker-server=<your-registry-server> --docker-username=<your-name> --docker-password=<your-pword> --docker-email=<your-email>
In my case, the regcred is the name of our secret that will be used in a deployment file to pull images from the repo. Your command looks like the below one.
kubectl create secret docker-registry regcred --docker-server=https://index.docker.io/v1/ --docker-username=1004** --docker-password=**j*****1 --docker-email=ranade.ajinkya1@gmail.com
Create a Deployment file
In this step, we have to create a deployment file which is a set of instructions to build a pod. Let’s try to understand some important points related to the deployment file.
?KIND:- kind is indicated the type of object or its behavior. It may be a service, deployment, secret, pod type, etc.
?IMAGE: the path of the docker image to build the container.
{your_docker_id}/(your_docker_repo_name}:{your_tag_name}? ImagePullPolicy: It’s an instruction to the container when we will require a new docker image to a container. the default value is IfNotPresent.
? Service: to expose the endpoints outside the Kubernetes.
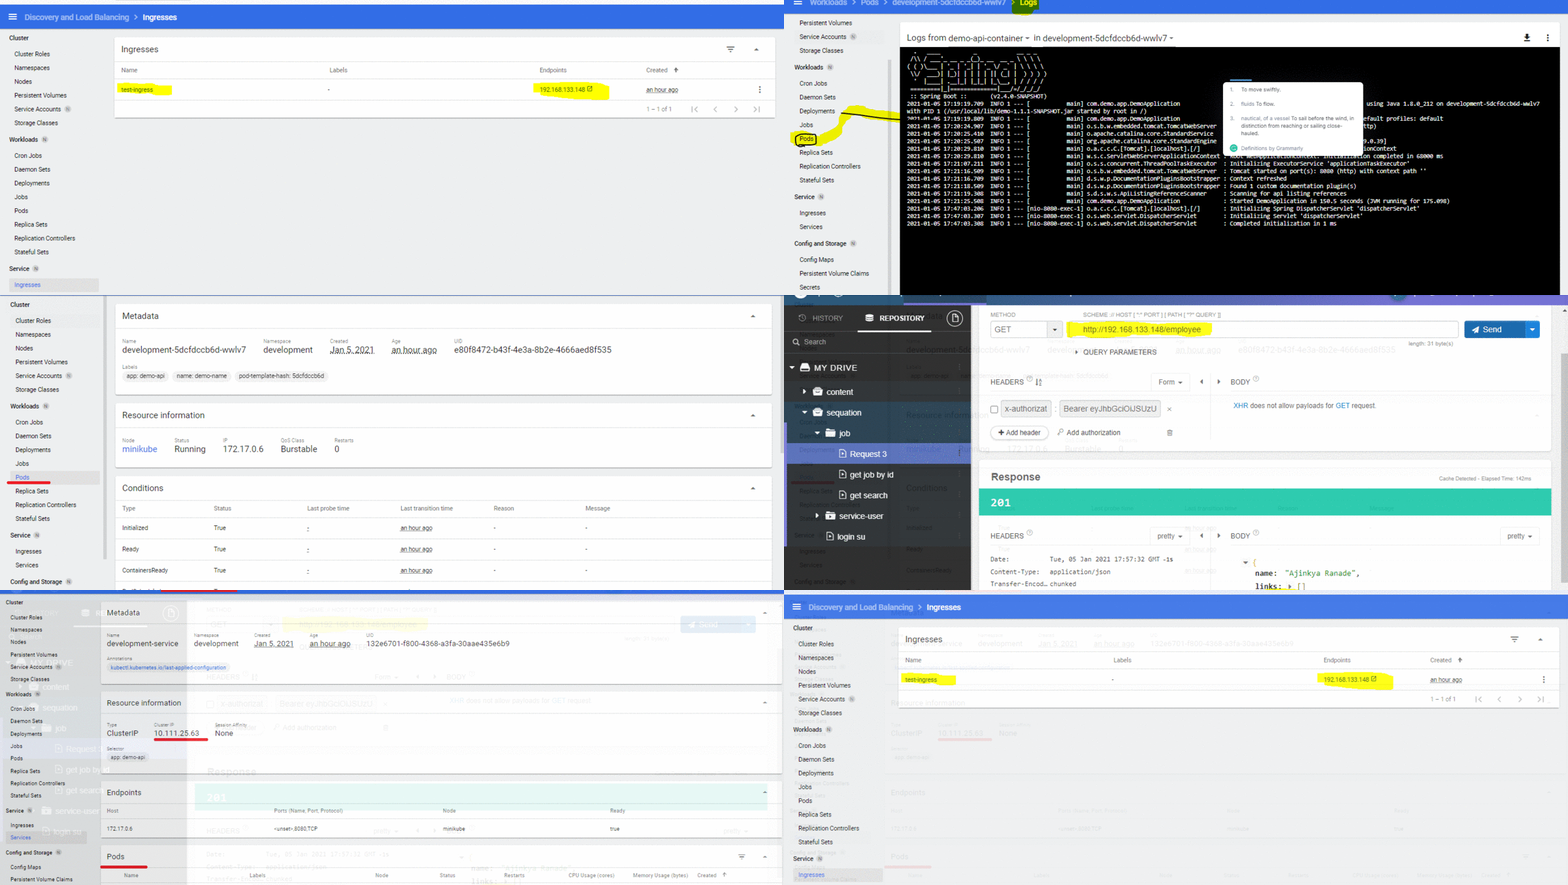
Enable Ingress (Load balancer / routing rules)
Ingress exposes HTTP request routes from outside the cluster to service within the cluster and managed traffic routing through the ingress resources.
our request first hit Ingress controllers and base on routing rules it’s forward to the service (in our case development-service) then forward this request to POD for executions.
you can enable the plugin using the below command
cmd : minikube addons enable ingress
Applying the Deployment file to the cluster
let us create a simple deployment.yml file that contains configuration related to Namespace, deployment, and service. Deployment file contains, number of the pod replicas we needed, imagepullscrect name which we had created earlier steps, and image name to pull a specific image.
? you can also create Namespace using the kuberctl command as well.
Apply deployment.yml to cluster through the kubectl command.
kubectl apply -f ‘.\DeploymentAll (1).yml’
Revisited Docker file
Grate. we are almost finished with up dynamic pulling exercised in this step we are going to put the maven layer and package installing layer inside our existing .docker file looks like the below one. once you will push the modified docker file in the codebase cluster pick the latest image and build the container.
Important Command
minikube stop →Stop minikube
minikube start →Start minikube
minikube dashboard →open minikube interface
docker login →docker login
docker pull openjdk:8-alpine →pull a docker image from docker hub
docker build -t 100490/aj-docker:demo-api-alpine -f dockerFile . → create docker file
docker tag {image_id} {docker_id}/{docker_repo_name}:tag →add tag to push image on repo
docker push 100490/aj-docker →Push docker image
kubectl expose pods {pods-name} - target-port 8080 - type NodePort → expose pod to access outside(without load balancer)
kubectl get service -n development →get all services present inside the development namespace
kubectl get pod -n development →get all pod present inside the development namespace
kubectl apply -f .\DeploymentAll.yml →apply config to pod
kubectl create secret generic regcred →from-file=.dockerconfigjson=C:\Users\ajinkya.ranade\.docker\config.json - type=kubernetes.io/dockerconfigjson
kubectl create secret docker-registry regcred →docker-server=https://index.docker.io/v1/ - docker-username=100490 - docker-password=A***** - docker-email=****@gmail.com
kubectl get secret regcred - output=yaml
That’s It for Today but we aren’t done yet !! next, we’ll be exploring Ingress Controllers in-depth as well and convert our basic k8s setup to environment-specific.
Thank you for Reading ? ?please ? if you found it helpful.

Deploying Microservices on Kubernetes. was originally published in Level Up Coding on Medium, where people are continuing the conversation by highlighting and responding to this story.
This content originally appeared on Level Up Coding - Medium and was authored by AJinkya Ranade (Aj)
AJinkya Ranade (Aj) | Sciencx (2021-02-11T02:34:23+00:00) Deploying Microservices on Kubernetes.. Retrieved from https://www.scien.cx/2021/02/11/deploying-microservices-on-kubernetes/
Please log in to upload a file.
There are no updates yet.
Click the Upload button above to add an update.
