This content originally appeared on DEV Community and was authored by DarrylBryson
Deployment Walkthrough: Microservice Communication Interface
The purpose of this article is to walkthrough the setting up of infrastructure for containerized applications to communicate and access files. Containerizing an application gives great flexibility in how, where, and at what scale it’s deployed. A drawback to this versatility is the problem of discoverability. Microservice applications often rely on accessing remote files and the ability to communicate with other apps. How does an app find these resources when being deployed into different data centers and dynamically assign IP addresses?
Hard Coded Solution: Configuration files
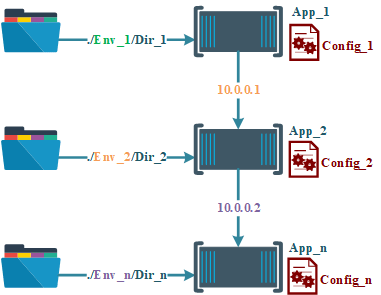
One way to resolve this, is to collect deployment environment differences into a configuration file. A new config. file is needed per deployment environment and app. This solution is straight forward but has a significant maintenance cost as the number of apps increases or are reused in multiple locations (1 Config per Env per App). This can really add up when an enterprise solution can rely on several dozen microservices.
Diagram 1-1: Direct hard coded addressing
Generalized Solution: Communication Interfaces
A solution for generalized deployment scenarios is to deploy containerizes that can interface between the microservices and the environments they're deployed into. Interfaces deployed as containers are instantly discoverable to other apps in the same Docker “network”.
The general concept is to utilize an sftp server and a messaging queue to provide applications with file access and intra-app communication, respectively. These components are able to service all other apps in the same environment This simplifies maintenance by focusing deployment specific configurations to a single file per environment (1 Config per Env).
Diagram 1-2: Communication Interface
SFTP Server
An sftp file server allows for applications to securely access files from a directory addressed on the file server but stored physically somewhere else. The advantages of accessing files through a server is that extremely complex or changing network mappings can be statically addressed by an app.
The below example uses the atmoz sftp image to create a file server with 2 directories. Directories are defined under the volume tag and match the pattern <Host_Path> : <Container_Path> : <Permission>. The first directory points to /mnt/d/GenStore/sample-data-set/survey-results on the host machine. On the file server this address becomes /home/admin/upload/raw. Likewise the second directory appears under the same parent even though it's location on the host is on a different drive. In addition the ro suffix makes the first directory read only, very useful in safe guarding source files from alteration.
version: '2'

services:
  sftp-server:
    image: atmoz/sftp
    volumes:
        - /mnt/d/GenStore/sample-data-set/survey-results:/home/admin/upload/raw:ro
        - /mnt/f/dept010/data-store/1mk3f5-e5ltb4-4r56yh/01/02:/home/admin/upload/weather-set
    ports:
        - "22:22"
    networks:
      - microservice-network
    command: admin:pass:1001
Messaging Queue
Messaging queues are standard design concepts for microservice applications. Queues allow for applications to be “loosely” connected. Meaning, that each app communicates with the queue instead of with each other. A message queue, in a way, is a running list of small messages. Messages are posted by one app (publishers) and then read by another (subscribers). This example uses an image created by RabbitMQ. RabbitMQ makes connectors for lots of different languages and is efficient for general purpose use cases.
Below is the docker-compose yaml for deploying the RabbitMQ broker.
version: '2'

services:
  rabbit-queue:
    image: rabbitmq:3-management
    hostname: rabbit-1
    environment:
      - RABBITMQ_ERLANG_COOKIE='Key_Link_k1'
    ports:
      - '15672:15672'
      - '5672:5672'
    networks:
      - microservice-network
You can follow a detailed “Hello World” walkthrough in your language of choice from the RabbitMQ site. Below are simple python scripts for a publisher and a subscriber.
def publish ():
    source_path = '/mnt/d/GenStore/sample-data-set/survey-results'
    rbt_srv = 'rabbit-queue'
    trgt_queue = 'new_files'

    try:
        # Get list of file paths to publish
        fAr = os.listdir( source_path )

        print('Connecting to rabbit ',rbt_srv)
        with pika.BlockingConnection(pika.ConnectionParameters(rbt_srv)) as connection:
            channel = connection.channel()
            print('Connected')
            # Create queue if it doesn't
            channel.queue_declare(queue=trgt_queue, durable=True)
            # Clear queue
            channel.queue_purge(queue=trgt_queue)

            i=0
            for f in fAr:
                # Publish file name to queue
                channel.basic_publish(exchange='',
                                    routing_key=trgt_queue,
                                    body=str(f))
                i+=1
            print(" [x] Sent", i,"files to the queue")

            connection.close()
    except Exception as err:
        print("An error occurred while retrieving the file.")
        print(str(err))
        traceback.print_tb(err.__traceback__)
    return
RabbitMQ Publisher rabbit-queue-pub-sub.py
def consume ():
    rbt_srv = 'rabbit-queue'
    src_queue = 'new_files'
    try:
        print(' [-] Connecting to RabbitMQ server',rbt_srv)
        with pika.BlockingConnection(pika.ConnectionParameters(rbt_srv)) as connection:
            channel = connection.channel()

            print(' [+] Connected to RabbitMQ')
            # Declare source queue
            channel.queue_declare(queue=src_queue, durable=True)

            def callback(ch, method, properties, filePath):
                print(" [*] Retrieved file path {0}".format(filePath))
                # Ack to the queue message has been recieved successfuly
                ch.basic_ack(delivery_tag=method.delivery_tag)
            channel.basic_qos(prefetch_count=1)
            channel.basic_consume(queue=src_queue, on_message_callback=callback, auto_ack=False)

            print(' [*] Waiting for messages. To exit press CTRL+C')
            channel.start_consuming()

            connection.close()
    except Exception as err:
        print()
        print("An error occurred while retrieving the file.")
        print(str(err))
        traceback.print_tb(err.__traceback__)
    return
RabbitMQ Subscriber rabbit-queue-pub-sub.py
Complete Script
version: '2'

services:
  sftp-srv:
    image: atmoz/sftp
    volumes:
        - /mnt/d/GenStore/sample-data-set/survey-results:/home/admin/upload/raw:ro
        - /mnt/f/dept010/data-store/1mk3f5-e5ltb4-4r56yh/01/02:/home/admin/upload/weather-set
    ports:
        - "22:22"
    networks:
      - microservice-network
    command: admin:pass:1001

  rabbit-queue:
    image: rabbitmq:3-management
    hostname: rabbit-1
    environment:
      - RABBITMQ_ERLANG_COOKIE='Key_Link_k1'
    ports:
      - '15672:15672'
      - '5672:5672'
    networks:
      - microservice-network
networks:
  microservice-network:
    external: true
Interface hosts: docker-compose.yaml
Python Requirements: requirements.txt
This content originally appeared on DEV Community and was authored by DarrylBryson
DarrylBryson | Sciencx (2021-03-15T21:45:46+00:00) Deployment Walkthrough: Microservice Communication Interface. Retrieved from https://www.scien.cx/2021/03/15/deployment-walkthrough-microservice-communication-interface/
Please log in to upload a file.
There are no updates yet.
Click the Upload button above to add an update.


