This content originally appeared on DEV Community and was authored by Adit Modi
Because of its popularity and widespread adoption, Kubernetes has become the industry’s de facto for deploying a containerized app. Google Kubernetes Engine (GKE) is Google Cloud Products’ (GCP) managed Kubernetes service. It provides out-of-the-box features such as auto-scaling nodes, high-availability clusters, and automatic upgrades of masters and nodes. In addition, it offers the most convenient cluster setup workflow and the best overall developer experience.
After discussing the state of Kubernetes services in the cloud, this article will trace the life cycle of a containerized application in its most mature environment, GKE.
My Background: I am Cloud , DevOps & Big Data Enthusiast | 4x AWS Certified | 3x OCI Certified | 3x Azure Certified .
State-of-the-art Kubernetes in the Cloud
Each of the major cloud providers have a managed Kubernetes service (also known as Kubernetes-as-a-Service) which creates an isolated and supervised environment for Kubernetes clusters. These services provide the Kubernetes API setup, measure basic node health, autoscale or upgrade when needed, and maintain some security best practices.
There are more than ten listed providers in the official Kubernetes documentation, including AWS, GCP, and Azure. If you want a deep dive comparison of Google Kubernetes Engine, Azure Kubernetes Service, and Amazon Elastic Container Service for Kubernetes, check out my other blogs.
Google Cloud Platform provides the most reliable and easily managed Kubernetes clusters, as Google is the creator of Kubernetes and donated it to the open source community, hence we’ll be examining its service in this article.
Below, we’ll start our process by creating some containers for a microservice application in Google Cloud Platform. You’ll need a GCP account to continue. Keep in mind that, if you’re a new customer, GCP’s free tier gives you $300 credit.
CLI Environment Setup
The first step in deploying a containerized app is setting up a CLI environment in GCP. We will use Cloud Shell to do this, since it already has installed and configured gcloud, Docker, and kubectl. Cloud Shell will enable you to quickly start using the CLI tools with authentication and configuration in place. In addition, the CLI already runs inside the GCP console where you can access your resources and check their statuses.
Open the Google Cloud Console, and click “Activate Cloud Shell” on the top of the navigation bar:
A terminal with a command line prompt will open as follows:
Now that you have the environment set up, you are ready to create containers from microservices and prepare them for release.
Microservice to Containers
The life cycle of a containerized app starts with source code. In this tutorial, we’ll use an open source web server named hello-app, available on Github. Because Kubernetes is a container management system, we’ll need to create container images for our applications. The following steps will guide you through creating a Docker container for hello-app and uploading the container image to the registry. When you deploy the application, Kubernetes will download and run it from the registry.
In Cloud Shell, download the source code of the sample application:
git clone https://github.com/GoogleCloudPlatform/kubernetes-engine-samples
cd kubernetes-engine-samples/hello-app
Then, build the container image with a tag that includes your GCP project ID:
docker build -t gcr.io/${DEVSHELL_PROJECT_ID}/hello-app:v1 .
GCP has a managed Container Registry service that can push and pull Docker container images. If you are using the registry for the first time, enable it in the API Library.
Authenticate to the registry with the following command, and then push the image:
gcloud auth configure-docker
docker push gcr.io/${DEVSHELL_PROJECT_ID}/hello-app:v1
The last step packaged and uploaded the container image to the registry. Now, we are ready to create a Kubernetes cluster and distribute the hello-app application over the cloud.
Creating a Kubernetes Cluster in GKE
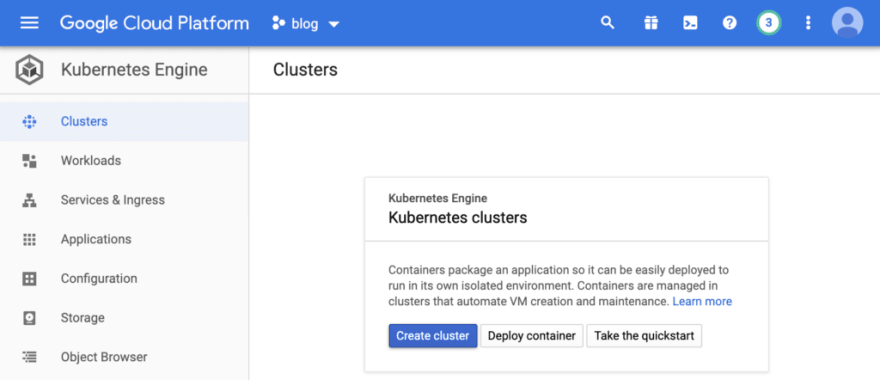
Kubernetes originated in Google, and its cloud provider, GCP, has the most convenient and easy setup for creating new clusters. With a couple of clicks, you can create a managed Kubernetes cluster. Google Cloud Platform takes care of the cluster’s health, upgrades, and security. Open the Kubernetes Engine in the GCP control panel, and click on “Create cluster”:
In the cluster creation view, the cluster basics focus on names such as hello, node locations, and Kubernetes master version. You can go to the Automation, Networking, Security, Metadata, and Features tabs for the following additional options:
Automation: Configuration of automatic maintenance, autoscaling, and auto-provisioning.
Networking: Configuration of communication within the application and with the Kubernetes control plane and configuration of how clients reach the control plane. If you want to use a specific network, node subnet, or set network policy, you need to set it here.
Security: Configuration of cluster authentication handled by IAM and Google-managed encryption.
Metadata: Labels for and descriptions of the cluster.
Features: These are the “extra toppings” for the otherwise “vanilla” Kubernetes cluster— serverless, telemetry, Kubernetes dashboard, and Istio installation.
In this tutorial, we will go with the default setting, a single-zone three-node cluster, by simply clicking “Create”:
In a couple of minutes, your new cluster will be created. A green check will appear in the Kubernetes cluster list, as seen below:
Click the “Connect” button, and then click “Run in Cloud Shell” to continue in the terminal. In the terminal, run the following command to list the nodes:
kubectl get nodes
NAME STATUS ROLES AGE VERSION
gke-hello-default-pool-d30403be-94dc Ready 3m31s v1.14.10-gke.36
gke-hello-default-pool-d30403be-b2bv Ready 3m31s v1.14.10-gke.36
gke-hello-default-pool-d30403be-v9xz Ready 3m28s v1.14.10-gke.36
The default setup will create three nodes, as shown above. You can also run other kubectl commands and play around with your newly-created cluster.
Next, let’s deploy our containerized app to the cluster.
Containers to the Cloud
Kubernetes manages containers inside a logical grouping, called a pod, and encapsulates them with the network and storage to provide some level of isolation and segmentation. The pods are managed via Controllers which provide different capabilities to manage the life cycle of the pod, these include Deployments, StatefulSets, DaemonSets, and never other replication lifecycle types. Deployments focus on scalable and reliable applications. StatefulSets focus on stateful application management, such as databases. DaemonSets ensure that there is an instance of the application running on each node such as for observability needs.
Create a deployment with the following command:
kubectl create deployment hello-world --image=gcr.io/${DEVSHELL_PROJECT_ID}/hello-app:v1
deployment.apps/hello-world created
This command creates a 1-replica deployment from the image that we have already pushed. Now, scale it with the following command:
kubectl scale --replicas=5 deployment/hello-world
deployment.extensions/hello-world scaled
This command updates the deployment to have five replicas of the pods. Kubernetes assigns these pods to the nodes. Inside the nodes, the Docker images will be pulled, and containers will be started. Let’s check the status of the pods:
kubectl get pods
NAME READY STATUS RESTARTS AGE
hello-world-77cc5b59b6-4p5dc 1/1 Running 0 8m55s
hello-world-77cc5b59b6-bkph9 1/1 Running 0 8m54s
hello-world-77cc5b59b6-c8hc5 1/1 Running 0 8m52s
hello-world-77cc5b59b6-g59z7 1/1 Running 0 8m51s
hello-world-77cc5b59b6-qfnvr 1/1 Running 0 8m54s
Since all the pods are “Running,” we know that Kubernetes has distributed the pods to the nodes. Currently, we have five pods running over the three nodes. You can change the number of replicas based on your needs, metrics, and usage with the help of the kubectl scale command.
Monitoring the Applications
Kubernetes distributes the containers to the nodes, making it critical to collect logs and metrics in a central location.
There are currently two popular stacks used to collect logs from the clusters: Elasticsearch, Logstash, and Kibana (ELK) and Elasticsearch, Fluentd, and Kibana (EFK).
It’s also possible to check the Kubernetes metrics in GKE with the kubectl top command. Let’s use it to look at the usage of the pods:
kubectl top pods
NAME CPU(cores) MEMORY(bytes)
hello-world-77cc5b59b6-4p5dc 0m 1Mi
hello-world-77cc5b59b6-bkph9 0m 1Mi
hello-world-77cc5b59b6-c8hc5 0m 1Mi
hello-world-77cc5b59b6-g59z7 0m 1Mi
hello-world-77cc5b59b6-qfnvr 0m 1Mi
Similarly, you can use the kubectl top nodes command to retrieve aggregate data about the nodes:
kubectl top nodes
NAME CPU(cores) CPU% MEMORY(bytes) MEMORY%
gke-hello-default-pool-d30403be-94dc 50m 5% 714Mi 27%
gke-hello-default-pool-d30403be-b2bv 52m 5% 674Mi 25%
gke-hello-default-pool-d30403be-v9xz 52m 5% 660Mi 25%
Now, let’s open our application up to the internet and receive some Hello World responses.
Containers to the Internet
In addition to container management, Kubernetes provides resources to connect to applications from inside and outside the cluster. With the following command, you expose the deployment to the internet:
kubectl expose deployment hello-world --type=LoadBalancer --port 80 --target-port 8080
service/hello-world exposed
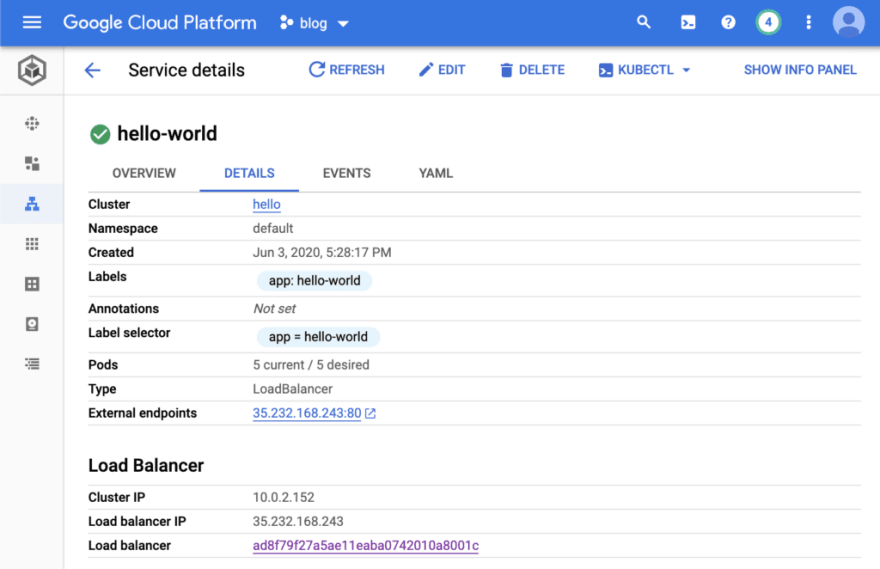
This command creates a service resource in Kubernetes, and it provides networking with an IP attached to the application instances. It can be checked from the menu item Kubernetes Engine > Services & Ingress:
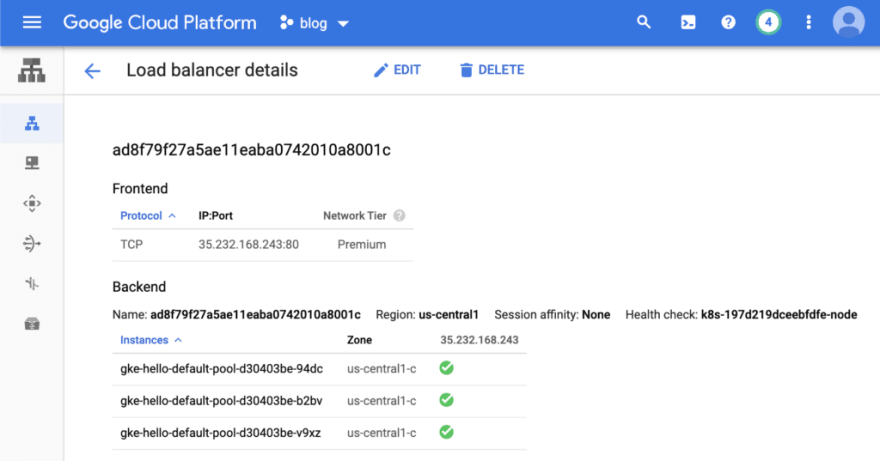
The Service details page lists the networking configuration from the point of view of a Kubernetes cluster. In addition, there is an external IP assigned to the service enabling access from the internet. It’s created by GCP TCP Load Balancer by default for zonal and regional clusters. Let’s check the TCP load balancer in Network services > Load Balancer by clicking the load balancer in the previous view:
In this screenshot, load balancer instances for all three nodes are listed along with their health status. If you create a multi-region cluster, you will need an ingress controller and global load balancer deployed to your cluster for routing.
Check for the external IP with the following command:
kubectl get service
NAME TYPE CLUSTER-IP EXTERNAL-IP PORT(S) AGE
hello-world LoadBalancer 10.0.2.152 35.232.168.243 80:30497/TCP 77s
kubernetes ClusterIP 10.0.0.1 443/TCP 54m
Now, open the external IP listed above for hello-world in your browser:
In the output, the hostname indicates the name of the pod. You can see all of your pod names as hostnames if you reload the browser tab a couple of times. You can expect a change of hostnames with each reload, since we have created a LoadBalancer type of service to expose the application.
Summary
This article has examined the life cycle of a containerized app in Google GKE, starting from the source code. We created a Docker container image which was pushed to the registry for future use in scaling. Then, we created a Kubernetes cluster in GKE and deployed our application into it. We scaled the app with many replicas and checked its status. We reviewed the metrics and logs with potential extensions. Finally, we exposed our application to the internet. With this hands-on knowledge, you should now be able to package, deploy, and manage containerized applications inside a Kubernetes cluster in GKE.
Hope this guide helps you understand how to Deploying a Containerized App in Google GKE, feel free to connect with me on LinkedIn.
You can view my badges here.
If you are interested in learning more about AWS / GCP then follow me on github.
If you liked this content then do clap and share it . Thank You .
This content originally appeared on DEV Community and was authored by Adit Modi
Adit Modi | Sciencx (2021-04-12T06:14:04+00:00) Deploying a Containerized App in Google GKE. Retrieved from https://www.scien.cx/2021/04/12/deploying-a-containerized-app-in-google-gke/
Please log in to upload a file.
There are no updates yet.
Click the Upload button above to add an update.


