This content originally appeared on Level Up Coding - Medium and was authored by Bartosz Konikiewicz
Or: how not to lose five hours at your 9 to 5

I’ve landed a job recently! I’m working as a front-end developer. I was assigned to a project that’s perfectly written. It’s clean and the code architecture is concise. In practice, it means that it utilizes a dozen libraries, just as you would expect from a well-maintained code base. It’s a pure pleasure to contribute. I’m doing well at keeping it exemplary, occasionally struggling with some seemingly simple things, like creating controlled forms.
Making controlled forms with Formik and Material UI is pretty straightforward. Basically, all you have to do is to wrap your form components with <Formik> tag and attach property or two. Alternatively, you can use an useFormik() hook, although I’m not going to cover it in this tutorial. What I’m going to explain is creating a controlled radio group, because I find it a little complicated.
Let’s go!
Set things up
For the sake of this tutorial I’m going to simplify the process as much as possible, hence the idea of using create-react-app command:
npx create-react-app .
Then, you can install the dependencies:
npm install typescript formik @material-ui/core
In this step, the last thing left to do is to change the extension of App file from .js to .tsx .
Code
Purge the App.tsx file to look like this:
import React from 'react'
import { Form, Formik } from 'formik'
import {
  Radio,
  RadioGroup,
  FormControlLabel,
  FormControl,
  FormLabel
} from '@material-ui/core'
const App: React.FC = () => {}
export default App
Outside of the App function, define an enum of radio buttons values:
enum Options {
  Option1,
  Option2,
  Option3,
}
Make the function a component by adding a return statement:
const App: React.FC = () => {
  return ()
}
You should get a TypeScript error. That’s perfectly fine — you need to return an actual element first. The first thing that should be added is a Formik element — a wrapper that will make your little form a controlled one:
return (
  <Formik
    initialValues={{
      selectedOption: Options.Option1.toString()
    }}
      onSubmit={() => {}}
  >
  </Formik>
)
Some things to note:
- initialValues — a property that accepts an object that declares the form fields and defines their default values.
- Options.Option1.toString() — the values of radio buttons have to be strings. Otherwise, the <RadioGroup> wouldn’t work.
- onSubmit —it’s required, although you’re not going to implement it. An empty function will work just fine.
Now, you need to ask Formik for some handles. <Formik> render function provides plenty of props. Since you are going to control the underlying form yourself, you need values and setFieldValue:
<Formik
  initialValues={{
    selectedOption: Options.Option1.toString()
  }}
  onSubmit={() => {}}
>
  {({ values, setFieldValue }) => (

  )}
</Formik>
Your form needs to reside in <Form> element. This ensures that handleSubmit callback would get fired, even if you explicitly stated that it should do nothing. Code below:
{({ values, setFieldValue }) => (
  <Form>

  </Form>
)}
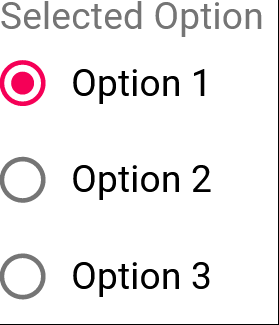
Now, let’s add the actual form:
<Form>
  <FormControl component="fieldset">
    <FormLabel component="legend">Selected Option</FormLabel>
    <RadioGroup>
      <FormControlLabel control={<Radio />} label="Option 1" />
      <FormControlLabel control={<Radio />} label="Option 2" />
      <FormControlLabel control={<Radio />} label="Option 3" />
    </RadioGroup>
  </FormControl>
</Form>
- <FormControl>, with and underlying <fieldset> element, serves as a wrapper for our form. According to the Material docs:
Provides context such as filled/focused/error/required for form inputs. Relying on the context provides high flexibility and ensures that the state always stays consistent across the children of the FormControl.
- <FormLabel> — a wrapper for a <legend> describing the parent <fieldset> element.
- <RadioGroup> — a wrapper for radio inputs and their corresponding labels.
- <FormControlLabel> — a Material element that renders both the <Radio> element (which is passed through a control prop) and a label described by the appropriate prop.
Putting It All Together
Now, you need to control the form with Formik. Start with the <RadioGroup> element. First, you need to pass the form name to it:
<RadioGroup name={name}>Next, assign the selectedOption value. Take in mind that you need to represent the value as a string. That’s the catch — without this, the form wouldn’t behave:
<RadioGroup name={name} value={values.selectedOption.toString()}>Finally, provide an onChange callback. Normally, for ease of use, Formik handles this for yourself. Unfortunately, not this time. From what understand, it’s one of the culprits of integrating Material with it: you need to do it manually by invoking the setFieldValue method:
<RadioGroup name={name} value={values.selectedOption.toString()} onChange={(event) => {
  setFieldValue(name, event.currentTarget.value)
}}>
As for <FormControlLabel>, you need to pass one of the Options enumeration values:
<FormControlLabel value={Options.Option1.toString()} control={<Radio />} label="Option 1" />
<FormControlLabel value={Options.Option2.toString()} control={<Radio />} label="Option 2" />
<FormControlLabel value={Options.Option3.toString()} control={<Radio />} label="Option 3" />
After invoking npm start, you should see the following output:

And that’s it. For the same of completeness, I provide everything you’ve written so far:
Final Words
Even if this tutorial is rather lengthy for a problem this simple, the idea of combining Material with Formik is not complicated at all, as you’ve might already notice. That’s a good thing — once you grasp the method, it would come as natural to you.
Keep on learning!
Create a Controlled Radio Group in React, Formik, Material UI, and TypeScript was originally published in Level Up Coding on Medium, where people are continuing the conversation by highlighting and responding to this story.
This content originally appeared on Level Up Coding - Medium and was authored by Bartosz Konikiewicz
Bartosz Konikiewicz | Sciencx (2021-04-25T13:41:21+00:00) Create a Controlled Radio Group in React, Formik, Material UI, and TypeScript. Retrieved from https://www.scien.cx/2021/04/25/create-a-controlled-radio-group-in-react-formik-material-ui-and-typescript/
Please log in to upload a file.
There are no updates yet.
Click the Upload button above to add an update.
