
This content originally appeared on DEV Community and was authored by Mahmoud Abdelwahab
Supabase is a backend-as-a-service built on top of open source technologies. It gives you a database, authentication, a REST API, real-time subscriptions, and storage.
It offers a free plan which includes a hosted PostgreSQL database. This can be useful if you're getting started with a new project.
This guide explains how to quickly connect the Postgres database provided by Supabase to a Prisma project. There are other services out there that provide hosted PostgreSQL databases like Heroku or Digital Ocean.
Prisma is an open source next-generation ORM. It consists of the following parts:
- Prisma Client: Auto-generated and type-safe query builder for Node.js & TypeScript.
- Prisma Migrate: Migration system.
- Prisma Studio: GUI to view and edit data in your database.
Step 1: Log into Supabase
Navigate your browser to https://app.supabase.io/api/login and log in with GitHub.

Step 2: Create a new project
You'll find that an organization has been created for you under the same GitHub username you used when logging in.
Go ahead and create a new project by clicking on "new project" and then pick the organization.

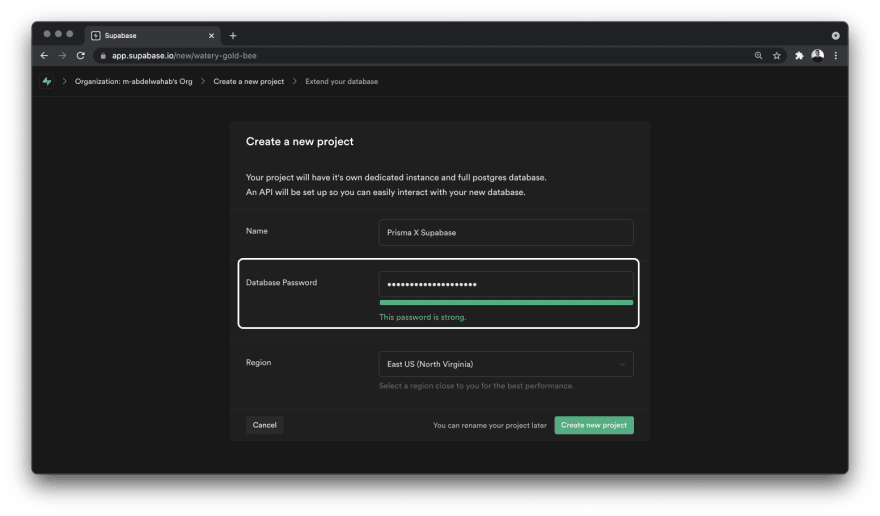
You'll then need to provide a name and set a password for your database (we'll need it later). Finally, click on "create new project".
After creating the project, you'll need to wait for ~2 minutes for Supabase to finish creating the database.
Step 3: Get the connection string from the project settings
Go to the settings page from the sidebar and navigate to the Database tab. You'll find the database's connection string with a placeholder for the password you provided when creating the project.

Step 4: Testing the connection
To make sure that everything works correctly, let's try the connection string in a Prisma project.
If you already have one, all you need to do is set the DATABASE_URL to the connection string (including the password) in your .env file, and you're good to go.
In case you don't have a Prisma project or this is your first time working with Prisma, you're going to use with the repo from the quickstart guide.
Cloning the starter project
Navigate into a directory of your choice and run the following command in your terminal if you're on a Windows machine:
curl https://pris.ly/quickstart -L -o quickstart-master.tar.gz && tar -zxvf quickstart-master.tar.gz quickstart-master/typescript/starter && move quickstart-master\typescript\starter starter && rmdir /S /Q quickstart-master && del /Q quickstart-master.tar.gz
And if you're using Mac OS or Linux, run the following command:
curl -L https://pris.ly/quickstart | tar -xz --strip=2 quickstart-master/typescript/starter
You can now navigate into the directory and install the project's dependencies:
cd starter && npm install
A look at the project's structure
This project comes with TypeScript configured and has the following structure.
- A
prismadirectory which contains:- A
.envfile: Contains theDATABASE_URLvariable, which Prisma will use. - A
dev.dbfile: This is a SQLite database. - A
schema.prismafile: Where we define the different database models and relations between them.
- A
- A
script.tsfile: where we will run some queries using Prisma Client.
This starter also comes with the following packages installed:
-
@prisma/client: An auto-generated and type-safe query builder that's tailored to your data. -
prisma: Prisma's command-line interface (CLI). It allows you to initialize new project assets, generate Prisma Client, and analyze existing database structures through introspection to automatically create your application models.
Note: Prisma works with both JavaScript and TypeScript. However, to get the best possible development experience, using TypeScript is highly recommended.
Configuring the project to use PostgreSQL
Go ahead and delete the prisma/dev.db file because we will be switching to PostgreSQL.
Next, inside the prisma/.env file, update the value of the DATABASE_URL variable to the connection string you got in step 3. The URL might look as follows:
# prisma/.env

postgres://postgres:[YOUR-PASSWORD]@db.vdbnhqozmlzdsaejdxwr.supabase.co:5432/postgres
Finally, inside your schema.prisma file, change the provider from "sqlite" to "postgresql".
This is what your schema.prisma file should look like:
datasource db {
  provider = "postgresql"
  url      = env("DATABASE_URL")
}

generator client {
  provider = "prisma-client-js"
}

model Post {
  id        Int     @id @default(autoincrement())
  title     String
  content   String?
  published Boolean @default(false)
  author    User?   @relation(fields: [authorId], references: [id])
  authorId  Int?
}

model User {
  id    Int     @id @default(autoincrement())
  email String  @unique
  name  String?
  posts Post[]
}
To test that everything works correctly, run the following command:
prisma migrate dev --name init
You can optionally give your migration a name, depending on the changes you made. Since this is the project's first migration, you're setting the --name flag to "init".
If everything works correctly, you should get the following message in your terminal:
Your database is now in sync with your schema.

✔ Generated Prisma Client (2.x.x) to ./node_modules/@prisma/client in 111ms
This will create a prisma/migrations folder inside your prisma directory and synchronize your Prisma schema with your database schema.
Note: if you want to skip the process of creating a migration history, you can use the
db pushcommand instead ofmigrate dev.
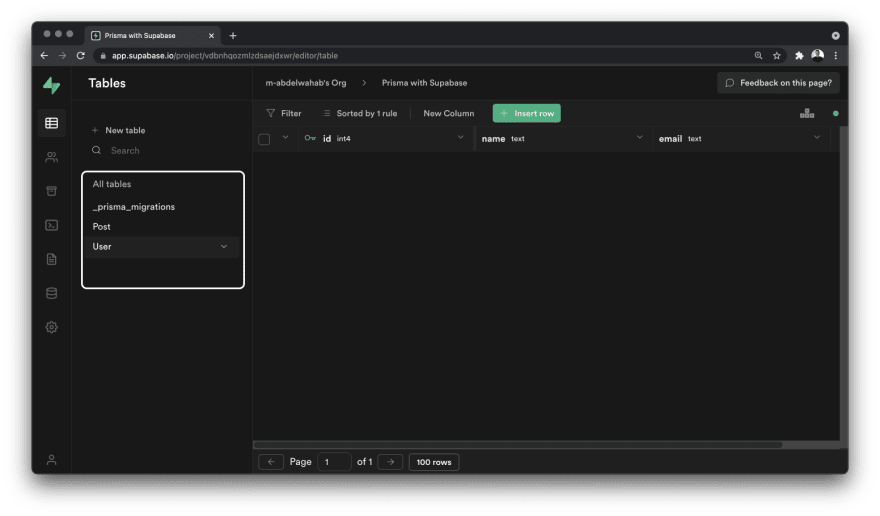
If you go to your Supabase project, in the table editor, you should see that two tables have been created, a Post and a User table.
That's it! You have now successfully connected a Prisma project to a PostgreSQL database hosted on Supabase and ran your first migration.
Connection pooling with Supabase
If you're working in a serverless environment (for example Node.js functions hosted on AWS Lambda, Vercel or Netlify Functions), you need to set up connection pooling using a tool like PgBouncer. That's because every function invocation may result in a new connection to the database.
Fortunately, Supabase projects support connection management using PgBouncer and are enabled by default.
Go to the Database page from the sidebar and navigate to connection pool settings
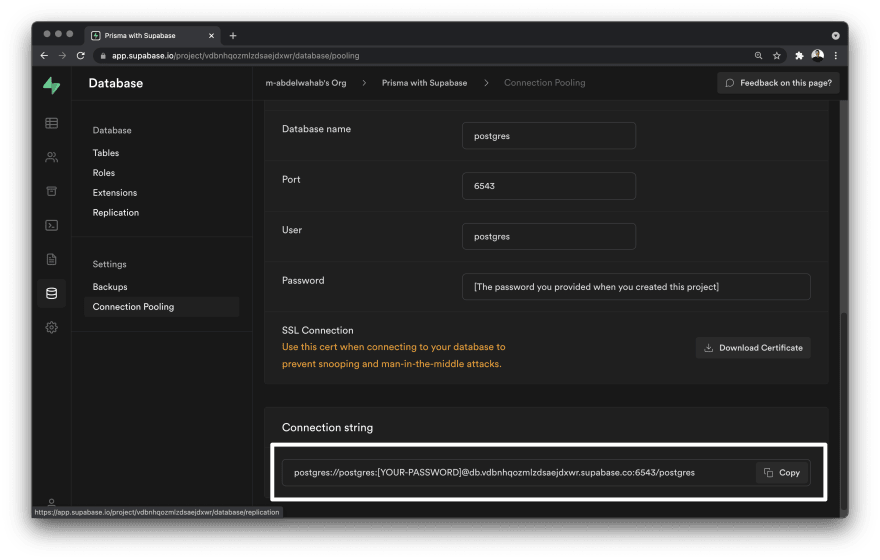
When running migrations you need to use the non pooled connection URL (like the one we used in step 4). However, when deploying your app, you'll use the pooled connection URL. and add the ?pgbouncer=true flag to the PostgreSQL connection URL. The URL might look as follows:
# prisma/.env

postgres://postgres:[YOUR-PASSWORD]@db.vdbnhqozmlzdsaejdxwr.supabase.co:6543/postgres?pgbouncer=true
Prisma Migrate uses database transactions to check out the current state of the database and the migrations table. However, the Migration Engine is designed to use a single connection to the database, and does not support connection pooling with PgBouncer. If you attempt to run Prisma Migrate commands in any environment that uses PgBouncer for connection pooling, you might see the following error:
Error: undefined: Database error
Error querying the database: db error: ERROR: prepared statement "s0" already exists
This is a known issue and it is being worked on, you can follow the progress on this GitHub issue.
If you want to learn more about Prisma, check out the docs. Also in case you have any questions or run into any issue, feel free to start a discussion in the repo's discussions section.
This content originally appeared on DEV Community and was authored by Mahmoud Abdelwahab
Mahmoud Abdelwahab | Sciencx (2021-06-11T20:13:04+00:00) Set up a free PostgreSQL database on Supabase to use with Prisma. Retrieved from https://www.scien.cx/2021/06/11/set-up-a-free-postgresql-database-on-supabase-to-use-with-prisma/
Please log in to upload a file.
There are no updates yet.
Click the Upload button above to add an update.