
This content originally appeared on Envato Tuts+ Tutorials and was authored by Akanksha Rawat


Learn how to blend in Procreate. In this tutorial, we will learn how to blend colors on Procreate using the blending tools, adjustments, and blending brushes on Procreate. We will also go over various tips to mix the colors seamlessly. The tips and techniques which are described here allow the creation of all kinds of artwork where blending is used.
You can always try Envato Elements, where you can find a massive collection of Procreate Brushes to choose from. This Procreate brush set is just one of many examples.


What You'll Learn in This Procreate Blending Tutorial
- How to use gaussian blur in Procreate
- How to use the smudge blending tool in Procreate
- How to use blending brushes on Procreate
- Tips on how to mix colors on Procreate
- How to create a vibrant artwork using various blending techniques like adjustments and a blending brush on Procreate
Tutorial Assets
The following asset was used during this Procreate blending tutorial to create the piece at the end:
1. How to Blend in Procreate With Different Techniques
There are quite a few ways to blend on Procreate. Getting different colors to blend nicely is the key to creating striking artwork. It can seem overwhelming at first, but it’s really not. With the blending techniques and tips coming your way, you will master it in no time.
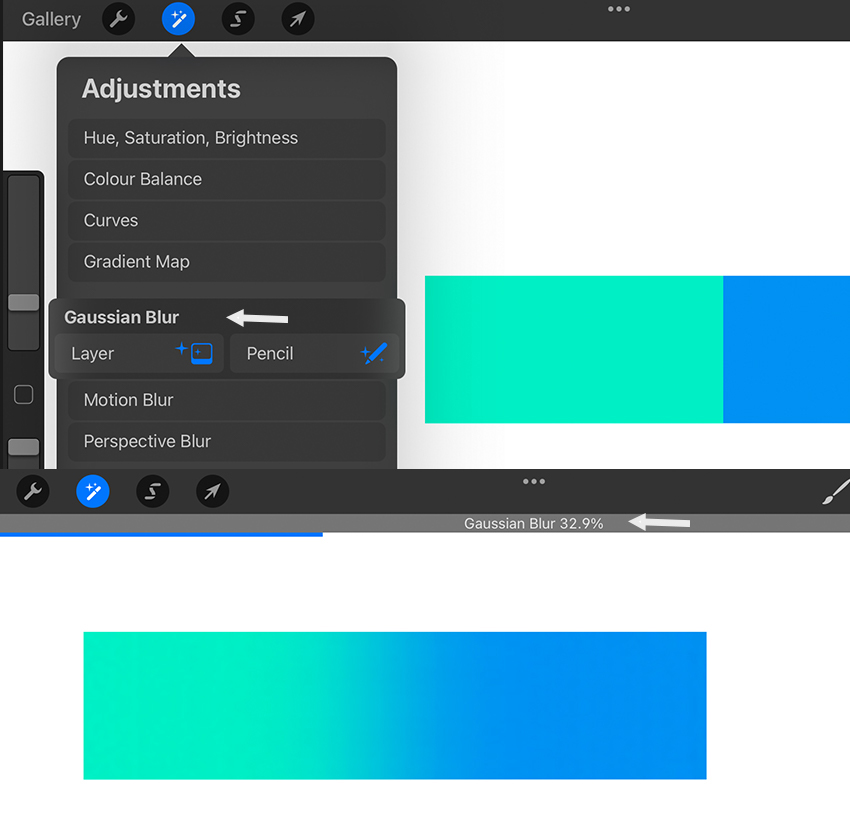
How to Use Gaussian Blur to Blend in Procreate
Go to Adjustments > Gaussian Blur and you'll find the option of either blurring the entire layer or just where you draw with your pencil. A pencil is a better option in places where you want more control. Here we will go with the Layer option. Initially, it will be set at 0%, which is basically no blur. Drag your pencil or finger right and left to increase or decrease the amount of Gaussian Blur.


How to Use the Smudge Blending Tool to Mix Colors on Procreate
The Smudge tool creates varying effects depending on the value of the opacity slider. Raise the opacity slider to strengthen your smudge tool, or lower the opacity for a softer look. This tool is best used for blending the artwork, mixing colors, and smoothing out strokes. Here, color is irrelevant, and any brush can be used as a smudge brush. However, some smudge brushes will work better than others. It’s a great tool for blending small details or any hard edges in your artwork.
Click on the Smudge Tool > AR Smudge 1 and start blending and pushing the pixels around.


How to Use Blending Brushes to Blend on Procreate
You can use the default brushes to mix colors on Procreate. Do keep in mind that the different brushes will have different effects. Some brushes create a very interesting textured transition, while a soft airbrush will give you a smooth blend.


2. Tips for Better Blending in Procreate
Before we jump into creating artwork using the blending techniques mentioned above, it's best to keep in mind these handy tips to make your color blending as smooth as possible.
Use Monochromatic and Analogous Colors
Complementary colors are often difficult to blend on Procreate. When using the blending techniques in complementary colors, the transition often becomes muddy. On the other hand, monochromatic color, which is based on a single hue and extended using its shades, tones, and tints, is easier to blend. Analogous colors, or colors that sit next to each other on the color wheel when blended, give a smoother transition and are in harmony with one another.
Stick to a Single Layer
When blending in Procreate, be sure to use one layer. You can create part of your design on different layers or use a clipping mask and then merge it down. Having colors on one layer and blending will cut down on your time.
Turn on Alpha Lock
Turning on alpha lock when blending will ensure that you stay within the boundary. You can block out colors, alpha locks the layer, and then freely blend using any one of the blending techniques.
Use the Selection Tool
Using the Selection tool is one of the ways in which we adjust any part of the art with the fine control we need. If you work with limited layers, then chances are that you will have a lot of colors on one layer. The alpha lock may not be useful in this case. With the Selection tool, you can instantly select areas of your artwork and then blend easily.
Keep a Light Touch
Using a light hand when blending will create a smoother transition and create additional values in between. Ensure that you hold the Apple pencil very lightly and use less pressure as we are trying to blend the colors that are already there. Using heavy pressure will result in blocks. Alternatively, we can use a brush at low opacity and mix the values such that it gradually creates a smooth gradient that goes from the lightest value to the darkest value.
Vary the Brush Size
Do vary the size of your brush when blending colors in Procreate. Depending on the style and your artwork we can blend with a smaller or a bigger brush. As a rule of thumb, when you want quite a lot of detail, it's always better to use a smaller brush. In areas where you want a smooth gradient across a larger area, it's better to make your blending brush big.
3. How to Blend in Procreate: Walk-Through
Let's create artwork in Procreate using the tips and blending techniques that we have learned so far.
Step 1
Go to Procreate > + and you'll get a drop-down menu. Click on the Custom Canvas icon at the top.


Step 2
Create a Custom Canvas with these settings:
- Width: 1700 pixel
- Height: 1000 pixel
- DPI: 300
- Color Profile: sRGB


Step 3
On layer 1, you can create a rough sketch of your artwork using a sketch pencil.
- Brush: Pencil 1


Step 4
We will create a new layer between the background layer and the sketch layer. Choose a smooth brush and create a circle with the dark blue color selected.
- Brush: Ink 1
- Color:
#1c064f


Step 5
Create three layers between the Background Layer and the Sketch Layer. Rename the layers. With the same brush we used in the previous step, we will block colors in Procreate.
- Base 1 Color:
#f693bd - Base 2 Color:
#fe4485 - Base 3 Color:
#322e94


Step 6
Create a new layer and clip it to Base 1. Make sure that you have a light yellow color selected and use a light touch to create a gradient effect at the top.
- Brush: Textured Ink 9
- Color:
#feecb0


Step 7
Merge down layer 6 to Base 1. Alpha lock the Base 1 layer. To create a smooth transition, you can use any of the methods explained above. For this artwork, let's go with a blending brush and create a smooth transition.
- Brush: Blender 1


Step 8
Create another layer and clip it to Base 2. We will use a textured brush and a solid ink brush to bring interest to the artwork.
- Brush: Textured Ink 1 and Ink 2
- Color:
#df73c3 - Color:
#f8f1f0


Step 9
Again, we will create another layer, this time clipping it to Base 3. Add details to make the artwork more appealing.
- Brush: Ink 2
- Color:
#f9b4ab


Step 10
Go to the Background layer and alpha lock it. With the brush selected, lay down the color on the top. Then use Gaussian Blur to create a smooth, blended effect.
- Brush: Textured Ink 9
- Color:
#47095b


Step 11
Create a new layer on top of the circular background. With the help of a dotted brush, we can add the last set of details.
- Brush: Ink 7
- Colors:
#f9b4aband#1c064f


Congratulations, You're Now Done!
In this Procreate blending tutorial, you learned how to blend on Procreate. We started with blending techniques, then we moved on to various tips for better blending, and finally, we created artwork using various blending tools. And now you know how to blend in Procreate!


5 Cool Procreate Brushes to Download From Envato Elements
Envato Elements is an excellent resource for Procreate brushes. Here are some of the most popular digital Procreate Brush sets that you can find.
Vintage Comics: Grunge Procreate Brushes
Recreate the distinctive look of vintage comics by using these halftone digital brushes! You get 12 grunge brushes for iPad, plus four worn paper textures to help you mimic the look and feel of vintage comic books.


Watercolor&Pencil Procreate Brushes
These realistic Procreate watercolor and pencil brushes are super easy to use for artists and designers who want to try out their hand at watercolors on the iPad. This pack's versatility will give your watercolor designs in Procreate an extra edge. You get seven watercolor brushes, seven pencil brushes, four color palettes, two smudge brushes, one layered Procreate file, and a readme PDF file with instructions on how to install brushes.


Procreate Pencil Brushes
Pencil brushes for Procreate include the must-have pencil brushes to use for all kinds of designs, from polished artwork to creating childish doodles! You get 12 Procreate pencil brushes and 12 Procreate pencil brushes for texturing, perfect for those times when you need to give an added touch of shading and texturing your illustrations.


Kota Brush Lettering: Procreate Brush
In this lettering Procreate brush set, you will find the perfect brushes to make logos, illustrations, or special backgrounds. You can create simple or complex illustrations with this multi-use brush set. You get 25 lettering texture brushes and 25 Procreate brushes to create that perfect illustration in Procreate.


Rainbow Metallic Graffiti Procreate Brushes
This graffiti Procreate brush set has a metallic sheen added to all the brushes. Use these brushes when you want to add a shine to your graffiti artwork in Procreate. With the color dynamics turned on, you can experiment with the ten brushes to create authentic metallic graffiti on your iPad.


Want to Learn More?
We have loads of tutorials on Envato Tuts+, from beginner to intermediate level. Take a look!


This content originally appeared on Envato Tuts+ Tutorials and was authored by Akanksha Rawat
Akanksha Rawat | Sciencx (2021-10-02T09:50:17+00:00) How to Blend in Procreate. Retrieved from https://www.scien.cx/2021/10/02/how-to-blend-in-procreate/
Please log in to upload a file.
There are no updates yet.
Click the Upload button above to add an update.