This content originally appeared on DEV Community and was authored by Chandler Baskins
Photo by John Bakator on Unsplash
NgRx Effects
Effects are a powerful model for handling side effects in your application. Commonly this means when you are making a HTTP request in a NgRx powered application you will use an effect to handle the communication with the service but they can do so much more than that. And frankly this is what I usually used them for until I read https://timdeschryver.dev/blog/start-using-ngrx-effects-for-this#handling-the-flow-of-a-angular-material-dialog .
I became intrigued by the idea of offloading some component material dialog code into the effect and started viewing the life cycle as a series of events and using the effect to talk to other effects. This can keep components more simple and pure where they use selectors to read data and dispatch actions in response to events. When components are pure and simple this makes them easier test and easier to change when future requirements are different. This was a motivator for me to start looking down this path but first I wanted to make sure to follow some common best practices and make sure that I wasn't creating an anti-pattern.
Some Effects Best Practices
This isn't an exhaustive list but rather some tidbits of gold I capture from the worlds most interesting man, Mike Ryan from the NgRx Core Team from this episode of The Angular Show https://open.spotify.com/episode/6YSwV2WqiZddt2F16jTQ1M?si=_BqOD8fVRYyIOEZuEdV3ug&dl_branch=1
Effects should be the only thing that calls your HTTP Services
This one is straight forward and makes alot of sense.
Use the right Higher Order Mapping Operator and if you don't know use concatMap
This is a good one. But I would also point out that you may not need one if your not returning inner Observables and beware of backpressure.
If you need store information in your effect use concatLatestFrom
This one is probably one of the most important. The concatLatestFrom operator handles store selectors (Observables) in a more intelligent way. It will only subscribe to them when your effect is processing it's action (lazy). The withLatestFrom operator will always subscribe to the selector forcing the selector to stay hot and compute even if your not in that part of the app. This operator is almost a drop in replacement and a easy performance gain.
Break up big effects by creating multiple smaller ones that listen to the same action
The actions stream which effects subscribe to multi casts its values, the ofType operator helps us decide which one we are interested in for this effect. So with that being said make many small operators that handle one side effect.
Effects talk to other Effects via Actions
Not really a best practice but its good to know. NgRx is all about indirection and Actions are the communication mechanism that drives communication through the indirection. This is also how Effects talk to Reducers. Important to note that Reducers don't talk but only listen.
Common Material Dialog Lifecycle
Now that we have a good understanding of effects lets look at a common material dialog life-cycle.
To interact with Material Dialogs you'll need to inject it into the host(?) component. With that service comes methods for interacting with the dialog such as opening it.
//app.component.ts
@Component({
  template: `...`
})
export class AppComponent {
    constructor(private dialog: MatDialog) {}
    //click handler when we wanna open the dialog
    openDialog(){
        const configData = {} //whatever we wanna give our dialog
        const dialogRef = this.dialog.open(DialogComponent,configData)
    dialogRef.afterClosed().subscribe(data => {
            this.doSomethingWithData(data)
        })
    }
}

//dialog-component.component.ts
@Component({
  template: `...`
})
export class DialogComponent {
    constructor(
        public dialogRef: MatDialogRef<DialogOverviewExampleDialog>,
        @Inject(MAT_DIALOG_DATA) public data: DialogData)
    ) {}
    save(data){
        this.dialogRef.close(data)
    }
}
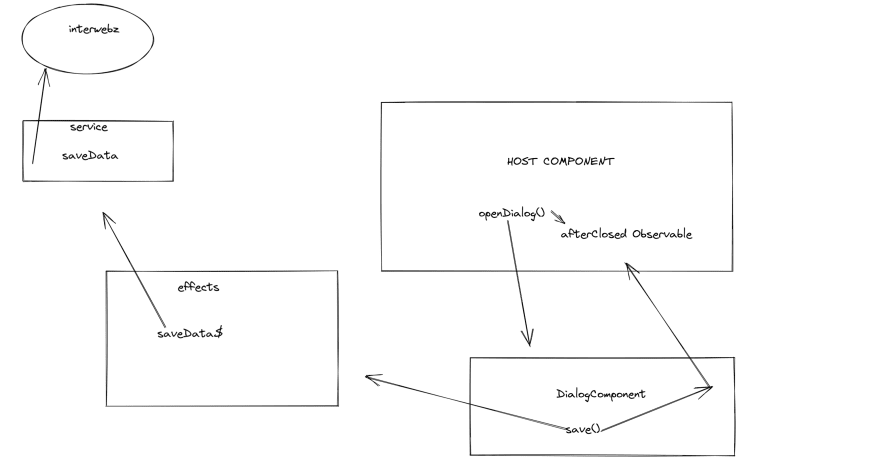
Now this is a pretty contrived example but it illustrates simply what the life-cycle is usually like with a dialog. Breaking it down we inject the service for Mat Dialog. Then we have a click handler method that handles the button click and opens the dialog with data we want to give the dialog component. In the Dialog Component we inject a reference to the opened dialog and inject a Token that carries the data that we passed the dialog. Then when the user wants to save we close the dialog and give it some data.
Back in the host component when we call open that returns the dialog reference of the opened dialog. This reference has a after closed method on it that returns an observable that carries the data that we gave it when we called close on the dialog reference in the Dialog Component. With this data we do whatever we want usually somewhere downstream making a HTTP call that posts the data back to the server.
Now this is a contrived example but it can be a bit confusing. In the openDialog method on the component we do more than just open the dialog. We handle the whole life-cycle of the dialog and handle the end result which is getting data back from the dialog and then doing something with. This can make testing this component and this method a little more complicated than it could be.
Viewing the Life Cycle as a series of events to be handled by Effects.
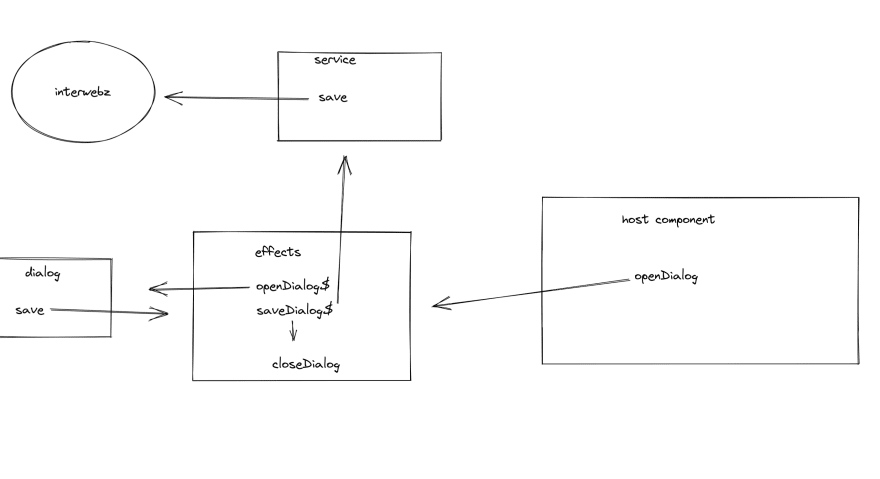
Now that we know our prerequisites its time to get into the point of this post. We know the life-cycle of a dialog which is open ⇒ interaction(save or cancel) ⇒ dialog close so lets model these life-cycles with the appropriate actions first
//dialog.actions.ts
const dialogOpened = createAction(
    '[Home Page] Dialog Opened',
    props<{component:unknown, data:unknown}>()
)

const dialogSaved = createAction(
    '[Home Page] Dialog Saved',
    props<{data:DataToSave}>()
)

const dialogClosed = createAction(
    '[Home Page] Dialog Closed',
    props<{data:DataToClose}>()
)
Definitely don't type your stuff as any if you can avoid it. Although I couldn't find a way to type components and the data could look different depending on your situation
Next we create our effects that are listening for these actions
//dialog.effects.ts
@Injectable()
export class DialogEffects {
    constructor(private actions$: Actions){}

    saveDataSuccess$ = createEffect(() => this.actions$.pipe(
        ofType(DataActions.SaveDataSuccess),
        map(response => DialogActions.dialogClosed(response))
    ))

    dialogOpened$ = createEffect(() => this.actions$.pipe(
        ofType(DialogActions.dialogOpened),
        tap(payload => {
            this.dialogRef.open(payload.component,payload.data)
        })
    ),{dispatch:false})

    dialogSaved$ = createEffect(() => this.actions$.pipe(
        ofType(DialogActions.dialogSaved),
        map(payload => DataActions.SaveData(payload))
    ))

    dialogClosed$ = createEffect(() => this.actions$.pipe(
        ofType(DialogActions.dialogClosed),
        map(payload => {
            this.dialogRef.closeAll();
            return snackBarActions.savedSuccessfully(payload)
        })
    ))
}
Two important things of note here. The first is the {dispatch:false} on the dialogOpened$ effect. We use this to tell NgRx that we are not going to have any actions coming out from this effect. If we didn't use this we would end up in a infinite loop with a warm computer and a crashed browser. Second notice that I have an effect that is listening for the Success action that would have been dispatched upon completion of a successful HTTP request. We use this to dispatch the dialogClose action because we don't wanna close our dialog until the data has been saved or at all if there is an error.
Finally in our components its as simple as dispatching the appropriate actions
//app.component.ts
@Component({
  template: `...`
})
export class AppComponent {
    constructor() {}
    //click handler when we wanna open the dialog
    openDialog(){
        this.store.dispatch(DialogActions.dialogOpened({component,data}))
    }
}

//dialog-component.component.ts
@Component({
  template: `...`
})
export class DialogComponent {
    constructor(@Inject(MAT_DIALOG_DATA) public data: DialogData) {}

    save(data){
        this.store.dispatch(DialogActions.dialogSaved({data}))
    }
}
Testing is now a bit easier
Now that we have offloaded some code from our components to our effects testing is a bit easier. We've been able to remove some dependencies from our component so we don't have to mock them in the tests anymore and to unit test these methods we simply assert that the dispatch action was called with what we expect.
describe("DialogComponent", () => {
    let component: DialogComponent;
  let fixture: ComponentFixture<DialogComponent>;
  let store: MockStore;

  beforeEach(() => {
    TestBed.configureTestingModule({
      imports: [ReactiveFormsModule],
      declarations: [DialogComponent],
      providers: [
        { provide: MAT_DIALOG_DATA, useValue: data },
        provideMockStore(initialState),
      ],
    }).compileComponents();
  });

  beforeEach(() => {
    fixture = TestBed.createComponent(DialogComponent);
    store = TestBed.inject(MockStore);
    component = fixture.componentInstance;
    fixture.detectChanges();
  });
    it("should dispatch save action with form data", () => {
        const storeSpy = spyOn(store,"dispatch")
        component.save(formData)
        expect(storeSpy).toHaveBeenCalledWith(DialogActions.dialogSaved(expectedData))
    })
})
Again this is a contrived example but I hope it can demonstrate how offloading code from our components makes them more easier to test. When we make our components more easier to test we make the barrier to entry lower for testing. Asserting the dispatch method was called with the appropriate action could be the only thing for this method anything else needs to be handled by the effects unit test. Here is what our effect test could look like
describe("DialogEffects", () => {
    let actions$ = new Observable<Action>();

    TestBed.configureTestingModule({
      providers: [provideMockActions(() => actions$)],
    });

    describe("dialogSaved$",() => {
        it("should dispatch action to save data",(done) => {
            actions$ = of(DialogActions.dialogSaved({data}))
            dialogSaved$.subscribe(result => {
                expect(result).toBe(DataActions.saveData)
            })

        })
    })
})
Conclusion
To close I like Tim find writing the life-cycle of a mat dialog a lot easier when its moved to the effect model. With the compos-ability of effects you can easily build complex features. This offloads some logic into our effect model keeping our components lean and simple and easy to test.
This content originally appeared on DEV Community and was authored by Chandler Baskins
Chandler Baskins | Sciencx (2021-10-19T23:02:37+00:00) Moving Material Dialog Lifecycle Into NgRx Effects. Retrieved from https://www.scien.cx/2021/10/19/moving-material-dialog-lifecycle-into-ngrx-effects/
Please log in to upload a file.
There are no updates yet.
Click the Upload button above to add an update.


