This content originally appeared on Level Up Coding - Medium and was authored by Falvis
What is Change Data Capture?
Moving data from your application database into another database with negligible effect on the functionality of your application is the key inspiration for using a shift data capture architecture pattern.
Uses
- tracking data changed to feed into an elastic search index.
- moving data changes from OLTP to OLAP in real-time
- creating audit logs, etc
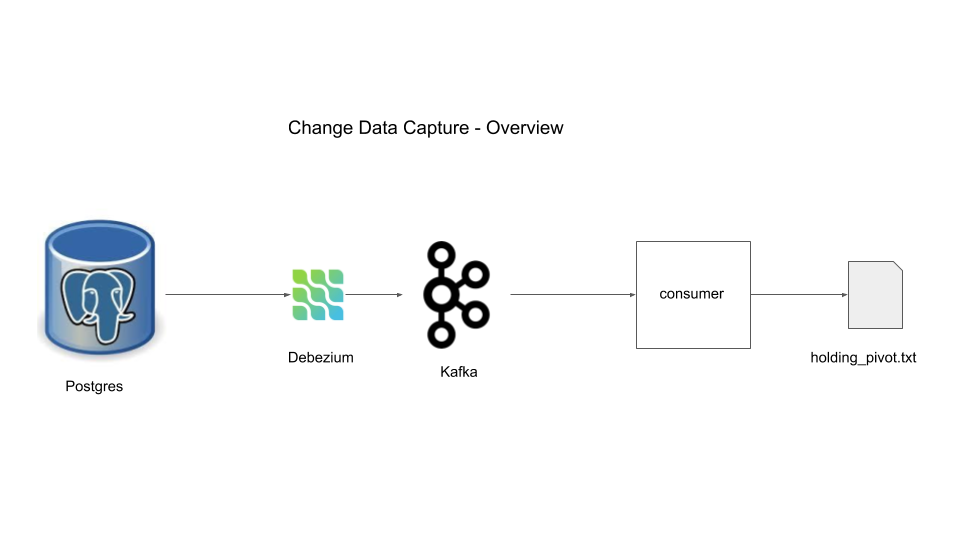
Project overview
We are going to use Mysql for our database

Components
Prereq Installations
In order to follow along you will need the tools specified below
1. Postgres
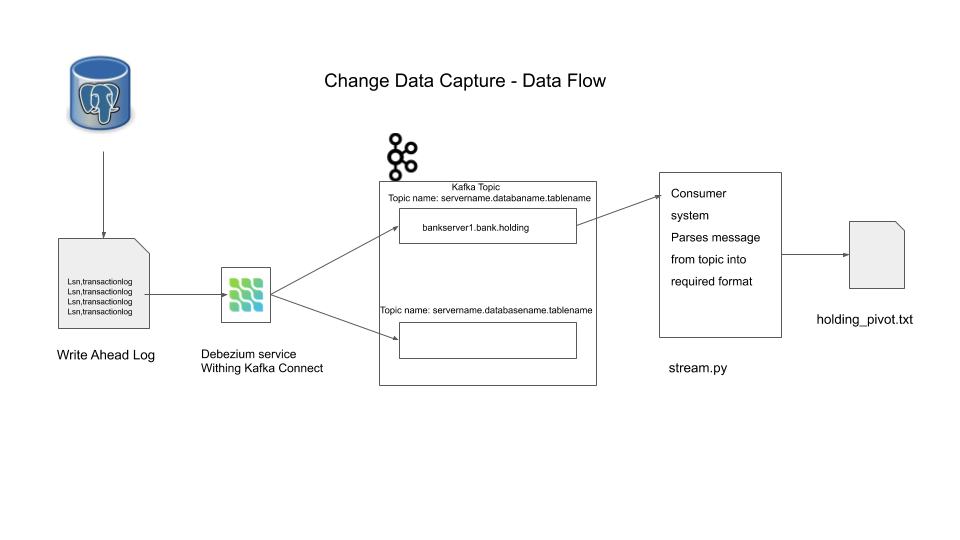
This will serve as our application database. To understand how CDC (with debezium) works we need to understand what happens when a transaction occurs. When a transaction occurs, the transaction is logged in a place called Write Ahead Log (WAL) in the disk and then the data change or update or delete is processed. The transactions are generally held in cache and flushed to disk in bulk to keep latency low. In case of a database crash we may loose the cache but the database can recover using the logs in WAL in disk. Using WAL, only logs are written to the disk which is less expensive than writing all the data changes to the disk, this is a tradeoff the developers of postgres had to make to keep latency of transactions low and have the ability to recover in case of crash(using WAL).
You can think of the WAL as an append only log that contains all the operations in a sequential manner with the timestamp denoting when the transaction was logged. The WAL files are periodically removed or archived so that the size of the database is kept small.
We are going to use docker to run a postgres instance
docker run -d --name postgres -p 5432:5432 -e POSTGRES_USER=start_data_engineer \
-e POSTGRES_PASSWORD=password debezium/postgres:12
The above docker command starts a postgres docker container named postgres. The user name is set as start_data_engineer and password is password. If you notice you will see we have used the debezium/postgres:12 image, the reason for using the debezium’s docker of postgres was to enable the settings that postgres requires to operate with debezium. Let’s take a look at those settings
docker exec -ti postgres /bin/bash
Use the above command to execute the /bin/bash command on the postgres container in interactive mode -it. You are now inside your docker container. Type in
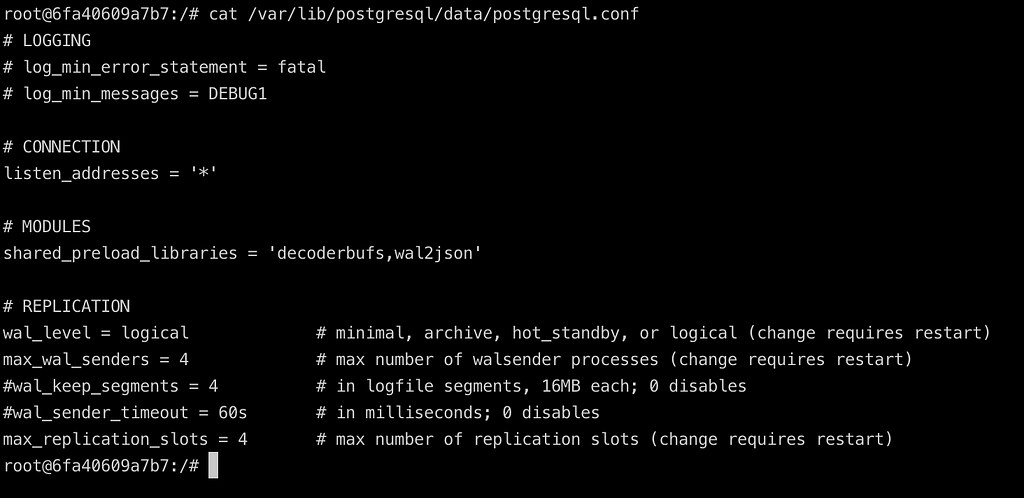
cat /var/lib/postgresql/data/postgresql.conf
to view the configuration settings for postgres.
postgresql.conf

The Replication section is where we set the configuration for the database to write to the WAL. The
- wal_level has options of minimal: minimal information required to restart from a database crash, archive: enables the database engine to be able to do WAL archiving, hot_standby: enables the database engine to create a read only replica of our server, logical: is what we want for our purposes, it adds all the information necessary to make this (WAL) data available for other systems to consume.
- max_wal_senders the WAL senders are process that run on the database to send WAL to receivers (other replica or systems).This config denotes the maximum number of WAL sender processes allowed.
Let’s create the data in postgres. We use pgcli to interact with our postgres instance
pgcli -h localhost -p 5432 -U start_data_engineer
#password is password
CREATE SCHEMA bank;
SET search_path TO bank,public;
CREATE TABLE bank.holding (
    holding_id int,
    user_id int,
    holding_stock varchar(8),
    holding_quantity int,
    datetime_created timestamp,
    datetime_updated timestamp,
    primary key(holding_id)
);
ALTER TABLE bank.holding replica identity FULL;
insert into bank.holding values (1000, 1, 'VFIAX', 10, now(), now());
\q
The above is standard sql, with the addition of replica identity. This field has the option of being set as one of DEFAULT, NOTHING, FULL and INDEX which determines the amount of detailed information written to the WAL. We choose FULL to get all the before and after data for CRUD change events in our WAL, the INDEX option is the same as full but it also includes changes made to indexes in WAL which we do not require for our project’s objective. We also insert a row into the holding table.
2. Kafka
Kafka is a message queue system with an at least once guarantee. A quick overview of some key kafka concepts
- Kafka is a distributed message queue system. The distributed cluster management is provided by zookeeper.
- The broker handles consumer write, producer request and metadata config. One server within a kafka cluster is one kafka broker, there can be multiple brokers within a single kafka cluster
- A Topic is a specific queue into which the producers can push data into and consumers can read from.
- Partitions are way to distribute the content of a topic over the cluster.
- You can think of offset (specific to a partition) as the pointer pointing to which message you are in while reading messages from that topic-partition.
In our project the kafka broker will be used to store the data changes being made in the postgres database as messages. We will set up a consumer in the later sections to read data from the broker.
Let’s start zookeeper and a kafka broker
docker run -d --name zookeeper -p 2181:2181 -p 2888:2888 -p 3888:3888 debezium/zookeeper:1.1
docker run -d --name kafka -p 9092:9092 --link zookeeper:zookeeper debezium/kafka:1.1
Again we are using debezium images for ease. You can see for the zookeeper we keeps ports 21821, 2888, 3888 open, these are required for zookeeper operations. And similarly we keep 9092 open for kafka, we can communicate with kafka through this port.
3. Debezium
We use a kafka tool called Connect to run debezium. As the name suggests connect provides a framework to connect input data sources to kafka and connect kafka to output sinks. It runs as a separate service.
Debezium is responsible for reading the data from the source data system (in our example postgres) and pushing it into a kafka topic (automatically named after the table) in a suitable format.
Let’s start a kafka connect container
docker run -d --name connect -p 8083:8083 --link kafka:kafka \
--link postgres:postgres -e BOOTSTRAP_SERVERS=kafka:9092 \
-e GROUP_ID=sde_group -e CONFIG_STORAGE_TOPIC=sde_storage_topic \
-e OFFSET_STORAGE_TOPIC=sde_offset_topic debezium/connect:1.1
Notice we are specifying the kafka host and endpoint with BOOTSTRAP_SERVERS env variable. The GROUP_ID here represents a group this connect service belongs to. We can use curl to check for registered connect services Note: wait for a few seconds (atleast 10 sec) before running the curl command below
curl -H "Accept:application/json" localhost:8083/connectors/
[]
We can register a debezium connect service using a curl command to the connect service on port 8083
curl -i -X POST -H "Accept:application/json" -H "Content-Type:application/json" \
localhost:8083/connectors/ -d '{"name": "sde-connector", "config": {"connector.class": "io.debezium.connector.postgresql.PostgresConnector", "database.hostname": "postgres", "database.port": "5432", "database.user": "start_data_engineer", "database.password": "password", "database.dbname" : "start_data_engineer", "database.server.name": "bankserver1", "table.whitelist": "bank.holding"}}'
Let’s take a look at the configuration part of the api call above
{
  "name": "sde-connector",
  "config": {
    "connector.class": "io.debezium.connector.postgresql.PostgresConnector",
    "database.hostname": "postgres",
    "database.port": "5432",
    "database.user": "start_data_engineer",
    "database.password": "password",
    "database.dbname": "start_data_engineer",
    "database.server.name": "bankserver1",
    "table.whitelist": "bank.holding"
  }
}- The database.* configs are connection parameters for our postgres database
- database.server.name is a name we assign for our database
- table.whitelist is a field that informs the debezium connector to only read data changes from that table. Similarly you can whitelist or blacklist tables or schemas. By default debezium reads from all tables in a schema.
- connector.class is the connector used to connect to our postgres database
- name name we assign to our connector
Let’s check for presence of connector
curl -H "Accept:application/json" localhost:8083/connectors/
["sde-connector"]%
We can see the sde-connector is registered.
4. Consumer
Now that we have our connector pushing in message into our kafka broker, we can consume the messages using a consumer. Let’s take a look at only the first message in the kafka topic bankserver1.bank.holding using the command below
docker run -it --rm --name consumer --link zookeeper:zookeeper --link kafka:kafka debezium/kafka:1.1 watch-topic -a bankserver1.bank.holding --max-messages 1 | grep '^{' | jqIn the above we start a consumer container to watch the topic bankserver1.bank.holding which follows the format {database.server.name}.{schema}.{table_name} and we have set the maximum number of messages to be read by this consumer to be 1 . The grep is to filter out non JSON lines, as the docker container will print out some configs. jq(optional download) is to format the json. The output should be similar to the structure shown below
{
  "schema": {
    "type": "struct",
    "fields": [
      {
        "type": "struct",
        "fields": [
          {
            "type": "int32",
            "optional": false,
            "field": "holding_id"
          },
          {
            "type": "int32",
            "optional": true,
            "field": "user_id"
          },
          {
            "type": "string",
            "optional": true,
            "field": "holding_stock"
          },
          {
            "type": "int32",
            "optional": true,
            "field": "holding_quantity"
          },
          {
            "type": "int64",
            "optional": true,
            "name": "io.debezium.time.MicroTimestamp",
            "version": 1,
            "field": "datetime_created"
          },
          {
            "type": "int64",
            "optional": true,
            "name": "io.debezium.time.MicroTimestamp",
            "version": 1,
            "field": "datetime_updated"
          }
        ],
        "optional": true,
        "name": "bankserver1.bank.holding.Value",
        "field": "before"
      },
      {
        "type": "struct",
        "fields": [
          {
            "type": "int32",
            "optional": false,
            "field": "holding_id"
          },
          {
            "type": "int32",
            "optional": true,
            "field": "user_id"
          },
          {
            "type": "string",
            "optional": true,
            "field": "holding_stock"
          },
          {
            "type": "int32",
            "optional": true,
            "field": "holding_quantity"
          },
          {
            "type": "int64",
            "optional": true,
            "name": "io.debezium.time.MicroTimestamp",
            "version": 1,
            "field": "datetime_created"
          },
          {
            "type": "int64",
            "optional": true,
            "name": "io.debezium.time.MicroTimestamp",
            "version": 1,
            "field": "datetime_updated"
          }
        ],
        "optional": true,
        "name": "bankserver1.bank.holding.Value",
        "field": "after"
      },
      {
        "type": "struct",
        "fields": [
          {
            "type": "string",
            "optional": false,
            "field": "version"
          },
          {
            "type": "string",
            "optional": false,
            "field": "connector"
          },
          {
            "type": "string",
            "optional": false,
            "field": "name"
          },
          {
            "type": "int64",
            "optional": false,
            "field": "ts_ms"
          },
          {
            "type": "string",
            "optional": true,
            "name": "io.debezium.data.Enum",
            "version": 1,
            "parameters": {
              "allowed": "true,last,false"
            },
            "default": "false",
            "field": "snapshot"
          },
          {
            "type": "string",
            "optional": false,
            "field": "db"
          },
          {
            "type": "string",
            "optional": false,
            "field": "schema"
          },
          {
            "type": "string",
            "optional": false,
            "field": "table"
          },
          {
            "type": "int64",
            "optional": true,
            "field": "txId"
          },
          {
            "type": "int64",
            "optional": true,
            "field": "lsn"
          },
          {
            "type": "int64",
            "optional": true,
            "field": "xmin"
          }
        ],
        "optional": false,
        "name": "io.debezium.connector.postgresql.Source",
        "field": "source"
      },
      {
        "type": "string",
        "optional": false,
        "field": "op"
      },
      {
        "type": "int64",
        "optional": true,
        "field": "ts_ms"
      },
      {
        "type": "struct",
        "fields": [
          {
            "type": "string",
            "optional": false,
            "field": "id"
          },
          {
            "type": "int64",
            "optional": false,
            "field": "total_order"
          },
          {
            "type": "int64",
            "optional": false,
            "field": "data_collection_order"
          }
        ],
        "optional": true,
        "field": "transaction"
      }
    ],
    "optional": false,
    "name": "bankserver1.bank.holding.Envelope"
  },
  "payload": {
    "before": null,
    "after": {
      "holding_id": 1000,
      "user_id": 1,
      "holding_stock": "VFIAX",
      "holding_quantity": 10,
      "datetime_created": 1589121006547486,
      "datetime_updated": 1589121006547486
    },
    "source": {
      "version": "1.1.1.Final",
      "connector": "postgresql",
      "name": "bankserver1",
      "ts_ms": 1589121006548,
      "snapshot": "false",
      "db": "start_data_engineer",
      "schema": "bank",
      "table": "holding",
      "txId": 492,
      "lsn": 24563232,
      "xmin": null
    },
    "op": "c",
    "ts_ms": 1589121006813,
    "transaction": null
  }
}
Basically there 2 main sections
- schema: The schema defines the schema of the payload for before, after, source, op, ts_ms and transaction sections. This data can be used by the consumer client program to parse the input.
- payload: This contains the actual data, there are before and after sections showing the columns of holding, before and after the data change. The data change is represented by the op which is one of c create (insert), u for update, d for delete, and r for read (at snapshot). The source section shows the WAL configurations with the tx_id denoting the transaction id and lsn log sequence number which are used to store the byte offset of the log file per WAL record.
We care about the before and after sections. We will use python to format this into the pivot structure we defined at the start.
#!/usr/bin/env python3 -u
# Note: the -u denotes unbuffered (i.e output straing to stdout without buffering data and then writing to stdout)
import json
import os
import sys
from datetime import datetime
FIELDS_TO_PARSE = ['holding_stock', 'holding_quantity']
def parse_create(payload_after, op_type):
    current_ts = datetime.now().strftime('%Y-%m-%d-%H-%M-%S')
    out_tuples = []
    for field_to_parse in FIELDS_TO_PARSE:
        out_tuples.append(
            (
                payload_after.get('holding_id'),
                payload_after.get('user_id'),
                field_to_parse,
                None,
                payload_after.get(field_to_parse),
                payload_after.get('datetime_created'),
                None,
                None,
                current_ts,
                op_type
            )
        )
return out_tuples
def parse_delete(payload_before, ts_ms, op_type):
    current_ts = datetime.now().strftime('%Y-%m-%d-%H-%M-%S')
    out_tuples = []
    for field_to_parse in FIELDS_TO_PARSE:
        out_tuples.append(
            (
                payload_before.get('holding_id'),
                payload_before.get('user_id'),
                field_to_parse,
                payload_before.get(field_to_parse),
                None,
                None,
                ts_ms,
                current_ts,
                op_type
            )
        )
return out_tuples
def parse_update(payload, op_type):
    current_ts = datetime.now().strftime('%Y-%m-%d-%H-%M-%S')
    out_tuples = []
    for field_to_parse in FIELDS_TO_PARSE:
        out_tuples.append(
            (
                payload.get('after', {}).get('holding_id'),
                payload.get('after', {}).get('user_id'),
                field_to_parse,
                payload.get('before', {}).get(field_to_parse),
                payload.get('after', {}).get(field_to_parse),
                None,
                payload.get('ts_ms'),
                None,
                current_ts,
                op_type
            )
        )
return out_tuples
def parse_payload(input_raw_json):
    input_json = json.loads(input_raw_json)
    op_type = input_json.get('payload', {}).get('op')
    if op_type == 'c':
        return parse_create(
            input_json.get('payload', {}).get('after', {}),
            op_type
        )
    elif op_type == 'd':
        return parse_delete(
            input_json.get('payload', {}).get('before', {}),
            input_json.get('payload', {}).get('ts_ms', None),
            op_type
        )
    elif op_type == 'u':
        return parse_update(
            input_json.get('payload', {}),
            op_type
        )
    # no need to log read events
    return []
for line in sys.stdin:
    # 1. reads line from unix pipe, assume only valid json come through
    # 2. parse the payload into a format we can use
    # 3. prints out the formatted data as a string to stdout
    # 4. the string is of format
    #    holding_id, user_id, change_field, old_value, new_value, datetime_created, datetime_updated, datetime_deleted, datetime_inserted
    data = parse_payload(line)
    for log in data:
        log_str = ','.join([str(elt) for elt in log])
        print(log_str, flush=True)
Note: Use tmux for easy multi terminal viewing.
docker run -it --rm --name consumer --link zookeeper:zookeeper \
--link kafka:kafka debezium/kafka:1.1 watch-topic \
-a bankserver1.bank.holding | grep --line-buffered '^{' \
| <your-file-path>/stream.py > <your-output-path>/holding_pivot.txt
The above command starts a consumer container, grep to allow only line that start with { denoting a json, the –line-buffered option tells grep to output one line at a time without buffering(the buffer size depends on your os) and then use the python script to transform the message into a format we want and write the output to a file called holding_pivot.txt.
In another terminal do the following
tail -f <your-output-path>/holding_pivot.txt
The above command opens the holding_pivot.txt file and follows along, so you can see if there are any new lines added to the file. In another terminal open a connection to your postgres instance using
pgcli -h localhost -p 5432 -U start_data_engineer
# the password is password
Try the following sql scripts and make sure the output you see in the holding_pivot.txt is accurate
-- C
insert into bank.holding values (1001, 2, 'SP500', 1, now(), now());
insert into bank.holding values (1002, 3, 'SP500', 1, now(), now());
-- U
update bank.holding set holding_quantity = 100 where holding_id=1000;
-- d
delete from bank.holding where user_id = 3;
delete from bank.holding where user_id = 2;
-- c
insert into bank.holding values (1003, 3, 'VTSAX', 100, now(), now());
-- u
update bank.holding set holding_quantity = 10 where holding_id=1003;
Your output should be
1000,1,holding_stock,None,VFIAX,1589121006547486,None,None,2020-05-10-10-31-23,c
1000,1,holding_quantity,None,10,1589121006547486,None,None,2020-05-10-10-31-23,c
1001,2,holding_stock,None,SP500,1589121109691459,None,None,2020-05-10-10-31-50,c
1001,2,holding_quantity,None,1,1589121109691459,None,None,2020-05-10-10-31-50,c
1002,3,holding_stock,None,SP500,1589121109695248,None,None,2020-05-10-10-31-50,c
1002,3,holding_quantity,None,1,1589121109695248,None,None,2020-05-10-10-31-50,c
1000,1,holding_stock,VFIAX,VFIAX,None,1589121112732,None,2020-05-10-10-31-53,u
1000,1,holding_quantity,10,100,None,1589121112732,None,2020-05-10-10-31-53,u
1002,3,holding_stock,SP500,None,None,1589121116301,2020-05-10-10-31-56,d
1002,3,holding_quantity,1,None,None,1589121116301,2020-05-10-10-31-56,d
1001,2,holding_stock,SP500,None,None,1589121116303,2020-05-10-10-31-56,d
1001,2,holding_quantity,1,None,None,1589121116303,2020-05-10-10-31-56,d
1003,3,holding_stock,None,VTSAX,1589121119075024,None,None,2020-05-10-10-31-59,c
1003,3,holding_quantity,None,100,1589121119075024,None,None,2020-05-10-10-31-59,c
1003,3,holding_stock,VTSAX,VTSAX,None,1589121121916,None,2020-05-10-10-32-02,u
1003,3,holding_quantity,100,10,None,1589121121916,None,2020-05-10-10-32-02,u
Data Flow
This represents how we use CDC pattern to capture changes from our application database, transform it into a different format without having an impact on the application performance or memory.
Design Data Flow

Docker commands
# starting a pg instance
docker run -d --name postgres -p 5432:5432 -e POSTGRES_USER=start_data_engineer -e POSTGRES_PASSWORD=password debezium/postgres:12
# bash into postgres instance
docker exec -ti postgres /bin/bash
# zookeeper and kafka broker
docker run -d --name zookeeper -p 2181:2181 -p 2888:2888 -p 3888:3888 debezium/zookeeper:1.1
docker run -d --name kafka -p 9092:9092 --link zookeeper:zookeeper debezium/kafka:1.1
# Kafka connect
docker run -d --name connect -p 8083:8083 --link kafka:kafka --link postgres:postgres -e BOOTSTRAP_SERVERS=kafka:9092 -e GROUP_ID=sde_group -e CONFIG_STORAGE_TOPIC=sde_storage_topic -e OFFSET_STORAGE_TOPIC=sde_offset_topic debezium/connect:1.1
# register debezium connector
curl -i -X POST -H "Accept:application/json" -H "Content-Type:application/json" localhost:8083/connectors/ -d '{"name": "sde-connector", "config": {"connector.class": "io.debezium.connector.postgresql.PostgresConnector", "database.hostname": "postgres", "database.port": "5432", "database.user": "start_data_engineer", "database.password": "password", "database.dbname" : "start_data_engineer", "database.server.name": "bankserver1", "table.whitelist": "bank.holding"}}'
# sample consumer
docker run -it --rm --name consumer --link zookeeper:zookeeper --link kafka:kafka debezium/kafka:1.1 watch-topic -a bankserver1.bank.holding --max-messages 1 | grep '^{'
# stream consumer, parse it and write to file
docker run -it --rm --name consumer --link zookeeper:zookeeper --link kafka:kafka debezium/kafka:1.1 watch-topic -a bankserver1.bank.holding | grep --line-buffered '^{' | <your-file-path>/stream.py > <your-output-path>/holding_pivot.txt
Stop Docker containers
You can stop and remove your docker containers using the following commands
docker stop $(docker ps -aq)
docker rm $(docker ps -aq)
docker stop <your-container-name> # to stop and remove specific container
docker rm <your-container-name>
Things to be aware off
- We have seen data changed but not data schema changes, depending on your use case this can get extremely tricky.
- You need postgres version 9.4 or higher.
- WAL configurations need to be set carefully to prevent overloading the database.
- As with most distributed systems, there are multiple points of failure, for e.g the database could crash, kafka cluster could crash, your consumer may crash, etc. Always plan for failures and have recovery mechanisms to handle these issues.
- Both kafka and debezium offers atleast once event delivery guarantee. This is very good, but your consumer or user have to be designed to deal with duplicates. A good approach for this would be to use upsert based data ingestion on the consumer side.
Conclusion
Hope this post gives you an idea of what change data capture is, when you use it, how to implement it using debezium and common pitfalls to be aware of. Let me know if you have any questions in the comment section below.
Change Data Capture with Debezium Kafka and MySQL was originally published in Level Up Coding on Medium, where people are continuing the conversation by highlighting and responding to this story.
This content originally appeared on Level Up Coding - Medium and was authored by Falvis
Falvis | Sciencx (2021-12-19T20:11:02+00:00) Change Data Capture with Debezium Kafka and MySQL. Retrieved from https://www.scien.cx/2021/12/19/change-data-capture-with-debezium-kafka-and-mysql/
Please log in to upload a file.
There are no updates yet.
Click the Upload button above to add an update.
