This content originally appeared on DEV Community and was authored by Anubhab Mukherjee
Today we will learn one of the most important topic in Angular - how to communicate between two components when they have a parent child relationship.
🔴 Prerequisite 🔴
You need to know (if not please follow the link associated)-
🔵 What is a component in Angular
🔵 How to create a component in Angular
Before we begin we need to understand what is the meaning of parent-child relation. Suppose you have a component called P. In the template of the P component you write selector of another component say C. In this case the component C is the child of the P component or P is the parent of C.
So now we know the theory so lets quickly setup our playground.
We create two components, lets name the parent component as
movie-dashboard or easier way I would say movie-dashboard component will act as the parent and movie-table (our second component) will act as the child component.
The CLI commands:
ng g c movie-dashboard
ng g c movie-table
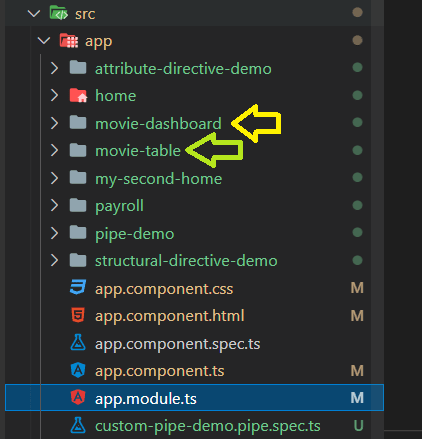
Project Folder Structure:
Parent marked with yellow arrow 🟡
Child marked with green arrow 🟢
In the app.component.html we paste in the below code -
<app-movie-dashboard></app-movie-dashboard>
In the movie-dashboard.component.html file lets paste in the below code -
<p>movie-dashboard works!</p>
<app-movie-table></app-movie-table>
Now if you start the application you should see the following output in the browser's localhost:4200
So now our playground is ready.
❔❔❔ Next big question what are we building ❔❔❔
We will be building a simple flow where the parent component will be holding some movie names/ movie array (I will refer to as movie list from now on...). We will be passing the movieList to the child component where we will be displaying the list in a tabular format.
From the table the user can select a movie by clicking the button (some user action) which will be passed back to the parent (may be for some processing).
So now the context is set.
Lets see how we can pass data from parent to child.
We pass data from parent to child using an Input decorator.
Note:
Decorator we already have come across when we defined a component, directive, pipe, module remember??? (@Component, @Directive, @Pipe, @NgModule)
All the above decorators are placed on the top of a class. They are also called Class Decorator.
Input decorator is a property decorator. What does that mean???
What ever variables you create directly inside a class (not inside a method) are all properties.
And this Input decorator can be put only on the top of a property. So that is the reason it is called Property decorator (and a decorator always starts with @ so @Input)
Once you put a decorator it gets some special power like a super hero.
So where should we put this decorator. Easy way I will tell you which will always stick to your mind -
Which ever component will receive the data should have the property decorated with @Input. So in our case the movie-table component will receive the data. So we need to create a property and mark it with the decorator by now you know which decorator we will use.
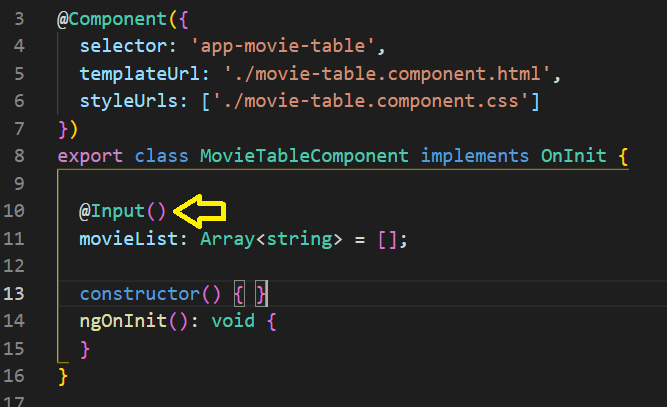
So lets open the movie-table.component.ts file and paste in the below code -
  @Input()
  movieList: Array<string> = [];
You can see line number 11 is the movieList property. We have put the @Input() on the line number 10.
Although you can put in front of the property as well like below -
@Input() movieList: Array<string> = [];
So once we use this decorator on a property the property is able to hold the data we pass from parent.
By now we got some one who will hold the data in the child. But how to pass the data from parent. For that lets go to the movie-dashboard.component.ts file and paste in the below code -
  myFavoriteMovies = [
    {
      movieName: 'Encanto',
      genre: 'Animation'
    },
    {
      movieName: 'Spider-Man: No Way Home',
      genre: 'Action'
    },
    {
      movieName: "Harry Potter and the Sorcerer's Stone",
      genre: 'Fantasy'
    }
  ];
and now come to the corresponding template file the movie-dashboard.component.html and paste in the below code (by removing the old code present) -
<p>movie-dashboard works!</p>
<app-movie-table [movieList]="myFavoriteMovies"></app-movie-table>
Here we have 2 points to note-
1️⃣ The input decorator property we created in the child component is placed inside the square bracket []. Here movieList is present inside the square bracket.
2️⃣ The data which we want to pass to the child should be assigned to the above property. We use equal operator and the variable which contains the data. Here myFavoriteMovies property contains the data which we have assigned.
That's it now its ready & we learnt how to pass the data from parent to child.
But wait I need to show it to you also right?
So for that lets paste in the below code in the movie-table.component.html
<table>
    <tr>
      <th>Movie Name</th>
      <th></th>
    </tr>
    <tr *ngFor="let movie of movieList">
      <td>{{movie}}</td>
      <td><input type="button" value="Select"></td>
    </tr>
</table>
You will see the output as -
Wow! We are receiving the data in the child component.
As I said earlier movieList property will receive the data from the parent. Since we are passing an array we are just looping through it using ngFor (If you are not aware of please have a look).
Our First step is done - Passing data from parent to child.
Now comes the second part. The user clicks the select button and the selected movie will be passed to the parent component.
For that we will learn yet another new property decorator the
Output decorator.
So lets paste in the below code in the movie-table.component.ts
  @Output()
  movieSelectedEventEmitter =  new EventEmitter();
So here we are adding a property movieSelectedEventEmitter and decorating with Output decorator. And now what is the remaining part?
When ever the user clicks a button it actually raises an event which will emitted back to the parent. We are actually creating an object of it. So the property becomes super powerful (like our action hero) and can emit/ send the data to the parent component.
But we also need to capture the click event when the user clicks the button. So lets create a method which will be called when the user clicks the button.
movieSelected(selectedMovie: string) { }
Nothing in the body yet. We will fill it soon!
In the corresponding template file lets paste the below code
 <td><input type="button" value="Select"
(click)="movieSelected(movie)"></td>
All events we write inside a round bracket ().
Here click is an inbuilt event.
And once that event is fired/ triggered the function we pass just after the equal operator will be called.
Now lets come back to the method which we just now created. And paste in the below code -
this.movieSelectedEventEmitter.emit(selectedMovie);
So what are we doing?
On the Output property we created we are calling the emit (remember we assigned an EventEmitter object) and passing the data, in this case the selected movie name.
But the job is still half done. In order to get the data in the parent we need to add few extra lines of code.
So lets open the movie-dashboard.component.html file and paste in the below code (and you can remove the old one)-
<p>movie-dashboard works!</p>
<app-movie-table
(movieSelectedEventEmitter)="selectedMovieToWatch($event)"
[movieList]="myFavoriteMovies">
</app-movie-table>
Here we are using the event emitter we created movieSelectedEventEmitter (or the Output property inside a round bracket since its an event, same formula as the click we used few steps back) and assigning it to a method which will be called when the event is triggered (exactly same concept/ way as the click event, the only difference is click is an inbuilt one and this is a custom/ user-defined one)
So lets define the selectedMovieToWatch method.
In the movie-dashboard.component file lets paste the below code -
  selectedMovieToWatch(data: string) {
    debugger;
    alert(data);
  }
Here data will receive the value which we passed from the child.
That's it. Now lets look at the output -
I clicked the second item (trust me)
So this brings to the end!!! I know it was a long post.
Highlights
Input
1️⃣ Need to decorate a property in the child component as @Input()
  @Input()
  movieList: Array<string> = [];
2️⃣ In the Parent component where the child selector is used need to add the same input property in Square Bracket [] and assign the value to be passed
[movieList]="myFavoriteMovies"
Output
1️⃣ Need to mark a property in the child component with the Output decorator and assign an EventEmitter Object
  @Output()
  movieSelectedEventEmitter = new EventEmitter();
2️⃣ In the parent we need to add the event and assign to a method
(movieSelectedEventEmitter)="selectedMovieToWatch($event)"
Hope you enjoyed reading the post
If you liked it please do like ❤️ share 💞 and comment 🧡.
Coming up more topics on Angular.
So stay tuned.
I will be tweeting more on Angular JavaScript TypeScript CSS
So hope to see you there too 😃
Cheers!!!
Happy Coding
This content originally appeared on DEV Community and was authored by Anubhab Mukherjee
Anubhab Mukherjee | Sciencx (2022-01-15T19:18:05+00:00) Component Communication in Angular (Parent to Child & Child to Parent). Retrieved from https://www.scien.cx/2022/01/15/component-communication-in-angular-parent-to-child-child-to-parent/
Please log in to upload a file.
There are no updates yet.
Click the Upload button above to add an update.


